Проброс (открытие) портов на роутере на примере Asus RT‐N66U
В некоторых ситуациях проброс портов на роутере просто необходим. Например, Вы «сидите за роутером (маршрутизатором)» и хотите что бы люди при обращении к Вашему роутеру попадали прямиком на Вашу машину (например, это может пригодиться для DC++-клиента или игрового/web сервера).
В общем то, здесь нет ничего сложного. Детали, конечно, отличаются от роутера к роутеру, но общая идея остаётся прежней. Во всех относительно новых роутерах есть такая функциональность. Если же Вы не можете найти ничего подобного, обратитесь к «Руководству пользователя» Вашего роутера. Я покажу как это сделать на примере проброса портов для настройки DC++-клиента на роутере Asus RT-N66U .
Настраиваем внутрисетевой IP
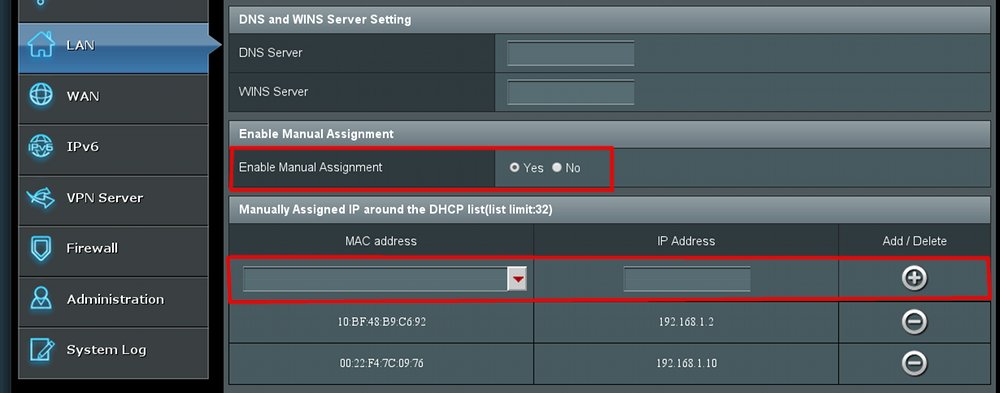
Для начала, убедитесь в что роутер внутри сети статически выдаёт вам IP-адрес (постоянно один и тот же). На роутере за это отвечает DHCP Server. Если он включен (посмотрите в настройках, что-то в районе раздела LAN), то нужно назначить IP-адрес для вашей машины статически в обход DHCP .
На вкладке LAN- DHCP Server включаем ручное назначение IP (Enable Manual Assignment), выбираем в поле ниже свой MAC-адрес (если к роутеру подключено несколько машин, свой MAC можно узнать на вкладке Карта Сети, нажав «Клиенты«, и «Обновить«. Зная свой текущий IP, справа в таблице увидите и MAC), желаемый IP (в разумных пределах), жмём Добавить и Применить. Всё, после сохранения, у вашей машины внутри сети постоянно будет указанный IP адрес.
Проброс (открытие) портов
Теперь смело можно переходить непосредственно к самому главному. Вкладка WAN-Virtual Server / Port Forwarding (Интернет / Переадрессация портов) Включаем опцию Enable Port Forwarding (Включить переадрессацию портов), если ещё не сделали этого.
И заполняем необходимые поля:
- Service Name (имя службы) — ни к чему не обязывающее имя «правила» перенаправления портов;
- Port Range (диапазон портов) — диапазон портов (или 1 конкретный), С которых роутер будет перенаправлять входящие соединения;
- Local IP (локальный IP) — локальный (внутри вашей сети) IP, НА который роутер будет перенаправлять входящие соединения с портов ;
- Local Port (локальный порт) — номер порта на машине с IP на который роутер будет перенаправлять соединения;
- Protocol (протокол) — соединения какого типа следует отлавливать роутеру.
Для настройки DC-клиента, пусть например, требуется открыть (пробросить) 2 порта : 3000 для TCP/UDP и 3001 для TLS (работает по протоколу TCP).
Таким образом, добавляем и заполняем 2 строчки следующим содержанием и жмём Применить:
# name Port-Range Local-Ip Local.Port Protocol type dc-tcp 3000 192.168.1.2 3000 BOTH dc-tsl 3001 192.168.1.2 3001 BOTH Здесь — всё. Теперь роутер все входящие TCP/UDP соединения на порты 3000:3001 будет перенаправлять прямиком на 3000:3001 порты машинки c IP 192.168.1.2.
Настройка DC++-клиента
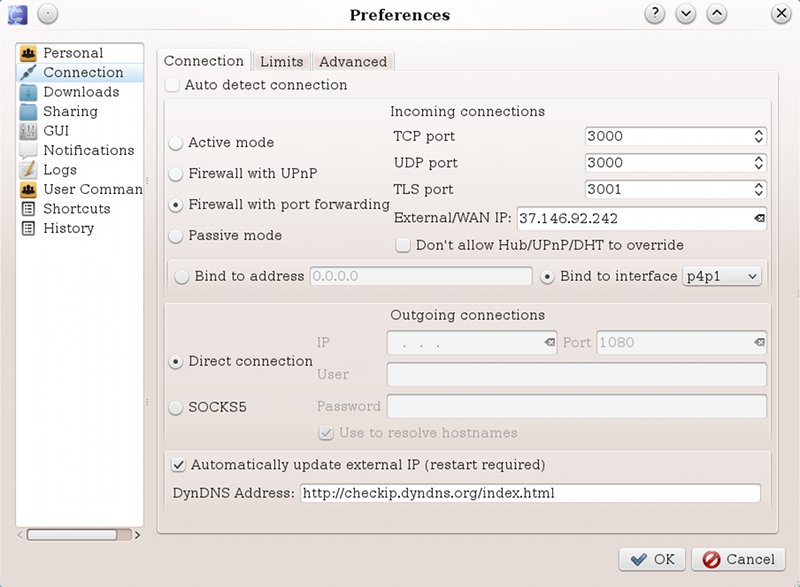
Осталось настроить DC-клиент. Открываем настройки соединения (Файл-Настройки-Соединение | Tools-Preferences-Connection ; у меня eiskaltdcpp).
P. s. Если роутер поддерживает технологию UPnP, то можно выбрать этот пункт в настройках, и не вписывать порты — программа должна сама определить, а возможно ещё и на роутере сама пробросит все необходимые порты. Но я люблю ясность во всём 🙂
Does it work.
Всё. Осталось проверить что всё работает. Но. есть такие вещи, как Антивирус, Браундмауэр, и куча куча всего ещё! Они вполне могут блокировать обращение по необходимым портам. Я думаю, Вам не составит труда их настроить (:
Например, мне, на Fedora 16, пришлось повозиться с iptables
su # посмотреть все существующие правила: iptables -nvL # если, и скорее всего, нужные порты не настроены - исправим это # открываем входящие соединения на нужные порты iptables -A INPUT -p tcp -m tcp --dport 3000 -j ACCEPT iptables -A INPUT -p tcp -m tcp --dport 3001 -j ACCEPT iptables -A INPUT -p udp -m udp --dport 3000 -j ACCEPT # открываем исходящие соединения с этих портов iptables -A OUTPUT -p tcp -m tcp --dport 3000 -j ACCEPT iptables -A OUTPUT -p tcp -m tcp --dport 3001 -j ACCEPT iptables -A OUTPUT -p udp -m udp --dport 3000 -j ACCEPT # ну и проверьте что нет никаких правил, закрывающих *всё* # у меня такое было одно: # -A INPUT -j REJECT --reject-with icmp-host-prohibited # что бы его удалить, нужно выполнить iptables -D INPUT -j REJECT --reject-with icmp-host-prohibited # обязательно проверьте, что все ваши изменения отобразились в выводе # iptables-save Осталось сохранить правила iptables в fedora 16 (в моём случае)
# В большинстве дистрибутивов хватит service iptables save # Там же где во всю царствует Systemd, типа Fedora 16, # используем старую версию команды: /usr/libexec/iptables.init save # на крайний случай, Вы всегда можете поправить конфиги ручками vim /etc/sysconfig/iptables Здесь можно найти инструкции для настройки тех же самых вещей для многих роутеров (если у вас не биилайн — это вообще не важно). Смотрите пункт Настраиваем доступ к локальным ресурсам.
Site map: for robots | for humans
All content copyright Vit Ry.
© 2010 – 2014 Feel free to repost any information.
[Wireless Router] How to set up Virtual Server/Port Forwarding Rules on ASUS Router?
[Wireless Router] How to set up Virtual Server/Port Forwarding Rules on ASUS Router? Prepare 1. To use port forwarding on your ASUS router, your router needs to have a public WAN IP from your ISP’s internet service. This will allow devices on the internet to locate your ASUS router via a public WAN IP. 2. This only article applies to these models after updating tofirmware version 3.0.0.4.384.40000.Please refer to[Wireless Router] How to update the firmware of your router to the latest version ?3. Models that do not support the way this article is set:RT-N12_D1, RT-N12VP, RT-N12HP_B1,RT-N300, RT-AC52U, RT-AC54U, RT-AC51U, RT-AC52U, RT-AC1200HP, RT-AC55UHP, RT-AC55U, RT-N14U, RT-AC58U/RT-ACRH13/RT-AC1300UHP/RT-AC1300G+, 4G-AC55U, BRT-AC828, RT-AC1200GU, RT-AC1200, RT-N600, RT-AC53/RT-AC750GF, RT-AC51U+/RT-AC51UP/RT-AC52U_B1, RT-N11P_B1/RT-N300_B1/RT0N12 VP_B1, RT-N12+ B1, RT-N12+ PRO, RT-N12E C1.Click here for detailed steps Each computer connected to a router has an assigned LAN IP address and is authorized to transfer files to each other. However, computers on a LAN connection cannot access data or devices on a specific computer thru an Internet connection. Similarly, computers connected thru an Internet connection cannot access data stored in LAN devices. Simply put, LAN computers that are configured as FTP servers cannot complete requests from the Internet.  By setting up port forwarding rules, routers will apply these rules to send requests coming from the Internet to a specific LAN device to complete each task. For example, you can set up a LAN IP 192.168.1.103, port 80, to accept external requests.
 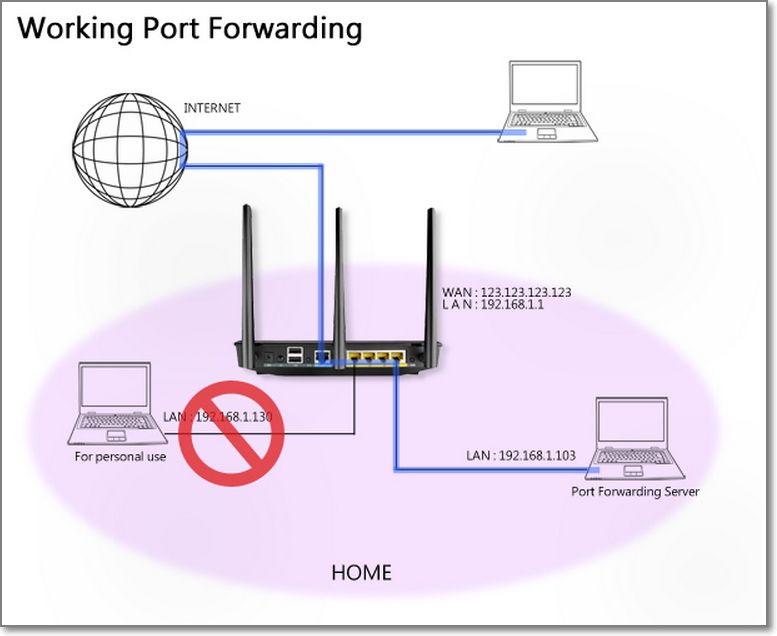 Please note that each port can only be used by a single LAN device. Two PCs cannot communicate via the same port. If you have added a FTP service using port 21, port 21 will no longer be available for the next service. Please avoid port conflicts as they will lead to rule failures. Here is a list of well-known services with their default port numbers for quick refernce. Choose one of the services below and your system will automatically fill in the assigned port number.
 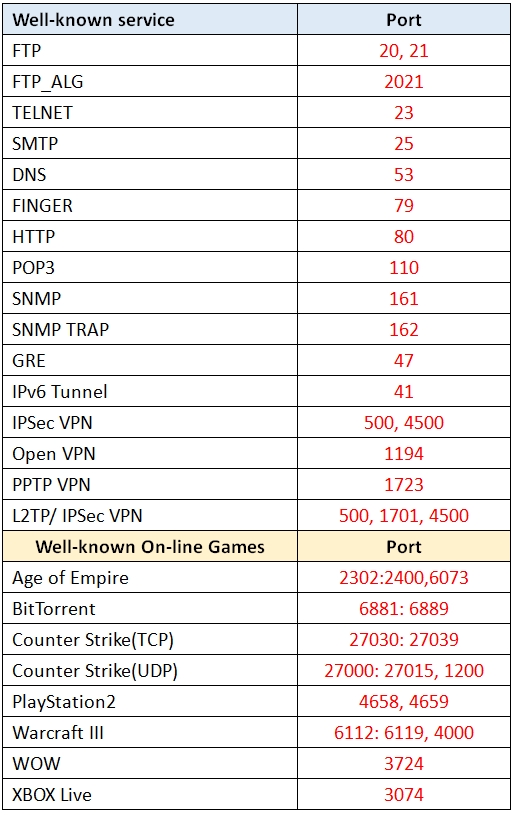 Set up Virtual Server/Port forwardingStep 1. Connect your computer to the router via wired or WiFi connection and enter your router LAN IP or router URL http://www.asusrouter.com to the WEB GUI.
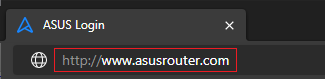 Please refer to How to enter the router setting page(Web GUI) to learn more. Step2. Key in your router’s username and password to log in.
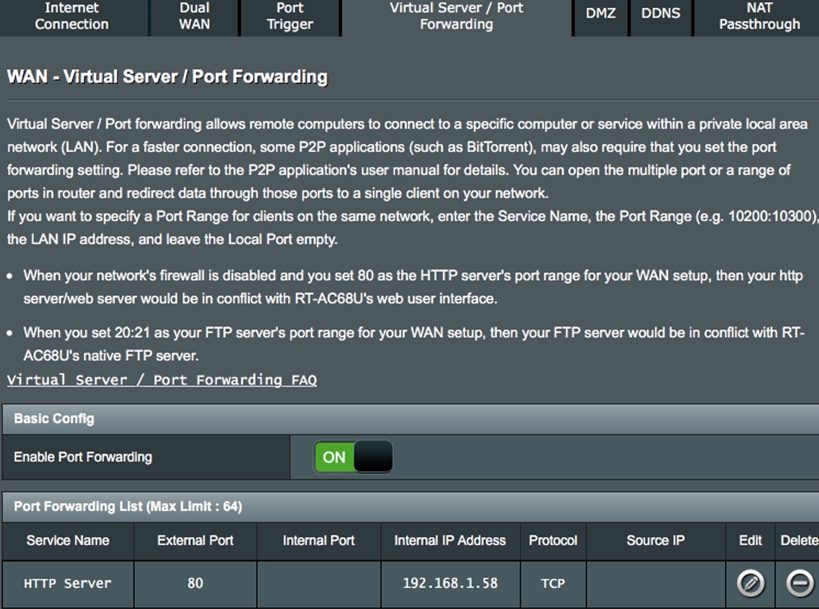
 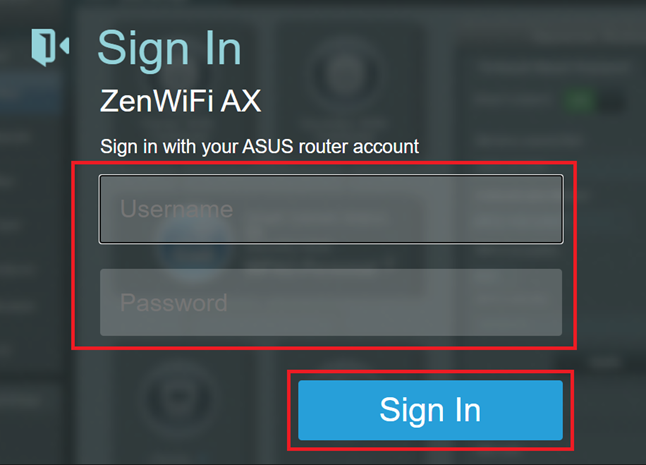 Note: If you forget the user name and/or password, please restore the router to the factory default status and setup. Please refer to [Wireless Router] How to reset the router to factory default setting? for how to restore the router to default status. Step 3. Go toWAN >Virtual Server/Port Forwarding >Switch the button on [Enable Port Forwarding] to ON (Default is OFF and click on “Add profile.”
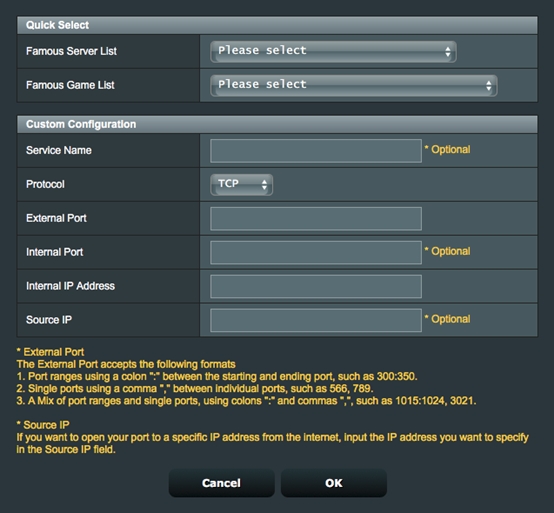
 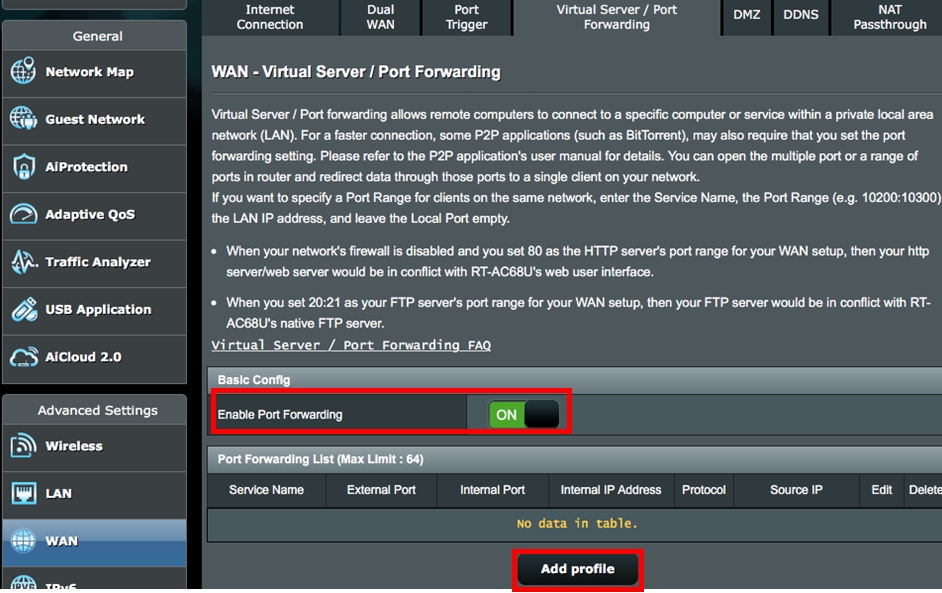 Field ExplanationsExternal Port: This field accepts the following formats
- Port ranges using colon “:”between the starting and ending port, such as 300:500.
- Single Ports using a comma “,”between individual ports, such as 566, 789.
- A mix of port ranges and single ports, using colons “:”, such as 1015:1024, 3021.
Source IP: If you want to open your port to a specific IP address from the Internet, input the IP address you want to specify in the Source IP field.
The following details how to use the port forwarding feature to set up HTTP and FTP servers.
How Do You Configure Port Forwarding for a HTTP Server?
Before setting up a port forwarding rule for a HTTP server, a PC using the Internet cannot connect to your server/PC via HTTP. Please refer to the steps below to complete the setup process.
Step 1. On the Virtual Server/Port Forwarding page, enable Port Forwarding and click «Add profile«.
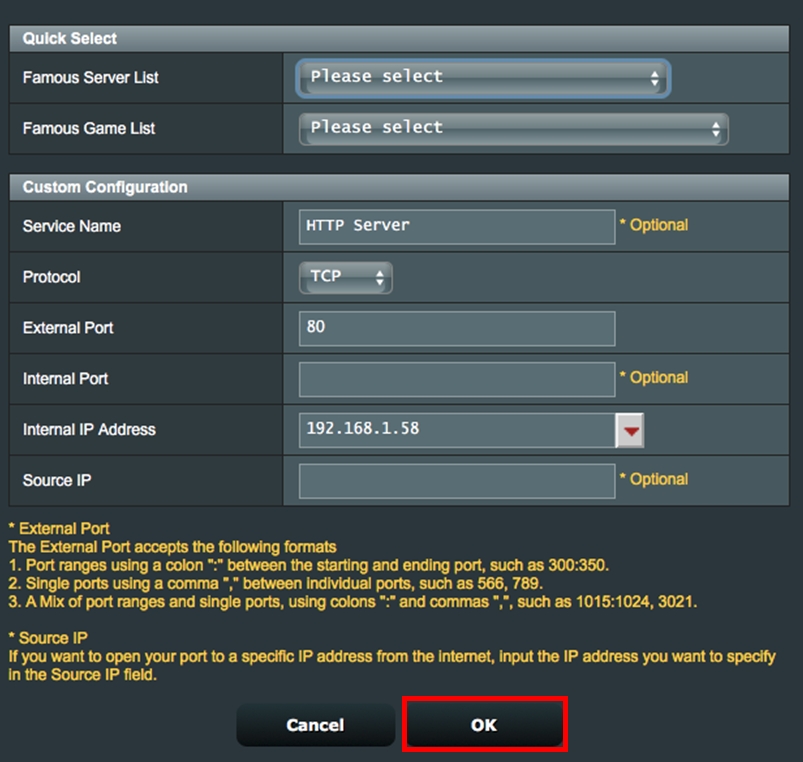
Step 2. Select HTTP (80) from the quick select list.
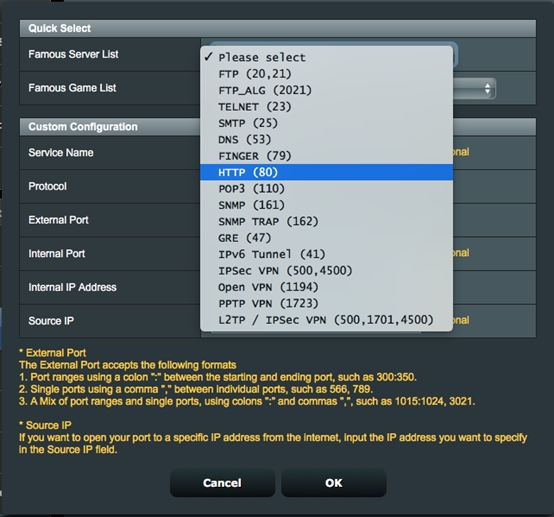
Step 3. The system will automatically fill in port 80 as the External Port and will choose the Internal IP Address. (In this demo, the Internal IP address is 192.168.1.58. Please change this to your actual address.)
Step 4. Click OK.
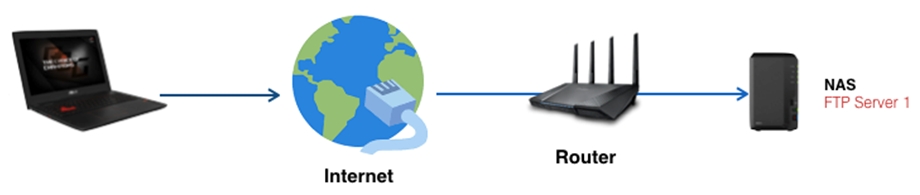
How to Check if a HTTP Server Has Been Successfully Set Up?
Step 1. Confirm your HTTP server is all set up.
Step 2. You need a PC connected to the Internet instead of under LAN.
Step 3. Open the browser on this PC and key in WAN IP of your router. If you can access the web page on the HTTP server, your port forwarding rule has been successfully set up.
How to Configure Port Forwarding for a FTP server?
This system supports dual FTP server services. You can use «FTP» and «FTP_ALG», which can be found in the quick select list, when setting up your port forwarding rules. We have provided guides to teach users how to set up port forwarding for FTP servers in 4 scenarios.
Note: The port forwarding device can be connected to AiMesh node and all setting should be configured from primary router.
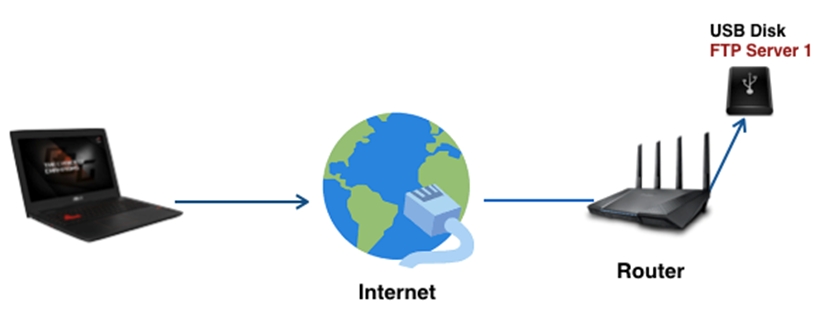
Scenario 1 : You only have a LAN PC/NAS as a FTP server.
Use FTP (20, 21) in the quick select list and then follow the steps below to add a new rule. Click here for detailed steps.
Scenario 2 : You have two FTP servers. One is this router, and the other is a LAN PC/NAS.
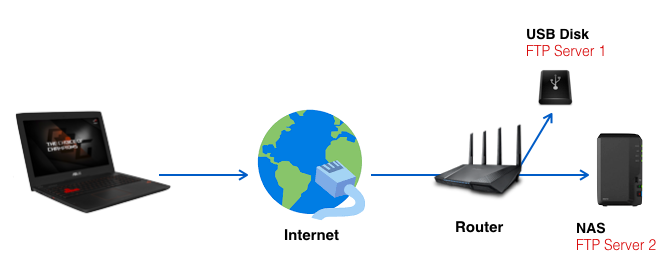
Please add the two rules for each server.
- Rule 1 If the current router is a FTP server: Use FTP (20,21) in the quick select list.
- Rule 2 for a LAN PC/NAS: Use FTP_ALG(2021) in the quick select list. Click here for detailed steps.
Scenario 3 : You have two LAN PC/NAS as FTP servers.
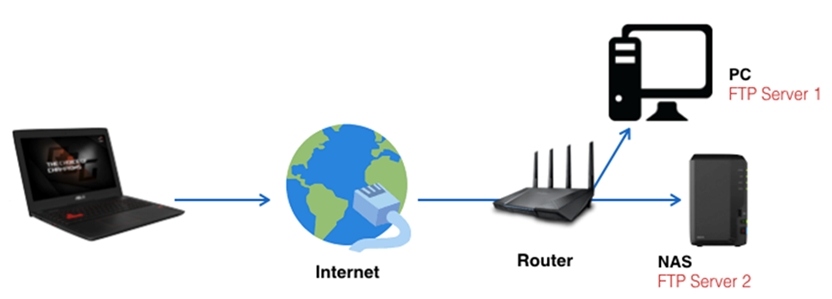
Please add two rules for each server.
- Rule 1 for the 1 st LAN PC/NAS as a FTP server: Use FTP(20,21) in the quick select list.
- Rule 2 for the 2 nd LAN PC/NAS as a FTP server: Use FTP_ALG(2021) in the quick select list. Click here for detailed steps.
Scenario 4 : You only have this current router as a FTP server.
You can use the default port (21) without adding any rules on the port forwarding setup page. Click here for detailed steps.
Frequently Asked Question(FAQ)
1. Is it possible to configure port forwarding rules for IPv6, or is it only applicable to IPv4?
Port forwarding is currently not supported for IPv6, and we currently do not have plans to support it.
How to get the (Utility / Firmware)?
You can download the latest drivers, software, firmware and user manuals in the ASUS Download Center.
If you need more information about the ASUS Download Center, please refer this link.