Project zomboid dedicated server linux
This guide requires some knowledge
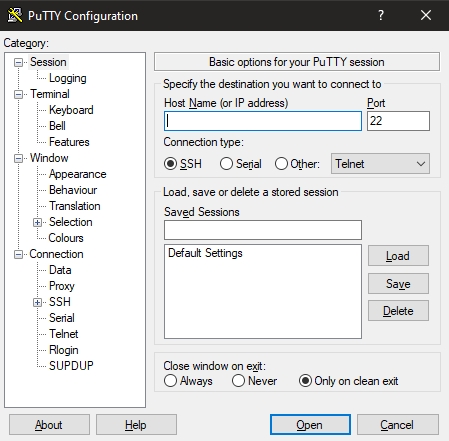
1) Download PuTTy (https://www.putty.org/)
2) Start PuTTy
3) Enter the IP of your VPS in Host Name
4) Enter the port of your VPS (22 by default )
Put the commands in the console following this order
- dpkg —add-architecture i386
- sudo apt install screen libsdl2-2.0-0:i386
- sudo apt-get update && apt-get upgrade
You can change «pzuser» by what you want
- sudo adduser pzuser
- enter the password when the console ask you
- usermod -aG sudo pzuser
- su — pzuser
You can change «pzserver» by what you want, it’s the directory of ProjectZomboid Dedicated server’s files
- mkdir steamcmd pzserver
- cd steamcmd
- wget https://steamcdn-a.akamaihd.net/client/installer/steamcmd_linux.tar.gz
- tar -xvzf steamcmd_linux.tar.gz
- ./steamcmd.sh
- force_install_dir /home/pzuser/pzserver/
- login anonymous
- app_update 380870 validate
- exit
The first launch will create all config files of your server
You must put the password of the admin account in Project Zomboid (it’s a new password)
After this message, you can launch Project Zomboid and connect to your server
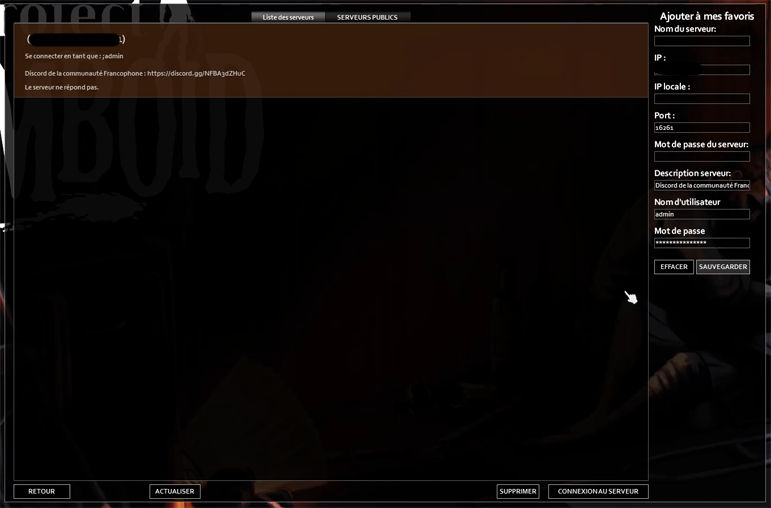
- Launch Project Zomboid
- Go to Online
- Go to server list
- Enter the IP of you server in IP input
- Enter the port (default : 16261)
- Enter «admin» as username or other name if you don’t want to log in as admin
- Enter the admin password or your user account’s password
If you want your server to run in the background 24h/24h
You can resume the server’s console when you will connect again to PuTTy
Stop a running server
> servertest.ini
> servertest_SandboxVars.lua
> servertest_spawnpoints.lua
> servertest_spawnregions.lua
This file contains the main configuration of your server
The parameters’ description are written in it
nightlengthmodifier=1
PVP=false
PauseEmpty=true
GlobalChat=true
ChatStreams=s,r,a,w,y,sh,f,all
Open=true
ServerWelcomeMessage=WELCOME Survivor
LogLocalChat=false
AutoCreateUserInWhiteList=true
DisplayUserName=true
ShowFirstAndLastName=false
SpawnPoint=0,0,0
SafetySystem=false
ShowSafety=false
SafetyToggleTimer=2
SafetyCooldownTimer=3
SpawnItems=
DefaultPort=16261
ResetID=831494815
Mods=
Map=Muldraugh, KY
DoLuaChecksum=true
DenyLoginOnOverloadedServer=true
Public=true
PublicName= Public server
PublicDescription= Nice server
MaxPlayers=32
PingFrequency=10
PingLimit=400
HoursForLootRespawn=48
MaxItemsForLootRespawn=4
ConstructionPreventsLootRespawn=true
DropOffWhiteListAfterDeath=false
NoFire=false
AnnounceDeath=false
MinutesPerPage=0.2
SaveWorldEveryMinutes=10
PlayerSafehouse=true
AdminSafehouse=false
SafehouseAllowTrepass=true
SafehouseAllowFire=false
SafehouseAllowLoot=true
SafehouseAllowRespawn=true
SafehouseDaySurvivedToClaim=0
SafeHouseRemovalTime=144
AllowDestructionBySledgehammer=false
KickFastPlayers=false
ServerPlayerID=313828062
RCONPort=27015
RCONPassword=
DiscordEnable=false
DiscordToken=
DiscordChannel=
DiscordChannelID=
Password=
MaxAccountsPerUser=0
SleepAllowed=false
SleepNeeded=false
SteamPort1=8766
SteamPort2=8767
WorkshopItems=
SteamScoreboard=true
SteamVAC=true
UPnP=true
UPnPLeaseTime=86400
UPnPZeroLeaseTimeFallback=true
UPnPForce=true
CoopServerLaunchTimeout=20
CoopMasterPingTimeout=60
VoiceEnable=true
VoiceComplexity=5
VoicePeriod=20
VoiceSampleRate=24000
VoiceBuffering=8000
VoiceMinDistance=10.0
VoiceMaxDistance=20.0
Voice3D=true
PhysicsDelay=500
SpeedLimit=70.0
server_browser_announced_ip=
UseTCPForMapDownloads=false
PlayerRespawnWithSelf=false
PlayerRespawnWithOther=false
FastForwardMultiplier=40.0
PlayerSaveOnDamage=true
SaveTransactionID=true
DisableSafehouseWhenPlayerConnected=false
Faction=true
FactionDaySurvivedToCreate=0
FactionPlayersRequiredForTag=1
AllowTradeUI=true
DisableRadioStaff=false
DisableRadioAdmin=true
DisableRadioGM=true
DisableRadioOverseer=false
DisableRadioModerator=false
DisableRadioInvisible=true
ClientCommandFilter=-vehicle.*;+vehicle.damageWindow;+vehicle.fixPart;+vehicle.installPart;+vehicle.uninstallPart
ItemNumbersLimitPerContainer=0
BloodSplatLifespanDays=7
AllowNonAsciiUsername=true
BanKickGlobalSound=true
RemovePlayerCorpsesOnCorpseRemoval=false
ZombieUpdateMaxHighPriority=50
ZombieUpdateDelta=0.5
ZombieUpdateRadiusLowPriority=45.0
ZombieUpdateRadiusHighPriority=10.0
TrashDeleteAll=true
PVPMeleeWhileHitReaction=true
MouseOverToSeeDisplayName=true
HidePlayersBehindYou=true
PVPMeleeDamageModifier=30.0
PVPFirearmDamageModifier=50.0
CarEngineAttractionModifier=0.5
The night’s length, this can be edited to change the speed at which the night will progress. 0.5 will make it last twice as normal, 2 will make it go double as fast.
Player vs Player combat — true = on, false = off
If set to true, this will pauset your server if there are no players on it.
If set to true, it allows the «/all» channel, making your players able to safely communicate with everyone.
Whitelisting — If true, anyone can join, if false, players need to be added to a whitelist in order to play.
Welcome to Project Zomboid MP ! to chat locally press ‘t’, to global chat press ‘y’ or add ‘/all’ before chatting Type ‘/help’ to have a list of available commands
You can change the message players see each time they log-in.
When using the «/say» command nearby people will be able to read it in the chat log, if set to false people can only view the message on their screen.
To set a custom spawn point, change 0,0,0 to something like 1,2,0 the 1 is the first number (x position), 2 is the 2nd (y position), and 0 is the level (z position). So if you want to be upstairs in a room then you change that number. you can use the Project Zomboid Map to look for specific coordinates to spawn onto.
Are you getting an error that says «you have been kicked! Your lua version does not match the server.» ? This usually means you have mods installed and need to either turn off this by setting the argument to false, or you have to uninstall all mods, including ones which are directly installed into your media files.
MaxItemsForLootRespawn
This option is very important when you want to keep your house items from disapearing because of respawn ! Whatever this is set at, any chest/item that doesn’t equal this amount will respawn. So if it’s 4, make sure every container in your house has at least 4 items in it or they will respawn !
Make it so your embarrassing death is broadcasted to your friends
Project zomboid dedicated server linux
Hey, I’m Nerea, and I’m here to teach you how to host your own multiplayer dedicated PZ server in an Ubuntu (it may also work for Debian) server o VPS.
This is a guide to do it manually, but you can set a LGSM [linuxgsm.com] and simplify all the process. Anyway for both options, you need to read Configuring the server parameters and Configuring the ProjectZomboid64.json
— Obviously having an Ubuntu/Debian server or VPS with Ubuntu 20+ or Debian 11+
— Having installed a shh client like PuTTY [www.putty.org] (I recommend Bitvise [www.bitvise.com] because it will allow you to create a SFTP connection to manage your server files) with the access to the machine already configured
— Having opened in the firewall rules of your server the default port of PZ (16261, 8766, 8767 UPD/TCP and 27015 if u want to use Rcon)
— Having installed JDK17+
Create a user account named steam to run SteamCMD safely, isolating it from the rest of the operating system. Do not run SteamCMD while operating as the root user — to do so is a security risk.
0. I recommend executing an update and upgrade command
sudo add-apt-repository multiverse sudo dpkg —add-architecture i386 sudo apt update sudo apt install lib32gcc1 steamcmd
Agree the license TABing to OK and I agree
4. Get in the steam user we have just created
Wait for the download to complete
For this section, we’re going to need a Windows computer with PZ installed for doing the configs the easy way.
1. Enter the game and create new settings set in the co-op section with the name of your server
- yourservername.ini
- yourservername_spawnregions.lua
- yourservername_SandboxVars.lua
If you want to edit manually the server parameters files, follow this guide
https://steamcommunity.com/sharedfiles/filedetails/?id=2682570605
In the PZ server directory, /home/steam/.steam/steamapps/common/Project Zomboid Dedicated Server you will find a file called ProjectZomboid64.json
In this file, you need to edit the Xmx parameter. This parameter is going to set how many gigs of ram the server is allowed to use. For example, if u set it as Xmx5g you will be establishing that the maximum amount of ram that the server can use is 5g.
¿How many gigs of ram do you need?
The more always the best, I recommend that if the VPS has 10 gigs of ram, using at least 8 gigs for the server. But if it is a VPS you’re using for a couple of things, usually it is recommended to use 2 gigs and 500mb for every player that is going to use the server
1. Being in the PZ server directory /home/steam/.steam/steamapps/common/Project Zomboid Dedicated Server execute the following command
It’s important that the name is the same that you set when you created the yourservername.ini/lua files
2. Set the admin password when the console ask you to and wait til you see
If you can’t cd to the PZ server directory /home/steam/.steam/steamapps/common/Project Zomboid Dedicated Server try putting the directory between «» like this
‘Thread(0x00007FFE03F0B400/0x000’ src\tier0\threadtools.cpp (3594) : Assertion Failed: Illegal termination of worker thread ‘Thread(0x00007FFE03F0B400/0x000’ src\tier1\fileio.cpp (5146) : CFileWriterThread already exited src\tier1\fileio.cpp (5146) : CFileWriterThread already exited src\tier1\fileio.cpp (5146) : CFileWriterThread already exited src\tier1\fileio.cpp (5146) : CFileWriterThread already exited src\tier1\fileio.cpp (5146) : CFileWriterThread already exited src\tier1\fileio.cpp (5146) : CFileWriterThread already exited src\tier1\fileio.cpp (5146) : CFileWriterThread already exited src\tier1\fileio.cpp (5146) : CFileWriterThread already exited
2.1) Run server 24h/24h
You can quit PuTTy, your server will run in background.
At the next connection to PuTTy to resume the server console
3) Stop a server
Stop a running server
Write : quit

4) Server configuration

4.1) servertest.ini
This file contains the main configuration of your server
the description of the parameters is being written
PublicDescription= Nice server
nightlengthmodifier
The length of the night, this can be modified to change the speed at which a night progresses. 0.5 will make it last twice as normal, 2 will make it go double as fast.
Player vs Player combat – true = on, false = off
If set to true, this will halt your server if there are no players on it.
If set to true, it allows for the “/all” command in chat, making your players able to safely communicate with everyone.
Whitelisting – If true, anyone can join, if false, players need to be added to a whitelist in order to play.
ServerWelcomeMessage
Welcome to Project Zomboid MP ! to chat locally press ‘t’, to global chat press ‘y’ or add ‘/all’ before chatting Type ‘/help’ to have a list of available commands
Change the message players see each time they log-in.
LogLocalChat
When using the “/say” command nearby people will be able to read it in the chat log, if set to false people can only view the message on their screen.
To set a custom spawn point, change 0,0,0 to something like 1,2,0 the 1 is the first number, 2 is the 2nd, and 0 is the level. So if you want to be upstairs in a room then you change that number. you can use the Project Zomboid Map Project to look for a specific location to spawn into
DoLuaChecksum
Are you getting an error that says “you have been kicked! Your lua version does not match the server.” This usually means you have mods installed and need to either turn off this by setting the argument to false, or you have to uninstall all mods, including ones that directly installed into your media files.
MaxItemsForLootRespawn
This option is very important when you want to keep your house items from disapearing because of respawn! whatever this is set at, any chest/item that doesn’t equal this amount will respawn. So if it’s 4, make sure every container in your house has at least 4 items in it or they will respawn!
AnnounceDeath
Makes it so your embarrassing death is broadcasted to your friends
4.2) add mods to your server
Search parameters
Go to on a Workshop mod page
Get the Workshop ID and Mod ID at the end of the description of the mod
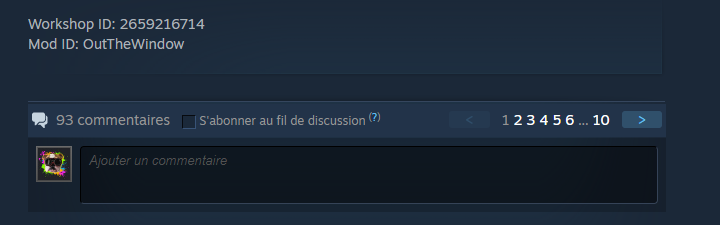
And copy past here
(in screen, you can see two mods add separated by “;”
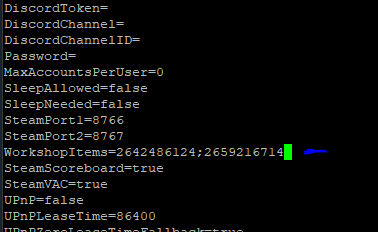
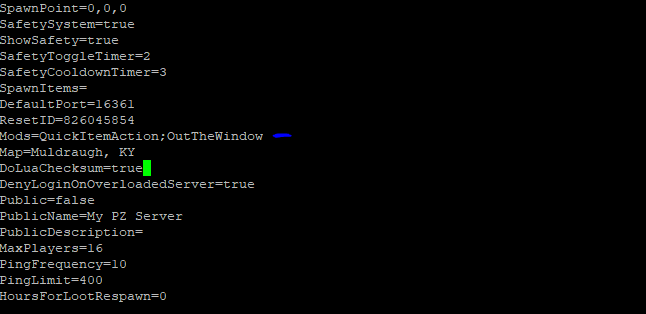
Save your servertest.ini file and exit
4.3) servertest_SandboxVars.lua
Sandbox Parameters Configuration File
the description of the parameters is being written