- Arduino UNO WiFi FW Change
- Burn the firmware using UNO WiFi Firmware Updater tool
- Burn the Firmware using the Arduino Software (IDE)
- Burn the firmware using EspRecovery
- Burn the firmware using ESP Flash download tool
- See also
- Arduino UNO WiFi firmware updater
- Hardware required
- Circuit
- UNO WiFi Firmware updater procedure
- See also
- Arduino UNO WiFi Firmware Updater
- Hardware required
- Circuit
- UNO WiFi Firmware updater procedure
- See also
Arduino UNO WiFi FW Change
There are four different ways to change or upgrade the firmware on your Arduino UNO WiFi:
- burn the firmware using UNO WiFi Firmware Updater tool (for all O.S. via Serial);
- burn the firmware using Arduino Software (IDE) 1.7.x (for all O.S. via OTA );
- burn the firmware using ESP recovery (for all O.S. via Serial);
- burn the firmware using ESP Flash Download tool for Windows user (Only Windows via Serial).
All these ways are shown in below paragraphs.
Burn the firmware using UNO WiFi Firmware Updater tool
If you are using the Arduino 1.8.x or later then you can upgrade the Esp firmware using the UNO WiFi Firmware Updater tool. The complete guide is in this link.
Note: This procedure is recommended for all Operating System and it is usable via serial.
Burn the Firmware using the Arduino Software (IDE)
If you want burn the firmware using the file into Arduino Software (IDE) 1.7.x, then continue to follow the guide, if instead you are using the Arduino Software (IDE) 1.8.x then follow the Arduino UNO WiFi Firmware Updater guide.
Note: This procedure is recommended for all Operating System and it is usable only via OTA.
- Download the latest Arduino Software (IDE) version. Click here.
- Launch the Arduino Software (IDE).
- Plug the Arduino UNO WiFi to PC.
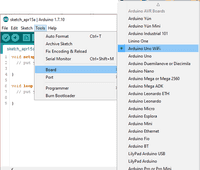
- Select the board: Arduino UNO WiFi from Tools>Board menu.


Burn the firmware using EspRecovery
This procedure is recommended for all Operating System and it is usable only via Serial.
1 — First you must upload the EspRecovery sketch on your Arduino UNO WiFi:
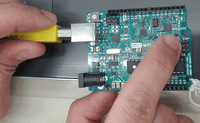
- Connect the Arduino UNO WiFi to PC with a USB cable.
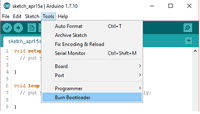
- Open the Arduino Software (IDE).
- Select the correspondent port and board.
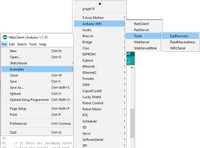
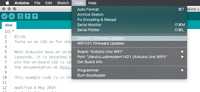
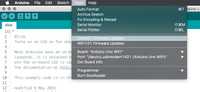
- Upload the ESPRecovery sketch from File>Examples>Arduino UNO WiFI>Tools menu of Arduino Software (IDE):
2 — Enter the board in bootloader mode:
- Disconnect the Arduino Uno WiFi
- Reconnect the board while pressing the ESP B/L button.
3 — Open your terminal as Administrator.
4 — Download the ESPtool, you can download from here or you can use the command:
5 — Test the esptool, for example, inserting the below command to read the MAC address:
python esptool.py -p your port -b baudrate read_macFor linux user, for example, the port will be /dev/ttyACM0:
sudo python esptool.py -p /dev/ttyACM0 -b 9600 read_macFor Mac user, for example, the port will be /dev/tty.usbmodem1411:
sudo python esptool.py -p /dev/tty.usbmodem1411 -b 9600 read_macfor example in case that the tools is in * * \Users\XXXX\Desktop\esptool\esptool * * folder and the COM is 30:
python \User\XXXX\Desktop\esptool\esptool\esptool.py -p COM30 -b 9600 read_mac 
6 If it appears on your MAC terminal, then continue the procedure:
7 — Use this command to write the firmware but PAY ATTENTION to set the correct path and insert your correspondent port:
1sudo python esptool.py -p /dev/ttyACM0 -b 9600 write_flash -ff 80m -fm qio -fs 32m2 0x00000 20151223/boot_v1.4.bin_rep 0x1000 20151223/user1.bin 0x3FC000 3 20151223/esp_init_data_default.bin_rep 0x3FE000 20151223/blank.binFor Windows user: for example in case that the tools is in \Users\XXXX\Desktop\esptool\esptool * * folder and the COM is 30 * * :
1C:\WINDOWS\system32>python \Users\xxxx\Desktop\esptool\esptool\esptool.py -p COM30 -b 9600 write_flash -ff 80m -fm qio -fs 32m 0x00000 2 3C:\Users\xxxxx\Desktop\esptool\esptool\20151223/boot_v1.4.bin_rep 0x1000 4 5C:\Users\xxxxx\Desktop\esptool\esptool\20151223/user1.bin 0x3FC000 6 7C:\Users\xxxxx\Desktop\esptool\esptool\20151223/esp_init_data_default.bin_rep 0x3FE000 8 9C:\Users\xxxxx\Desktop\esptool\esptool\20151223/blank.bin8 — Wait some minutes that the process ends
Note: You can find the updated user1.bin file directly into Arduino Software (IDE), here the path: arduino-1.7.x\hardware\arduino\avr\firmwares\esp8266\unowifi\firmware_arduino_esp8266_20xx_xx_xx_file1.bin
Burn the firmware using ESP Flash download tool
If you are a Windows user and you want to upgrade the firmware using a baudrate higher than 9600 then follow the procedure below:
Note: This method allows to burn the firmware quickly (baudrate to 115200) but it needs an USB2Serial and some welding.
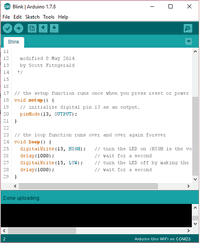
1 — First you must upload the Blink sketch on your Arduino UNO WiFi:
- Connect the Arduino UNO WiFi to your PC with a USB cable.
- Open the Arduino Software (IDE), you can download it here.
- Select the correspondent port and board.
- Upload the Blink sketch from File>Examples>Basics menu.
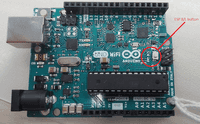
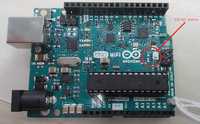
2 — Create a jumper between TP_GPIOESP test point and Ground, as shown in the image below:
3 — Connect the board to the USB2Serial:
USB2SerialArduino Uno WiFiRXRXTXTXGNDGND
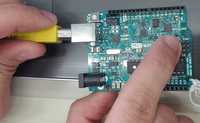
4 — Put the board in bootloader mode:
- Disconnect the Arduino Uno WiFi
- Reconnect the board while pressing the ESP B/L button.
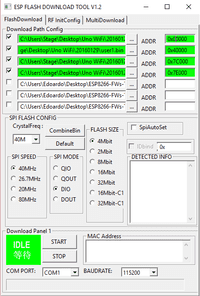
5 — Open the ESP FLASH DOWNLOAD TOOL, you can download it from here Δ.
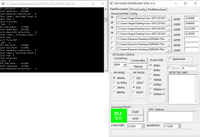
6 — Setting the the esptool:
- Select the first row and insert the boot.bin_rep file and set the address: 0x00000.
- Select the second row and insert the user1.bin file and set the address: 0x40000.
- Select the third row and insert the esp_init_data_default.bin_rep file and set the address: 0x7C000.
- Select the quarter row and insert the blank.bin file and set the address: 0x7E000, as shown in the picture.
Note: You can find the updated user1.bin file directly into Arduino Software (IDE), here the path: arduino-1.7.x\hardware\arduino\avr\firmwares\esp8266\unowifi\firmware_arduino_esp8266_20xx_xx_xx_file1.bin
- Select the correspondent USB2Serial COM.
- Setting the baudrate to 115200.
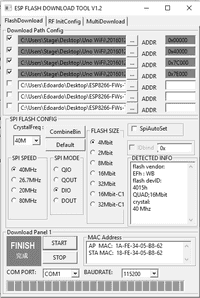
7 — Execute the Firmware writing.
- Click on START
- Wait the ending of the process; Finish will appear when done, as shown in the image below.
8 — Now remove the jumper between TP_GPIOESP and Ground.
See also
The text of the Arduino getting started guide is licensed under a Creative Commons Attribution-ShareAlike 3.0 License. Code samples in the guide are released into the public domain.
Arduino UNO WiFi firmware updater
This tutorial will guide you in the process of updating the firmware of your Arduino UNO WiFi board.
Hardware required
Circuit
Connect the board at the USB port of your computer ready with Arduino Software (IDE) 1.8.0 or later.
UNO WiFi Firmware updater procedure
To simplify the process, we have prepared a tool — UNO WiFiFirmwareUpdater — available in Arduino IDE 1.8.0 or later.
Follow these steps to enable this tools into Arduino software:
- Download the tool here.
- Create a folder called tools into the sketchbook directory (normally in Documents >Arduino).
- Extract it.
- Launch the Arduino Software (IDE) 1.8.0 or later.
- Connect the board to PC.
- Select the Arduino UNO WiFi as board in the Tools>Board menu.
- Select the corresponding serial port in the Tools>Port menu.
- Upload the ESP Recovery sketch. It is into the UNOWiFiDev.Edition Library. Download it from Library Manager.
/*ESP Recovery sketch*/ #include #include #define BAUD 9600 WifiData ESPSerial; void setup() Serial.begin(BAUD); pinMode(13, OUTPUT); digitalWrite(13, LOW); ESPSerial.begin(BAUD); > void loop() while (Serial.available()) char inChar = (char)Serial.read(); ESPSerial.write(inChar); > while (ESPSerial.available()) char inChar = (char)ESPSerial.read(); Serial.write(inChar); > >- Put the board in DFU mode, keeping pressed the ESP B/L button and connect the board to PC
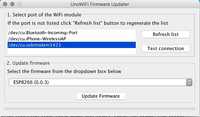
- Click on Refresh list if the port is not listed.
- Select the corresponding port.
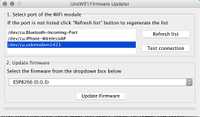
- Click on Test connection.
- Select from windows menu the ESP firmware requested.
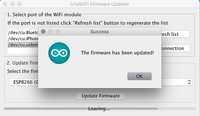
- Click on Update Firmware.
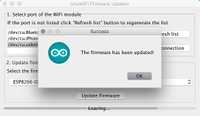
- Wait the end of process.
Warning: The process could last several minutes.
See also
The text of the Arduino getting started guide is licensed under a Creative Commons Attribution-ShareAlike 3.0 License. Code samples in the guide are released into the public domain.
Arduino UNO WiFi Firmware Updater
This tutorial will guide you in the process of updating the firmware of your Arduino UNO WiFi board.
Hardware required
Circuit
Connect the board at the USB port of your computer ready with Arduino Software (IDE) 1.8.0 or later.
UNO WiFi Firmware updater procedure
To simplify the process, we have prepared a tool — UNO WiFiFirmwareUpdater — available in Arduino IDE 1.8.0 or later.
Follow these steps to enable this tools into Arduino software:
- Download the tool here.
- Create a folder called tools into the sketchbook directory (normally in Documents >Arduino).
- Extract it.
- Launch the Arduino Software (IDE) 1.8.0 or later.
- Connect the board to PC.
- Select the Arduino UNO WiFi as board in the Tools>Board menu.
- Select the corresponding serial port in the Tools>Port menu.
- Upload the ESP Recovery sketch. It is into the UNOWiFiDev.Edition Library. Download it from Library Manager.
1/*ESP Recovery sketch*/ 2 #include 3 #include 4 5 #define BAUD 9600 6 7WifiData ESPSerial; 8 9 void setup() 10 11 12 Serial.begin(BAUD); 13 14 pinMode(13, OUTPUT); 15 16 digitalWrite(13, LOW); 17 18 ESPSerial.begin(BAUD); 19 > 20 21 void loop() 22 23 24 while (Serial.available()) 25 26 char inChar = (char)Serial.read(); 27 28 ESPSerial.write(inChar); 29 30 > 31 32 while (ESPSerial.available()) 33 34 char inChar = (char)ESPSerial.read(); 35 36 Serial.write(inChar); 37 38 > 39 40 >- Put the board in DFU mode, keeping pressed the ESP B/L button and connect the board to PC


- Click on Refresh list if the port is not listed.
- Select the corresponding port.
- Click on Test connection.
- Select from windows menu the ESP firmware requested.
- Click on Update Firmware.
- Wait the end of process.
Warning: The process could last several minutes.
See also
The text of the Arduino getting started guide is licensed under a Creative Commons Attribution-ShareAlike 3.0 License. Code samples in the guide are released into the public domain.