- How to list and manage files attributes on Linux
- Introduction
- Listing files attributes
- Setting and removing attributes
- Removing attributes
- Conclusions
- Related Linux Tutorials:
- Как в Linux узнать свойства медиафайлов (видео, аудио, фотографии)
- Программы для просмотра характеристик медиофайлов
- MediaInfo (графический интерфейс)
- VLC
- SMPlayer
- Audacious (для аудио файлов)
- DeaDBeeF (для аудио файлов)
- GIPM (для изображений)
- Eye of Gnome (eog) (для изображений)
- gThumb (для изображений)
- Как посмотреть характеристики медиофайлов в командной строке
- MediaInfo (интерфейс командной строки)
- ffprobe
- ExifTool
- MPlayer
How to list and manage files attributes on Linux
When using Linux we have many ways to manage access to resources: the most basic one is by setting the appropriate UGO/RWX permissions on files and directories. In some occasions we may also want to make use of the setuid, the setgid and the sticky bit. Furthermore, we can use ACLs (Access Control List) in order to achieve an higher level of granularity or implement Mandatory Access Control security such those based SELinux or AppArmor.
In addition to the strategies mentioned above, on most filesystems we can manipulate a set of “attributes” in order, for example, to make a file immutable.
In this article we talk about file attributes on Linux, and we learn how to check the attributes assigned to a file and how to manage them.
In this tutorial you will learn:

- What file attributes can be used for
- How to list file attributes
- How to assign/remove file attributes
| Category | Requirements, Conventions or Software Version Used |
|---|---|
| System | Distribution independent |
| Software | chattr/lsattr |
| Other | Administrative privileges to manage file attributes |
| Conventions | # – requires given linux-commands to be executed with root privileges either directly as a root user or by use of sudo command $ – requires given linux-commands to be executed as a regular non-privileged user |
Introduction
Discretionary access control on Linux (DAC) and other Unix-based operating system, is, in its basic form, implemented by applying a certain set of permissions on files, and by setting their ownership to a specific user and group: this is what we call UGO/RWX permissions. In previous tutorials we also talked about a set of “special” flags or bits which can be useful on certain circumstances: the setuid, setgid and sticky bits, and we learned how we can assign permissions with an higher level of granularity by using ACLs (Access Control List).
We also talked about SELinux, which is probably the main Mandatory Access Control implementation on Linux. In this tutorial we see how, depending on the filesystem we use, we can also make use of a series of attributes in order to enable/disable specific features on files and directories.
Listing files attributes
In order to list files attributes on Linux, we can use the lsattr utility, which is included in the e2fsprogs package on the most used Linux distributions (despite the name, it can be also used on filesystems other than ext2/3/4, as the xfs, for example).
The utility takes one or more files as arguments, and supports a series of options to modify its behavior. Let’s see an example of its usage. When lsattr is invoked without any argument or option, it returns the list of the attributes associated with the files and directories contained in the working directory, just like the ls command, does:
$ lsattr --------------e------- ./Templates --------------e------- ./Downloads --------------e------- ./Projects --------------e------- ./Documents --------------e------- ./Desktop --------------e------- ./Music --------------e------- ./Public --------------e------- ./Videos --------------e------- ./Pictures
In the example above, you can see I invoked the command in my HOME directory. From the output of the command we can see the visible directories have just the e attribute assigned: this means that they are using “extents” to map the blocks on disk (this is related to how the ext4 filesystem works). As you can see, hidden files are not included in the output by default; to include them we can pass the -a option to the command. We can also list the attributes of a directory recursively by using the -R option, or list the attribute of a directory instead those of its content, by using -d .
Another useful option is -l which is used in order to display the full name of the attributes associated to files, instead of the single letter identifying them:
$ lsattr -l ./Templates Extents ./Downloads Extents ./Projects Extents ./Documents Extents ./Desktop Extents ./Music Extents ./Public Extents ./Videos Extents ./Pictures Extents
The meaning of the various attributes can be retrieved in the chattr utility manual, which as we will see in a moment, is used to set or remove attributes. Here we just report few of them (some attributes can only be set on certain fileystems – “j”, for example cannot be set on an ext2 filesystem, which has no journaling):
| ATTRIBUTE | USE |
| a | If a file has the a attribute, content can be only appended to it. |
| c | A file with the c attribute is transparently compressed by the kernel when written and decompressed when read. |
| i | A file with the i attribute associated to it cannot be modified, deleted or renamed (immutable) |
| s | A file with the s attribute is automatically zeroed when deleted |
| j | A file with the j attribute set, has data written to the filesystem journal before the actual writing happens. |
Setting and removing attributes
The utility we use to assign attributes is chattr ; its syntax is pretty simple: to assign an attribute to a file we use a + sign followed by the attribute letter and we pass the path of the file(s) the attribute should be assigned to, as argument to the command. Let’s see an example.
Suppose we have a file (let’s say it is called example.txt ), and we want to assign the a attribute to it, in order to avoid its content to be overwritten. Here is the command we would run:
You may notice that we prefixed the command with sudo , since the majority of the attributes can only be assigned or removed by the root user. We can verify the attribute has been assigned to the file by using lsattr :
$ lsattr -l example.txt example.it Append_Only, Extents
Now, if we try to write to overwrite the file by using the > shell redirect operator, we receive an error:
$ echo "line" > example.txt bash: example.txt: Operation not permitted
If we use the >> redirection operator instead, which makes so that content is appended to the file, no errors are generated:
Here is another example. The i attribute can be used to make a file immutable and impossible to delete or move, even by the root user (which can, however, remove the attribute altogether):
$ sudo chattr +i example.txt $ sudo rm example.txt rm: cannot remove 'example.txt': Operation not permitted
Removing attributes
To remove one or more attributes from files, all we have to do is to change the “operator” we use with chattr . Instead of a + we use — . To remove the i and a attributes we set in the previous example from the “example.txt” file, we would run:
$ sudo chattr -ai example.txt
In some cases we want to apply a “reversed” logic, and basically say: “remove all attributes but those specified”: in order to apply this strategy we can use the = operator.
Conclusions
In this tutorial we learned how to list and manage file attributes on Linux using the “lsattr” and “chattr” utilities, and we saw the meaning of some attributes, as “i” (immutable) or “a” (append-only). Some filesystems accepts only a certain set of attributes: consult the respective manuals to check those supported. To know more about attributes, in general you can take a look at the documentation of the aforementioned utilities.
Related Linux Tutorials:
Comments and Discussions
Как в Linux узнать свойства медиафайлов (видео, аудио, фотографии)
В данной статье будет показано, как узнать характеристики видео, аудио, фотографий в Linux. Мы познакомимся с программами с графическим интерфейсом, а также с утилитами командной строки.
У каждого файла есть набор характеристик, их можно разделить на две группы:
- независящие от операционной системы (размер, метаданные)
- зависящие от операционной системы (права доступа, владелец, дата создания, расположение и т. д.)
Для мультимедиа файлов, таких как видео, аудио, фотографии можно выделить особые характеристики:
- размер кадра видео или изображения
- битрейт
- используемый кодек или формат
- и другие
Именно эти характеристики мы и научимся сегодня смотреть в Linux.
Программы для просмотра характеристик медиофайлов
MediaInfo (графический интерфейс)
MediaInfo предоставляет техническую информацию и считывает данные из тегов о видео или аудио файле. Причём эта программа работает на огромном количестве операционных систем и даже на мобильных телефонах.
Для установки MediaInfo в Windows перейдите на страницу официального сайта https://mediaarea.net/en/MediaInfo/Download, скачайте и установите инсталлятор.
Для установки MediaInfo с графическим интерфейсом в Debian, Linux Mint, Kali Linux, Ubuntu и их производные выполните:
sudo apt install mediainfo-gui
Для установки MediaInfo с графическим интерфейсом в Arch Linux, BlackArch и их производные выполните команду:
sudo pacman -S mediainfo-gui
Вы можете перетащить файл прямо в окно программы, либо воспользоваться иконками для открытия одного файла или целой папки:
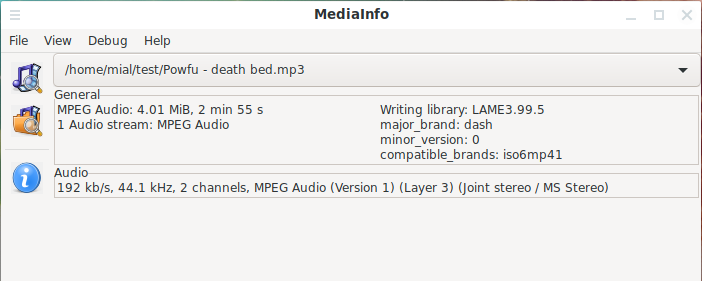
Пример вывода информации о технических характеристиках видеофайла:

VLC
VLC — это популярный медиа проигрыватель, поддерживающий множество форматов. Для просмотра информации о файле нажмите Ctrl+i, для просмотра информации о кодеках нажмите Ctrl+j.

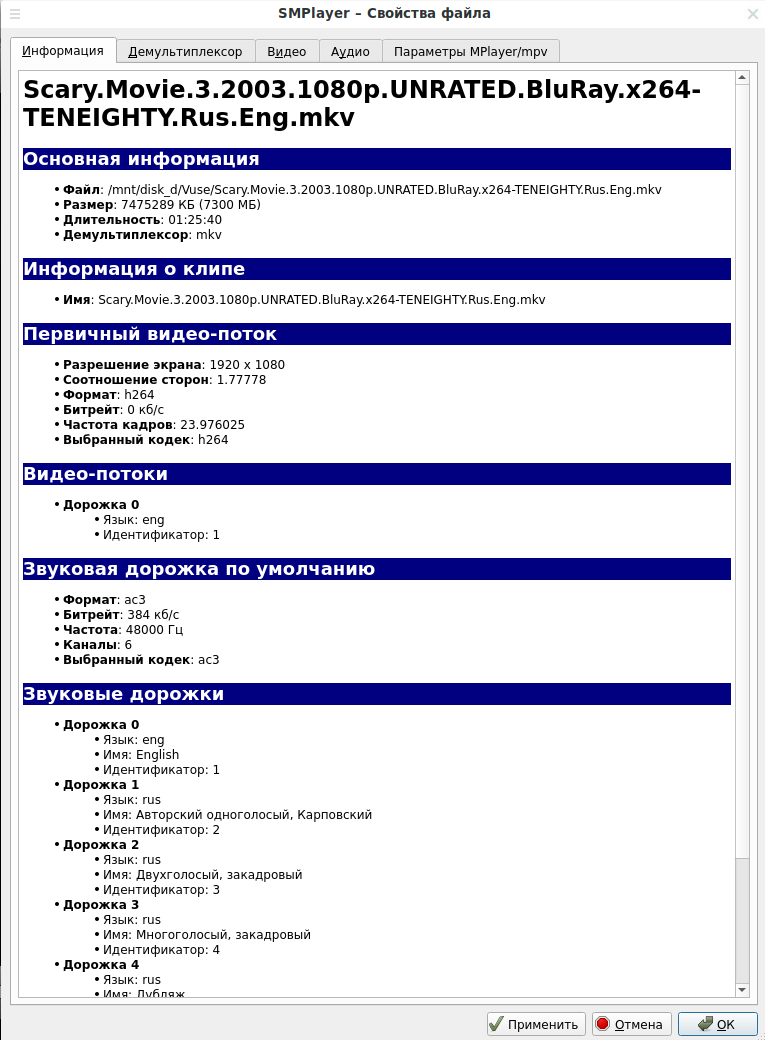
SMPlayer
Ещё один популярный плеер с большим количеством функций. Для просмотра свойств файла нажмите Ctrl+i:
Audacious (для аудио файлов)
Нажмите в программе Alt+i для показа информации об аудиофайле.
DeaDBeeF (для аудио файлов)
Кликните по файлу правой кнопкой мыши и выберите «Свойства дорожки».
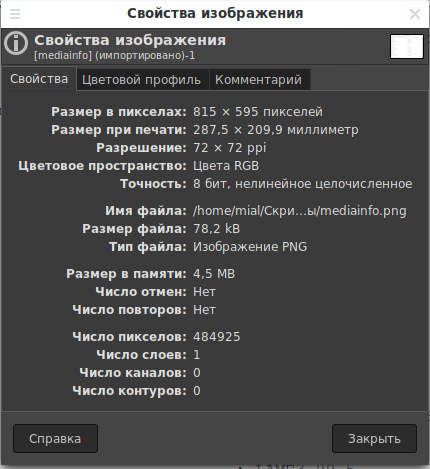
GIPM (для изображений)
Нажмите Alt+Enter для показа информации о фотографии или картинке.
Eye of Gnome (eog) (для изображений)
Нажмите Alt+Enter для показа информации об изображении.
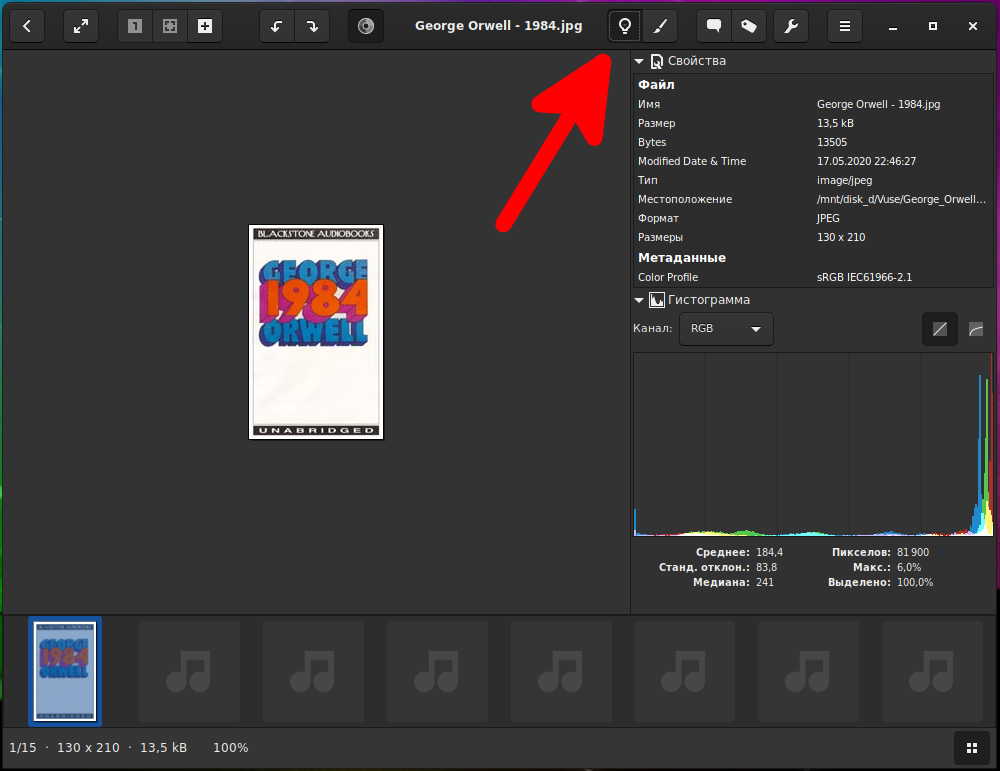
gThumb (для изображений)
Чтобы показать свойства изображения, нажмите на иконку лампочки в верхней панели:
Как посмотреть характеристики медиофайлов в командной строке
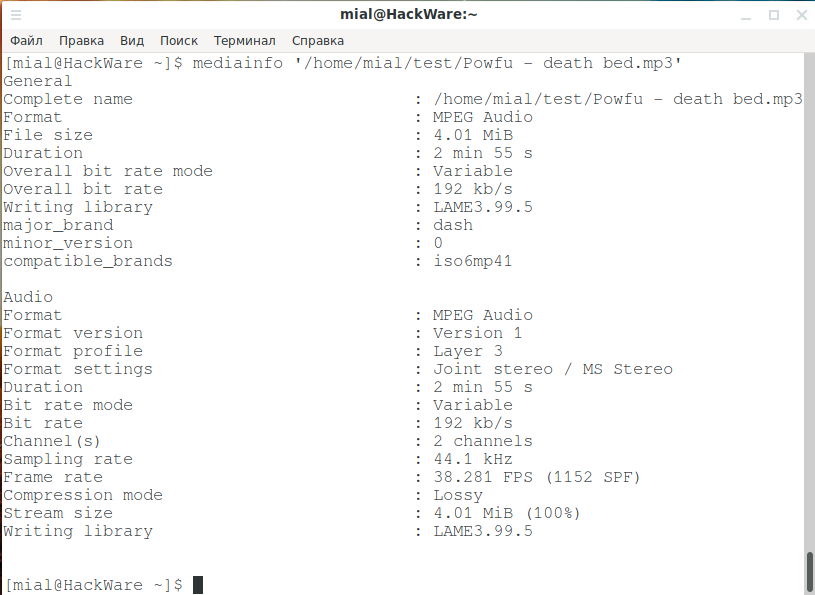
MediaInfo (интерфейс командной строки)
Уже знакомая нам программа MediaInfo.
Для установки MediaInfo с интерфейсом командной строки в Debian, Linux Mint, Kali Linux, Ubuntu и их производные выполните:
sudo apt install mediainfo
Для установки MediaInfo с интерфейсом командной строки в Arch Linux, BlackArch и их производные выполните команду:
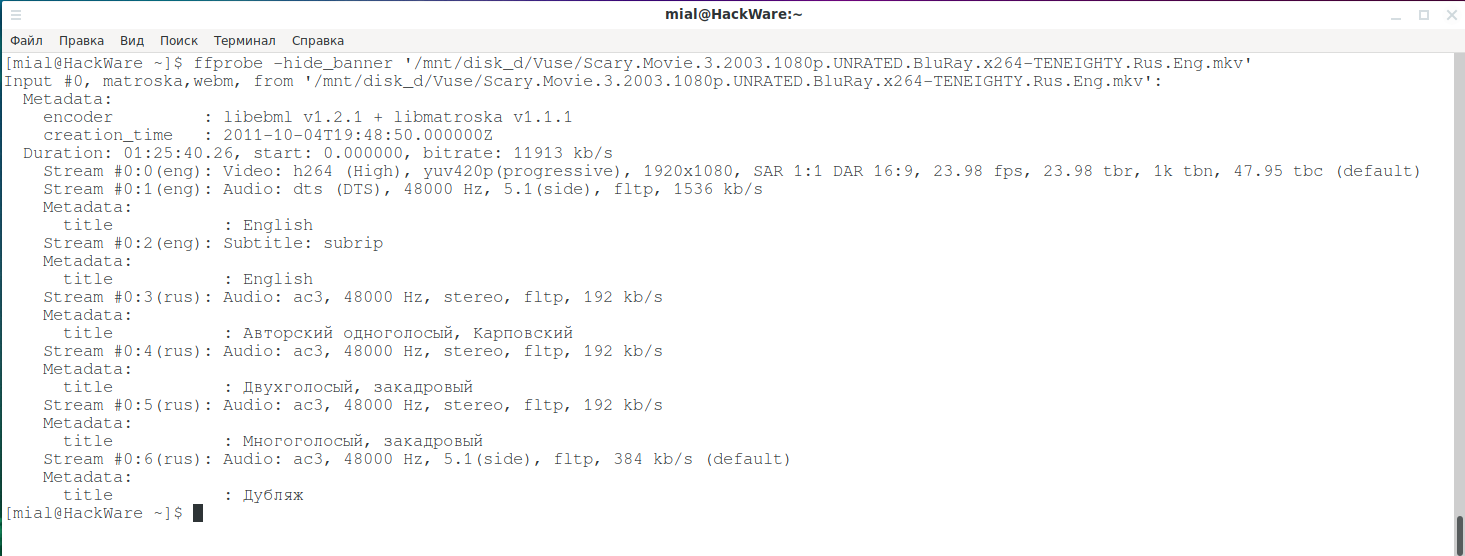
ffprobe
Команда ffprobe содержится в пакете ffmpeg.
Для установки ffmpeg в Debian, Linux Mint, Kali Linux, Ubuntu и их производные выполните:
Для установки ffmpeg в Arch Linux, BlackArch и их производные выполните команду:
Использование ffmpeg чтобы показать информацию о свойствах видео:
ffprobe -hide_banner /ПУТЬ/ДО/ФАЙЛА
Чтобы показать информацию о формате, потоках и прочем:
ffprobe -v error -show_format -show_streams /ПУТЬ/ДО/ФАЙЛА
ExifTool
Программа ExifTool читает и записывает информацию EXIF и другие метаданные, поддерживает множество форматов
Для установки perl-image-exiftool в Debian, Linux Mint, Kali Linux, Ubuntu и их производные выполните:
sudo apt install perl-image-exiftool
Для установки perl-image-exiftool в Arch Linux, BlackArch и их производные выполните команду:
sudo pacman -S perl-image-exiftool
MPlayer
Mplayer — это медиа проигрыватель для Linux.
Для установки mplayer в Debian, Linux Mint, Kali Linux, Ubuntu и их производные выполните:
Для установки mplayer в Arch Linux, BlackArch и их производные выполните команду:
mplayer -vo null -ao null -frames 0 -identify /ПУТЬ/ДО/ФАЙЛА