How to check ‘mdadm’ RAIDs while running?
I’m starting to get a collection of computers at home and to support them I have my «server» linux box running a RAID array. Its currently mdadm RAID-1 , going to RAID-5 once I have more drives (and then RAID-6 I’m hoping for). However I’ve heard various stories about data getting corrupted on one drive and you never noticing due to the other drive being used, up until the point when the first drive fails, and you find your second drive is also screwed (and 3rd, 4th, 5th drive). Obviously backups are important and I’m taking care of that also, however I know I’ve previously seen scripts which claim to help against this problem and allow you to check your RAID while its running. However looking for these scripts again now I’m finding it hard to find anything which seems similar to what I ran before and I feel I’m out of date and not understanding whatever has changed. How would you check a running RAID to make sure all disks are still preforming normally? I monitor SMART on all the drives and also have mdadm set to email me in case of failure but I’d like to know my drives occasionally «check» themselves too.
Sounds like you’re already on the right path, you just need to setup a cron to send you the results of smartctl for your drives.
5 Answers 5
The point of RAID with redundancy is that it will keep going as long as it can, but obviously it will detect errors that put it into a degraded mode, such as a failing disk. You can show the current status of an array with mdadm —detail (abbreviated as mdadm -D ):
# mdadm -D /dev/md0 0 8 5 0 active sync /dev/sda5 1 8 23 1 active sync /dev/sdb7 Furthermore the return status of mdadm -D is nonzero if there is any problem such as a failed component (1 indicates an error that the RAID mode compensates for, and 2 indicates a complete failure).
You can also get a quick summary of all RAID device status by looking at /proc/mdstat . You can get information about a RAID device in /sys/class/block/md*/md/* as well; see Documentation/md.txt in the kernel documentation. Some /sys entries are writable as well; for example you can trigger a full check of md0 with echo check >/sys/class/block/md0/md/sync_action .
In addition to these spot checks, mdadm can notify you as soon as something bad happens. Make sure that you have MAILADDR root in /etc/mdadm.conf (some distributions (e.g. Debian) set this up automatically). Then you will receive an email notification as soon as an error (a degraded array) occurs.
Make sure that you do receive mail send to root on the local machine (some modern distributions omit this, because they consider that all email goes through external providers — but receiving local mail is necessary for any serious system administrator). Test this by sending root a mail: echo hello | mail -s test root@localhost . Usually, a proper email setup requires two things:
- Run an MTA on your local machine. The MTA must be set up at least to allow local mail delivery. All distributions come with suitable MTAs, pick anything (but not nullmailer if you want the email to be delivered locally).
- Redirect mail going to system accounts (at least root ) to an address that you read regularly. This can be your account on the local machine, or an external email address. With most MTAs, the address can be configured in /etc/aliases ; you should have a line like
root: djsmiley2k@mail-provider.example.com Использование smartctl для проверки RAID контроллеров Adaptec под Linux
Команду «smartctl -d ata -a /dev/sdb» можно использовать для проверки жесткого диска и текущего состояния его соединения с системой. Но как с помощью команд smartctl проверить SAS или SCSI диски, спрятанные за RAID контроллером Adaptec в системах под управлением Linux ОС? Для этого необходимо использовать последовательные синтаксисы проверки SAS или SATA. Как правило — это логические диски для каждого массива физических накопителей в операционной системы. Команду /dev/sgX возможно использовать в качестве перехода через контроллеры ввода/вывода, которые обеспечиваюь прямой доступ к каждому физическому диску, подключенному к RAID контроллеру Adaptec.

Распознает ли Linux контроллер Adaptec RAID?
Для проверки Вы можете использовать следующую команду:
# lspci | egrep -i 'raid|adaptec' В результате выполнения команды получите следующее:
81:00.0 RAID bus controller: Adaptec AAC-RAID (rev 09) Загрузка и установка Adaptec Storage Manager для Linux
Необходимо установить Adaptec Storage Manager в соответсвии собранному дисковому массиву.
Проверяем состояния SATA диска
Команда для сканирования накопителя выглядит довольно просто:
В результате у Вас должно получится следующее:
/dev/sda -d scsi # /dev/sda, SCSI device Таким образом, /dev/sda — это одно устройство, которое было определено как SCSI устройство. Выходит, что у нас SCSI собран из 4 дисков, расположенных в /dev/sg . Введите следующую smartclt команду, чтобы проверить диск позади массива /dev/sda:
# smartctl -d sat --all /dev/sgX # smartctl -d sat --all /dev/sg1 Контроллер должен сообщать о состоянии накопителя и уведомлять про ошибки (если такие имеются):
# smartctl -d sat --all /dev/sg1 -H Для SAS диск используют следующий синтаксис:
# smartctl -d scsi --all /dev/sgX # smartctl -d scsi --all /dev/sg1 ### Ask the device to report its SMART health status or pending TapeAlert message ### # smartctl -d scsi --all /dev/sg1 -H В результате получим что то похожее на:
smartctl version 5.38 [x86_64-redhat-linux-gnu] Copyright (C) 2002-8 Bruce Allen Home page is http://smartmontools.sourceforge.net/ Device: SEAGATE ST3146855SS Version: 0002 Serial number: xxxxxxxxxxxxxxx Device type: disk Transport protocol: SAS Local Time is: Wed Jul 7 04:34:30 2010 CDT Device supports SMART and is Enabled Temperature Warning Enabled SMART Health Status: OK Current Drive Temperature: 24 C Drive Trip Temperature: 68 C Elements in grown defect list: 0 Vendor (Seagate) cache information Blocks sent to initiator = 1857385803 Blocks received from initiator = 1967221471 Blocks read from cache and sent to initiator = 804439119 Number of read and write commands whose size segment size = 45998 Vendor (Seagate/Hitachi) factory information number of hours powered up = 13224.42 number of minutes until next internal SMART test = 42 Error counter log: Errors Corrected by Total Correction Gigabytes Total ECC rereads/ errors algorithm processed uncorrected fast | delayed rewrites corrected invocations [10^9 bytes] errors read: 58984049 1 0 58984050 58984050 3151.730 0 write: 0 0 0 0 0 9921230881.600 0 verify: 1308 0 0 1308 1308 0.000 0 Non-medium error count: 0 No self-tests have been logged Long (extended) Self Test duration: 1367 seconds [22.8 minutes] А вот команда для проверки следующего диска с интерфейсом SAS, названного /dev/sg2:
# smartctl -d scsi --all /dev/sg2 -H В /dev/sg1 заменяется номер диска. Например, если это RAID10 из 4-х дисков, то будет выглядеть так:
/dev/sg0 - RAID 10 контроллер. /dev/sg1 - Первый диск в массиве RAID 10. /dev/sg2 - Второй диск в массиве RAID 10. /dev/sg3 - Третий диск в массиве RAID 10. /dev/sg4 - Четвертый диск в массиве RAID 10. Проверить жесткий диск можно с помощью следующих команд:
# smartctl -t short -d scsi /dev/sg2 # smartctl -t long -d scsi /dev/sg2 -t short : Запуск быстрого теста. -t long : Запуск полного теста. -d scsi : Указывает scsi, как тип устройства. --all : Отображает всю SMART информацию для устройства. Использование Adaptec Storage Manager
Другие простые команды для проверки базового состояния выглядят следующим образом:
# /usr/StorMan/arcconf getconfig 1 | more # /usr/StorMan/arcconf getconfig 1 | grep State # /usr/StorMan/arcconf getconfig 1 | grep -B 3 State Device #0 Device is a Hard drive State : Online -- S.M.A.R.T. : No Device #1 Device is a Hard drive State : Online -- S.M.A.R.T. : No Device #2 Device is a Hard drive State : Online -- S.M.A.R.T. : No Device #3 Device is a Hard drive State : Online Обратите внимание на то, что более новая версия arcconf расположена в архиве /usr/Adaptec_Event_Monitor. Таким образом, весь путь должен выглядеть так:
# /usr/Adaptec_Event_Monitor/arcconf getconfig [AD | LD [LD#] | PD | MC | [AL]] [nologs] Prints controller configuration information. Option AD : Информация исключительно о контроллере Adapter LD : Информация исключительно о логических устройствах LD# : Дополнительная информация об указанном логическом устройстве PD : Информация исключительно о физическом устройстве MC : Информация исключительно о Maxcache 3.0 AL : Вся информация Вы можете самостоятельно проверить состояние массива Adaptec RAID на Linux с помощью ввода простой команды:
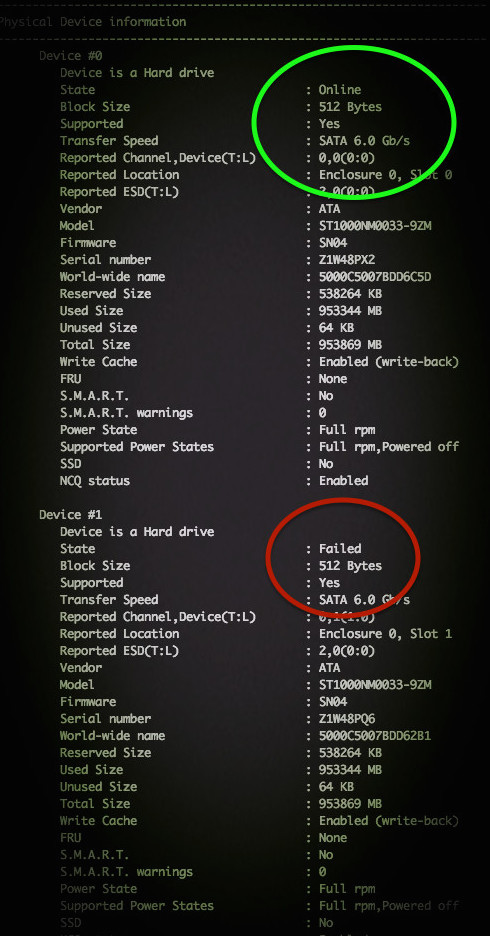
# /usr/Adaptec_Event_Monitor/arcconf getconfig 1
# /usr/StorMan/arcconf getconfig 1 Примерный результат на фото:
По традиции, немного рекламы в подвале, где она никому не помешает. Напоминаем, что в связи с тем, что общая емкость сети нидерландского дата-центра, в котором мы предоставляем услуги, достигла значения 5 Тбит / с (58 точек присутствия, включения в 36 точек обмена, более, чем в 20 странах и 4213 пиринговых включений), мы предлагаем выделенные серверы в аренду по невероятно низким ценам, только неделю!.