- Linux File Command: How to Determine File Type in Linux
- File Command Syntax
- File Command Options
- File Command Examples
- Test Multiple Files
- Test All Files in a Directory
- Test Files in a Range
- Test Files from a List
- Test Special Files
- Test Compressed Files
- Test Parsed Version of File
- Display Brief Output
- Add Separators to Output
- Remove File Name Padding from Output
- Команда file в Linux
- Синтаксис и опции file
- Примеры использования file
- Выводы
Linux File Command: How to Determine File Type in Linux
The Linux file command helps determine the type of a file and its data. The command doesn’t take the file extension into account, and instead runs a series of tests to discover the type of file data.
In this tutorial, we will show you how the file command works and how to use it.
File Command Syntax
The file command uses the following basic syntax:
In the syntax above, file name represents the name of the file you want to test. The file command performs three sets of tests trying to determine the file type, in this order:
- Filesystem tests perform a stat(2) system call and check the result against the system header file. This way, the file command determines if the file is a common type for your system (such as a text file, image, directory, etc.).
- Magic tests use a short string of numbers stored near the beginning of the file («magic number») to test if the file is a binary executable and, if so, determine its type. The information needed to perform these tests is stored in /etc/magic or /usr/share/misc/magic from a compiled magic file.
- Language tests use a special tag to determine which programming language a binary executable file is written in.
The command output provides a short description of the file and data type. For instance, using the file command to test a text file:

File Command Options
The file command uses the following options:
| Option | Description |
|---|---|
| —apple | Changes the command output to the one used by older versions of MacOS. |
| -b, —brief | Changes command output to brief mode. |
| -C, —compile | Creates an output file that contains a pre-parsed version of the magic file or directory. |
| -c, —checking-printout | Checks the printout for the parsed version of the magic file. |
| -d | Prints internal debugging information in the standard error format. |
| -E | On filesystem error, issues an error message and exits. |
| -e, —exclude | Excludes a test from the list of tests performed on a file. |
| —exclude-quiet | Excludes tests that the file command doesn’t know about. |
| —extension | Prints a list of valid extensions for the file type. |
| -F, —separator | Uses the provided string as a separator between the file name and file type. |
| -f, —files-from | Uses a provided text file as a list of files to test. The list must contain only one file name per line. |
| -h, —no-deference | Disables following symbolic links. |
| -i, —mime | Changes the command output to a MIME-type string. |
| —mime-type, —mime-encoding | Changes the command output to a MIME-type string and only displays the specified element (type or encoding). |
| -k, —keep-going | Keeps the test going after the first results match. |
| -l, —list | Shows a list of matching patterns in descending order of strength. |
| -L, —deference | Enables following symbolic links. |
| -m, —magic-file | Uses an alternative magic file provided by the user. |
| -N, —no-pad | Doesn’t pad the file names to align with the output. |
| -n, —no-buffer | Flushes the output after checking each file. |
| -p, —preserve-date | Attempts to preserve the last time the file was accessed to make it look like the file command didn’t test it. |
| -P, —parameter | Sets various parameters, such as max bytes or recursion, count, and length limit. |
| -r, —raw | Disables translating unprintable characters. |
| -s, —special-files | Enables reading special files. |
| -S, —no-sandbox | Disables sandboxing on systems that support it. |
| -v, —version | Displays the version of the file command. |
| -z, —uncompress | Checks compressed files. |
| -Z, —uncompress-noreport | Checks compressed files and only displays file type without the compression. |
| -0, —print0 | Displays a null character after the end of the file name. |
| —help | Displays the help message. |
File Command Examples
Below are examples of common use cases for the file command.
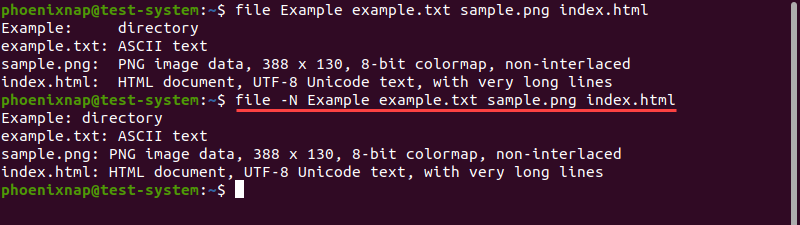
Test Multiple Files
To test multiple files simultaneously, append the file names to the end of the file command:
file [file name 1] [file name 2] … [file name n]For instance, testing a directory, a text file, an image, and a webpage:
file Example example.txt sample.png index.html
Test All Files in a Directory
Add a wildcard character ( * ) to the file command to test all the files and directories in the current working directory:
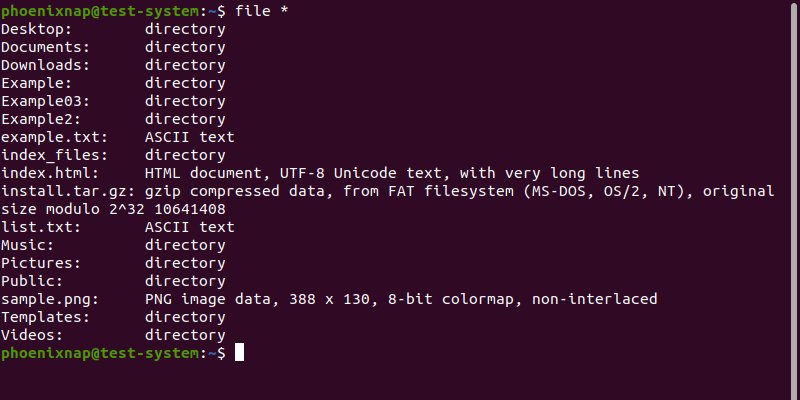
Add the path to a directory to the wildcard character to test the contents of that directory:
For instance, to test the contents of the Example directory, use:

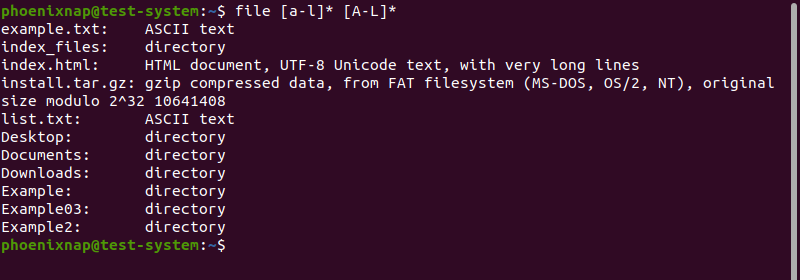
Test Files in a Range
The file command lets you test a subset of files in a directory using Regex-style ranges. Select a range by placing the values in brackets. For instance, testing files and directories with names in the a-l range:
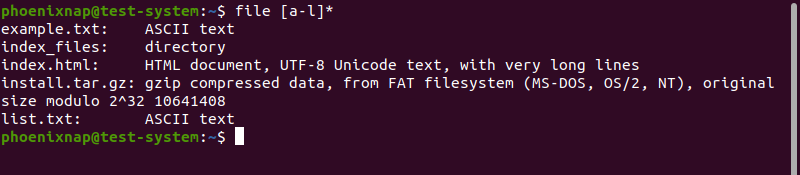
Since Regex-style ranges are case-sensitive, the output in the example above only shows file types for files starting with lowercase a-l. Adding another range lets you include uppercase characters as well:
Test Files from a List
The file command lets you use a text file as a list of files to test. The text file must only contain one file name per line.

Use the -f option and add the path to the list file to file command:
Test Special Files
The file command is not always able to read special files, such as system files:

In the example above, the file command output shows that /dev/sda5 is a block special file but doesn’t offer additional details. Using the -s option lets you fully test special files:

Note: If you are not logged in as the root user, attempting to test a special file results in a no read permission error message. Add sudo to the file command to prevent this.
Test Compressed Files
Use the -z option to fully test compressed files, trying to detect their content:

Test Parsed Version of File
Using the -c option displays the check printout for the parsed version of the file:

This option is usually used with the -m option to debug and install a new magic file.
Display Brief Output
Using the -b option displays the brief version of the output. This version of the output only shows file types and omits file names.
file -b Example example.txt sample.png index.html
Add Separators to Output
Using the -F option lets you define a character that acts as a separator between the file name and file type sections of the output. For instance, add a plus sign ( + ) as a separator with:
file -F + Example example.txt sample.png index.html
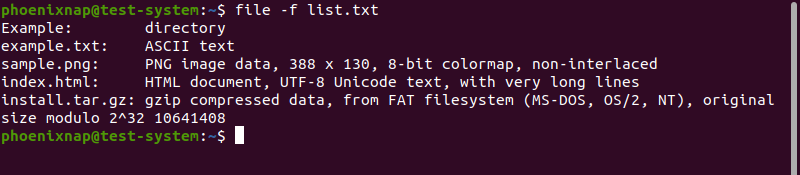
Remove File Name Padding from Output
Use the -N option to remove the padding between the file name and file type sections of the output:
file -N Example example.txt sample.png index.htmlThe resulting output is no longer vertically aligned:
After reading this tutorial, you should be able to use the Linux file command to find out the types of files on your system.
If you’re interested in learning more about Linux commands, have a look at our Linux commands cheat sheet.
Команда file в Linux
Команда file — одна из самых полезных, поскольку позволяет узнать тип данных, которые на самом деле содержатся внутри документа. Если у вас есть какой-либо файл, взятый из ненадёжного источника, не поленитесь проверить его с помощью этой команды, прежде чем нажать кнопку Открыть. Возможно, такая предосторожность покажется лишней, но она оградит вас от «встречи» с нежелательным контентом.
В большинстве дистрибутивов Linux утилита file (работу которой и запускает одноимённая команда) входит в стандартный набор программного обеспечения.
Синтаксис и опции file
Синтаксис команды file достаточно простой. Записывать её в эмуляторе терминала или консоли следует так:
file опции название_документа
Что же касается опций, то их у этой команды несколько десятков. Мы рассмотрим лишь основные:
- -b, —brief — запрет на демонстрацию имен и адресов файлов в выводе команды;
- -i, —mime — определение MIME-типа документа по его заголовку;
- —mime-type, —mime-encoding — определение конкретного элемента MIME;
- -f, —files-from — анализ документов, адреса которых указаны в простом текстовом файле;
- -l, —list — список паттернов и их длина;
- -s, —special-files — предотвращение проблем, которые могут возникнуть при чтении утилитой специальных файлов;
- -P — анализ определенной части файла, которая обозначается различными параметрами;
- -r, —raw — отказ от вывода /ooo вместо непечатных символов;
- -z — анализ содержимого сжатых документов.
Для того, чтобы ознакомиться с полным списком опций, выполните в терминале команду:
Примеры использования file
Если вам нужно всего лишь посмотреть тип файла, использовать опции не обязательно. Достаточно прописать имя команды, а также название файла и путь к нему, при условии, что он находится не в корневой папке:
Случается, что нужно проверить не один, а несколько файлов. Чтобы не выполнять команду много раз подряд, перечисляйте названия всех файлов через пробел:
file /home/main-user/losst/test-file1.zip /home/main-user/losst/test-file2.tiff

Как видно на примере, картинки с расширениями gif и tiff в действительности оказались текстовыми документами, а архив с расширением zip — PDF документом. Кстати, команда file даёт возможность не только проверить, является ли архив архивом, но и заглянуть внутрь, чтобы узнать, что в нём содержится. Для этой цели используется опция -z:
file -z /home/main-user/losst/testarchive.zip

Как вы успели заметить, команда, возвращая ответ, постоянно выводит названия файлов, что в некоторых случаях бывает удобно, но зачастую только усложняет чтение результатов. Отключить эту функцию легко — воспользуйтесь опцией -b:
file -b /home/main-user/losst/test-file.gif /home/main-user/losst/test-file1.zip /home/main-user/losst/test-file2.tiff

Иногда нужно узнать не просто тип файла, а его MIME-тип. В таком случае на помощь приходит опция -i:
file -i -b /home/main-user/losst/fileA.sbin /home/main-user/losst/fileG.aspx /home/main-user/losst/fileH.lua

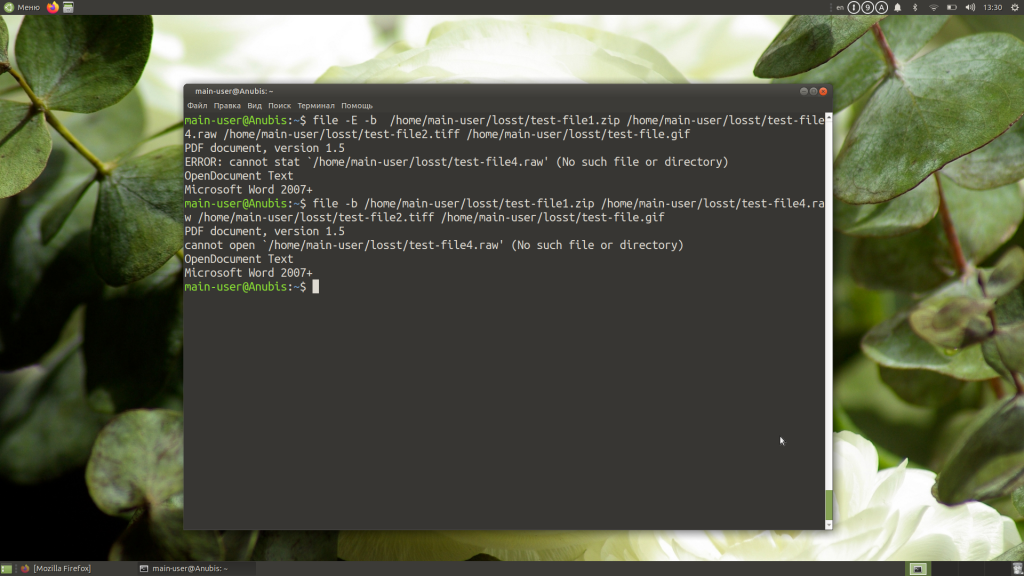
Нередко по каким-либо причинам утилита не может найти указанный файл: например, вы ошиблись буквой в его названии или неверно указали папку, в которой он находится. Тогда вывод информации об этом файле предваряет фраза cannot open. Впрочем, есть возможность видоизменить результат, добавив в него сообщение об ошибке. Для этого используйте опцию -E.
Сравните вывод команды с опцией -E и без неё:
file -E -b /home/main-user/losst/test-file1.zip /home/main-user/losst/test-file4.raw /home/main-user/losst/test-file.gif
file -b /home/main-user/losst/test-file1.zip /home/main-user/losst/test-file4.raw /home/main-user/losst/test-file.gif
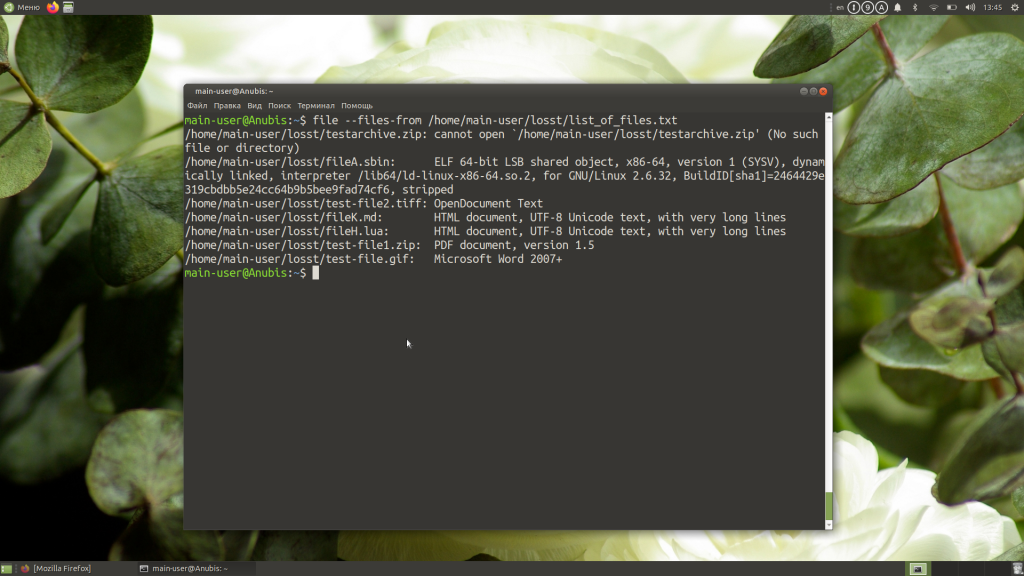
Еще один способ работы с утилитой file — запись названий и адресов документов в простой текстовый файл. Применяя этот способ на практике, не забывайте добавлять к команде опцию —files-from, после которой указывайте имя файла, содержащего список документов, и путь к нему.
file —files-from /home/main-user/losst/list_of_files.txt
Выводы
Команда file помогает избежать ситуаций, когда вам приходится открывать подозрительные файлы, не будучи уверенными в их содержимом. Также вы можете использовать её для проверки содержимого нескольких архивов, если есть необходимость найти потерявшийся в большом массиве файлов документ, но нет желания просматривать все архивы вручную.
Обнаружили ошибку в тексте? Сообщите мне об этом. Выделите текст с ошибкой и нажмите Ctrl+Enter.