- Установка и настройка zabbix агента в Ubuntu Linux
- Шаг 1: Включите репозиторий Zabbix на удаленном хосте
- Шаг 2: Установка Zabbix агента
- Шаг 3: Настройка Zabbix агента
- Шаг 4: Настройка брандмауэра
- Шаг 5: Добавление Хоста на Zabbix — Server Ubuntu Linux
- Заключение
- 1. Monitor Linux with Zabbix agent
- Install Zabbix agent
- Configure Zabbix for monitoring
- Passive checks
- Zabbix frontend
- Zabbix agent
- Active checks
- Zabbix frontend
- Zabbix agent
- View collected metrics
- Set up problem alerts
- Test your configuration
Установка и настройка zabbix агента в Ubuntu Linux
Zabbix agent устанавливается на удаленном хосте для мониторинга жесткого диска, процессора памяти и т. д. Агент собирает данные и отправляет их обратно на Zabbix — сервер.
Агенты Zabbix могут использовать пассивные или активные проверки для передачи информации. При пассивной проверке Zabbix-сервер (poller) запрашивает у агента определенную информацию, и агент отправляет обратно значение. В активной проверке агент обрабатывает все данные и отправляет их на Zabbix-сервер. Однако агент периодически подключает сервер для сбора метрики, которую необходимо отслеживать.
Эту инструкцию мы начнем с установки Zabbix агента на удаленный хост Ubuntu 20.04, а затем добавим Хост на панель мониторинга Zabbix server.
Рекомендую. к прочтению:
Шаг 1: Включите репозиторий Zabbix на удаленном хосте
Как всегда начните с обновления списков пакетов на удаленном хосте.
Затем загрузите Zabbix файл из репозитория Центра загрузки Zabbix. Делается это следующим образом.
Затем включите его с помощью команды dpkg следующим образом:
$ sudo dpkg -i zabbix-release_5.0-1+focal_all.deb
Далее обновите индекс пакетов Ubuntu, чтобы убедиться, что репозиторий синхронизирован
Шаг 2: Установка Zabbix агента
Как только репозиторий будет создан, установите Zabbix агент в Ubuntu Linux.
После завершения установки проверьте, работает ли демон Zabbix-agent следующим образом:
Zabbix — agent прослушивает порт 10050. Возможно, вы захотите проверить это. Сделать проверку можно с помощью команды netstat:
На изображении выше видно, что Служба Zabbix agent запущена и работает.
Шаг 3: Настройка Zabbix агента
Мы установили агент Zabbix и работает он как ожидалось. Но этого недостаточно. Нам нужно внести несколько изменений в конфигурационный файл. Сделайте изменения в файле /etc/zabbix/zabbix_agentd.conf, чтобы агент мог взаимодействовать с сервером Zabbix..
$ sudo vim /etc/zabbix/zabbix_agentd.conf
Здесь мы собираемся включить пассивные проверки агента. Сначала найдите переменные “server” и “Hostname” в файле zabbix_agentd.conf.
Например, мой IP адрес Zabbix-сервера — 10.128.0.16, а имя хоста (client system).
Сохраните изменения и выйдите из файла. Затем перезапустите службу Zabbix agent для внесения изменений.
$ sudo systemctl restart zabbix-agent
Примечание: Если вы настраиваете активную проверку, то ищите переменную “ServerActive” и используйте порт 10051.
Шаг 4: Настройка брандмауэра
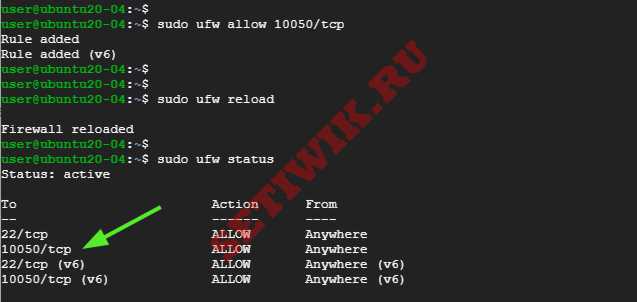
Последним шагом в настройке хоста является разрешение порта, который Zabbix агент слушает через брандмауэр. Если у вас включен брандмауэр UFW, выполните следующие команды:
Затем перезагрузите брандмауэр
А так же убедитесь, что порт был открыт и разрешен на брандмауэре.
Идеально! Теперь zabbix — агент должен работать.
Шаг 5: Добавление Хоста на Zabbix — Server Ubuntu Linux
По умолчанию Zabbix отслеживает только тот сервер, на котором он установлен. В этом разделе мы добавим Zabbix-Host на Zabbix-Server через браузер.
Итак, войдите в свой экземпляр Zabbix-сервера используя браузер.
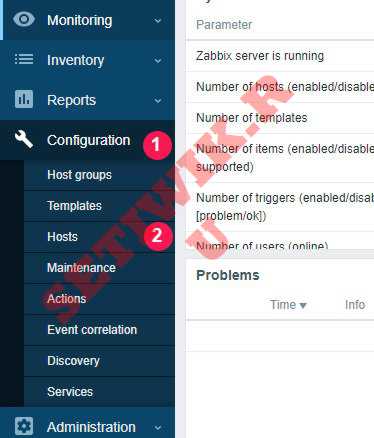
В левой навигационной панели выберите пункт Configuration > > Hosts
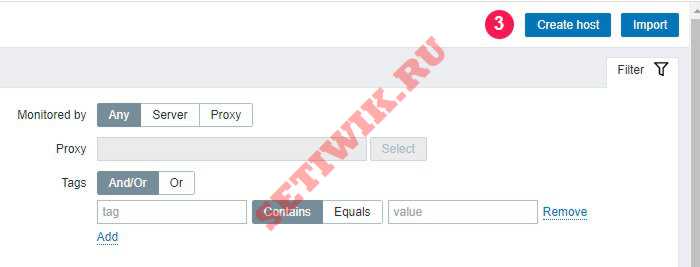
Перейдите в правый верхний угол и нажмите кнопку «Создать хост«. (Create host)
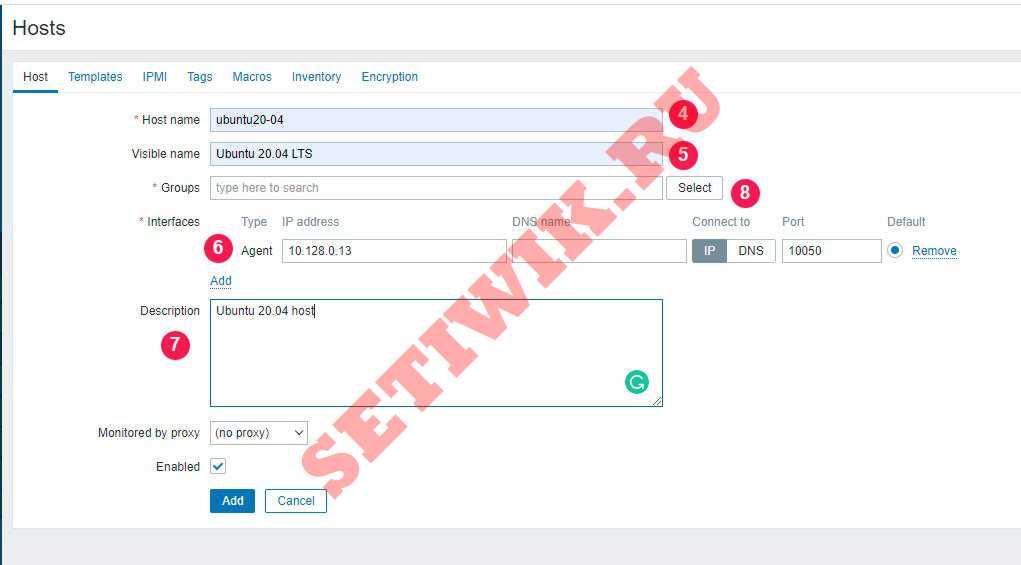
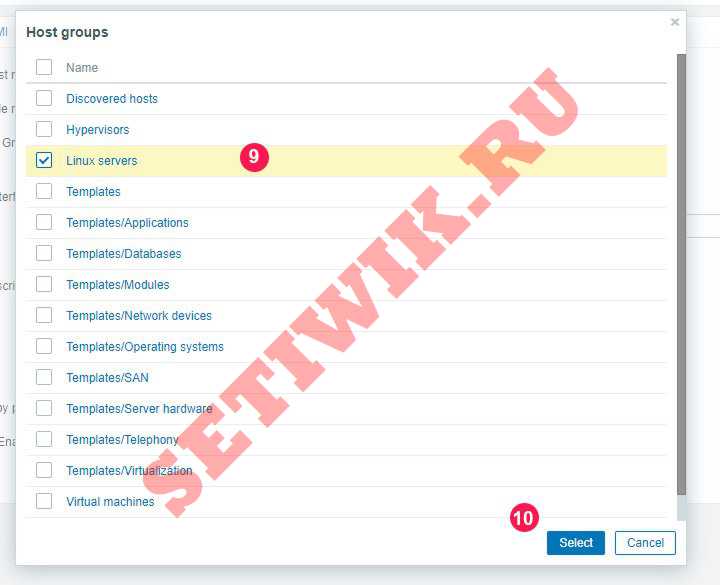
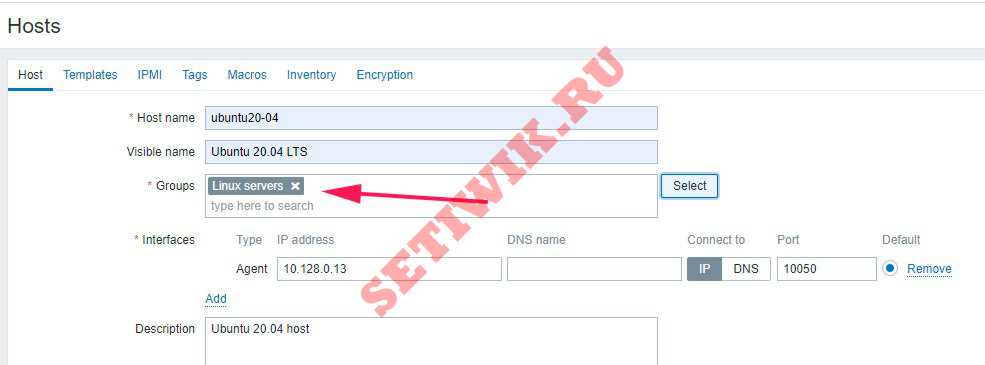
В появившемся окне заполните данные удаленного хоста, такие как имя хоста. видимое имя, IP-адрес, краткое описание и нажмите на кнопку «Выбрать» (Select) рядом с текстовым полем «Группы«.
В появившемся списке выберите пункт «Серверы Linux‘ и нажмите кнопку «Выбрать«.
Это приведет вас обратно, и вы сможете просмотреть только что добавленную группу, как показано ниже.
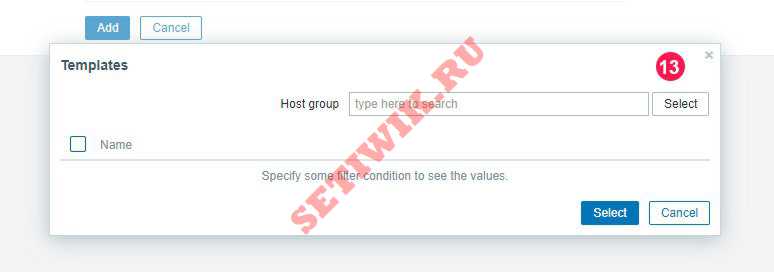
Затем перейдите на вкладку «шаблоны» (Templates) и нажмите кнопку «Выбрать» рядом с текстовым полем «Связать новые шаблоны» (Link new Templates).
Нажмите на кнопку «Выбрать«(Select) рядом с текстовым полем «Группа хостов«, как показано на рисунке.
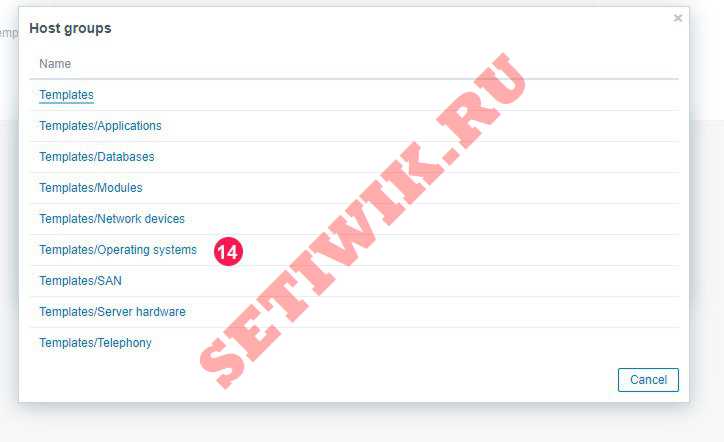
Нажмите на опцию «Шаблоны/операционные системы» (Templates/Operating systems), как показано на рисунке.
Затем выберите опцию «Template OS Linux by Zabbix agent’ и нажмите кнопку «Выбрать» (Select).
Затем нажмите на кнопку «Добавить» (Add).
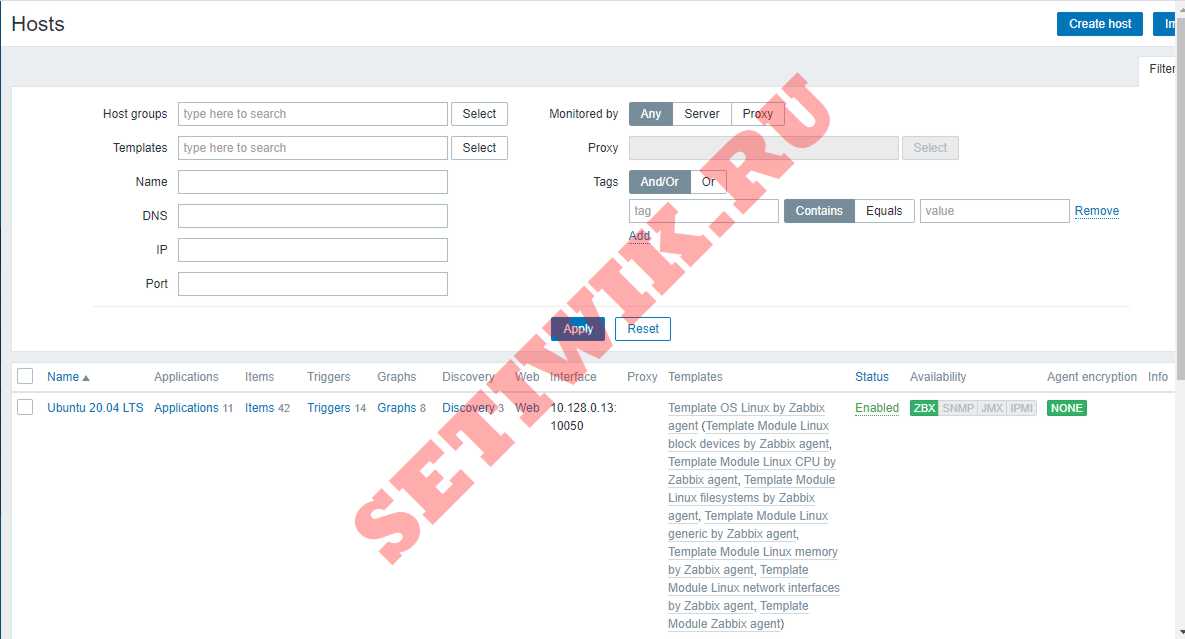
Теперь ваш хост будет указан на панели мониторинга, как показано на рисунке ниже.
Заключение
В этой инструкции мы подробно показали, как установить агент Zabbix в системе Ubuntu 20.04 Linux. А так же как настроить его для связи с сервером Zabbix. Это поможет вам активно отслеживать целевые локальные ресурсы и приложения.
1. Monitor Linux with Zabbix agent
This page walks you through the steps required to start basic monitoring of Linux machines with Zabbix. The steps described in this tutorial can be applied to any Linux-based operating system.
Who this guide is for
This guide is designed for new Zabbix users and contains the minimum set of steps required to enable basic monitoring of your Linux machine. If you are looking for deep customization options or require more advanced configuration, see Configuration section of Zabbix manual.
Prerequisites
Before proceeding with this installation guide, you must download and install Zabbix server and Zabbix frontend according to instructions for your OS.
Install Zabbix agent
Zabbix agent is the process responsible for gathering data.
Check your Zabbix server version:
Install Zabbix agent of the same version (recommended) on the Linux machine that you want to monitor. Based on your monitoring needs, it may be the same machine, where Zabbix server is installed, or a completely different machine.
Choose the most suitable installation method:
- Run as a Docker container — see the list of available images in Zabbix Docker repository.
- Install from Zabbix packages (available for Alma Linux, CentOS, Debian, Oracle Linux, Raspberry Pi OS, RHEL, Rocky Linux, SUSE Linux Enterprise Server, Ubuntu).
- Compile from sources.
Configure Zabbix for monitoring
Zabbix agent can collect metrics in active or passive mode (simultaneously).
A passive check is a simple data request. Zabbix server or proxy asks for some data (for example, CPU load) and Zabbix agent sends back the result to the server. Active checks require more complex processing. The agent must first retrieve from the server(s) a list of items for independent processing and then bulk send the data back. See Passive and active agent checks for more info.
Monitoring templates provided by Zabbix usually offer two alternatives — a template for Zabbix agent and a template for Zabbix agent (active). With the first option, the agent will collect metrics in passive mode. Such templates will deliver identical monitoring results, but using different communication protocols.
Further Zabbix configuration depends on whether you select a template for active or passive Zabbix agent checks.
Passive checks
Zabbix frontend
1. Log into Zabbix frontend.
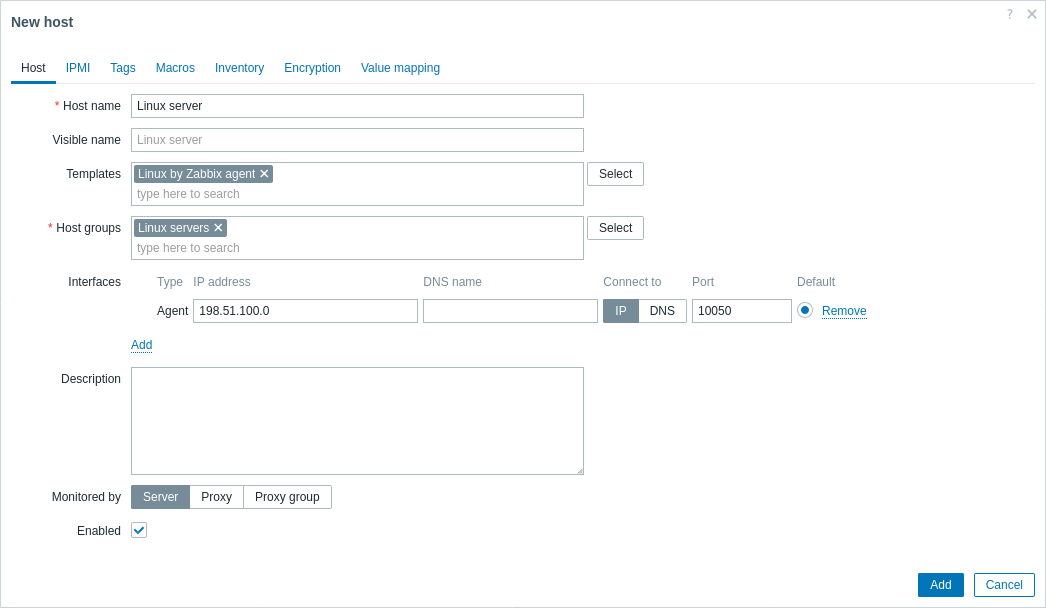
2. Create a host in Zabbix web interface.
This host will represent your Linux machine.
3. In the Interfaces parameter, add Agent interface and specify the IP address or DNS name of the Linux machine where the agent is installed.
4. In the Templates parameter, type or select Linux by Zabbix agent.
Zabbix agent
Open Zabbix agent configuration file (by default, the path is /usr/local/etc/zabbix_agentd.conf):
sudo vi /usr/local/etc/zabbix_agentd.confAdd the IP address or DNS name of your Zabbix server to the Server parameter.
Active checks
Zabbix frontend
1. Log in to Zabbix frontend.
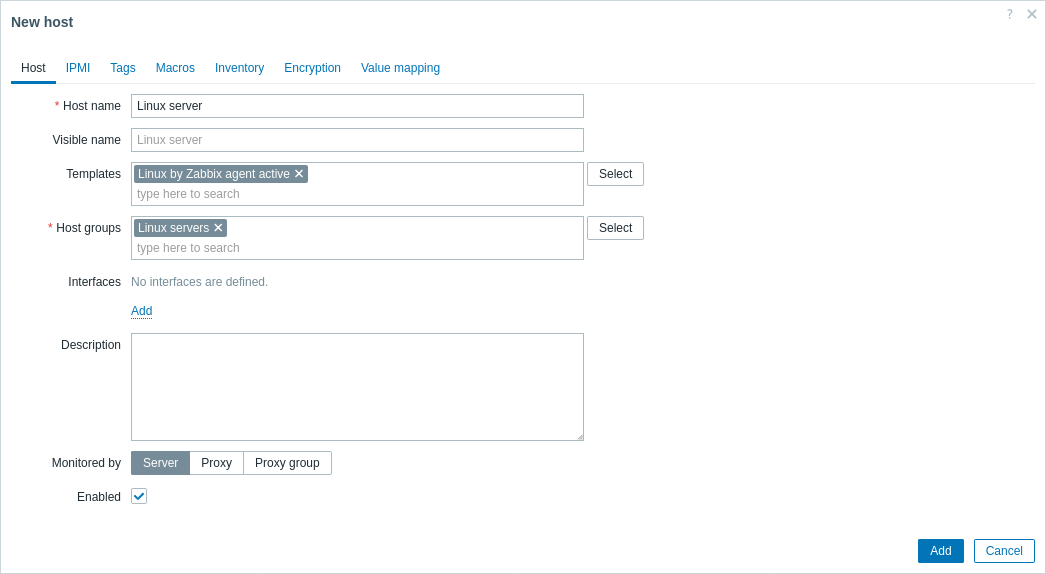
2. Create a host in Zabbix web interface.
This host will represent your Linux machine.
3. In the Templates parameter, type or select Linux by Zabbix agent active.
Zabbix agent
Open Zabbix agent configuration file (by default, the path is /usr/local/etc/zabbix_agentd.conf):
sudo vi /usr/local/etc/zabbix_agentd.conf- The name of the host you created in Zabbix web interface to the Hostname parameter.
- The IP address or DNS name of your Zabbix server to the ServerActive parameter.
ServerActive= 192.0.2.22 Hostname=Linux serverView collected metrics
Congratulations! At this point, Zabbix is already monitoring your Linux machine.
To view collected metrics, open the Monitoring->Hosts menu section and click on the Latest data next to the host.
This action will open a list of all the latest metrics collected from Linux server host.
Set up problem alerts
Zabbix can notify you about a problem with your infrastructure using a variety of methods. This guide provides configuration steps for sending email alerts.
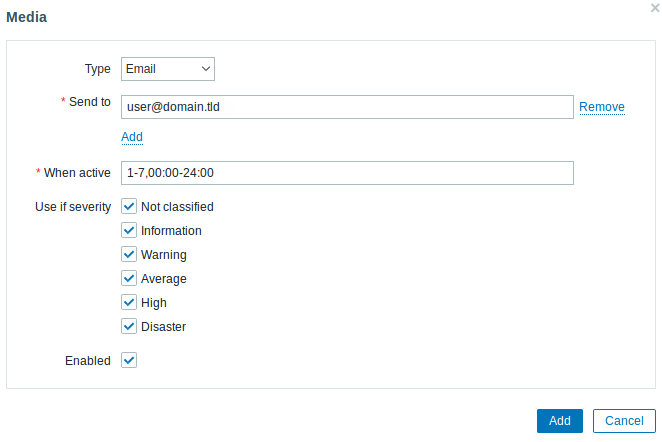
1. Go to the User settings -> Profile, switch to the tab Media and add your email.
Next time, when Zabbix detects a problem you should receive an alert via email.
Test your configuration
On Linux, you can simulate high CPU load and as a result receive a problem alert by running:
You may need to run several md5sum processes for CPU load to exceed the threshold.
When Zabbix detects the problem, it will appear in the Monitoring->Problems section.
If the alerts are configured, you will also receive the problem notification.
- Creating an item — how to start monitoring additional metrics (custom monitoring without templates).
- Zabbix agent items, Zabbix agent items for Windows — full list of metrics you can monitor using Zabbix agent on Windows.
- Problem escalations — how to create multi-step alert scenarios (e.g., first send message to the system administrator, then, if a problem is not resolved in 45 minutes, send message to the data center manager).


