How to set up guest WiFi
Every guest is a prospect. Businesses have realised that a uniform and honest customer experience goes a long way. And in some cases, providing a superior experience can be as simple as giving Internet access to a guest by using guest WiFi. The concept of «free WiFi» has spread rapidly, especially in the hospitality sector. It is now being adopted by other small and medium-sized businesses as well. Guest WiFi is a way of improving customer experience without shelling out a fortune.
Why guest WiFi?
Guest WiFi is a dedicated access point to your router meant for visitors who do not have company credentials. It allows your guests limited access to the Internet, along with some other network-connected peripherals that you want them to access. The free WiFi that you use at the local cafe is a simple example of guest WiFi. Here’s a walk-through on how to set up guest WiFi for your business.
How to set up guest WiFi
- Set up your connection.Pick a reliable Internet service provider (ISP). You should typically go with the preferred ISP in your area. More users compel the ISPs to give better connectivity and quicker customer service.
Compare different service plans for high speed and high bandwidth against the prices and pick the one that best suits your needs.
You will also need the right wireless access point or router for optimum speed. Make sure that your equipment is compatible with the ISP and proceed to the WiFi setup as directed by the ISP. - Set up your guest network. The need for a guest network arises when you can’t let visitors access your private network due to security reasons. You do not wish to give them access to specific files or expose yourself to malware that may be infecting the guest device.
In order to set up the guest network, you can activate it from the router’s configuration page and provide a separate name and login credentials for the network.
Turn off the SSID (service set identifier) for the business’s private network so that only the guest network is visible to the visitors. It will help minimise confusion and reduce malicious attempts to log in to your primary network. You can even disable broadcasting the SSID for the guest WiFi automatically. With this setting, your guests would need to configure their connections manually.
Next, use WPA/WPA2 (WiFi Protected Access) encryption and choose a secure guest WiFi password for the network.
The guest WiFi password can be something easy to remember and pass around, as opposed to the password for your internal network, where security is of more significant concern. - Set up the » captive portal». A captive portal: the page your guests use to log in and access the guest WiFi. With proper design, it can inform visitors of the terms of use and acquaint them with your services or provide any message you wish to highlight. Many newer versions of wireless access points also allow you to leverage social login. Guests can simply log in using their Facebook or Gmail credentials in the portal for a seamless guest WiFi experience.
You can also use this portal to limit access to specific websites. You may mention these websites on the captive portal along with the terms of use. Access control is essential to avoid any malicious activity.
Another practical application of this feature is to block video-streaming services, preventing your guests from occupying too much bandwidth. This step is necessary to ensure that speeds remain steady across the network. That’s all there is to the guest WiFi setup.
How to leverage guest WiFi
Guest WiFi offers a unique way to market your products and services to customers when they visit your business. Here are some of the ways you can utilise guest WiFi to offer them more than just Internet access:
- Give out promo codes from the captive portal. If you’re already offering discounts through discount vouchers, you can display these voucher codes on the captive portal. This way, you boost your sales and create a possibility for future engagement, even before the actual meeting.
- Remind them to rate your premises. Referrals are a powerful way of getting new business. About 64 per cent of consumers say they check reviews on Google before visiting a business, and 93 per cent of clients are likely to make repeat purchases based on customer service. To bank on this trend, allow your visitors to rate you when they are comfortably lounging in your waiting area and using your guest WiFi.
- Give them access to some company literature. Your service portfolio and product catalogue serve well as reading material for people who are interested in your business. Providing this material helps you build rapport with guests and provides you with a context for the conversation.
- Redirect to your website home page upon login. In the modern business world, your website is at the centre of your existence. It is more likely for your brand message to resonate with your prospects when they view it at your premises, straight before a discussion. You can encourage visitors to interact with your website and learn more about your business by taking them to your website home page once they log in to your network.
- Give access to devices such as the printer or a smart TV. When someone is at your business to make a pitch, you can give them access to basic amenities through the WiFi itself. It prevents the hassle of connecting and managing new devices. Providing easy access to a printer or a smart TV is particularly helpful for prospective collaborators – partners, service providers or consultants.
- Get feedback and reviews. Aside from public ratings, internal feedback and review systems were used by businesses long before it was a trend. With guest WiFi, you’ll get a chance to ask more specific questions and get a better understanding of your client base.
A wireless network is a critical component of small and medium-sized businesses today. With the technology entering its sixth-generation, WiFi is only going to get better, offering an improved connected experience. Leveraging this robust network through guest WiFi is a unique way to reflect your empathy towards your guests. It also puts forth a proactive image; the mark of a winning team.
How to Configure Guest Network on Dual Band Wireless Routers
Updated 06-28-2022 09:47:24 AM 271630
TL-WDR3500 , TL-WDR3600 , Archer C5( V1.20 ) , TL-WDR4900 , Archer C50( V1 ) , Archer C7( V1 V2 V3 ) , TL-WDR4300 , Archer C20( V1 )
Guest Network Access provides secure Wi-Fi access for guests to share your home or office network. When you have visitors in your house, apartment, or workplace, you can enable the guest network for them. You can set different access options for Guest Network users, which is very effective to ensure the security and privacy of your main network.
Step 1: Please login the web management page with http://tplinkwifi.net . (About How to log in, refer to: here ).
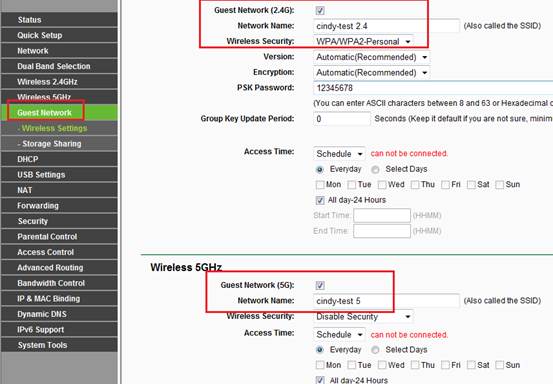
Step 3: For dual band routers,you can choose to enable either or both bands’ guest network.Check “Guest Network(2.4G)”and/or “Guest Network(5G)”to enable this function, then you can set the Guest Network’s SSID and Security. There are only two security types available, Disable Wireless Security & WPA/WPA2-Personnal. It is recommended to select WPA/WPA2-Personnal as the security type. Then please type in a Wireless Password as you like. Please click Save to make the settings take effect.
1. Time Out :Input the period that Guest clients can access the internet.The connection will drop automatically when the time arrives the configured value.Clients can reconnect and gain another Timeout period as they wish.
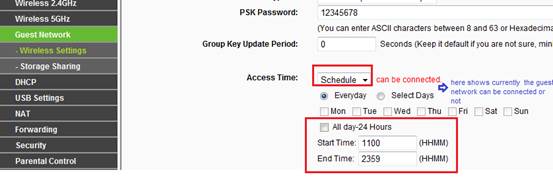
2. Schedule: Configure specific schedule for guest clients to be able to access the internet.
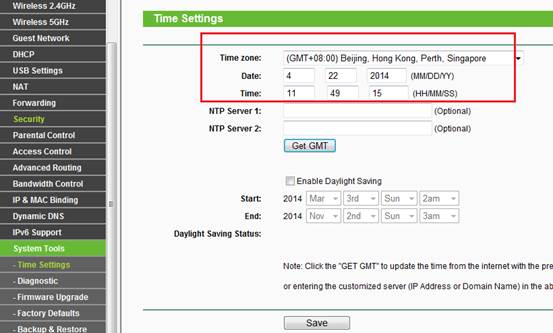
Note: Please make sure the Time Settings is correct to make sure the Schedule will take effect
If you want to allow the clients in the guest network to access the clients in your Local Network, please tick it. If not, please keep it disabled. If the router is configured as AP, you must tick it, otherwise there is no internet access of guest network.
With this feature, you can limit the Bandwidth of the guest network.
Get to know more details of each function and configuration please go to Download Center to download the manual of your product.
Is this faq useful?
Your feedback helps improve this site.
What’s your concern with this article?
- Dissatisfied with product
- Too Complicated
- Confusing Title
- Does not apply to me
- Too Vague
- Other
We’d love to get your feedback, please let us know how we can improve this content.
We appreciate your feedback.
Click here to contact TP-Link technical support.
How to create a network for guests on the Wi-Fi Routers (new logo)
Updated 06-27-2022 09:19:15 AM 131999
Archer C2300( V1 V2 ) , Archer C59( V2 V3 ) , Archer C1200( V2 V3 ) , Archer C58( V2 ) , Archer C3200( V2 ) , Archer C3150 V2 , Archer A10( V1 ) , Archer A64 , Archer C1900( V2 ) , Archer C60( V2 V3 ) , Archer A2300( V1 ) , Archer C80( V1 ) , Archer C90( V6 ) , Archer A6( V2 ) , Archer C8( V3 V4 ) , Archer C3150( V2 ) , Archer C9( V4 V5 ) , Archer A7( V5 ) , Archer C6( V2 ) , Archer C7( V4 V5 ) , Archer A9( V6 )
1. Log in to the web-based interface of the router. If you don’t know how to do that, please refer to
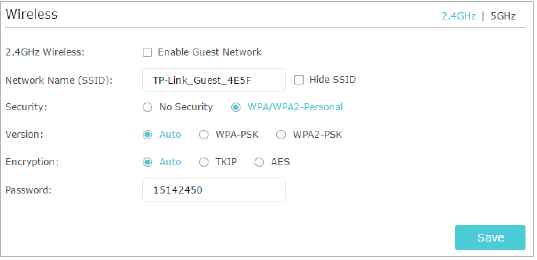
2. Go to Advanced > Guest Network. Locate the Wireless section.
3. Create a guest network as needed.
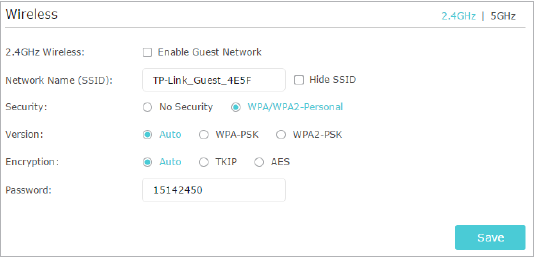
1) Select 2.4GHz or 5GHz network and tick the Enable Guest Network checkbox.
2) Customize the SSID. Don‘t select Hide SSID unless you want your guests to manually input the SSID for guest network access.
3) Set Security to WPA/WPA2 Personal, keep the default Version and Encryption values, and customize your own password.
4. Click Save. Now your guests can access your guest network using the SSID and password you set!
To view guest network information, go to Advanced > Status and locate the Guest Network section.
Get to know more details of each function and configuration please go to Download Center to download the manual of your product.
Is this faq useful?
Your feedback helps improve this site.
What’s your concern with this article?
- Dissatisfied with product
- Too Complicated
- Confusing Title
- Does not apply to me
- Too Vague
- Other
We’d love to get your feedback, please let us know how we can improve this content.
We appreciate your feedback.
Click here to contact TP-Link technical support.
