- How to enlarge an EXT4 disk on an Ubuntu Proxmox VM
- Resize Proxmox Volume with LVM
- Reference
- Resize disks
- qm command
- Using GUI
- 2. Enlarge the partition(s) in the virtual disk
- Offline for all guests
- Online for Windows Guests
- Online for Linux Guests
- Example with EFI
- Example without EFI
- 3. Enlarge the filesystem(s) in the partitions on the virtual disk
- Online for Linux guests with LVM
- Online for Linux guests without LVM
- Как увеличить размер диска LVM на Proxmox VE
- Как увеличить диск LVM на ProxMox VE 5.4
- 1. Настройка размера раздела LVM через Gparted
- 2. Увеличение размера LVM Proxmox через треминал
How to enlarge an EXT4 disk on an Ubuntu Proxmox VM
LVM is normally easy to resize but on a VM you can also easily resize if you have EXT and no LVM.
There are a few steps as things are layered. Proxmox controls the VM has the OS has the disk partitions has the file system. The outline of the steps are:
- Resize disk in Proxmox
- Use fdisk to learn current layout and if Proxmox resize worked
- Use parted to fix the GPT PMBR size mismatch
- Use parted to resize the correct partition number
- Use `resize2fs` to resize the actual file system
First resize the disk in Proxmox
Next use root to do this command sequence:
fdisk -l should show which disks are there. Typically /dev/sda
If you get this message which seems like an error, the resize in Proxmox worked:
GPT PMBR size mismatch (167772159 != 314572799) will be corrected by write. The backup GPT table is not on the end of the device. This problem will be corrected by write.
The example above is resizing from 80 GB to 150 GB.
Under some conditions you might now get the above warning. We have seen this on a secondary disk /dev/sdb that was about to be resized. Everything was perfect in Proxmox with the resize, but that warning didn’t show.
Next you’ll get an Warning which allows you to “correct” the first error:
Warning: Not all of the space available to /dev/sda appears to be used, you can fix the GPT to use all of the space (an extra 146800640 blocks) or continue with the current setting?
Next you’ll see this output, it indiciated our 80 GB drive is to be enlarged and it’s partition # 1:
Disk Flags: Number Start End Size File system Name Flags 14 1049kB 5243kB 4194kB bios_grub 15 5243kB 116MB 111MB fat32 boot, esp 1 116MB 85.9GB 85.8GB ext4
Now resize the partition, still in parted:
It will tell you the partition is in use. It’s safe to continue.
Warning: Partition /dev/sda1 is being used. Are you sure you want to continue? Yes/No? y
Next tell the system to use all the new space by typing 100%
End? [85.9GB]? 100%
At this point you still have to resize the file system:
# resize2fs /dev/sda1 resize2fs 1.45.5 (07-Jan-2020) Filesystem at /dev/sda1 is mounted on /; on-line resizing required old_desc_blocks = 10, new_desc_blocks = 19 The filesystem on /dev/sda1 is now 39293179 (4k) blocks long.
Resize Proxmox Volume with LVM
Four utilities are required, but use lsblk throughout to check progress. The following example assumes a Debian install with defaults, e.g. the LVM volume is called pbs-root
- parted /dev/sdx
- print and Fix
- resizepart and choose correct partition and 100%FREE flag
Reference
Resize disks
When you resize the disk of a VM, to avoid confusion and disasters think the process like adding or removing a disk platter.
If you enlarge the hard disk, once you have added the disk plate, your partition table and file system knows nothing about the new size, so you have to act inside the VM to fix it.
If you reduce (shrink) the hard disk, of course removing the last disk plate will probably destroy your file system and remove the data in it! So in this case it is paramount to act in the VM in advance, reducing the file system and the partition size. SystemRescueCD comes very handy for it, just add its iso as cdrom of your VM and set boot priority to CD-ROM.
Shrinking disks is not supported by the PVE API and has to be done manually.
Another page (deleted) with overlapping content was Resizing disks | Archive
qm command
You can resize your disks online or offline with command line:
exemple: to add 5G to your virtio0 disk on vmid100:
Linux should see the new size online without reboot with kernel >= 3.6
Windows should see the new size online without reboot with last virtio drivers.
Linux should see the new size online without reboot with kernel >= 3.7
Windows should see the new size online without reboot with last virtio drivers.
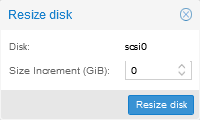
Using GUI
You can also select your VM from the list > Hardware > Hard Disk > Disk Action > Resize
You will be presented with the option of increasing the disk size:

2. Enlarge the partition(s) in the virtual disk
Depending on the installed guest there is several diffent ways to resize the partions
Offline for all guests
Use gparted or similar tool (recommended)
In gparted and possibly most other tools, LVM and Windows dynamic disc is not supportedBoot the virtual machine with gparted or similar tool, enlarge the partion and optionally the file system. With som linux clients you often need to enlarge the extended partion, move the swappartion, shrink the extended partion and enlarge the root partion. (or simple delete the swap and partion andre create it again — but remember to activwate the swap agin (last step).
Gparted have some warnings about some specific operations not well supported with windows guest — outside the scope of this document but read the warnings in gparted.Online for Windows Guests
- Guest is Windows 7, Windows Vista or Windows Server 2008
- logon as administrator and extend the disk and filesystem (Using Disk manager)
- For more info www.petri.co.il/extend-disk-partition-vista-windows-server-2008.htm
- Guest is Windows 10: logon as administrator and extend the disk and filesystem (Using Disk manager). If you do not see the ability to extend the disk (i.e. nothing seems to have happened as a result of using the resize command), go to the Windows command prompt and do a: shutdown -s -t 0 (This is a «normal» shutdown, as opposed to the «fast» shutdown that’s the default for Win 8 and onwards.) After a reboot, you’ll now see the ability to expand the disk.
Online for Linux Guests
Here we will enlarge a LVM PV partition, but the procedure is the same for every kind of partitions. Note that the partition you want to enlarge should be at the end of the disk. If you want to enlarge a partition which is anywhere on the disk, use the offline method.
(here we use VirtIO so the hard drive is named vda)
dmesg | grep vda [ 3982.979046] vda: detected capacity change from 34359738368 to 171798691840
Example with EFI
fdisk -l /dev/vda | grep ^/dev GPT PMBR size mismatch (67108863 != 335544319) will be corrected by w(rite). /dev/vda1 34 2047 2014 1007K BIOS boot /dev/vda2 2048 262143 260096 127M EFI System /dev/vda3 262144 67108830 66846687 31.9G Linux LVM
parted /dev/vda (parted) print Warning: Not all of the space available to /dev/vda appears to be used, you can fix the GPT to use all of the space (an extra 268435456 blocks) or continue with the current setting? Fix/Ignore? F
(parted) resizepart 3 100% (parted) quit
Example without EFI
Another example without EFI using parted:
Number Start End Size Type File system Flags 1 1049kB 538MB 537MB primary fat32 boot 2 539MB 21.5GB 20.9GB extended 3 539MB 21.5GB 20.9GB logical lvm
Yoy will want to resize the 2nd partition first (extended):
(parted) resizepart 2 100% (parted) resizepart 3 100%
Number Start End Size Type File system Flags 1 1049kB 538MB 537MB primary fat32 boot 2 539MB 26.8GB 26.3GB extended 3 539MB 26.8GB 26.3GB logical lvm
3. Enlarge the filesystem(s) in the partitions on the virtual disk
If you did not resize the filesystem in step 2
Online for Linux guests with LVM
Enlarge the physical volume to occupy the whole available space in the partition:
--- Logical volume --- LV Path /dev//root LV Name root VG Name LV UUID DXSq3l-Rufb-. LV Write Access read/write LV Creation host, time . LV Status available # open 1 LV Size
Enlarge the logical volume and the filesystem (the file system can be mounted, works with ext4 and xfs). Replace "" with your specific volume group name:#This command will increase the partition up by 20GB lvresize --size +20G --resizefs /dev//root
#Use all the remaining space on the volume group lvresize --extents +100%FREE --resizefs /dev//root
Online for Linux guests without LVM
Enlarge the filesystem (in this case root is on vda1)
Как увеличить размер диска LVM на Proxmox VE
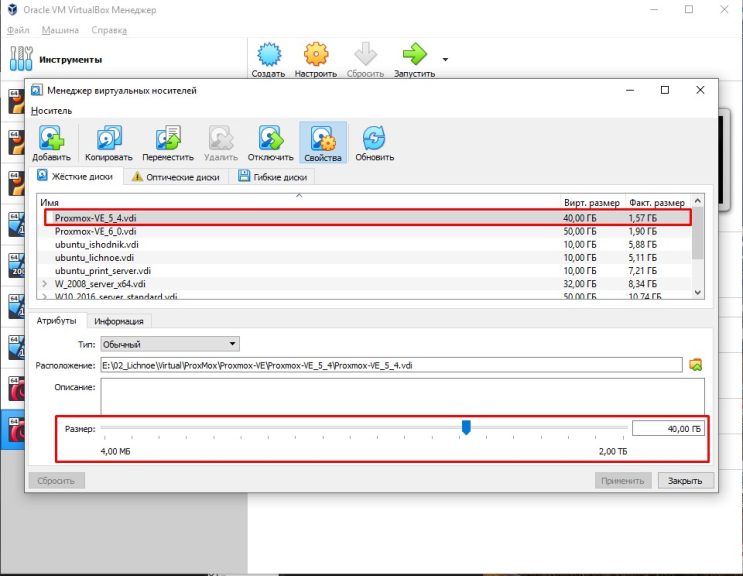
Всем привет, хочу поделиться тем как я увеличил диск на виртуальной машине ProxMox без потери данных и без добавления нового раздела диска в группу томов LVM. Установлен сервер ProxMox-VE 5.4 в VirtualBox, весь объем выделенного диска составлял 40GB. В планах увеличить размер LVM логического тома data который входит в группу томов pve.
Сейчас логический том data равен 18.9G. Физический том LVM и Группа томов pve в которую входит логический том data равна 39.5G.
Как увеличить диск LVM на ProxMox VE 5.4
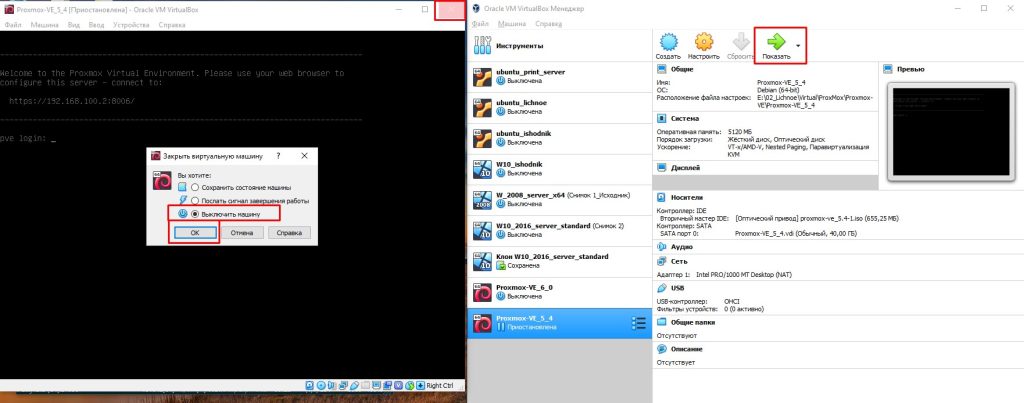
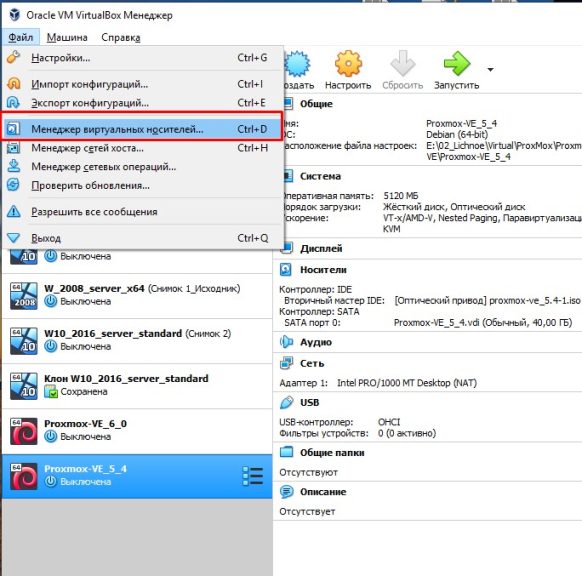
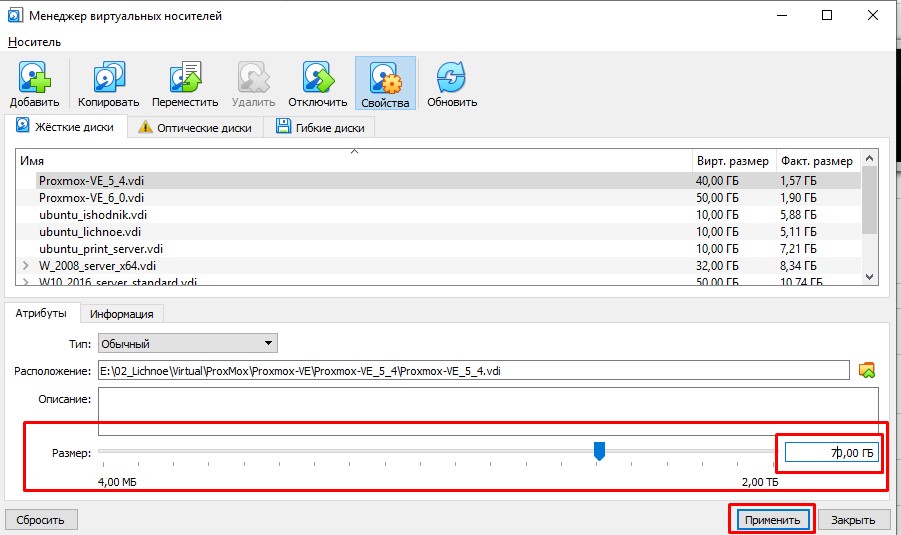
Итак приступим. Сперва выключаем нашу виртуальную машину в программе VirtualBox и добавляем место на диске для нашей виртуальной машины.
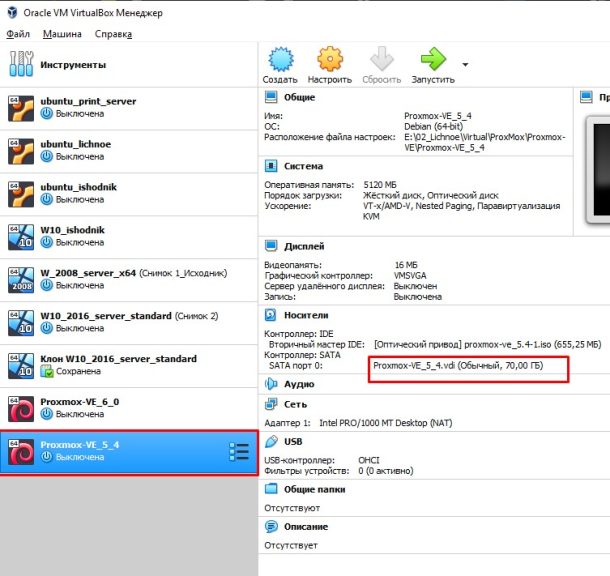
На картинке внизу мы видим что у нас получился новый размер диска:
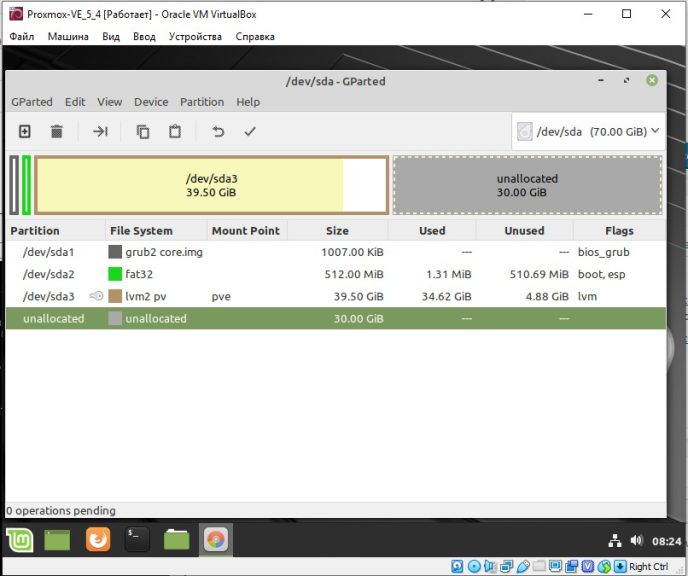
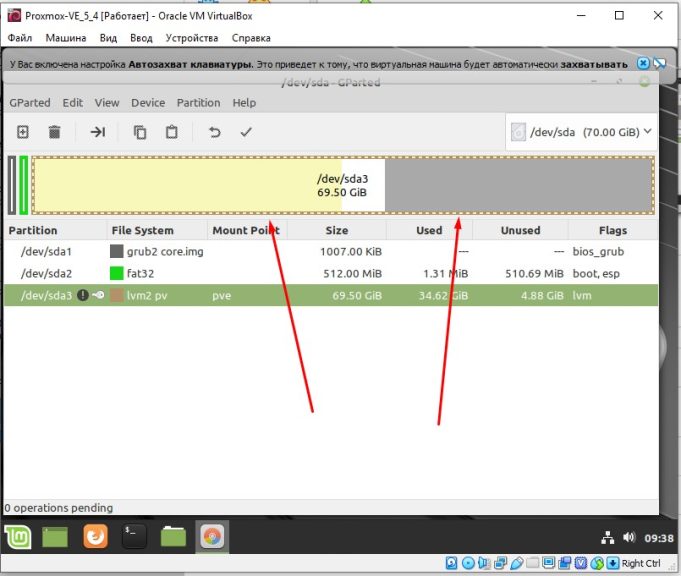
Ниже видно что размер диска sda изменился и стал 70G. Но sda3 раздел диска остался старого размера.

1. Настройка размера раздела LVM через Gparted
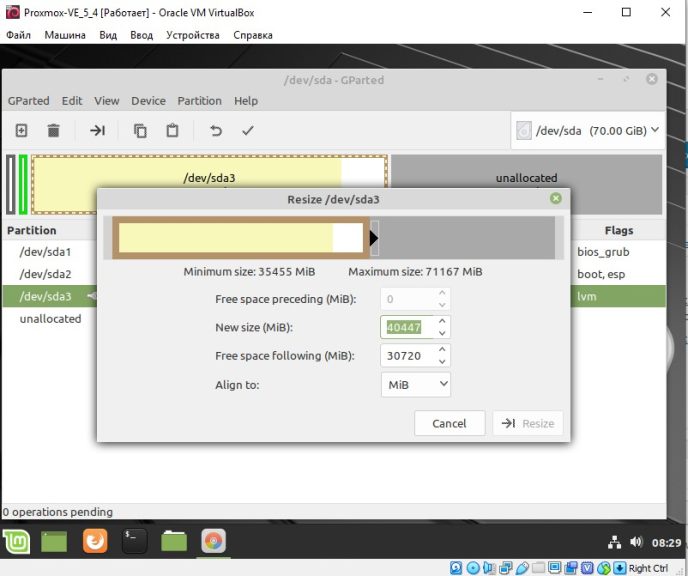
Вот так это будет смотреться если вы в VirtualBox на нашей виртуальной машине в оптический привод вставите iso образ LinuxMint, загрузитесь с него и посмотрите через программу Gparted. Видно что физический том LVM не изменился:
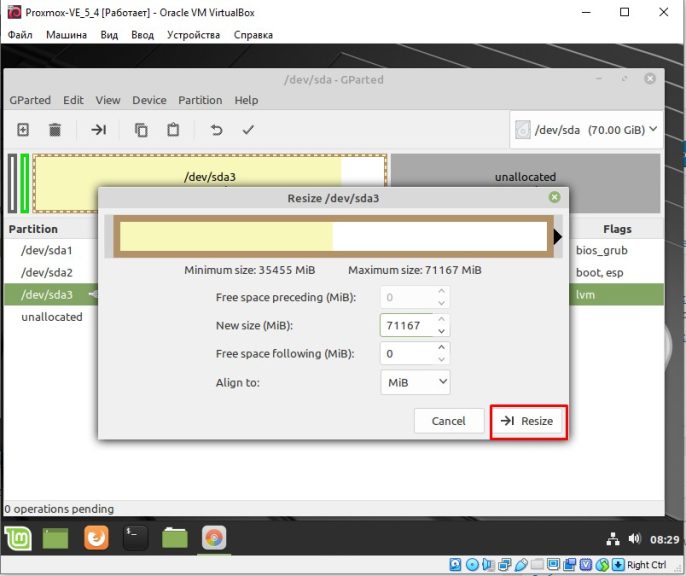
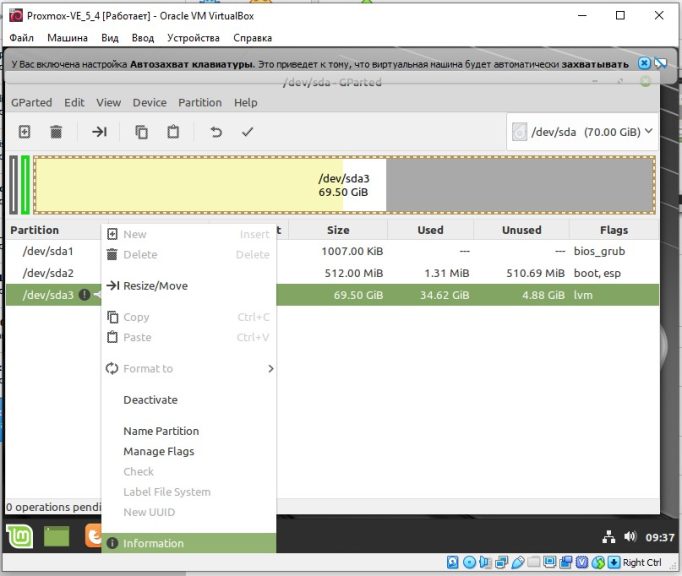
Сразу скажу если у вас есть возможность запустить GParted как показано выше, то вы можете и отсюда изменить размер sda3 без потерь следующим образом. Выбираете раздел -> sda3 и в меню, затем Edit ->Resize/Move см. ниже:
Смотрим ниже - тянем коричневую полосу до конца чтобы увеличить размер диска proxmox:
Жмем Resize:
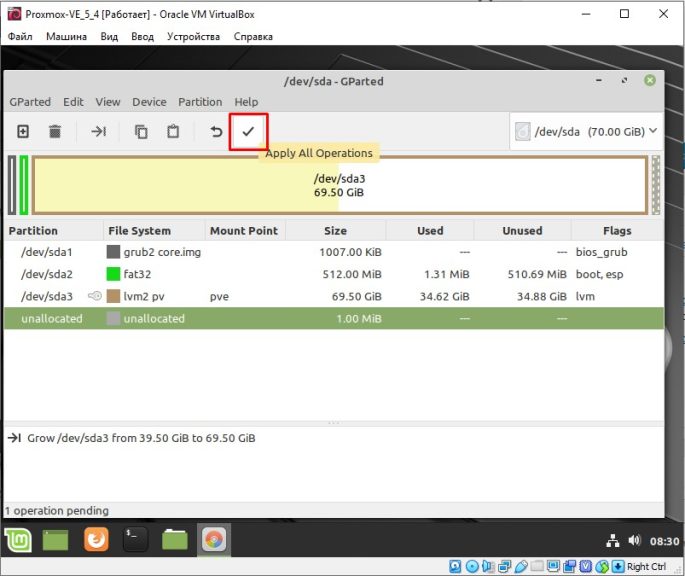
Теперь чтоб применить все изменения нажимаем на галочку:
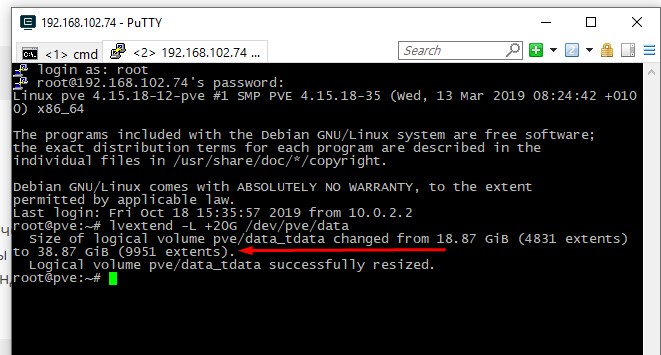
После выключаем виртуальную машину Proxmox, ставим первой загрузку с жесткого диска -> запускаем виртуальную машину и увидим что размер логической группы pve увеличился на 20G. И после в консоли можно добавить нужный нам размер, например, для логического тома data с помощью команды:
lvextend -L +10G /dev/pve/data
Мы добавили 10G для логического тома data.
2. Увеличение размера LVM Proxmox через треминал
Но бывает так что только через консоль есть возможность изменить размер, и желательно это сделать в самой вирт. машине. Давайте рассмотрим этот вариант. Вернемся к тому что мы добавили нашей виртуальной машине свободного места через VirtualBox, И все выглядит вот так:
Если с LiveCD смотреть то вот так это выглядит:
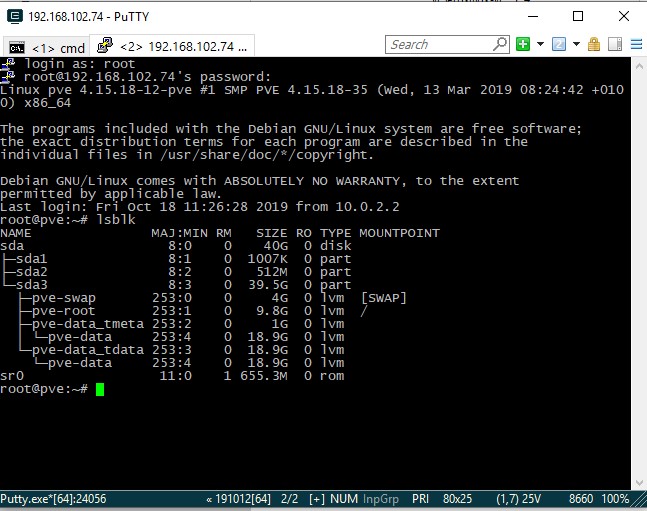
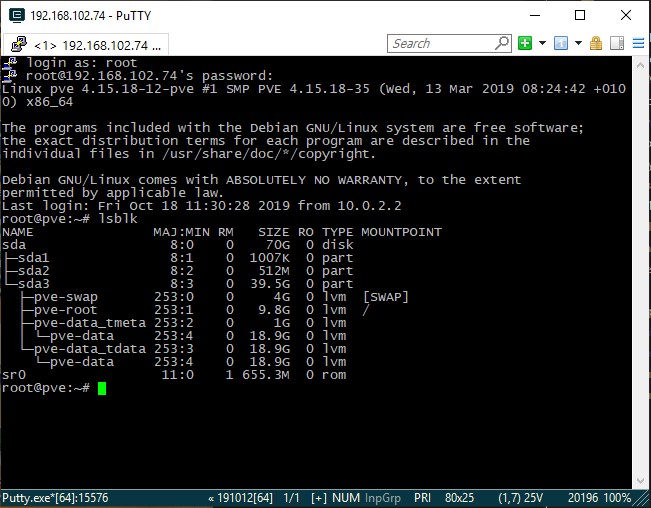
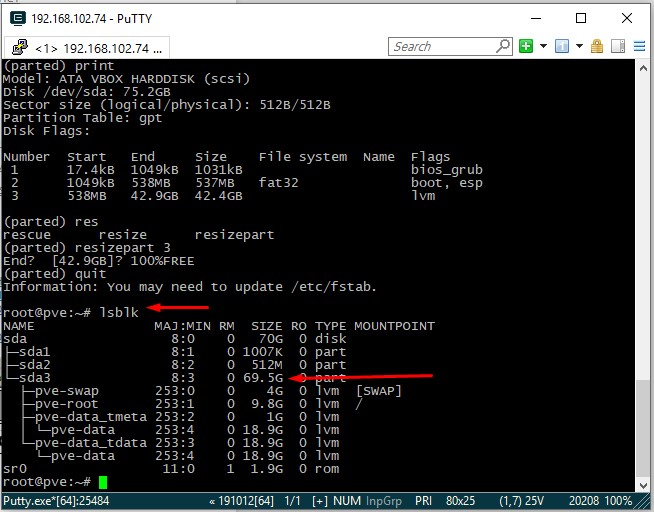
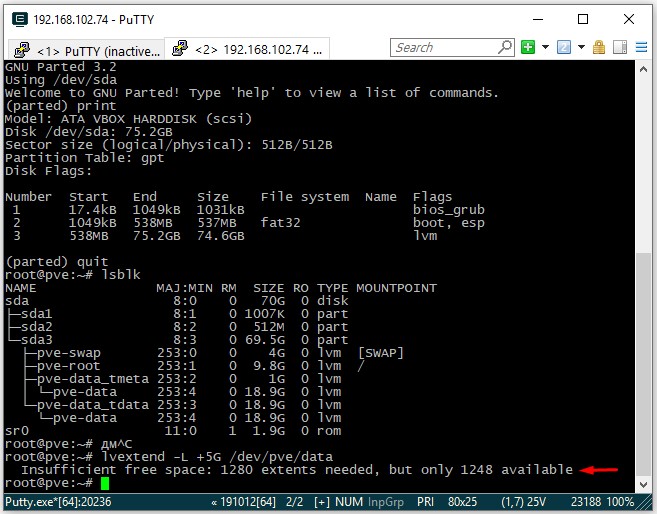
Итак мы загрузили нашу виртуальную машину Proxmox, зашли на нее по ssh, набрали lsblk, увидели новый размер sda = 70G. Теперь через консоль будем менять размер раздела sda3 а с ним и размер логического тома LMV c именем data:
Первое что нужно сделать это поставить программу parted, это консольная версия программы Gparted:
apt update
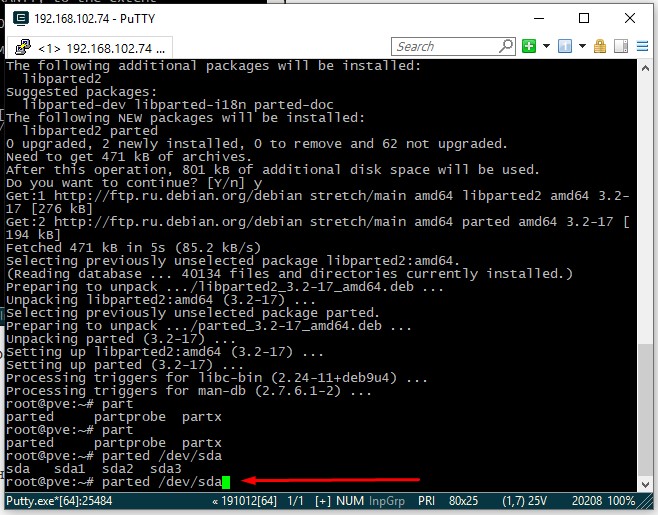
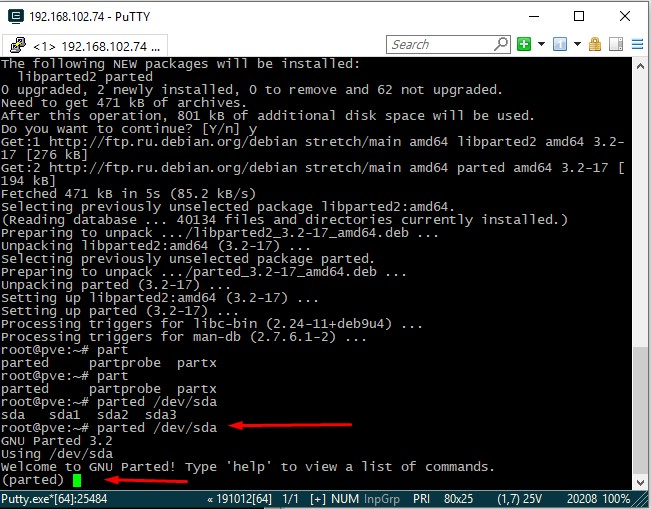
apt install partedПосле успешной установки заходим в parted и выбираем наш диск /dev/sda. Прошу не путать именно /dev/sda:


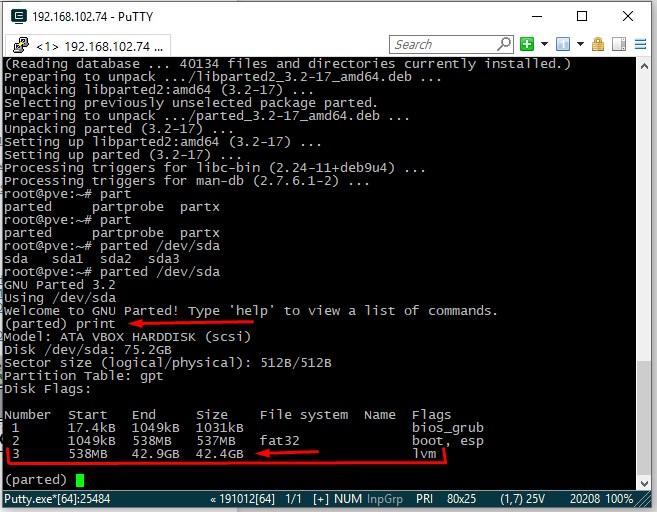
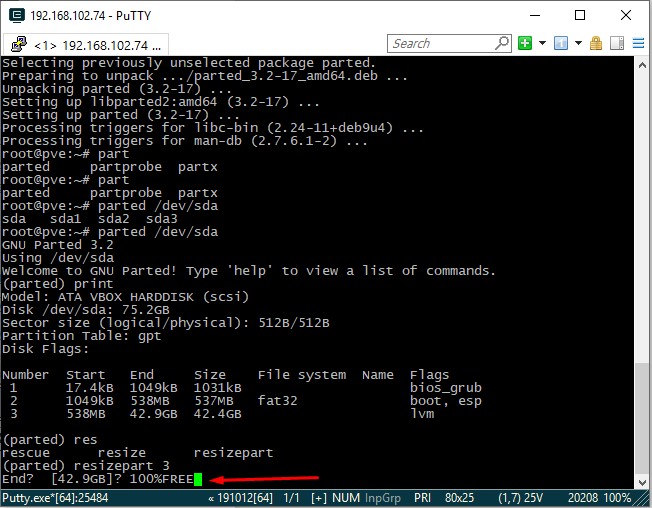
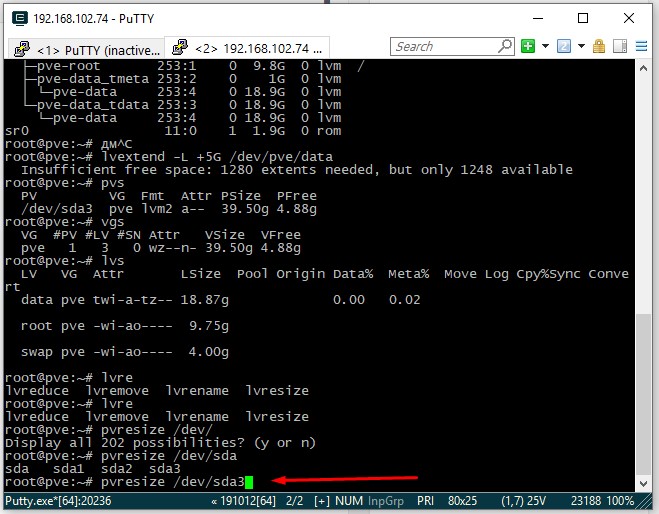
Далее смотрим наши разделы с помощью команды print:

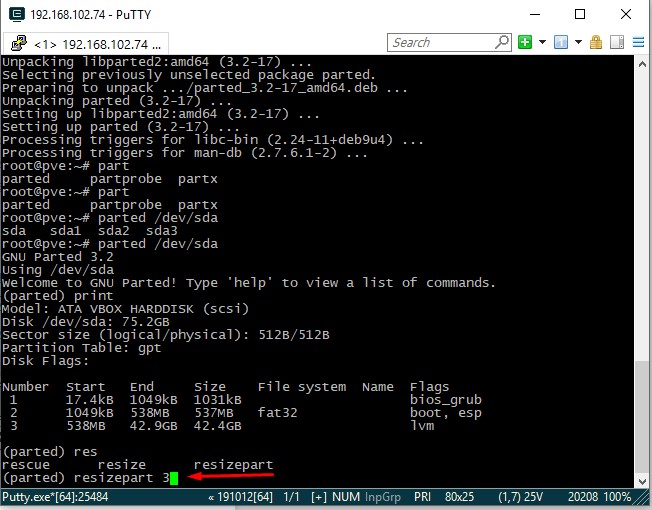
Cверху на картинке видим что размер нашего lvm диска 42.4 GB и его номер 3. Будем его изменять. Наберем команду resizepart 3 и жмем Enter:

Далее пишем 100%FREE это значит что увеличиваем диск до максимально возможного и жмем Enter:

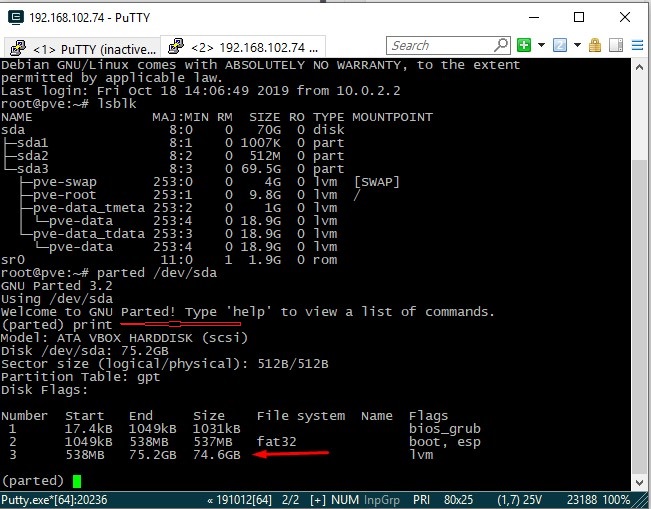
После выполнения можно снова выполнить команду print и мы увидим новый размер нашего LVM тома который стал 74.6GB:
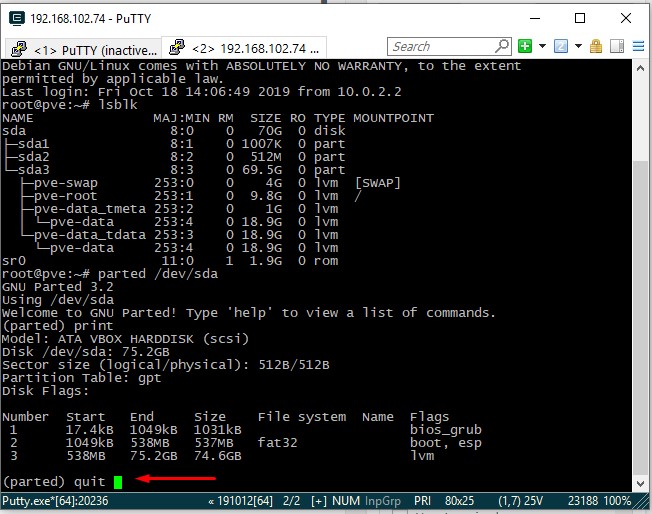
Далее выходим с помощью команды quit и жмем Enter:

Теперь проверим как все это выглядит с помощью команды:

Итак на картинке сверху мы видим что размер sda3 раздела стал 69.5G но при этом сам LVM том data мы увеличить не сможем, а будет выходить ошибка, давайте попробуем все таки увеличить логический том LVM, и проверим:

Мы видим что изменения не применялись т.к. недостаточно свободного места. Если мы загрузимся с LiveCD в нашу виртуальную машину и посмотрим через программу Gparted то увидим следующую картину:
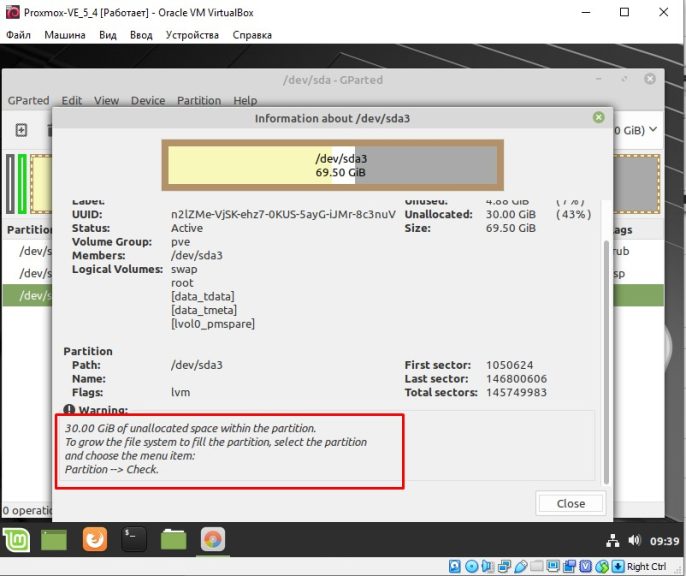
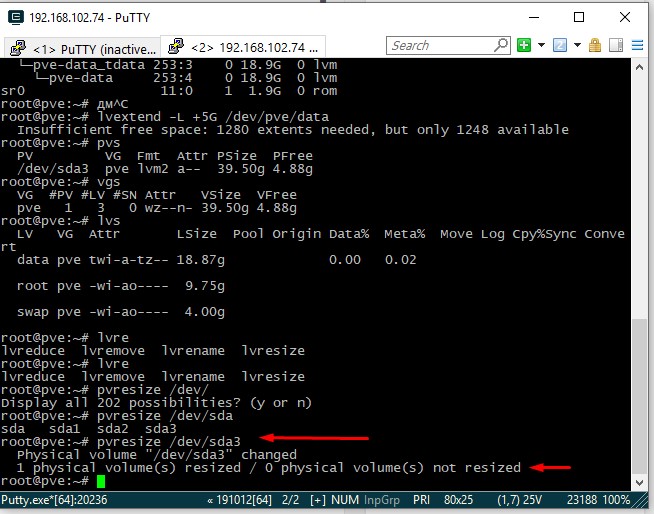
Дело в том что раздел sda3 мы увеличили, но при этом сам LVM физический том остался прежним. Физический LVM том - как следствие и группа LVM занимают старый объем. Чтобы это изменить надо растянуть физический LVM том на все свободное место для этого мы применим команду pvresize /dev/sda3 и жмем Enter:

На нижней картинке размер физического тома изменился мы это видим в сообщении:
Physical volume "/dev/sda3" changed
1 physical volume(s) resized / 0 physical volume(s) not resized
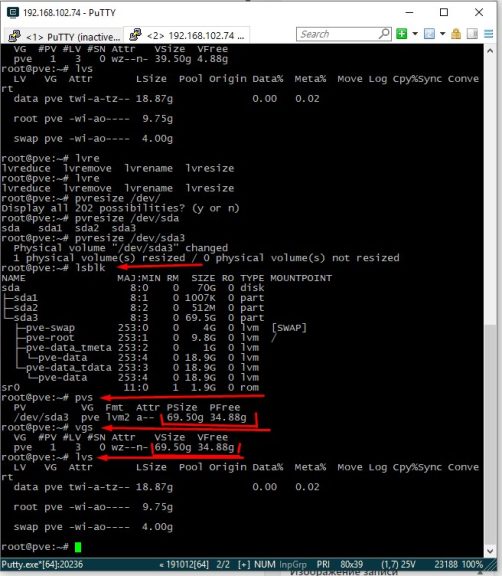
Так же мы это заметим если поочередно введем команды pvs (инф. о физических томах), vgs (инф. о группах LVM). А вот vgs (инф. о логических томах) показывает старый объем для data root и swap т. к. нам его еще предстоит изменить.
Вот так теперь отображается в программе Gparted если загрузиться с LiveCD:
Осталось только добавить свободный объем в логический раздел data. Набираем команду:
lvextend -L +20G /dev/pve/data


Проверяем изменения вводим поочередно команды:
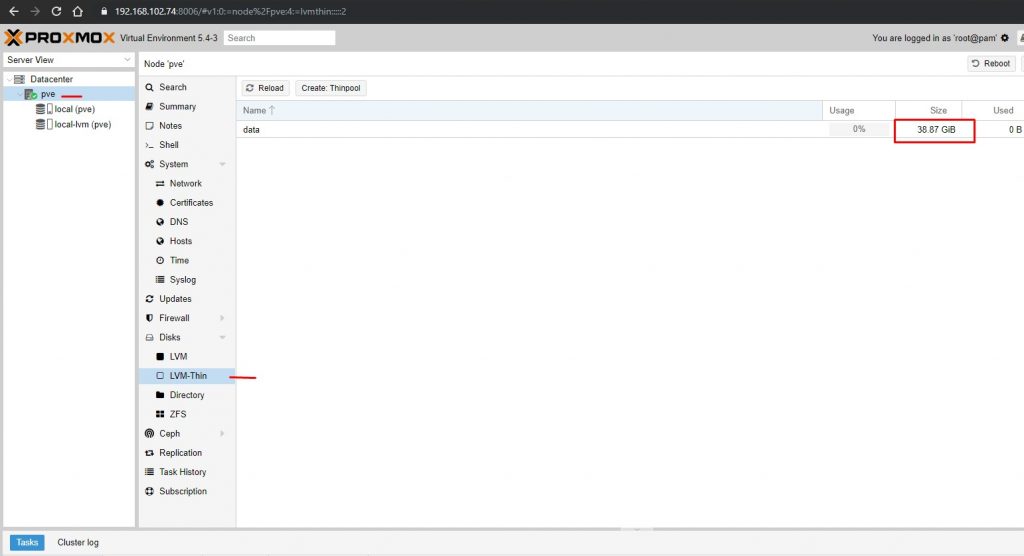
Видим что для pvs и vgs неизменны параметры, а команда lvs показывает что наш раздел data стал 38.87G мы видим что он увеличился на 20G. Если мы посмотрим предыдущий вывод команды lvs на снимке, то там видно, что логический том data занимает 18.87G:

В вэб интерфейсе нашей машины мы тоже видим изменения в логическом томе data:

Всем спасибо, рад поделиться опытом.
P.S. Все действия лучше отрабатывайте в виртуальной среде, так как всякое бывает.
Обнаружили ошибку в тексте? Сообщите мне об этом. Выделите текст с ошибкой и нажмите Ctrl+Enter.