- Install Proxmox qemu-guest-agent on Ubuntu 20.04
- 1. What is qemu-guest-agent?
- 2. Enable qemu-guest-agent in Proxmox for VM
- 3. Install QEMU guest agent package on Ubuntu VM
- 4. Check if guest agent is succesfully running in Proxmox webinterface
- By Leendert de Borst
- Qemu-guest-agent
- Installation
- Host
- Guest
- Linux
- Windows
- Testing that the communication with the guest agent is working
- Guest Agent
- Execute Command
- Enable
- CentOS / RHEL
- Use
- Installation on Windows
- Installation on Linux
- Troubleshooting
- Timed out waiting for device
- Agent on Windows is started but doesn’t work
- Установка гостевых средств интеграции Proxmox
- Установка гостевых средств интеграции Proxmox для Linux
- Debian дистрибутивы
- RHEL дистрибутивы
- Установка гостевых средств интеграции Proxmox для Windows
- Проверка доступности гостевых средств интеграции Proxmox
- Установка гостевых средств интеграции Proxmox : 2 комментария
- Добавить комментарий Отменить ответ
- Решение IT-задач любой сложности
- Архивы
- Рубрики
Install Proxmox qemu-guest-agent on Ubuntu 20.04
In this tutorial I will show you how to install the qemu-guest-agent package on Ubuntu 20.04.
1. What is qemu-guest-agent?
The qemu-guest-agent is a helper daemon, which is installed in a guest VM. It is used to exchange information between the host and guest, and to execute commands in the guest machine.
For example, when using Proxmox VE, the qemu-guest-agent is used for the following major features:
- To properly shutdown the guest, instead of relying on ACPI commands or windows policies.
- To freeze the guest file system when making a backup (on windows, use the volume shadow copy service VSS).
It is a good practice to install the qemu-guest-agent on all VM’s for the above reasons but also for various other stability tweaks and features.
2. Enable qemu-guest-agent in Proxmox for VM
The first step is to enable the qemu-guest-agent option for your VM. In Proxmox VE you can do this as follows.
Firstly, connect to your Proxmox server web interface (by default this is https://proxmox_ip:8006).
Important: Make sure the VM is shutdown before continuing. If the VM is currently running, shut it down now.
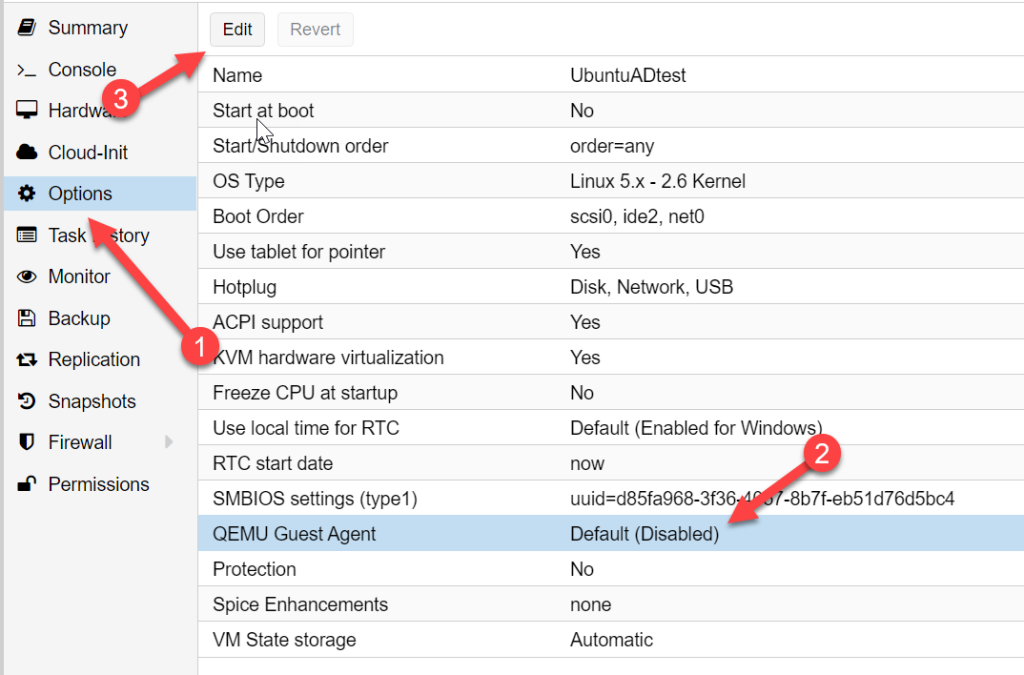
- Select the VM in the Proxmox interface, and then click on the “options” tab.
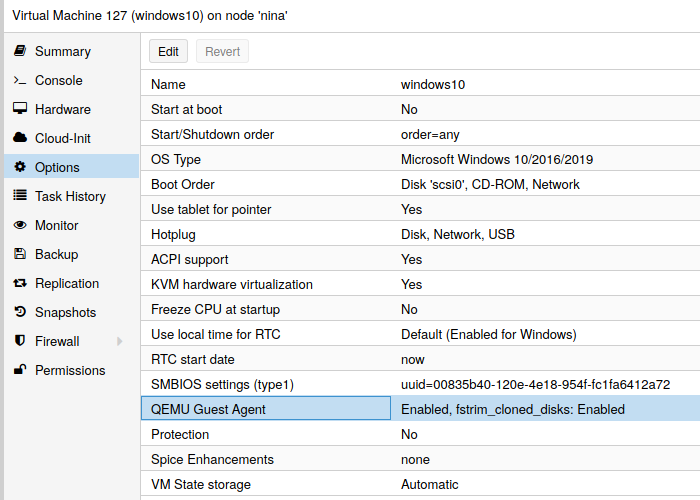
- Click on the “QEMU Guest Agent” row.
- Click on the “Edit” button.
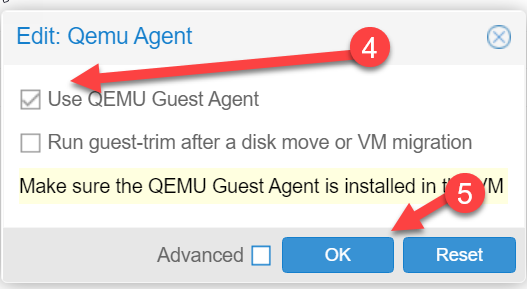
- Check the “Use QEMU Guest Agent” checkbox.
- Click “OK”.
- Boot the VM / turn it on.
3. Install QEMU guest agent package on Ubuntu VM
Login to your Ubuntu VM via SSH and issue the following commands:
sudo apt -y install qemu-guest-agent sudo systemctl enable qemu-guest-agent sudo systemctl start qemu-guest-agent
Note: if you get a message saying “The unit files have no installation config” you can safely ignore it.
The qemu-guest-agent is now installed! You can check if the service is running with this command:
sudo systemctl status qemu-guest-agent
This command should give the following output:
● qemu-guest-agent.service - QEMU Guest Agent Loaded: loaded (/lib/systemd/system/qemu-guest-agent.service; static; vendor preset: enabled) Active: active (running) since Mon 2021-11-22 19:52:07 CET; 19min ago Main PID: 464 (qemu-ga) Tasks: 1 (limit: 4637) Memory: 1.0M CGroup: /system.slice/qemu-guest-agent.service └─464 /usr/sbin/qemu-ga
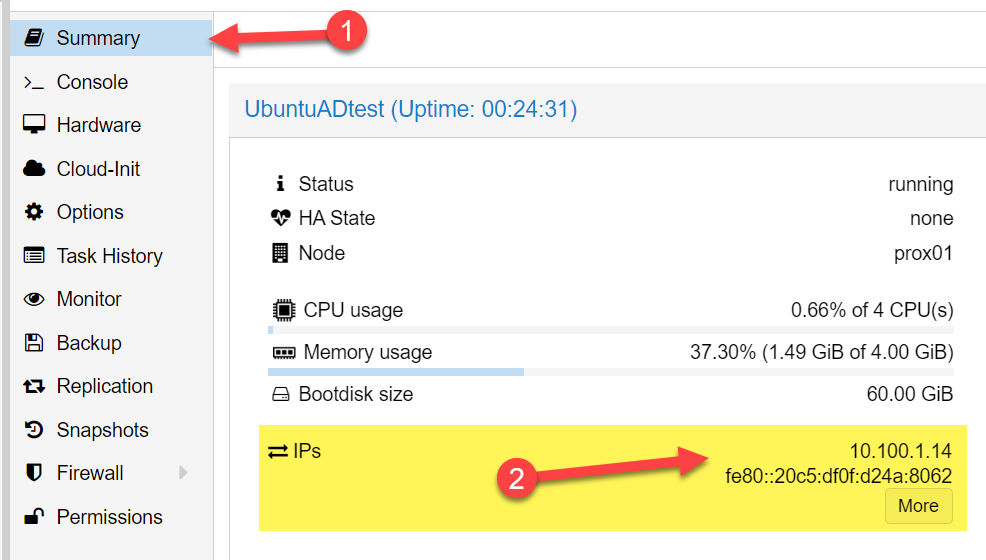
4. Check if guest agent is succesfully running in Proxmox webinterface
An easy way to check if the qemu-guest-agent is running, is to look at the “summary” tab of your VM in Proxmox. It should now show the IP address(es) currently in use by the VM:
That’s it. Your VM is now running the qemu-guest-agent! I hope this guide helped you.
By Leendert de Borst
Freelance software architect with 10+ years of experience. Expert in translating complex technical problems into creative & simple solutions.
Qemu-guest-agent
The qemu-guest-agent is a helper daemon, which is installed in the guest. It is used to exchange information between the host and guest, and to execute command in the guest.
In Proxmox VE, the qemu-guest-agent is used for mainly three things:
- To properly shutdown the guest, instead of relying on ACPI commands or windows policies
- To freeze the guest file system when making a backup/snapshot (on windows, use the volume shadow copy service VSS). If the guest agent is enabled and running, it calls guest-fsfreeze-freeze and guest-fsfreeze-thaw to improve consistency.
- In the phase when the guest (VM) is resumed after pause (for example after shapshot) it immediately synchronizes its time with the hypervisor using qemu-guest-agent (as first step).
Installation
Host
You have to install guest-agent in each VM and then enable it, you can do that in the Proxmox VE Webinterface (GUI)
or via CLI: qm set VMID —agent 1
Guest
Linux
On Linux you have to simply install the qemu-guest-agent, please refer to the documentation of your system.
We show here the commands for Debian/Ubuntu and Redhat based systems:
on Debian/Ubuntu based systems (with apt-get) run:
apt-get install qemu-guest-agent
and on Redhat based systems (with yum):
yum install qemu-guest-agent
Depending on the distribution, the guest agent might not start automatically after the installation.
Start it either directly with
systemctl start qemu-guest-agent
Then enable the service to autostart (permanently) if not auto started, with
systemctl enable qemu-guest-agent
(should work for most distributions) or reboot the guest.
Windows
First you have to download the virtio-win driver iso (see Windows VirtIO Drivers).
Then install the virtio-serial driver:
- Attach the ISO to your windows VM (virtio-*.iso)
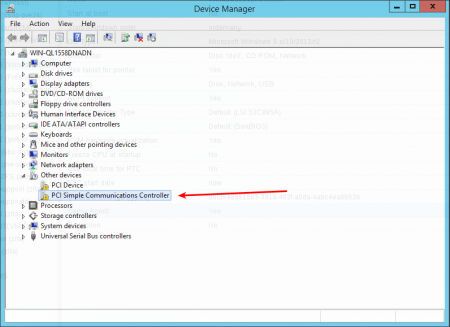
- Go to the windows Device Manager
- Look for «PCI Simple Communications Controller»
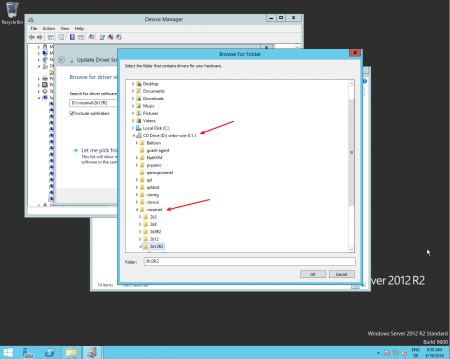
- Right Click -> Update Driver and select on the mounted iso in DRIVE:\vioserial\\ where is your Windows Version (e.g. 2k12R2 for Windows 2012 R2)
After that, you have to install the qemu-guest-agent:
- Go to the mounted ISO in explorer
- The guest agent installer is in the directory guest-agent
- Execute the installer with double click (either qemu-ga-x86_64.msi (64-bit) or qemu-ga-i386.msi (32-bit)
After that the qemu-guest-agent should be up and running. You can validate this in the list of Window Services, or in a PowerShell with:
PS C:\Users\Administrator> Get-Service QEMU-GA Status Name DisplayName ------ ---- ----------- Running QEMU-GA QEMU Guest Agent
If it is not running, you can use the Services control panel to start it and make sure that it will start automatically on the next boot.
Testing that the communication with the guest agent is working
The communication with the guest agent takes place over a unix socket located in /var/run/qemu-server/.qga You can test the communication qm agent:
if the qemu-guest-agent is correctly runnning in the VM, it will return without an error message.
Guest Agent
If this option is set, a new virtual serial device is shown to the vm, which will be accessed by the agent which will be installed in the guest os.
To set this option via cli use the following command:
Execute Command
Enable
Per default the qemu-guest-agent doesn’t allow command execution. You will see the following error message, if you try it:
root@mypve:~# qm guest exec 101 /bin/ls Agent error: The command guest-exec has been disabled for this instance
CentOS / RHEL
Search for the blacklist line.
BLACKLIST_RPC=guest-file-open,guest-file-close,guest-file-read,guest-file-write,guest-file-seek,guest-file-flush,guest-exec,guest-exec-status
Remove guest-exec (and guest-exec-status for async exec calls).
BLACKLIST_RPC=guest-file-open,guest-file-close,guest-file-read,guest-file-write,guest-file-seek,guest-file-flush
systemctl restart qemu-guest-agent
Use
root@mypve:~# qm guest exec 101 /bin/ls -- "-la" "/etc/hosts" < "exitcode" : 0, "exited" : 1, "out-data" : "-rw-r--r--. 1 root root 158 Sep 10 2018 /etc/hosts\n" >
Installation on Windows
Installation on Linux
For Debian/Ubuntu based systems:
apt install qemu-guest-agent
yum install qemu-guest-agent
systemctl start qemu-guest-agent
Troubleshooting
Timed out waiting for device
Starting the systemd unit file takes a long time and fails. You see the following errors in the journal:
Apr 10 18:14:39 pmg systemd[1]: dev-virtio\x2dports-org.qemu.guest_agent.0.device: Job dev-virtio\x2dports-org.qemu.guest_agent.0.device/start ti Apr 10 18:14:39 pmg systemd[1]: Timed out waiting for device /dev/virtio-ports/org.qemu.guest_agent.0.
You probably forgot to enable the QEMU Guest Agent setting in the vm settings.
Agent on Windows is started but doesn’t work
If the QEMU Guest Agent service is startet but in the vm overview you see “QEMU Guest Agent not running” then you probably forgot to enable the QEMU Guest Agent setting in the vm settings.
Except where otherwise noted, content on this wiki is licensed under the following license: CC Attribution-Share Alike 4.0 International
Установка гостевых средств интеграции Proxmox
Как и многие другие гипервизоры для корректной работы виртуальных машин Proxmox рекомендуется, чтобы была выполнена установка гостевых средств интеграции Proxmox. Например, такие же рекомендации есть и для гипервизоров ESXi, VMware Workstation, VirtualBox. Установка гостевых средств интеграции позволяет получить полный набор всех доступных возможностей, которые вам может предоставить Proxmox – расширенное управление электропитанием, получение дополнительной информации в веб панели управления гипервизора, дополнительные драйвера т.д.

В этой публикации я покажу установку гостевых средств интеграции для платформы Windows и для платформы Linux.
Установка гостевых средств интеграции Proxmox для Linux
Установка гостевых средств интеграции для Linux проще, чем для Windows. Для наиболее популярных дистрибутивов гостевые средства интеграции Proxmox уже доступны в репозиториях с программных обеспечением дистрибутива.
Debian дистрибутивы
Для установки гостевых средств интеграции на Debian подобных дистрибутивах выполните следующую действия:
1. Включаем гостевые средства интеграции в настройках виртуальной машины:

2. В гостевой операционной системе установите средства интеграции:
sudo apt install qemu-guest-agent3. Затем включите службу гостевых средств интеграции:
sudo systemctl enable qemu-guest-agent4. Останавливаем виртуальную машину.
5. Заново запускаем виртуальную машину.
RHEL дистрибутивы
Для установки гостевых средств интеграции на Debian подобных дистрибутивах выполните следующую действия:
1. Включаем гостевые средства интеграции в настройках виртуальной машины:
2. В гостевой операционной системе установите средства интеграции:
yum install qemu-guest-agent3. Затем включите службу гостевых средств интеграции:
systemctl enable qemu-guest-agent4. Останавливаем виртуальную машину.
5. Заново запускаем виртуальную машину.
Установка гостевых средств интеграции Proxmox для Windows
Процесс установки средств интеграции на Windows немного длиннее:
2. Монтируем образ из п. 1 – либо непосредственно в гостевой ОС, либо через виртуальный CD/DVD привод в Proxmox.
3. Включаем гостевые средства интеграции в настройках виртуальной машины.

4. В корне смонтированного образа находим файл с дистрибутивом VirtIO нужной вам разрядности и запускаем его.

5. Следуя шагам мастера выполняем установку дистрибутива VirtIO.
6. Затем запустите дистрибутив “virtio-win-guest-tools.msi”. Следуя шагам мастера выполните установку.
7. Останавливаем виртуальную машину.
8. Заново запускаем виртуальную машину.
Проверка доступности гостевых средств интеграции Proxmox
Процедуру проверки стоит начать с веб интерфейса администрирования Proxmox. В случае успешной установки и корректной работы гостевых средств интеграции вы должны увидеть на вкладке “Summary” сводную информацию об IP-адресах виртуальной машины.

Также в консоли Proxmox вы можете выполнить вот такую команду:

В случае, если гостевые средства интеграции доступы эта команда возвращает пустой вывод. Если средства интеграции по какой-то причине не доступны, то должна отобразиться какая-то ошибка.
Если ошибка все же возникла, то проверьте статусы служб интеграции в гостевой операционной системе. Для Linux систем это служба qume-quest-agent:
systemctl status qemu-quest-agent

Для Windows систем это служба “QEMU-GA”.

Установка гостевых средств интеграции Proxmox : 2 комментария
Ошибка в тексте
DeNian дистрибутивы Очень не хватает в рунете статьи о живой настройке Proxmox. Получается методом тыка настраивать правила, DSNBL, подключение VPN Для обновки SpamAssasian и ClamAV. Очень рекомендую статью составить, могу поделиться какой то инфой – сам держу селфхост уже лет 5.
Добрый день! Спвсибо за внимательность. Ошибку поправил. Хоть я и проверяю орфографию, но иногда бывают осечки… На самом деле перечень того, о чем я бы хотел написать достаточно большой, в т.ч. цикл статей про Proxmox. Вот только не всегда наши желания совпадают с нашими возможностями. Пока у меня дефицит свободного времени и я успеваю только периодически публиковать небольшие шпаргалки.
Добавить комментарий Отменить ответ
Решение IT-задач любой сложности
Архивы
Рубрики
- 1С (4)
- Active Directory Domain Services (4)
- Active Directory Federation Services (1)
- Ansible (7)
- Astra Linux Directory (1)
- Azure (5)
- Cireson (2)
- Communigate Pro (20)
- Docker (1)
- EVE-NG (2)
- Exchange (27)
- GitLab (1)
- JIRA (1)
- Kubernetes (4)
- Linux (24)
- Power Automate (4)
- Project Server (2)
- Project Web App (2)
- Proxmox (8)
- Scripts (1)
- Sendria (1)
- SharePoint (3)
- System Center (25)
- Veeam (3)
- VirtualHere (3)
- VMware (2)
- Web Application Proxy (2)
- Zabbix (7)
- Балансировка сетевого траффика (2)
- Онлайн кассы (2)
- Печать (1)
- Прочее (3)
- Публикация сервисов и приложений (2)
- Сертификаты (5)
- сети (1)
- Система управления проектами (2)
- Системы хранения данных (2)
- Торговое оборудование (1)