- Saved searches
- Use saved searches to filter your results more quickly
- ArtificalSUN/MKS-WIFI_PS_uploader
- Name already in use
- Sign In Required
- Launching GitHub Desktop
- Launching GitHub Desktop
- Launching Xcode
- Launching Visual Studio Code
- Latest commit
- Git stats
- Files
- README.md
- About
- UNI Форум
- UNI Форум
- Инструкции по PrusaSlicer от Дмитрия Соркина
- Инструкции по PrusaSlicer от Дмитрия Соркина
- Re: Полная инструкция по PrusaSlicer от Дмитрия Соркина
- Re: Полная инструкция по PrusaSlicer от Дмитрия Соркина
- Re: Полная инструкция по PrusaSlicer от Дмитрия Соркина
- Re: Инструкции по PrusaSlicer от Дмитрия Соркина
- Wi-Fi and PrusaLink setup (MK4)
- Step 2 Networking options
- Step 3 Setting up Wi-Fi
- Step 4 Generating the credentials
- Step 5 Editing the configuration file
Saved searches
Use saved searches to filter your results more quickly
You signed in with another tab or window. Reload to refresh your session. You signed out in another tab or window. Reload to refresh your session. You switched accounts on another tab or window. Reload to refresh your session.
Simple G-code file uploader for 3D-printers equipped with MKS-WIFI module
ArtificalSUN/MKS-WIFI_PS_uploader
This commit does not belong to any branch on this repository, and may belong to a fork outside of the repository.
Name already in use
A tag already exists with the provided branch name. Many Git commands accept both tag and branch names, so creating this branch may cause unexpected behavior. Are you sure you want to create this branch?
Sign In Required
Please sign in to use Codespaces.
Launching GitHub Desktop
If nothing happens, download GitHub Desktop and try again.
Launching GitHub Desktop
If nothing happens, download GitHub Desktop and try again.
Launching Xcode
If nothing happens, download Xcode and try again.
Launching Visual Studio Code
Your codespace will open once ready.
There was a problem preparing your codespace, please try again.
Latest commit
Git stats
Files
Failed to load latest commit information.
README.md
MKS-WIFI Uploader for Prusa Slicer (and forks)
This simple tool allows uploading files and starting print jobs for printers equipped with Makerbase MKS-WIFI module (i.e. Flyingbear Ghost 4S/5)
As of now (2021-01-17) the tool works fine. However, I curently have no printers with MKS-WIFI module. I’ll do my best to maintain this tool in a working condition, but my debugging and development capabilities for this project are extremely limited.
- Fixed uploading issue related to a g-code file encoding (thx @Goodsmileduck)
- Added feature (supposedly working) to convert PrusaSlicer thumbnails (model preview embedded into the gcode file) into TFT thumbnails that can be displayed by the printer with a stock firmware, similar to what the Cura plugin does (thx @SH1NZ33)
- Fixed issues with uploading and filenames for PrusaSlicer 2.4 and newer (thx @WashingtonJunior)
To run this version as a python script one requires to have Image and regex modules installed (in addition to the previously required requests mudule). DISCLAIMER: This version was never tested by me, it is provided as is with no warranties or responsibility from my side. Old version 0.2.2 is still available in releases.
It is written in Python and available in 2 versions:
- Python script (requires Python 3 with requests package)
- Windows x64 executable (frozen with pyinstaller, more convinient, no requirements to run)
I might think about releasing additional executables (like Win32 or linux) if there will be real demand for it. Until then you might always use Python script version (or pack the executable yourself using i.e. pyinstaller)

It is originally intended to work as a post-processing script in Prusa Slicer (or it’s forks like Slic3r++/SuperSlicer) Download the script or executable to the location of your preference (not necessarely the istallation directory of your slicer). However, avoid using system directories like Program Files on Windows, otherwise your slicer might require elevated rights to run the script. To use Uploader select your Print profile and go to the Output options. Here insert following command into the Post-processing script
To use executable (see screenshot)
"\path\to\the\executable\MKS_WIFI_PS_upload.exe" ip_address mode; "\path\to\the\python\installation\pythonw.exe" "\path\to\the\script\MKS_WIFI_PS_upload.pyw" ip_address mode; It is possible to use the script with Simplify3D slicer (however, it does not work if path to the g-code file contains spaces). Add following command to the «Additional Terminal Commands for Post Processing» section in the «Scripts» tab (quotes and brackets are necessary!)
"\path\to\the\executable\MKS_WIFI_PS_upload.exe" ip_address mode [output_filepath] ip_address — IP adress of the printer in your local network
mode — one of the following options:
- ask — when a file is uploaded the script will ask if you want to immediately start printing it
- always — when a file is uploaded the script will immediately start printing it without asking
- never — when a file is uploaded the script will not start any print job and will not ask anything
You actually have to do this modification to every Print profile you want to use Uploader for. After that each time you save a g-code file (to any location, not necessarely the same directory with the script) this file will be uploaded to your printer.
Despite being intended as a post-processing script, Uploader can be used completely standalone. If run without any options (i.e. double click on the executable) it will first prompt you to select a file you want to upload and ask for IP adress of your printer. It will then proceed with uploading file and ask if you want to print it (similar to running in ask mode)
Alternatively you can run it from a command line providing path to you gcode file as the third option:
MKS_WIFI_PS_upload.exe ip_addr mode "\path\to\the\file\for\upload.gcode" About
Simple G-code file uploader for 3D-printers equipped with MKS-WIFI module
UNI Форум
Можно отправлять файлы на печать напрямую из PrusaSlicer или CURA в DUET WEB CONTROL.

Настройка:
- Открываем вкладку Настройки принтера.
- Нажимаем иконку Изменить физический профиль.
- Вводим имя принтера (в свободной форме), Тип хоста = «Duet» и IP адрес платы DUET в Вашей сети.
- Нажимаем OK для сохранения изменений.
Теперь после нарезки модели у Вас появится значок для отправки файла на печать.


Не бойся поломать. Бойся не починить ))
- Новости
- Помощь по форуму
- Инструкции
- Релизы UNI
- ↳ UNI 1
- ↳ Обсуждения UNI 1
- ↳ UNI 2.2
- ↳ Объявления UNI 2.2
- ↳ Обсуждения UNI 2.2
- ↳ Мой UNI 2.2
- ↳ Direct
- ↳ Bowden
- ↳ UNI 2.3
- ↳ Объявления UNI 2.3
- ↳ Обсуждения UNI 2.3
- ↳ Мой UNI 2.3
- ↳ UNI 2.4
- ↳ Объявления UNI 2.4
- ↳ Обсуждения UNI 2.4
- ↳ Мой UNI 2.4
- ↳ UNI 2.5
- ↳ Объявления UNI 2.5
- ↳ Обсуждения UNI 2.5
- ↳ Мой UNI 2.5
- ↳ UNI PRO
- ↳ Обсуждения UNI PRO
- ↳ UNI MINI
- ↳ Объявления UNI MINI
- ↳ Обсуждения UNI MINI
- ↳ Мой UNI MINI
- ↳ UNI MINI PRO
- ↳ Обсуждения UNI MINI PRO
- Комплектующие
- ↳ Блоки питания и коммуникации
- ↳ Вентиляторы
- ↳ Датчики положения и концевики
- ↳ Направляющие и валы
- ↳ Моторы
- ↳ Платы управления, прошивки и драйверы
- ↳ UNI Board
- ↳ BIG TREE TECH
- ↳ Драйверы — BTT
- ↳ Неисправности и ремонт плат BIG TREE TECH
- ↳ DUET
- ↳ FYSETC
- ↳ LERDGE
- ↳ Драйверы — LERDGE
- ↳ Неисправности и ремонт плат LERDGE
- ↳ Прошивки LERDGE
- ↳ MAKERBASE
- ↳ MELLOW
- ↳ RAMPS
- ↳ Klipper
- ↳ Marlin
- ↳ Релизы прошивки Marlin
- ↳ RepRapFirmware
- ↳ Релизы прошивки RepRapFirmware
- ↳ Платы коммутации
- ↳ Драйверы
- ↳ Подсветка
- ↳ Подшипники, шпули и ремни
- ↳ Столы
- ↳ ШВП и трапецеидальные винты
- ↳ Экструдеры
- ↳ HotEnd / ColdEnd
- ↳ Фидеры
- ↳ Прочее
- 3D разговоры
- ↳ Моделирование
- ↳ Компас-3D
- ↳ FreeCAD
- ↳ Fusion 360
- ↳ OpenSCAD
- ↳ Пластики / Филамент
- ↳ 3D-CLUB
- ↳ BESTFILAMENT
- ↳ CREOZONE
- ↳ CYBERFIBER
- ↳ FDPLAST
- ↳ FILAMENTARNO
- ↳ GREG
- ↳ HI-TECH PLAST
- ↳ NOVAPRINT3D
- ↳ PRINT PRODUCT
- ↳ REC
- ↳ SYNTECH
- ↳ U3PRINT
- ↳ VOLPRINT
- ↳ Постобработка
- ↳ Секреты печати
- ↳ Серверы печати
- ↳ Repetier
- ↳ OctoPrint
- ↳ Слайсеры
- ↳ Cura
- ↳ Релизы Cura
- ↳ ideaMaker
- ↳ KISSlicer
- ↳ PrusaSlicer
- ↳ Релизы PrusaSlicer
- ↳ Simplify3D
- ↳ SuperSlicer
- Разное
- ↳ Барахолка
- ↳ Общение
- ↳ Корзина
UNI Форум
Инструкции по PrusaSlicer от Дмитрия Соркина
demonlibra Помогаю слегка Сообщения: 2534 Зарегистрирован: 18 янв 2020, 11:49 Откуда: Ростов-на-Дону Контактная информация:
Инструкции по PrusaSlicer от Дмитрия Соркина
Сообщение demonlibra » 01 ноя 2020, 11:18
Не бойся поломать. Бойся не починить ))
demonlibra Помогаю слегка Сообщения: 2534 Зарегистрирован: 18 янв 2020, 11:49 Откуда: Ростов-на-Дону Контактная информация:
Re: Полная инструкция по PrusaSlicer от Дмитрия Соркина
Сообщение demonlibra » 22 май 2021, 23:00
Не бойся поломать. Бойся не починить ))
demonlibra Помогаю слегка Сообщения: 2534 Зарегистрирован: 18 янв 2020, 11:49 Откуда: Ростов-на-Дону Контактная информация:
Re: Полная инструкция по PrusaSlicer от Дмитрия Соркина
Сообщение demonlibra » 23 май 2021, 15:32

Не бойся поломать. Бойся не починить ))
demonlibra Помогаю слегка Сообщения: 2534 Зарегистрирован: 18 янв 2020, 11:49 Откуда: Ростов-на-Дону Контактная информация:
Re: Полная инструкция по PrusaSlicer от Дмитрия Соркина
Сообщение demonlibra » 24 май 2021, 06:22

Не бойся поломать. Бойся не починить ))
demonlibra Помогаю слегка Сообщения: 2534 Зарегистрирован: 18 янв 2020, 11:49 Откуда: Ростов-на-Дону Контактная информация:
Re: Инструкции по PrusaSlicer от Дмитрия Соркина
Сообщение demonlibra » 07 фев 2023, 11:25
YouTube канал K3D // Dmitry Sorkin
Краткий гайд по 3D печати. Настройка принтера с нуля — 5.2 Первоначальная настройка Prusaslicer
Не бойся поломать. Бойся не починить ))
- Новости
- Помощь по форуму
- Инструкции
- Релизы UNI
- ↳ UNI 1
- ↳ Обсуждения UNI 1
- ↳ UNI 2.2
- ↳ Объявления UNI 2.2
- ↳ Обсуждения UNI 2.2
- ↳ Мой UNI 2.2
- ↳ Direct
- ↳ Bowden
- ↳ UNI 2.3
- ↳ Объявления UNI 2.3
- ↳ Обсуждения UNI 2.3
- ↳ Мой UNI 2.3
- ↳ UNI 2.4
- ↳ Объявления UNI 2.4
- ↳ Обсуждения UNI 2.4
- ↳ Мой UNI 2.4
- ↳ UNI 2.5
- ↳ Объявления UNI 2.5
- ↳ Обсуждения UNI 2.5
- ↳ Мой UNI 2.5
- ↳ UNI PRO
- ↳ Обсуждения UNI PRO
- ↳ UNI MINI
- ↳ Объявления UNI MINI
- ↳ Обсуждения UNI MINI
- ↳ Мой UNI MINI
- ↳ UNI MINI PRO
- ↳ Обсуждения UNI MINI PRO
- Комплектующие
- ↳ Блоки питания и коммуникации
- ↳ Вентиляторы
- ↳ Датчики положения и концевики
- ↳ Направляющие и валы
- ↳ Моторы
- ↳ Платы управления, прошивки и драйверы
- ↳ UNI Board
- ↳ BIG TREE TECH
- ↳ Драйверы — BTT
- ↳ Неисправности и ремонт плат BIG TREE TECH
- ↳ DUET
- ↳ FYSETC
- ↳ LERDGE
- ↳ Драйверы — LERDGE
- ↳ Неисправности и ремонт плат LERDGE
- ↳ Прошивки LERDGE
- ↳ MAKERBASE
- ↳ MELLOW
- ↳ RAMPS
- ↳ Klipper
- ↳ Marlin
- ↳ Релизы прошивки Marlin
- ↳ RepRapFirmware
- ↳ Релизы прошивки RepRapFirmware
- ↳ Платы коммутации
- ↳ Драйверы
- ↳ Подсветка
- ↳ Подшипники, шпули и ремни
- ↳ Столы
- ↳ ШВП и трапецеидальные винты
- ↳ Экструдеры
- ↳ HotEnd / ColdEnd
- ↳ Фидеры
- ↳ Прочее
- 3D разговоры
- ↳ Моделирование
- ↳ Компас-3D
- ↳ FreeCAD
- ↳ Fusion 360
- ↳ OpenSCAD
- ↳ Пластики / Филамент
- ↳ 3D-CLUB
- ↳ BESTFILAMENT
- ↳ CREOZONE
- ↳ CYBERFIBER
- ↳ FDPLAST
- ↳ FILAMENTARNO
- ↳ GREG
- ↳ HI-TECH PLAST
- ↳ NOVAPRINT3D
- ↳ PRINT PRODUCT
- ↳ REC
- ↳ SYNTECH
- ↳ U3PRINT
- ↳ VOLPRINT
- ↳ Постобработка
- ↳ Секреты печати
- ↳ Серверы печати
- ↳ Repetier
- ↳ OctoPrint
- ↳ Слайсеры
- ↳ Cura
- ↳ Релизы Cura
- ↳ ideaMaker
- ↳ KISSlicer
- ↳ PrusaSlicer
- ↳ Релизы PrusaSlicer
- ↳ Simplify3D
- ↳ SuperSlicer
- Разное
- ↳ Барахолка
- ↳ Общение
- ↳ Корзина
Wi-Fi and PrusaLink setup (MK4)
First, read the article about PrusaLink and Prusa Connect to get general information about these services.
Step 2 Networking options
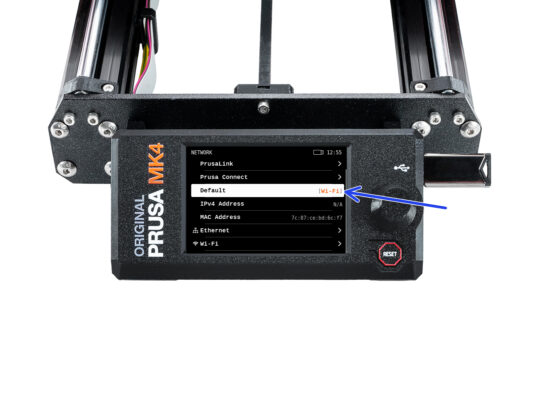
⬢ The preferred network connection type can be selected in the menu Settings > Network > Default
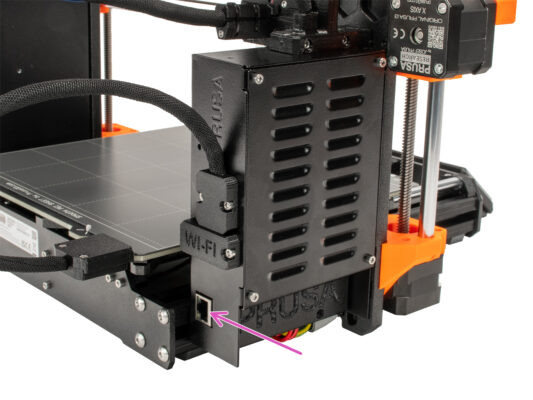
⬢ If you prefer the wired Ethernet connection to the network, use the connector on the back of the printer and skip to step 7.
Step 3 Setting up Wi-Fi
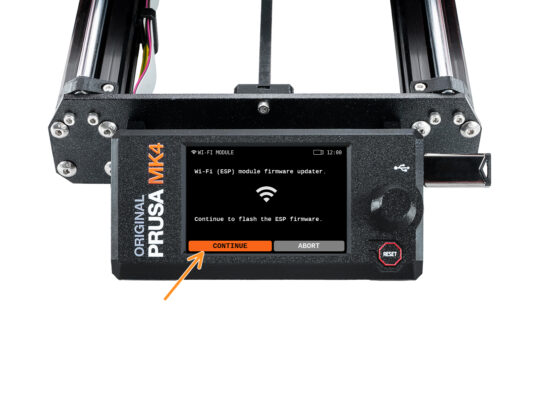
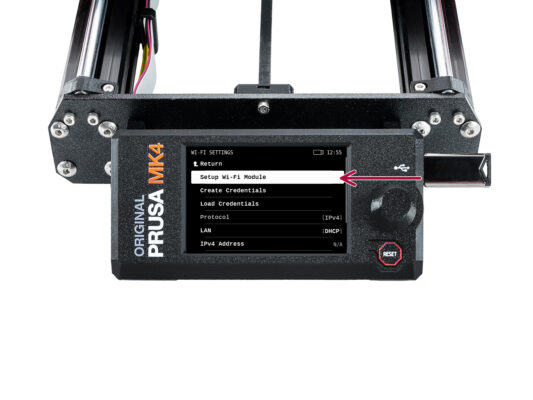
⬢ The Wi-Fi setup wizard is also available in the menu Settings > Network > Wi-Fi > Setup Wi-Fi Module
⬢ Hit Continue. The software in the printer’s Wi-Fi ESP module will get updated automatically.
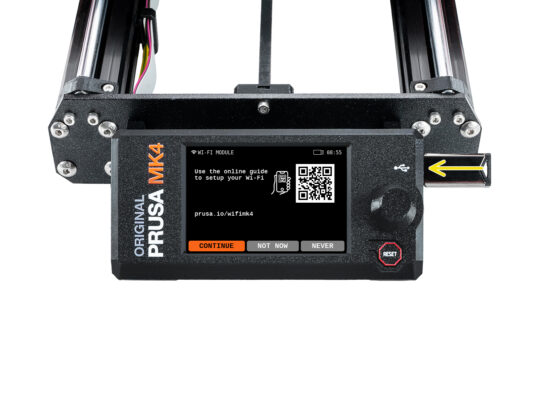
Step 4 Generating the credentials

The printer will generate a prusa_printer_settings.ini configuration file on the USB drive.
If there is a valid configuration file on the USB drive already, you can skip these steps and just load it straight away.
Step 5 Editing the configuration file
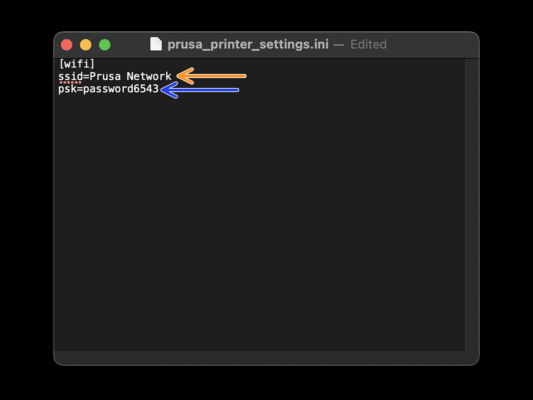
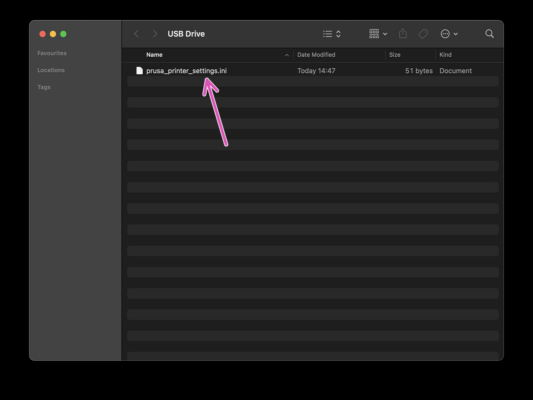
⬢ Locate the prusa_printer_settings.ini file on the USB drive created by the printer. Open the file in any text editor.
⬢ Go to the second line named ssid= and write down the name of the Wi-Fi network you want to connect your printer to.
Note: The bundled ESP Wi-Fi module supports 802.11 b/g/n 2.4 GHz networking. A 5Ghz network will not work.
⬢ Now, go to the third line named psk= and write down the Wi-Fi password. Make sure nobody is watching!