- eugenetriguba / Install Pulse Secure on Ubuntu 20.04.md
- How to Install Pulse Secure VPN Client on Ubuntu 20.04 LTS (Focal Fossa)
- How to Install Pulse Secure VPN Client on Ubuntu 20.04 LTS (Focal Fossa)
- Step 1: Prerequisites
- Step 2: Update Your Server
- Step 3: Install Dependencies
- Step 4: Download Pulse Secure
- Step 5: Install Pulse Secure
- Step 6: Start Pulse UI
- Step 7: Uninstall Pulse Secure
- Pulse secure linux client
- Prerequisites to Run the Command Line Client
- Launch the Command Line Client (initial launch OR when connecting to a new server)
- Launch the Command Line Client with Proxy
- Check the Status of the VPN Connection
- Terminate the Command Line Client
eugenetriguba / Install Pulse Secure on Ubuntu 20.04.md
Disclaimer: This gist is a bit outdated now. The client download page now redirects to a login page that the downloads are guarded behind. You’ll want to do a web search for a pulse secure deb file and install that now. Try: http://webdev.web3.technion.ac.il/docs/cis/public/ssl-vpn/ps-pulse-ubuntu-debian.deb. When I installed Pulse Secure 9.1R13, I didn’t need to do anything else to get it working.
To install Pulse Secure for Ubuntu 20.04, it is a bit complicated since the support isn’t great.
First, we’ll want to go through the form at https://www.pulsesecure.net/trynow/client-download/. You’ll get an email with download links to the latest versions of pulse secure. Download the Linux one with the deb file and then you can install it using dpkg from your downloads folder.
$ cd ~/Downloads $ sudo dpkg -i ps-pulse-linux-[your-pulse-version]-ubuntu-debian-64-bit-installer.deb
Now, we’ll want to go into the pulse directory and install the dependencies. We update the shell script file first to recognize Ubuntu 20.
$ cd /usr/local/pulse/ $ sudo sed -i "s/UBUNTU_VER\ \=\ 18\ \]/& \|\|\ [\ \$UBUNTU_VER\ \=\ 20 \]/" PulseClient_x86_64.sh $ ./PulseClient_x86_64.sh install_dependency_packages $ sudo apt-get install libenchant1c2a
Next, we’ll want to create an extras and debs folder inside the pulse folder.
$ sudo mkdir /usr/local/pulse/extra $ sudo mkdir /usr/local/pulse/debs
Then we’ll want to download the following debs into /usr/local/pulse/debs/ .
$ cd /usr/local/pulse/debs $ sudo wget http://archive.ubuntu.com/ubuntu/pool/main/i/icu/libicu60_60.2-3ubuntu3_amd64.deb $ sudo wget http://archive.ubuntu.com/ubuntu/pool/universe/w/webkitgtk/libjavascriptcoregtk-1.0-0_2.4.11-3ubuntu3_amd64.deb $ sudo wget http://archive.ubuntu.com/ubuntu/pool/universe/w/webkitgtk/libwebkitgtk-1.0-0_2.4.11-3ubuntu3_amd64.deb Next we will extract the debs into the extras folder.
$ cd /usr/local/pulse/extra $ sudo dpkg -x /usr/local/pulse/debs/libicu60_60.2-3ubuntu3_amd64.deb . $ sudo dpkg -x /usr/local/pulse/debs/libjavascriptcoregtk-1.0-0_2.4.11-3ubuntu3_amd64.deb . $ sudo dpkg -x /usr/local/pulse/debs/libwebkitgtk-1.0-0_2.4.11-3ubuntu3_amd64.deb .
Then we’ll want to add the library path to our shell startup file and for convience, the pulse secure command can be aliased as well. Likely .bashrc if you’re using bash or .zshrc if zsh.
export LD_LIBRARY_PATH=$LD_LIBRARY_PATH:/usr/local/pulse/extra/usr/lib/x86_64-linux-gnu/ alias vpn=/usr/local/pulse/pulseUi
By default, pulse secure will have its output go directly to the terminal from which you ran it from. If you’d like to keep those separate and detach the program from the terminal when you run it, you can instead create the following alias: alias vpn=»nohup /usr/local/pulse/pulseUi >| ~/.pulse_secure/pulse/pulse-output.log &» (thanks @GreyCardinal!)
Lastly, we want to make sure to source that same shell startup file e.g. source ~/.bashrc so the changes are loaded. We can then startup the client.
If you get disconnected and the GUI is stuck in a «reconnecting» status, you can use pulsesvc -K to kill the process.
How to Install Pulse Secure VPN Client on Ubuntu 20.04 LTS (Focal Fossa)
In this article, I will take you through the steps to install pulse secure VPN Client on Ubuntu 20.04 LTS. Pulse Secure VPN Client package is one of the standard tool from Pulse Secure to connect Virtual Private Network. It can be easily downloaded and installed in a Linux based Systems like Ubuntu, CentOS, Fedora etc. Here we will see the steps to install Pulse Secure VPN Client package on Ubuntu based System. Check more about Pulse Secure on its official website.
How to Install Pulse Secure VPN Client on Ubuntu 20.04 LTS (Focal Fossa)
Step 1: Prerequisites
a) You should have a running Ubuntu 20.04 LTS Server.
b) You should have sudo or root access to run privileged commands.
c) You should have apt-get , dpkg and wget utility available in your System.
Step 2: Update Your Server
You can choose to download and install all the latest available updates from Ubuntu Repo by using apt-get update command as shown below. In case any of the packages needs to be upgraded then it can be done by using apt-get upgrade command.
root@cyberithub:~# apt-get update Hit:1 http://in.archive.ubuntu.com/ubuntu focal InRelease Get:3 http://in.archive.ubuntu.com/ubuntu focal-updates InRelease [114 kB] Hit:4 http://ppa.launchpad.net/nilarimogard/webupd8/ubuntu focal InRelease Get:5 http://in.archive.ubuntu.com/ubuntu focal-backports InRelease [108 kB] Get:6 http://security.ubuntu.com/ubuntu focal-security InRelease [114 kB] Get:7 https://dl.google.com/linux/chrome/deb stable InRelease [1,811 B] Get:8 http://apt.postgresql.org/pub/repos/apt focal-pgdg InRelease [86.6 kB] Get:9 http://in.archive.ubuntu.com/ubuntu focal-updates/main i386 Packages [629 kB] Get:10 http://in.archive.ubuntu.com/ubuntu focal-updates/main amd64 Packages [1,712 kB] Get:11 http://in.archive.ubuntu.com/ubuntu focal-updates/main Translation-en [320 kB] Get:12 http://in.archive.ubuntu.com/ubuntu focal-updates/main amd64 DEP-11 Metadata [277 kB] Get:13 http://in.archive.ubuntu.com/ubuntu focal-updates/main amd64 c-n-f Metadata [14.9 kB] Get:14 http://in.archive.ubuntu.com/ubuntu focal-updates/restricted amd64 Packages [917 kB] Get:15 http://in.archive.ubuntu.com/ubuntu focal-updates/restricted Translation-en [131 kB] Step 3: Install Dependencies
There are few dependencies which needs to be pre installed before installing pulse secure vpn client package. It can be installed by using below apt-get install command.
root@cyberithub:~# apt-get install libcurl4 libnss3-tools Reading package lists. Done Building dependency tree Reading state information. Done libcurl4 is already the newest version (7.68.0-1ubuntu2.7). libcurl4 set to manually installed. The following packages were automatically installed and are no longer required: dmeventd libaio1 libdevmapper-event1.02.1 liblvm2cmd2.03 thin-provisioning-tools Use 'apt autoremove' to remove them. The following NEW packages will be installed: libnss3-tools 0 upgraded, 1 newly installed, 0 to remove and 165 not upgraded. Need to get 997 kB of archives. After this operation, 4,918 kB of additional disk space will be used. Do you want to continue? [Y/n] y Get:1 http://in.archive.ubuntu.com/ubuntu focal-updates/universe amd64 libnss3-tools amd64 2:3.49.1-1ubuntu1.6 [997 kB] Fetched 997 kB in 1s (1,126 kB/s) Selecting previously unselected package libnss3-tools. (Reading database . 191920 files and directories currently installed.) Preparing to unpack . /libnss3-tools_2%3a3.49.1-1ubuntu1.6_amd64.deb . Unpacking libnss3-tools (2:3.49.1-1ubuntu1.6) . Setting up libnss3-tools (2:3.49.1-1ubuntu1.6) . Processing triggers for man-db (2.9.1-1) . Step 4: Download Pulse Secure
Next step is to download the Pulse Secure VPN client package by using below wget command. This will download the package in your local system directory.
root@cyberithub:~# wget https://dl.technion.ac.il/docs/cis/public/ssl-vpn/ps-pulse-ubuntu-debian.deb --2022-04-11 10:26:24-- https://dl.technion.ac.il/docs/cis/public/ssl-vpn/ps-pulse-ubuntu-debian.deb Resolving dl.technion.ac.il (dl.technion.ac.il). 132.68.239.54 Connecting to dl.technion.ac.il (dl.technion.ac.il)|132.68.239.54|:443. connected. HTTP request sent, awaiting response. 200 OK Length: 5655292 (5.4M) [application/x-debian-package] Saving to: ‘ps-pulse-ubuntu-debian.deb’ ps-pulse-ubuntu-debian.deb 100%[============================================================================>] 5.39M 440KB/s in 18s 2022-04-11 10:26:47 (315 KB/s) - ‘ps-pulse-ubuntu-debian.deb’ saved [5655292/5655292] Step 5: Install Pulse Secure
Once downloaded you can install it by using dpkg -i ps-pulse-ubuntu-debian.deb command as shown below.
root@cyberithub:~# dpkg -i ps-pulse-ubuntu-debian.deb Selecting previously unselected package pulsesecure. (Reading database . 191965 files and directories currently installed.) Preparing to unpack ps-pulse-ubuntu-debian.deb . Unpacking pulsesecure (9.1.R14) . Setting up pulsesecure (9.1.R14) . Created symlink /etc/systemd/system/multi-user.target.wants/pulsesecure.service → /lib/systemd/system/pulsesecure.service. Processing triggers for gnome-menus (3.36.0-1ubuntu1) . Processing triggers for desktop-file-utils (0.24-1ubuntu3) . Processing triggers for mime-support (3.64ubuntu1) . Processing triggers for dbus (1.12.16-2ubuntu2.1) . Processing triggers for man-db (2.9.1-1) . Step 6: Start Pulse UI
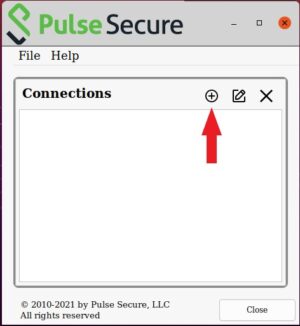
To start Pulse UI, go to Activities and search pulse in the Search box as shown below. Once Pulse UI shows, click on that.

You will see it opened like below. Now from here you can start adding your Connections by clicking on (+) as shown below.
Step 7: Uninstall Pulse Secure
Once you are done with Pulse Secure VPN Client package then you can also choose to uninstall it from your System by using dpkg -r pulsesecure command as shown below.
root@cyberithub:~# dpkg -r pulsesecure (Reading database . 192089 files and directories currently installed.) Removing pulsesecure (9.1.R14) . Removed /etc/systemd/system/multi-user.target.wants/pulsesecure.service. Save all current Pulse Secure configuration settings?[Yy/Nn]y Processing triggers for dbus (1.12.16-2ubuntu2.1) . Processing triggers for man-db (2.9.1-1) . Processing triggers for gnome-menus (3.36.0-1ubuntu1) . Processing triggers for desktop-file-utils (0.24-1ubuntu3) . Processing triggers for mime-support (3.64ubuntu1) . Pulse secure linux client
The usage information is also available in the readme file inside the package.
The following command gives the usage of the various options of the command line client:
The PulseClient.sh script will install the dependent packages (glibc, zlib, nss) if these packages are not already installed.
Prerequisites to Run the Command Line Client
- Pulse Connect Secure (PCS, formerly SA/IVE) IP address or hostname
- VPN user name and password
- PCS certificate (Contact PCS administrator to get certificate in DER format)
- PCS sign-in URL
- Proxy details, if applicable, (IP address/hostname, proxy username and password)
Launch the Command Line Client (initial launch OR when connecting to a new server)
Use the following command format to launch the command line client:
vpn.pulsesecure.net -u user1 -p PulseSecure
-U https://vpn.pulsesecure.net -f
- The PulseClient.sh arguments are stored internally. These arguments will be reused later, if no arguments are provided.
- Arguments storage will be overwritten if new set of arguments are provided to the script.
- In case the user does not want the password to be revealed in the terminal history, this argument can be left out. Then a prompt for password will appear.
Launch the Command Line Client with Proxy
Use the following command format to launch the command line client with proxy:
-a (-I for interactive proxy
Note : In case you do not want to reveal the proxy password in the command line arguments, then use -I (capital i) parameter instead of the proxy password parameter. Then a prompt for the proxy password appears.
Note : System proxy details will be used by command line client if proxy details are not provided as arguments explicitly.
Check the Status of the VPN Connection
Run the following command to see the status of the VPN connection:
Note : This command could take up to 30 seconds to reflect the current state of the Pulse client.
Terminate the Command Line Client
Run the following command to terminate the command line client: