- Генерация SSH-ключей
- Добавление ключа.
- PuTTYgen Download Guide for Windows, Linux and Mac
- How to use PuTTYgen?
- Download PuTTYgen
- Download PuTTYgen on Windows
- Run PuTTYgen on Windows
- Download PuTTYgen for Mac
- Ported PuTTY for Mac
- Download PuTTYgen for Linux
- Generate Key Pair for Authentication in Linux
- Various Command Line Options of PuTTY in Linux
- How To Configure SSH Keys Authentication With PuTTY And Linux Server
- Generate a private and public key pair
- Configure your Linux server (create user, save public key)
- Add Private key to PuTTY SSH authentication agent
- Use PuTTY to connect to your server
Генерация SSH-ключей
Рассмотрим создание SSH-ключей в Linux и Windows для подключения к серверу под управлением ОС Linux.
Использование SSH-ключей не только позволяет подключаться к серверу без пароля, но и повышает уровень безопасности сервера. Причина проста — пароль можно подобрать, а вот на подбор ключа могут уйти десятилетия. Ключ состоит из двух частей — открытой и закрытой. Именно открытый ключ передается на сервер, а закрытый ключ остается на ПК клиента. Если вы опасаетесь за безопасность ключа, его можно защитить парольной фразой при генерации.
Создание ключей выполняется командой
На что стоит обратить внимание.
OpenSSH поддерживает генерацию нескольких типов ключей:
Последнее время, надежность DSA-ключей ставится под сомнение и рекомендуют использовать RSA-ключи.
Если отсутствует каталог “.ssh” в каталоге вашей учетной записи (это скрытый каталог), то он будет создан. Так было не всегда и возможно его придется создать вручную. passphrase — парольная фраза для защиты ключа. Если не желаете её задавать, тогда просто нажимаете Enter. Далее вводится подтверждение этой фразы, либо также Enter. В результате выполнения команды, будет показан слепок ключа и его псевдографическое изображение. Открытый ключ располагается по пути /home/administrator/.ssh/id_rsa.pub. Закрытый — /home/administrator/.ssh/id_rsa.
Рассмотрим создание ключа через утилиту PuTTY-Gen.
Скачаем ее с официального сайта, выбрав соответствующую разрядность своей операционной системы (не серверной).


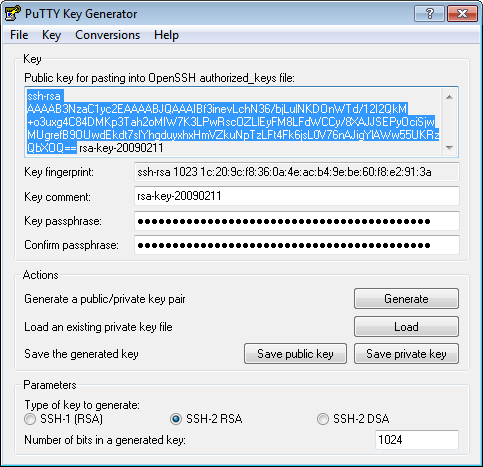
В открывшемся окне проверяем значение переключателя “Type of key to generate”, должно быть RSA, кликаем по кнопке Generate.
В обновленном окне программа нас просит выполнять случайные движения мышью в пустом поле программы. Таким образом программа получит случайные данные и создаст ключи.

Должен получиться примерно такой результат:

Копируем текст открытого ключа из поля “Public key for pasting into OpenSSH authorized_keys file:” временно в любой текстовый файл. Сохраняем закрытый ключ нажав соответствующую кнопку. При необходимости указываем парольную фразу.
Открытый ключ должен начинаться с ssh-rsa.
Добавление ключа.
Для успешного подключения к серверу следует прописать полученный открытый ключ в файл authorized_keys расположенном на сервере по пути:
В данном случае, имя пользователя administrator.
В *nix-подобный операционных системах экспорт открытого ключа на сервер выполняется командой:
remote_user_name — имя пользователя на удаленном сервере, под которым и будет происходить дальнейшее подключение.
10.10.0.1 — адрес сервера, в нашем случае, взят для примера. После выполнения команды, потребуется ввести пароль и более этого делать не придется., при попытках подключения с этого ПК.
PuTTYgen Download Guide for Windows, Linux and Mac
PuTTYgen is a tool used for generating public and private SSH keys which are its fundamental function. Though it collects keys in its own file format i.e. .ppk files, keys can also be transformed to any other file format quickly. It is available for the various operating system, i.e. Windows, Linux, Mac, etc. PuTTYgen.exe is the graphical tool on Windows OS. While on the other side, Linux OS has the only command-line version.
How to use PuTTYgen?
PuTTYgen is used to generate public or private key pair for creating SSH keys. Below is the complete guidance about how to generate RSA key in Windows operating system:
- Once you install the PuTTY on your machine, you can easily run PuTTYgen. For the same, go to Windows -> Start Menu -> All Programs -> PuTTY -> PuTTYgen.
- You will see the PuTTY key generator dialog box on your screen
- You will find a “Generate” button in that dialog. Clicking on it will lead to generating the keys for you.
- Now you will need to add a unique key passphrase in the Key passphrase and Confirm passphrase field.
- Click on the “Save Public Key” and “Save Private Key” buttons to save your public and private keys.
- You will see the text starting with ssh-RSA in the Public key for pasting into OpenSSH authorized_keys file field which is located at the top of the window. Copy that entire text to your clipboard by pressing ctrl+c as you will require the key to paste on your clipboard in the public key tool of control panel or directly on the cloud server.
Various Ways to Use RSA Key Pair
RSA key pair generated through PuTTYgen is used in two various ways defined as below:
- To assign while creating a new cloud server
You can choose the public key from the given list of keys at the time of creating cloud server. If you don’t find your key in that list, then first add and then assign it. - Assign to an existing cloud server
At the time of connecting to the cloud server, first of all, you need to tell PuTTY to use it for utilizing your newly created RSA key pair.
Download PuTTYgen
The installation of PuTTYgen is very simple as it is installed as a part of normal PuTTY .msi package installation. You can follow the simple steps to download PuTTYgen software for your system. That is the reason why you don’t need to download PuTTYgen separately. Once you download PuTTY software, you will be able to install and run PuTTYgen easily in no time. Below is the complete instruction about how to download and install PuTTY on Windows.
Download PuTTYgen on Windows
The very first requisite is to acquire the copy of PuTTY installation package. If your system is of 64-bit, then you should install a 64-bit version of PuTTY, i.e. putty-64bit—installer.msi. In case of a 32-bit operating system, you will need to install the 32-bit version of PuTTY, i.e. putty—installer.msi
Go to PuTTY Installation Download page, where you will find the download link of PuTTY installation package with the exhaustive details of its installation, setup instruction, verifying release signature, various alternatives, many more.
Once the PuTTY installation package is downloaded successfully, now it’s time to install it by starting the installer. Go to How to install PuTTY on Windows where you will find the step by step guidance for PuTTY installation for Windows operation system.
After successfully downloading and installing PuTTY on your Windows machine, you are just 2-3 clicks away to run PuTTYgen. Follow the below-given step by step guidance to run PuTTYgen:
Run PuTTYgen on Windows
1. Go to Windows -> Start Menu -> All Programs -> PuTTY -> PuTTYgen. You will see a window for PuTTY Key Generator on your screen.

That’s it. Now you can generate public or private key pair using PuTTYgen. puttygen
Download PuTTYgen for Mac
You can find the step by step guide to download PuTTYgen for Mac operating system. Command-line SSH client is a part of the Mac operating system. To utilize it, go to Finder and then opt for Go -> utilities from the top menu. After that find the terminal which supports SSH connections to remote servers.
Ported PuTTY for Mac
Mac has the port of PuTTY which can be installed in various ways described as below:
- Installation using Homebrew:
Use the below-given command to install PuTTY in case you have already installed “brew”command.sudo brew install putty - Installation using MacPorts:
PuTTY is easily available through MacPorts. First of all, install MacPorts and then apply the below-given command.
sudo port install puttyUse the below-given command to add the shortcut on the desktop.cp /opt/local/bin/putty ~/Desktop/PuTTY - Alternatives to PuTTY on Mac OSCyberduck, used by many people on Mac OS is the best SSH Client is the ultimate alternative to PuTTY on Mac OS.
Download PuTTYgen for Linux
In order to download PuTTYgen for Linux (Ubuntu) operating system, one required to install PuTTYgen separate from the PuTTY client in case of some Linux distributions.
For example, Debian Linux requires the below-given code to install PuTTYgen:
sudo aptitude install putty-tools
Generate Key Pair for Authentication in Linux
Use the below command to create the key pair for authentication in Linux.
PuTTYgen -t RSA -b 2048 -C “user@host” -o keyfile.ppk
Various Command Line Options of PuTTY in Linux
Below is the list of important command line options for PuTTY in Linux operating system.
PuTTYgen [-t keytype [-b bits] [-q] | keyfile]
[-C new-comment] [-P]
[-O output-type | -p | -l | -L]
[-o output-file]
- Keyfile – It is the name of the existing key file to read at the time of changing the current key.
- -t keytype – This command specifies the type of the key to creating. Its acceptable values are RSA and dsa.rsa1.
- -b bits – This command specifies a total number of bit in a particular key. 1024 is the perfect size for DSA key, while 2048 or 4096 are the perfect size for RSA keys.
- -q – This command suppresses the message about progress at the time of key generation.
- -C new-comment – This command is used to specify the comment to describe the key. It can be used for new and/or existing key. Key operation is not affected by comment. However, it is used to recognize the key owner, it’s not reliable completely as any value can be applied to it.
- –P – This command is used to update the passphrase of a key. Passphrase helps to encrypt the private key. As passphrase can’t be add or update on command line, it prompts a new passphrase tool to alter it.
- –old-passphrase-file – The old password of the key remains in this file. This is used when the key is protected by a passphrase.
- –new-passphrase file – This file entails the new passphrase of the key. This command comes in the action either at the time of generating new key or while applying –P command to change the passphrase.
- -O output-type – This command defines what to give in output. By default, the private key is the output.
Thus, above are the prominent commands of PuTTYgen in Linux operating system. There are many other commands also available to perform a various task from the command prompt in Linux at flank speed.
How To Configure SSH Keys Authentication With PuTTY And Linux Server
This tutorial explains how you can replace password-based SSH authentication with key-based authentication which is more secure because only the people that own the key can log in. In this example, we’re using PuTTY as our SSH client on a Windows system.
Generate a private and public key pair
Open PuTTYgen.exe, press Generate button, move mouse. Once the keys are generated, type your key passphrase (choose a «hard to guess» one). Save Public key. Save Private key.
Configure your Linux server (create user, save public key)
For this guide let’s assume you regular login name is us3r (replace it with one that you use regularly).
As root, on the shell, type:
adduser us3r --disabled-password
You will be asked to fill in some details such as the user’s real name (empty string is fine).
su us3r cd /home/us3r mkdir .ssh chmod 700 .ssh cd .ssh
Then in that folder, create and edit a file called authorized_keys2 .
In there, cut/paste your public ssh key, on ONE LINE (That is very important. )
- Do not add the email@example.com at the end of the line.
- Do not add the BEGIN PUBLIC KEY or END PUBLIC KEY.
- Do not add the rsa-key-20090211 at the end.
- Make sure, there is ssh-rsa at the beginning.
It should be something like:
ssh-rsa AAAAB3NzaC1yc2EAAAABJQAAAIBf3inevLchN36/bjLulNKDOnWTd/12I2QkM+o3uxg4C…
chmod 600 authorized_keys2
Add Private key to PuTTY SSH authentication agent
Start the PuTTY SSH authentication agent PAGEANT.EXE. When started, right-click its systray icon and select «add key». Select your private key file, and type in your passphrase when you add the key. The Pageant works as a passphrase keeper.
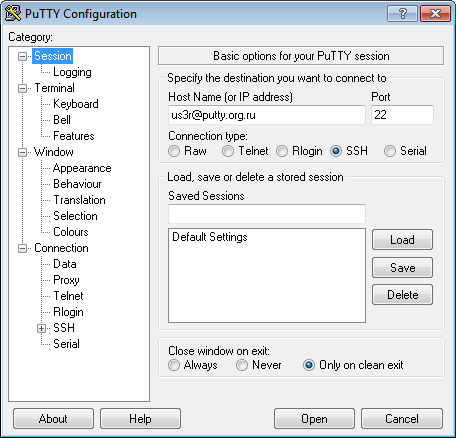
Use PuTTY to connect to your server
Open PuTTY and connect as us3r@putty.org.ru :
See that you log in without a password …