- Compile Python Scripts to Executable Files
- Prerequisite:
- How to Compile a python script for windows:
- 1.Compiling the script using Pyinstaller library:
- Step 1:
- Step 2:
- Step 3:
- Step 4:
- 2. Compiling the script using Py2exe library:
- Step 1:
- Step 2:
- Step 3:
- Step 4:
- 3. Compiling the script using the auto-py-to-exe library:
- Step 1:
- Step 2:
- How to Compile a python script for Linux:
- Step 1:
- Step 2:
- Step 3:
- Step 4:
- Conclusion:
- Как скомпилировать Python
- Функция bubble_sort
Compile Python Scripts to Executable Files
Writing scripts that are based on Python libraries and are meant to be executed more than once is a good practice. It is a good way to ensure that your code is not executing on a system that may not have all the required Python modules installed. Compiling a python script to an executable file is also a good practice. This will ensure that script runs independently of the Python installed on the system. This tutorial will discuss different ways to compile Python scripts to executable files. This includes compiling the script on Linux and windows.
Prerequisite:
For compiling the python script into a .exe file first, we need a Python script here we created a simple python script that gives you simple messes when clicking one button.
import tkinter as tk root= tk.Tk() canvas1 = tk.Canvas(root, width = 299, height = 299, bg='black') canvas1.pack() def hello (): label1 = tk.Label(root, text= 'Hello Programmer!', fg='red', font=('helvetica', 12, 'bold')) canvas1.create_window(150, 200, window=label1) button1 = tk.Button(text='say hello',command=hello, bg='white',fg='black') canvas1.create_window(150, 150, window=button1) root.mainloop()How to Compile a python script for windows:
We are going to use three python libraries to Compile a python script into an executable file for windows
1.Compiling the script using Pyinstaller library:
Step 1:
To install pyinstaller use the following command in the command prompt.
Pyinstaller: With PyInstaller, you can bundle your Python application and all of the packages it relies on into a single, compact executable. This reduces the need to install dozens or hundreds of packages when deploying an application or when helping students set up their programming environment. PyInstaller supports Python 2 and above.
Step 2:
Create a folder and save the python script in it. For example, we created a folder name exe_app and saved my python script named app.py in it.
Step 3:
Open a command prompt in the same folder where our python script is saved and type the following command and press enter.
pyinstaller --onefile app.py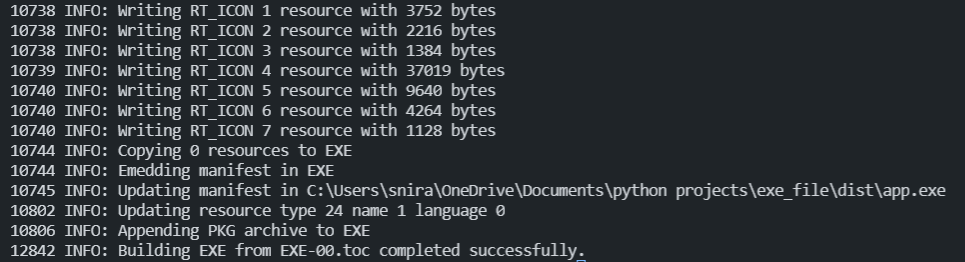
Output:
Step 4:
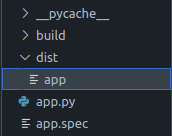
After running the command you can see that more files and folders are created in the root folder. There you can see folder name dist in that you can find the . EXE file.

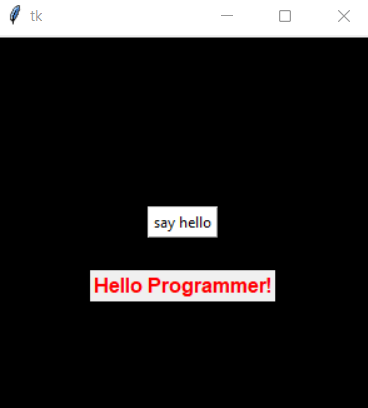
You can open the app.exe file to see it running like a normal windows application, you can click on the say hello button that shows the message.
2. Compiling the script using Py2exe library:
Step 1:
To install Py2exe use the following command in the command prompt.
Py2exe: py2exe library is the same as the pyinstaller library.
Step 2:
You need to create a new file setup.py at the same directory where you have the script. This file contains the below parameters.
from distutils.core import setup import py2exe setup(windows=['app.py'])in place of app.py, you can add your python file name. And if your script runs in the console replace windows for the console.
Step 3:
Open a command prompt in the same folder where our python script is saved type the following command and press enter.
Step 4:
After running the code folder name dist is created in the root folder and in the dist folder, you can find that app.exe is created.
3. Compiling the script using the auto-py-to-exe library:
Step 1:
To install auto-py-to-exe use the following command in the command prompt.
auto-py-to-exe (GUI Tool): auto-py-to-exe is also a library that converts Python scripts into executable Windows programs, able to run without requiring a Python installation. But it has a graphical interface.
Step 2:
To open the auto-py-to-exe use the following command in the command prompt.
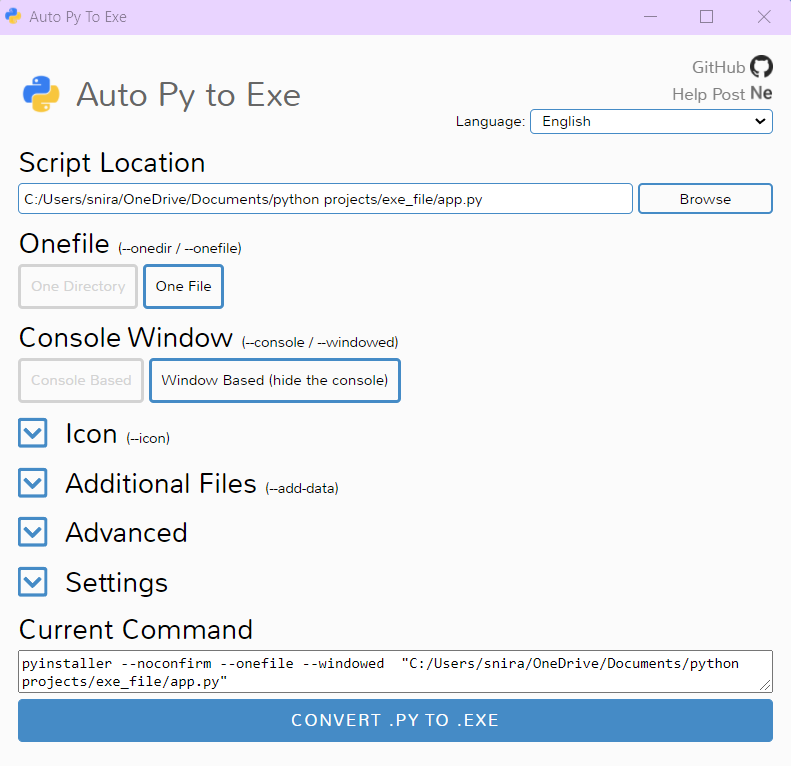
Output:
As you can see it opens a graphical interface that is already self-explanatory you just have to select the app.py file and select what you want in the given option and press on convert.py to .exe and that’s it. Then it will automatically open the folder of the exe file that you lunch.
How to Compile a python script for Linux:
Step 1:
For Linux, we can use the pyinstaller library as well but for compiling python script for Linux we need to do this process on a Linux system otherwise it will automatically make a .exe file
To install pyinstaller use the following command in the terminal.
Step 2:
Same as before creating a folder and saving the python script in it. For example, we created a folder name exe_app and saved my python script named app.py in it.
Step 3:
Open a terminal in the same folder where our python script is saved type the following command and press enter.
pyinstaller --onefile app.py
Output:
Step 4:
After running the command you can see that more files and folders are created in the root folder. There you can see folder name dist in that you can find the file name app.
you can launch the app file by using the following common in the terminal in the same directory.

Conclusion:
It is sometimes necessary to compile (aka build) a python script into an executable file that can be run independently of a python environment. Python does come with its built-in tools for doing so by itself, and in this post, we looked at the many types of the python library that you can easily create a standalone executable program on windows and Linux. for Windows systems, we used pyinstaller and py2exe. We also looked at the auto-py-to-exe, which is a graphical frontend for automatic script compilation. For Linux, we examined pyinstaller. All of these methods are easy to use and if you have any questions don’t hesitate to comment below!
Как скомпилировать Python

Я хочу рассказать об удивительном событии, о котором я узнал пару месяцев назад. Оказывается, одна популярная python-утилита уже более года распространяется в виде бинарных файлов, которые компилируются прямо из python. И речь не про банальную упаковку каким-нибудь PyInstaller-ом, а про честную Ahead-of-time компиляцию целого python-пакета. Если вы удивлены так же как и я, добро пожаловать под кат.
Объясню, почему я считаю это событие по-настоящему удивительным. Существует два вида компиляции: Ahead-of-time (AOT), когда весь код компилируется до запуска программы и Just in time compiler (JIT), когда непосредственно компиляция программы под требуемую архитектуру процессора осуществляется во время ее выполнения. Во втором случае первоначальный запуск программы осуществляется виртуальной машиной или интерпретатором.
Если сгруппировать популярные языки программирования по типу компиляции, то получим следующий список:
- Ahead-of-time compiler: C, C++, Rust, Kotlin, Nim, D, Go, Dart;
- Just in time compiler: Lua, С#, Groovy, Dart.
В python из коробки нет JIT компилятора, но отдельные библиотеки, предоставляющие такую возможность, существуют давно
Смотря на эту таблицу, можно заметить определенную закономерность: статически типизированные языки находятся в обеих строках. Некоторые даже могут распространяться с двумя версиями компиляторов: Kotlin может исполняться как с JIT JavaVM, так и с AOT Kotlin/Native. То же самое можно сказать про Dart (версии 2). A вот динамически типизированные языки компилируются только JIT-ом, что впрочем вполне логично.
При запуске виртуальная машина сначала накапливает информацию о типах переменных, затем после накопления статистики, запускается компиляция наиболее нагруженных частей программы. Виртуальная машина отслеживает типы аргументов и переключает выполнение программы между уже скомпилированными и не скомпилированными участками кода в зависимости от текущих значений переменных.
При использовании JIT компиляции типы не очень то и нужны, ведь информация о типах собирается во время работы программы. Поэтому все популярные динамически типизированные языки программирования распространяются именно с JIT компилятором. Но как быть с AOT компиляцией кода, в котором нет типов? Меня очень заинтересовал этот вопрос, и я полез разбираться.
Итак, вернемся к утилите, о которой говорилось в начале статьи. Речь про mypy — наиболее популярный синтаксический анализатор python-кода.

С апреля 2019 года эта утилита распространяется в скомпилированном виде, о чем рассказывается в блоге проекта. А для компиляции используется еще одна утилита от тех же авторов — mypyc. Погуглив немного, я нашел достаточно большую статью “Путь к проверке типов 4 миллионов строк Python-кода” про становление и развитие mypy (на Хабре доступен перевод: часть 1, часть 2, часть 3). Там немного рассказывается о целях создания mypyc: столкнувшись с недостаточной производительностью mypy при разборе крупных python-проектов в Dropbox, разработчики добавили кеширование результатов проверки кода, а затем возможность запуска утилиты как сервиса. Но исчерпав очевидные возможности оптимизации, столкнулись с выбором: переписать все на go или на cython. В результате проект пошел по третьему пути — написание своего AOT python-компилятора.
Дело в том, что для правильной работы mypy и так необходимо построить то же синтаксическое дерево, что и интерпретатору во время исполнения кода. То есть mypy уже “понимает” python, но использует эту информацию только для статистического анализа, а вот mypyc может преобразовывать эту информацию в полноценный бинарный код.
Думаю тут многие решили, что разобрались в вопросе того, как скомпилировать динамически типизированный python-код. Python c версии 3.4 поддерживает аннотацию типов, а mypy как раз и используется для проверки корректности аннотаций. Получается, python как бы уже и не динамически типизированный язык, что позволяет применить AOT компиляцию. Но загвоздка в том, что mypyc может компилировать и неаннотированный код!
Функция bubble_sort
Для примера рассмотрим функцию сортировки “пузырьком”. Файл lib.py:
def bubble_sort(data): n = len(data) for i in range(n - 1): for j in range(n - i - 1): if data[j] > data[j + 1]: buff = data[j] data[j] = data[j + 1] data[j + 1] = buff return dataУ типов нет аннотаций, но это не мешает mypyc ее скомпилировать. Чтобы запустить компиляцию, нужно установить mypyc. Он не распространяется отдельным пакетом, но если у вас установлен mypy, то и mypyc уже присутствует в системе! Запускаем mypyc, следующей командой:
После запуска в проекте будут созданы следующие директории:
- .mypy_cache — mypy кэш, mypyc неявно запускает mypy для разбора программы и получения AST;
- build — артефакты сборки;
- lib.cpython-38-x86_64-linux-gnu.so — собственно сборка под целевую платформу. Данный файл представляет из себя готовый CPython Extension.
CPython Extension — встроенный в CPython механизм взаимодействия с кодом, написанным на С/C++. По сути это динамическая библиотека, которую CPython умеет загружать при импорте нашего модуля lib. Через данный механизм осуществляется взаимодействие с модулями, написанными на python.
Компиляция состоит из двух фаз:
- Компиляция python кода в код С;
- Компиляция С в бинарный .so файл, для этого mypyc сам запускает gcc (gcc и python-dev также должен быть установлены).
Файл lib.cpython-38-x86_64-linux-gnu.so имеет преимущество перед lib.py при импорте на соответствующей платформе, и исполняться теперь будет именно он.
Ну и давайте сравним производительность модуля до и после компиляции. Для этого создадим файл main.py с кодом запуска сортировки:
import lib data = lib.bubble_sort(list(range(5000, 0, -1))) assert data == list(range(1, 5001))Получим примерно следующие результаты: