- How to install Python 3 in Windows Subsystem with Ubuntu
- Enabling Windows Subsystem for Linux using Settings
- Installing Linux distros using Microsoft Store
- Installing Linux distros using PowerShell
- Setting Up Python 3 in Windows Subsystem for Linux (WSL)
- How to setup Virtual Environment in Windows Subsystem for Linux (WSL)
- How to install Visual Studio Code in in Windows Subsystem for Linux (WSL)
- How install Python 3 and setup Virtual Environment in Windows
- Manual verification of Path ( optional)
- How to setup Virtual Environment in Windows
- How install Visual Studio Code with your Virtual Environment
- How to export your enviroment by using pip
- How to create requirements.txt for pip3 from conda
How to install Python 3 in Windows Subsystem with Ubuntu
In this blog post, we’ll see how to Install Python 3 in Windows Subsystem for Linux Ubuntu and Windows 10 and how to Set Up a Programming Environment with Visual Studio Code.
If you want to run distros of Linux on Windows 10, you must first enable the Windows Subsystem for Linux feature before you can download and install the flavor of Linux that you want to use.
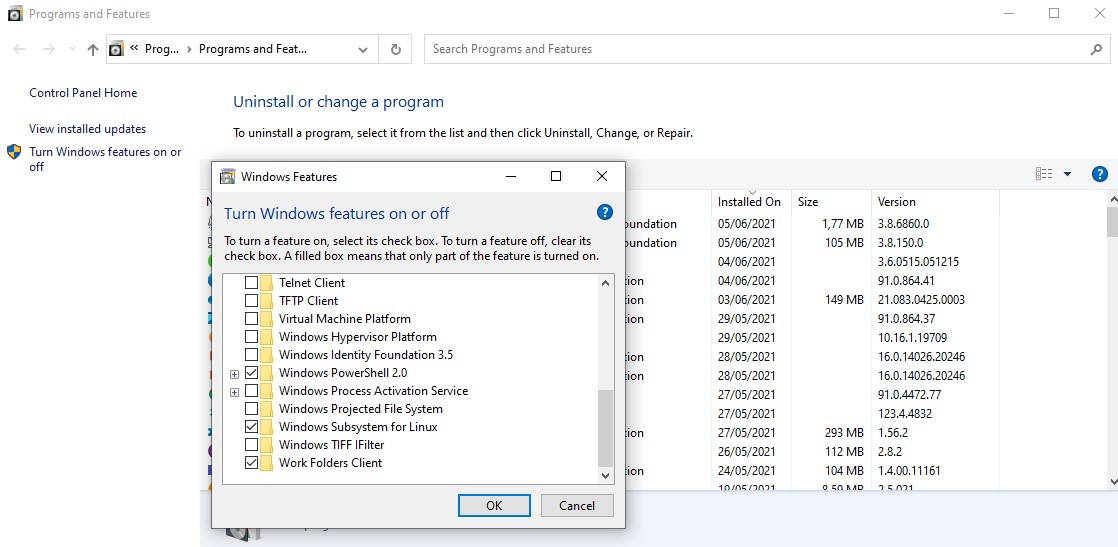
Enabling Windows Subsystem for Linux using Settings
To install WSL using Setting on Windows 10, use these steps:
- Open Settings.
- Click on Apps.
- Under the “Related settings” section, click the Programs and Features option.

- Click the Turn Windows features on or off option from the left panel
- Check the Windows Subsystem for Linux option.
- Click the OK button.
- Click the Restart now button.
%20with%20Ubuntu/1.jpg)
There are two ways to install Ubuntu: Using Microsoft store or using PowerShell
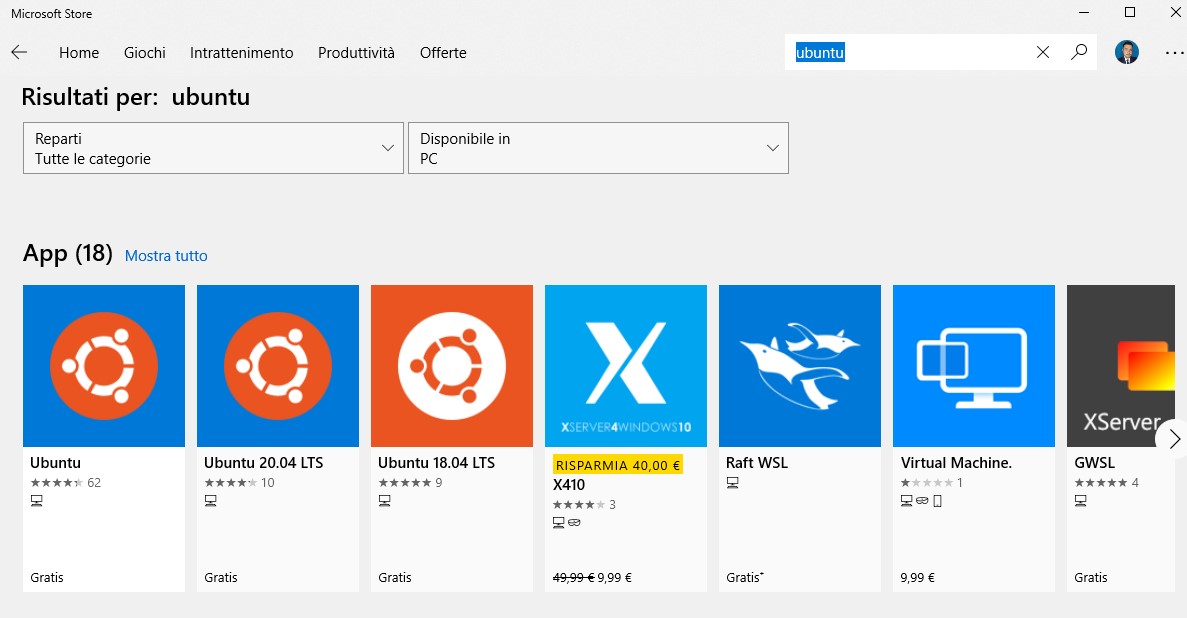
Installing Linux distros using Microsoft Store
To install a distribution of Linux on Windows 10, use these steps:
- Open Microsoft Store.
- Search for the Linux distribution that you want to install, in this case we choose ubuntu.
- We select and Install
- Click the Launch button.
- Create a username for the Linux distro and press Enter.
- Specify a password for the distro and press Enter.
Installing Linux distros using PowerShell
You can now install everything you need to run Windows Subsystem for Linux (WSL) by entering this command in an administrator PowerShell or Windows Command Prompt and then restarting your machine. PowerShellCopy
This command will enable the required optional components, download the latest Linux kernel, set WSL 2 as your default, and install a Linux distribution for you *(Ubuntu by default).
The first time you launch a newly installed Linux distribution, a console window will open and you’ll be asked to wait for files to de-compress and be stored on your machine. All future launches should take less than a second.
Setting Up Python 3 in Windows Subsystem for Linux (WSL)
We open the Command Prompt
and we type bash.exe
let’s update and upgrade the system
sudo apt update sudo apt -y upgrade The -y flag will confirm that we are agreeing for all items to be installed, but depending on your version of Linux, you may need to confirm additional prompts as your system updates and upgrades. Once the process is complete, we check if installed python
To manage software packages for Python, let’s install pip, a tool that will install and manage programming packages we may want to use in our development projects.
sudo apt install -y python3-pip Python packages can be installed by typing:
pip3 install package_name Here, package_name can refer to any Python package or library, such as Pandas for Data Science development or NumPy for scientific computing. So if you would like to install NumPy, you can do so with the command pip3 install numpy .
There are a few more packages and development tools to install to ensure that we have a robust setup for our programming environment:
sudo apt install -y build-essential libssl-dev libffi-dev python3-dev Once Python is set up, and pip and other tools are installed, we can set up a virtual environment for our development projects.
How to setup Virtual Environment in Windows Subsystem for Linux (WSL)
Virtual environments enable you to have an isolated space on your server for Python projects, ensuring that each of your projects can have its own set of dependencies that won’t disrupt any of your other projects.
Setting up a programming environment provides greater control over Python projects and over how different versions of packages are handled. This is especially important when working with third-party packages.
You can set up as many Python programming environments as you would like. Each environment is basically a directory or folder on your server that has a few scripts in it to make it act as an environment.
While there are a few ways to achieve a programming environment in Python, we’ll be using the venv module here, which is part of the standard Python 3 library.
Let’s install venv by typing:
sudo apt install -y python3-venv With this installed, we are ready to create environments. Let’s either choose which directory we would like to put our Python programming environments in, or create a new directory with mkdir , as in:
mkdir environments cd environments Once you are in the directory where you would like the environments to live, you can create an environment by running the following command:
python3 -m venv frameworkenv Essentially, pyvenv sets up a new directory that contains a few items which we can view with the ls command:
[email protected]:/mnt/c/Users/ruslanmv/environments$ ls frameworkenv bin include lib lib64 pyvenv.cfg share Together, these files work to make sure that your projects are isolated from the broader context of your server, so that system files and project files don’t mix. This is good practice for version control and to ensure that each of your projects has access to the particular packages that it needs. Python Wheels, a built-package format for Python that can speed up your software production by reducing the number of times you need to compile
To use this environment, you need to activate it, which you can achieve by typing the following command that calls the activate script:
source frameworkenv/bin/activate Your command prompt will now be prefixed with the name of your environment, in this case it is called frameworkenv. Depending on what version of Debian Linux you are running, your prefix may appear somewhat differently, but the name of your environment in parentheses should be the first thing you see on your line:
(frameworkenv) [email protected]:/mnt/c/Users/ruslanmv/environments$ This prefix lets us know that the environment frameworkenv is currently active, meaning that when we create programs here they will use only this particular environment’s settings and packages.
How to install Visual Studio Code in in Windows Subsystem for Linux (WSL)
Following the previous steps just we type
(frameworkenv) [email protected]:/mnt/c/Users/ruslanmv/environments$ code Installing VS Code Server for x64 (054a9295330880ed74ceaedda236253b4f39a335) Downloading: 100% Unpacking: 100% Unpacked 1952 files and folders to /home/ruslanmv/.vscode-server/bin/054a9295330880ed74ceaedda236253b4f39a335. Now we can Setup our first project.
we create our first python program
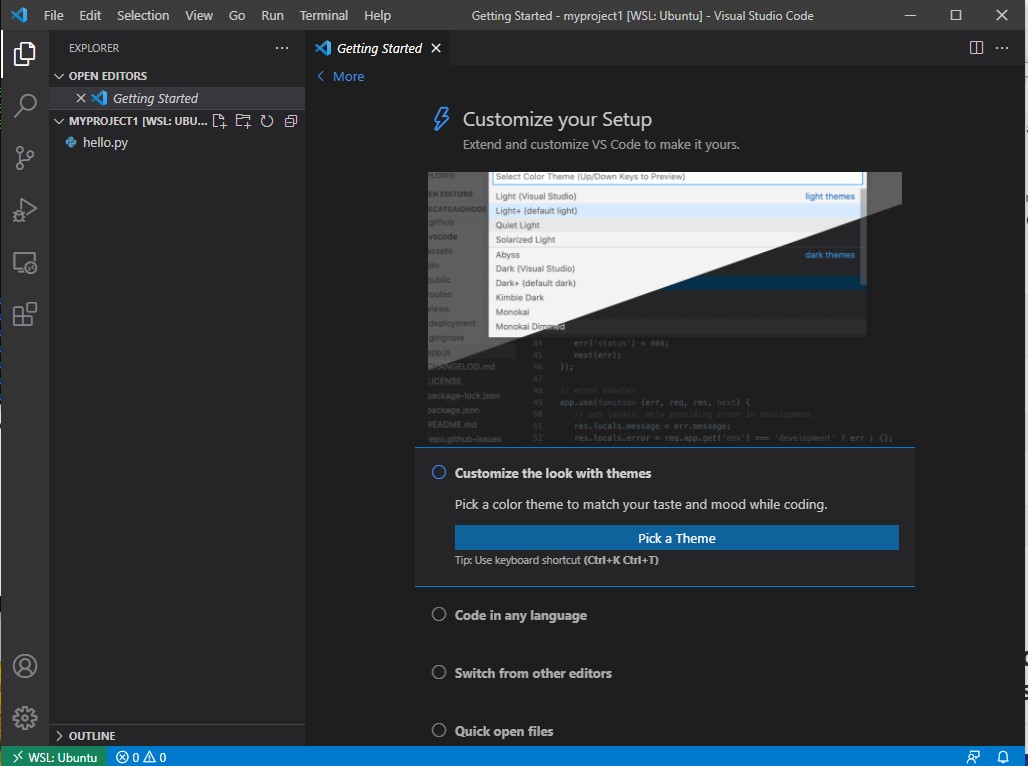
we select the hello.py file
print("Hello World from Ubuntu in Windows") 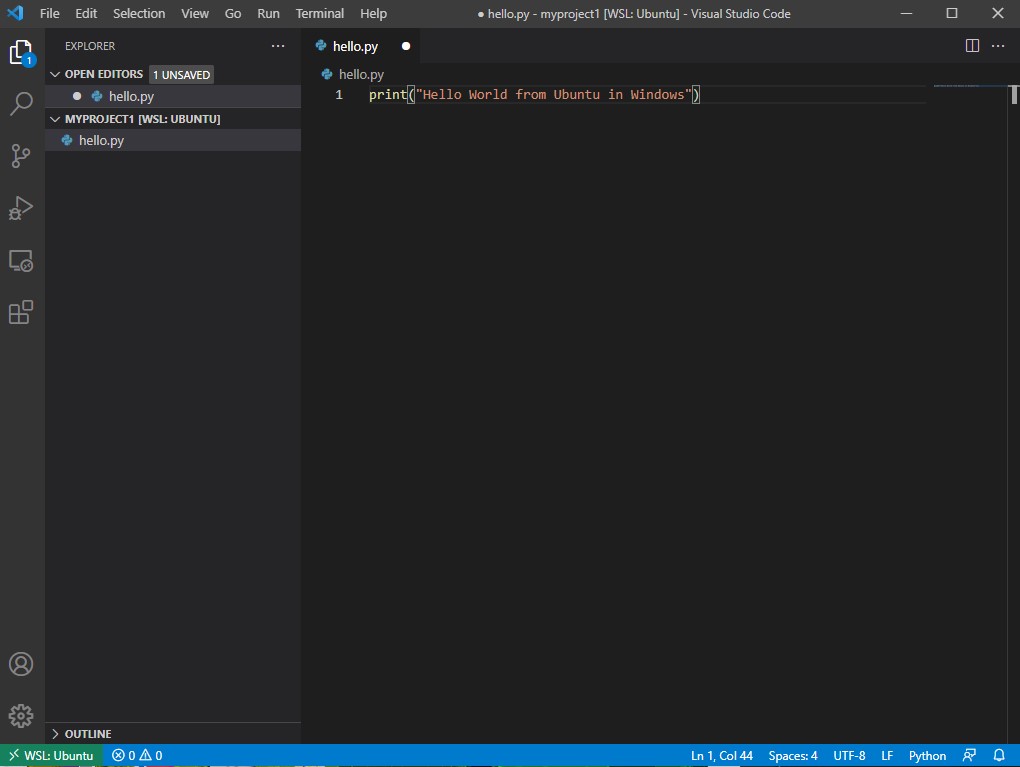
then we go to click on terminal then new terminal

source "../environments/frameworkenv/bin/activate" (frameworkenv) [email protected]:/mnt/c/Users/ruslanmv/myproject1$ source "../environments/frameworkenv/bin/activate" (frameworkenv) [email protected]:/mnt/c/Users/ruslamv/myproject1$ python3 hello.py Hello World from Ubuntu in Windows (frameworkenv) [email protected]:/mnt/c/Users/ruslamv/myproject1$ 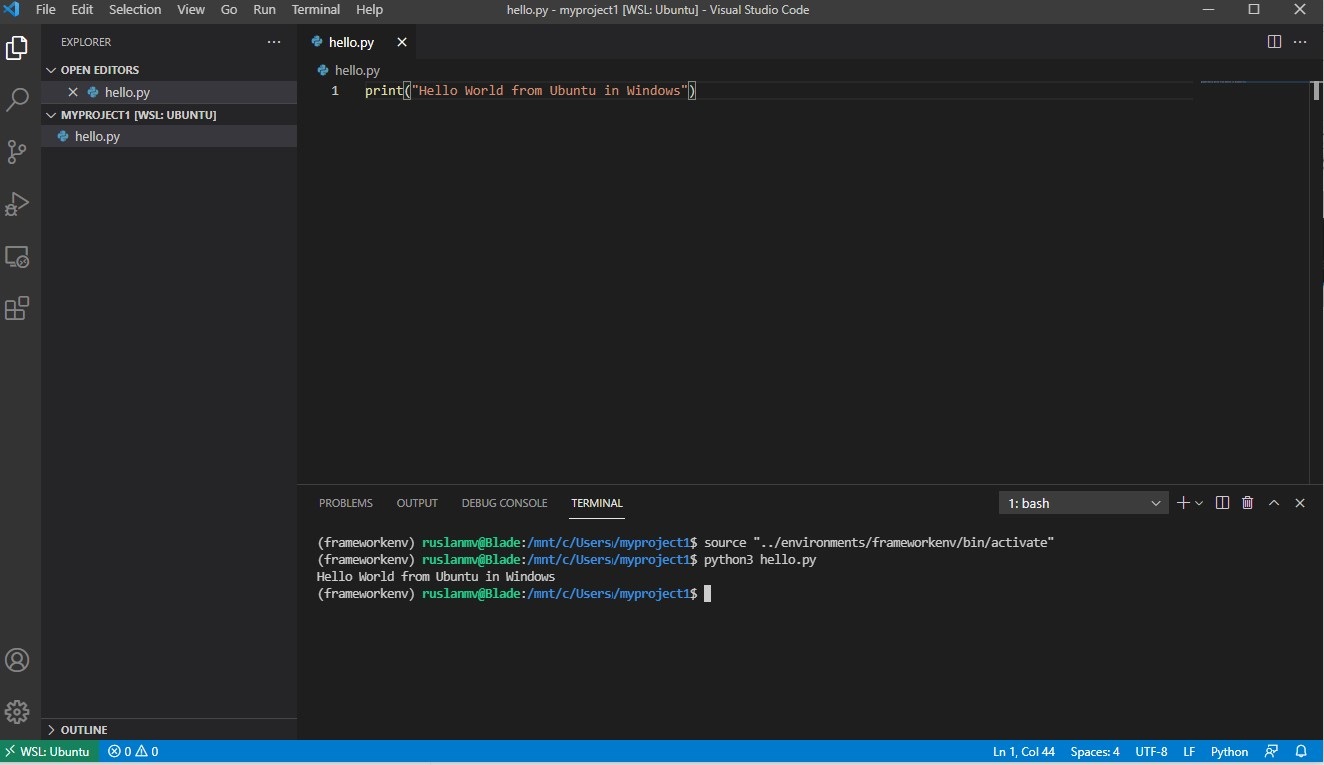
Congratulations ! Now we can work on VS code with your custom python environment.
The the next sections we will repeat the same but now by using only Windows 10.
How install Python 3 and setup Virtual Environment in Windows
If you need to setup your Python 3 in your windows and setup Virtual Environment you can download python from this Website link.
it will take you to the Python official download website.
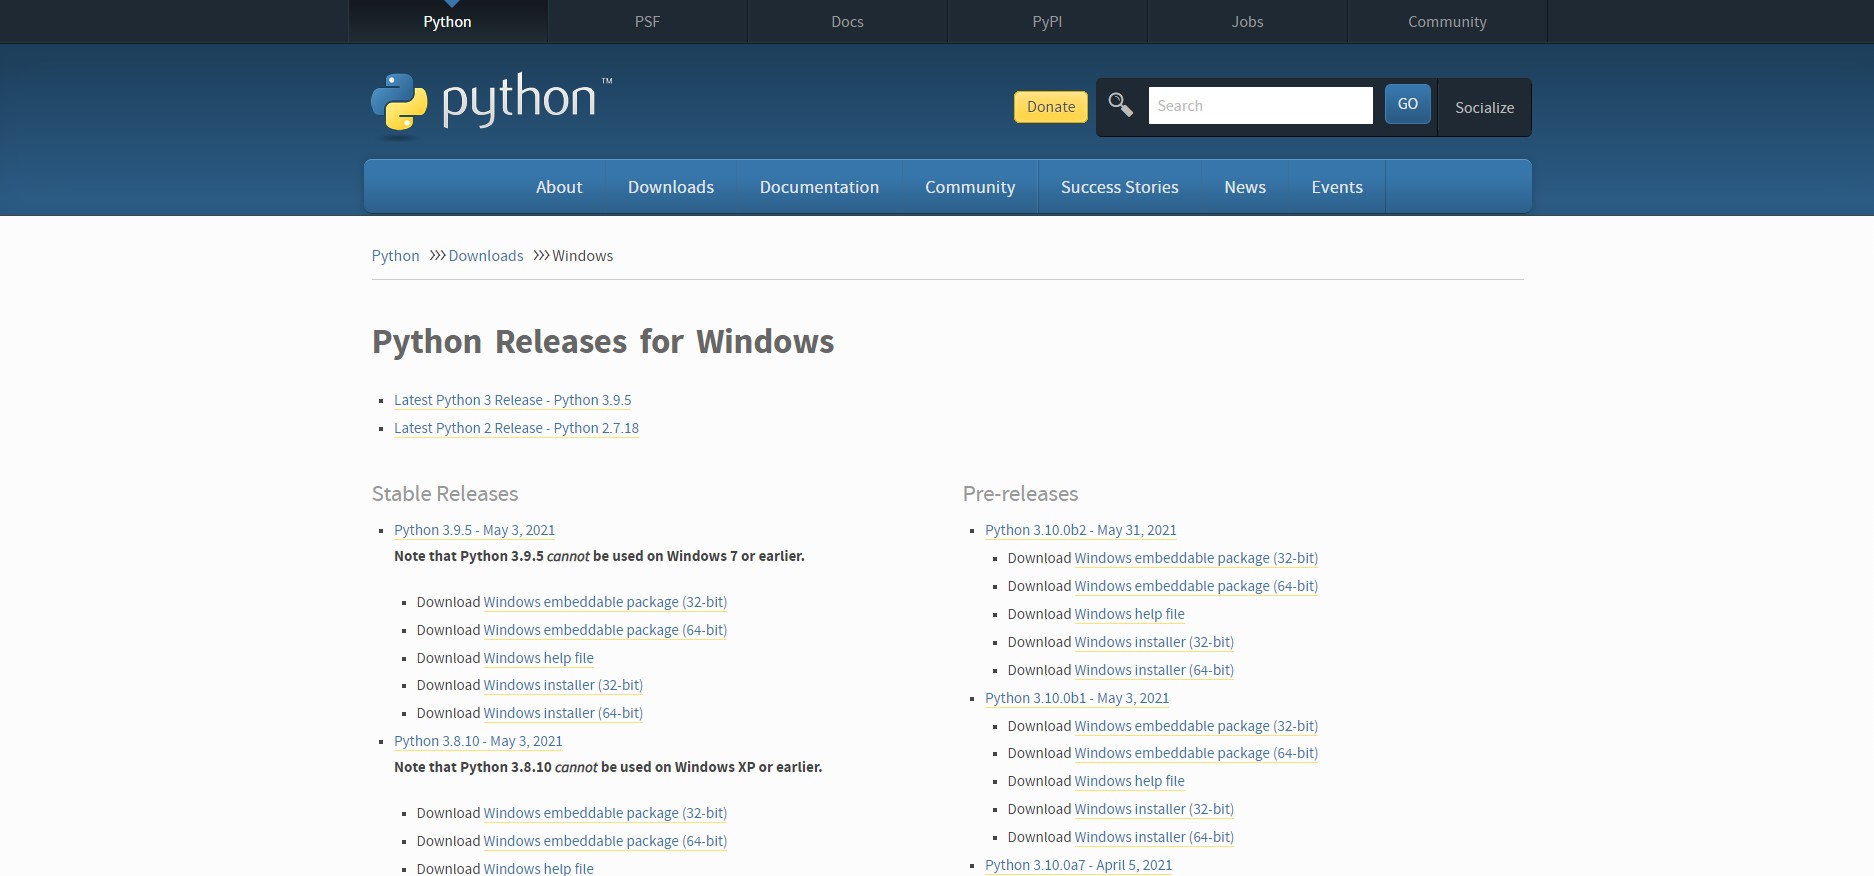
If you need Python 3.8.0. from this link and start to download.
Next, right click the mouse button you will see open button click to open.

Here is very important step
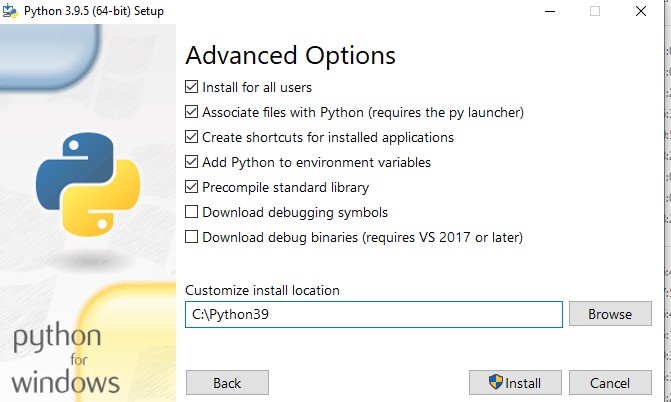
Enable to add Python 3.9 to path and select Customize Installation
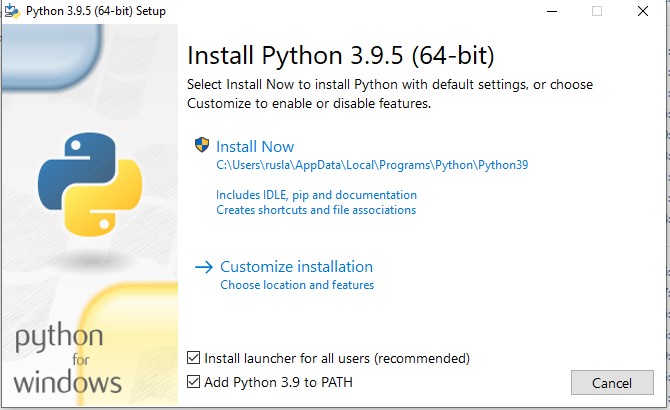
Select Install for all users and modify the Customize location choose
if you have installed a previous version choose that the last two digits ends to the first two digits of the version. for example, 3.8.0 C:\Python38
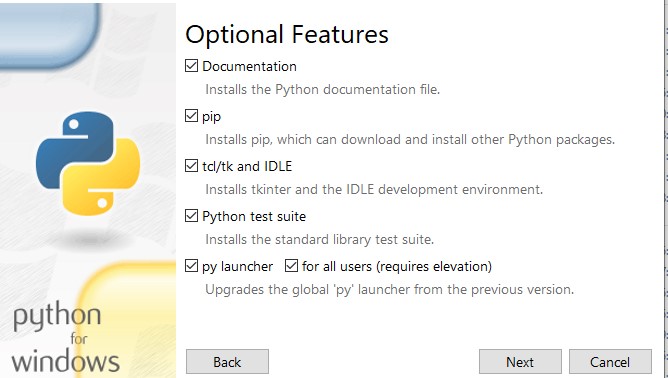
Wait a few minutes and display setup was successful. Next you will click the close button.
Manual verification of Path ( optional)
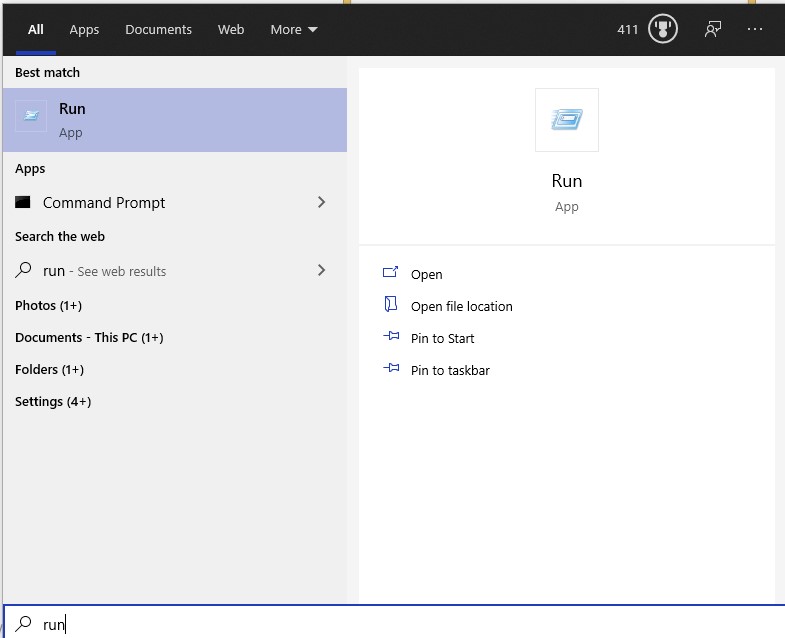
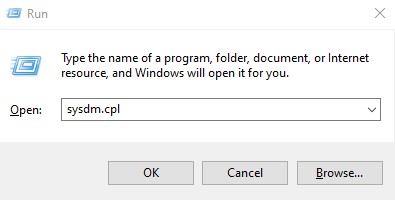
If we want to add the path to the python.exe file to the Path variable, start the Run box
and enter sysdm.cpl:
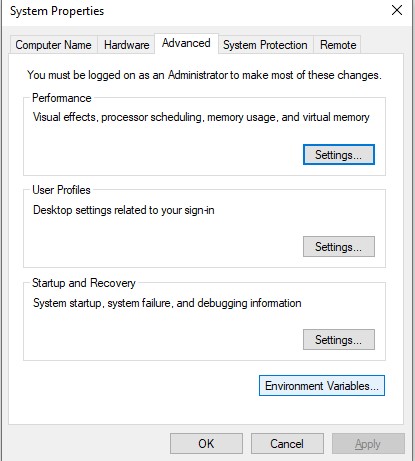
This should open up the System Properties window. Go to the Advanced tab and click the Environment Variables button:
In the System variable window, find the Path variable and click Edit:
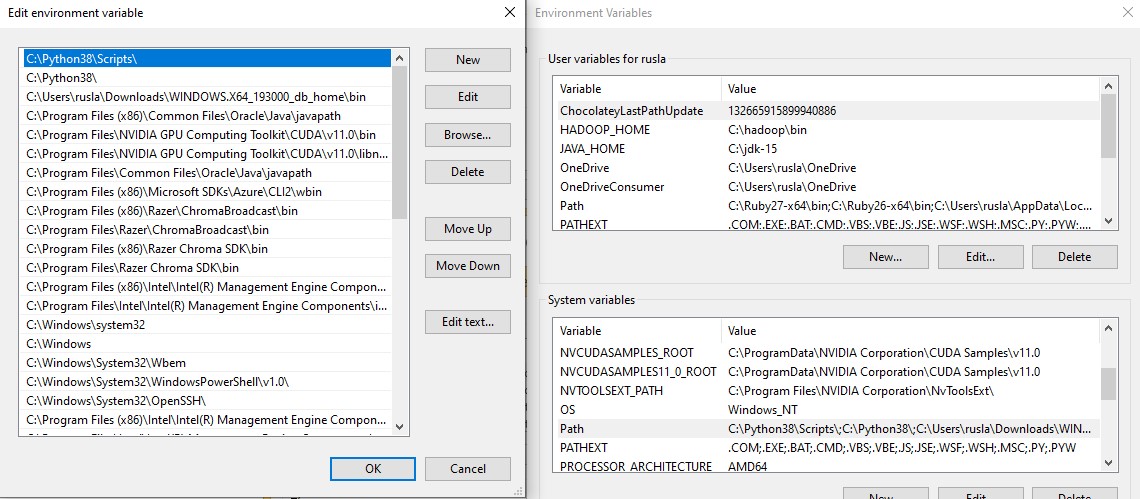
In the case the installation was done by adding the PATH we don’t need to do something else. JUST in case something goes wrong you have to be sure that the System Variable has Python, otherwise at the end of the Variable value line and add the path to the python.exe file, preceeded with the semicolon character (;). In our example we have ;C:\Python38
Close all windows. Now you can open cmd
Microsoft Windows [Version 10.0.19042.985] (c) Microsoft Corporation. All rights reserved. C:\Users\ruslanmv>python --version Python 3.8.0 C:\Users\ruslamv> Possible Issues with Windows 10
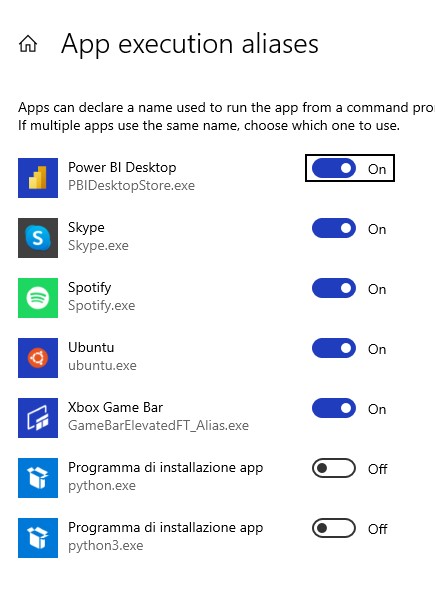
“Python was not found; run without arguments to install from the Microsoft Store, or disable this shortcut from Settings > Manage App Execution Aliases.”
1.Check your python version
2.Check the path variables
3.Go to -> “start” and type “Manage App Execution Aliases” .Go to it and turn off “python”
How to setup Virtual Environment in Windows
The first method is , first enter to cmd
python -m pip install virtualenv Let us assume that we want to create our virtual environment called frameworkenv in the folder venvs
so you go to your terminal type
virtualenv %USERPROFILE%\venvs\frameworkenv the second method is go to your folder of python38, so you type
python.exe -m venv %USERPROFILE%\venvs\frameworkenv then you go to your environment
cd %USERPROFILE%\venvs\frameworkenv and activate your environment by typing
C:\Users\rusla\venvs\frameworkenv\Scripts>dir Volume in drive C is Blade 15 Volume Serial Number is E883-FD8C Directory of C:\Users\ruslanmv\venvs\frameworkenv\Scripts 05/06/2021 15:48 . 05/06/2021 15:48 .. 05/06/2021 15:48 2.309 activate 05/06/2021 15:48 978 activate.bat 05/06/2021 15:48 18.147 Activate.ps1 05/06/2021 15:48 368 deactivate.bat 05/06/2021 15:48 103.303 easy_install-3.8.exe 05/06/2021 15:48 103.303 easy_install.exe 05/06/2021 15:48 103.285 pip.exe 05/06/2021 15:48 103.285 pip3.8.exe 05/06/2021 15:48 103.285 pip3.exe 05/06/2021 15:48 524.872 python.exe 05/06/2021 15:48 523.848 pythonw.exe 11 File(s) 1.586.983 bytes 2 Dir(s) 51.987.955.712 bytes free C:\Users\ruslanmv\venvs\frameworkenv\Scripts>activate (frameworkenv) C:\Users\ruslanmv\venvs\frameworkenv\Scripts> I am in the (frameworkenv) created
to exit from my environment just type wherever your are
How install Visual Studio Code with your Virtual Environment
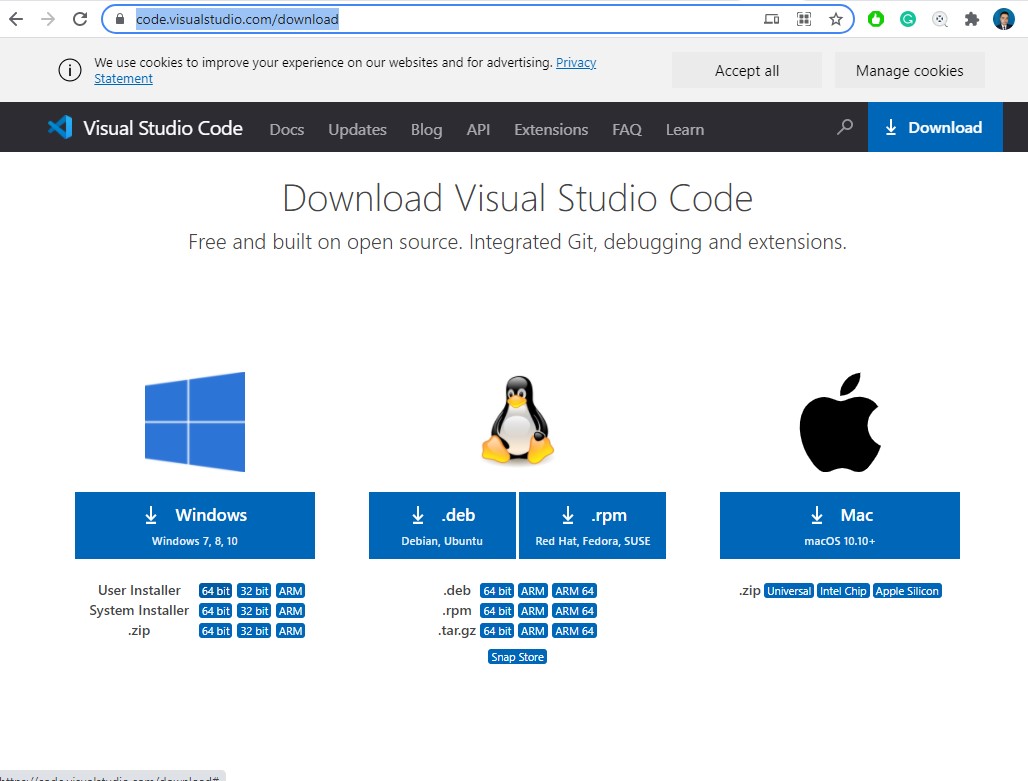
First you need is to install VScode from this link
after you installed you can return back to your cmd terminal
enter to your folder of your project you want to work
Microsoft Windows [Version 10.0.19042.985] (c) Microsoft Corporation. All rights reserved. C:\Users\ruslanmv>cd myproject1 C:\Users\ruslamv\myproject1>code . C:\Users\ruslamv\myproject1> 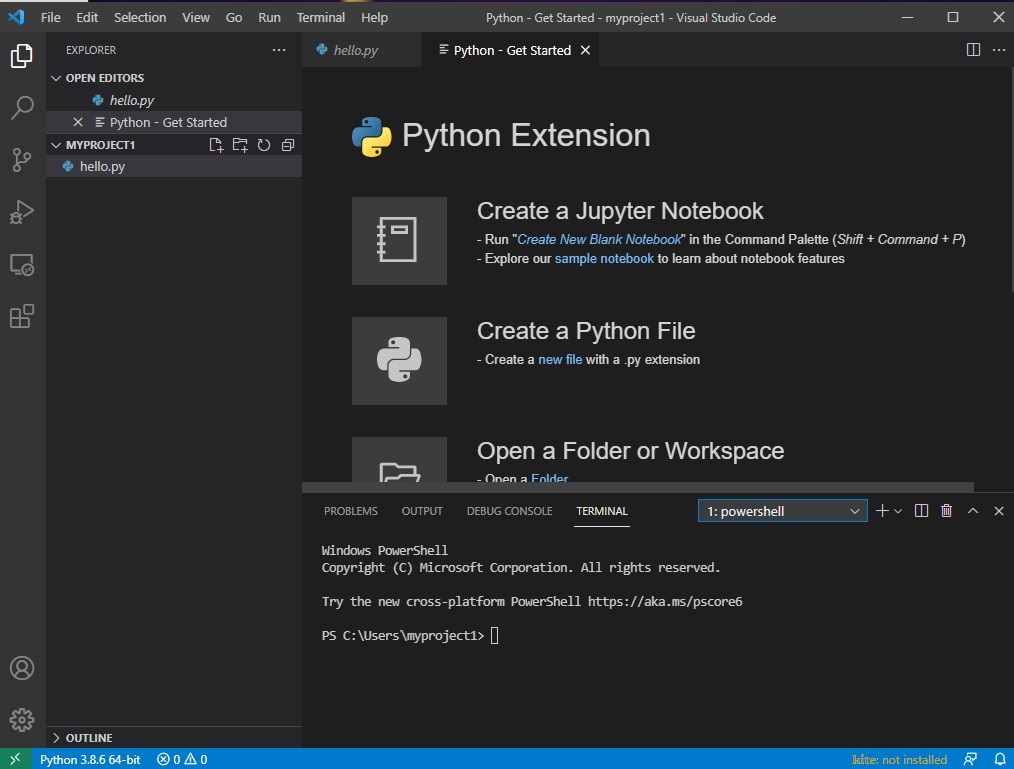
by default the terminal is PowerShell but you need to change it , in terminal, you have two buttons that seems to be one


you click this last one, and appears
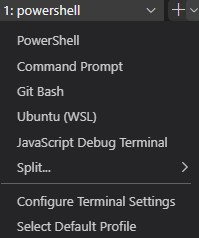
otherwise you just duplicate the terminals, and you select CommandPromt, and just type
%USERPROFILE%\venvs\frameworkenv\Scripts\activate you enter with your custom environment , for example
C:\Users\ruslanmv\myproject1>%USERPROFILE%\venvs\frameworkenv\Scripts\activate (frameworkenv) C:\Users\ruslanmv\myproject1> and then in the vscode , add the following line in the hello.py file
print("Hello World From my Virtual Enviroment") 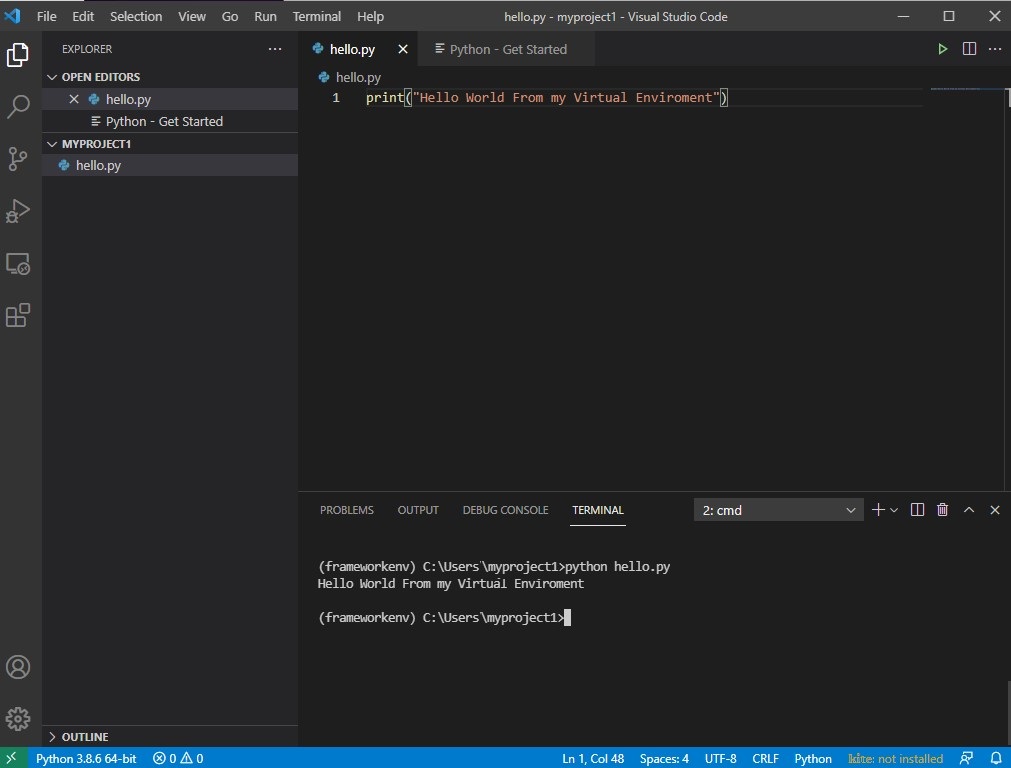
How to export your enviroment by using pip
If you want to to export your enviroment by using pip, you type
pip freeze > requirements.txt Then use the resulting requirements.txt to create a pip virtual environment:
python3 -m venv env source env/bin/activate pip install -r requirements.txt How to create requirements.txt for pip3 from conda
If you want to export your enviroment from conda to conda you type
conda list -e > requirements.txt can be used to create a conda virtual environment with
conda create --name --file requirements.txt If you want a file which you can use to create a pip virtual environment you can install pip within the conda environment, the use pip to create requirements.txt.
conda activate conda install pip pip list --format=freeze > requirements.txt Then use the resulting requirements.txt to create a pip virtual environment:
python3 -m venv env source env/bin/activate pip install -r requirements.txt Congratulations! you have installed Python 3 , VS Code in Windows Subsystem for Linux and and created Virtual Environments of python for your future projects.
Posted: June 05, 2021