- How To Install python-nfqueue on Ubuntu 18.04
- What is python-nfqueue
- Install python-nfqueue Using apt-get
- Install python-nfqueue Using apt
- Install python-nfqueue Using aptitude
- How To Uninstall python-nfqueue on Ubuntu 18.04
- Uninstall python-nfqueue And Its Dependencies
- Remove python-nfqueue Configurations and Data
- Remove python-nfqueue configuration, data, and all of its dependencies
- References
- Summary
- python-nfqueue on Ubuntu 16.04 LTS (Xenial Xerus)
- 2. Uninstall / Remove python-nfqueue package
- 3. Details of python-nfqueue package
- 4. References on Ubuntu 16.04 LTS (Xenial Xerus)
- 5. The same packages on other Linux Distributions
- Saved searches
- Use saved searches to filter your results more quickly
- Installation error «unable to locate package python-nfqeue» #18
- Installation error «unable to locate package python-nfqeue» #18
- Comments
- Глушим неприятельскую сеть Wi-Fi
- Установка
- Запуск и глушение
- Скрипт wifijammer
- Установка
How To Install python-nfqueue on Ubuntu 18.04
In this tutorial we learn how to install python-nfqueue on Ubuntu 18.04.
What is python-nfqueue
nfqueue-bindings is a set of high-level modules for several languages (Python and Perl, for the moment), for libnetfilter_queue. It provides a userspace API to access packets that have been queued by the kernel packet filter using the NFQUEUE target.
This package contains the Python bindings for nfqueue.
There are three ways to install python-nfqueue on Ubuntu 18.04. We can use apt-get , apt and aptitude . In the following sections we will describe each method. You can choose one of them.
Install python-nfqueue Using apt-get
Update apt database with apt-get using the following command.
After updating apt database, We can install python-nfqueue using apt-get by running the following command:
sudo apt-get -y install python-nfqueue Install python-nfqueue Using apt
Update apt database with apt using the following command.
After updating apt database, We can install python-nfqueue using apt by running the following command:
sudo apt -y install python-nfqueue Install python-nfqueue Using aptitude
If you want to follow this method, you might need to install aptitude first since aptitude is usually not installed by default on Ubuntu. Update apt database with aptitude using the following command.
After updating apt database, We can install python-nfqueue using aptitude by running the following command:
sudo aptitude -y install python-nfqueue How To Uninstall python-nfqueue on Ubuntu 18.04
To uninstall only the python-nfqueue package we can use the following command:
sudo apt-get remove python-nfqueue Uninstall python-nfqueue And Its Dependencies
To uninstall python-nfqueue and its dependencies that are no longer needed by Ubuntu 18.04, we can use the command below:
sudo apt-get -y autoremove python-nfqueue Remove python-nfqueue Configurations and Data
To remove python-nfqueue configuration and data from Ubuntu 18.04 we can use the following command:
sudo apt-get -y purge python-nfqueue Remove python-nfqueue configuration, data, and all of its dependencies
We can use the following command to remove python-nfqueue configurations, data and all of its dependencies, we can use the following command:
sudo apt-get -y autoremove --purge python-nfqueue References
Summary
In this tutorial we learn how to install python-nfqueue package on Ubuntu 18.04 using different package management tools: apt, apt-get and aptitude.
python-nfqueue on Ubuntu 16.04 LTS (Xenial Xerus)
This guide covers the steps necessary to install python-nfqueue package:
2. Uninstall / Remove python-nfqueue package
This guide covers the steps necessary to uninstall python-nfqueue package:
3. Details of python-nfqueue package
Package: python-nfqueue
Priority: extra
Section: universe/python
Installed-Size: 96
Maintainer: Ubuntu Developers
Original-Maintainer: Pierre Chifflier
Architecture: amd64
Source: nfqueue-bindings
Version: 0.5-1build2
Replaces: nfqueue-bindings-python
Provides: python2.7-nfqueue
Depends: python (>= 2.7), python ( = 2.14), libnetfilter-queue1, libpython2.7 (>= 2.7)
Filename: pool/universe/n/nfqueue-bindings/python-nfqueue_0.5-1build2_amd64.deb
Size: 24176
MD5sum: ea6c73aaf9f5ca9a450eeb0f4bf73e5f
SHA1: cd6c53fa2e6aa31d69cf20b825e4bdf2fc57e51c
SHA256: f17d21d4bb4fad712d80e4aa341e7ebc0c3f4a626f4bf71467dd3b5a2a0bb870
Description-en: Python bindings for nfqueue
nfqueue-bindings is a set of high-level modules for several languages
(Python and Perl, for the moment), for libnetfilter_queue.
It provides a userspace API to access packets that have been queued by
the kernel packet filter using the NFQUEUE target.
.
This package contains the Python bindings for nfqueue.
Description-md5: 7901d446e4b1f3d9447526be342b03c0
Homepage: https://www.wzdftpd.net/redmine/projects/nfqueue-bindings/wiki/
Bugs: https://bugs.launchpad.net/ubuntu/+filebug
Origin: Ubuntu
4. References on Ubuntu 16.04 LTS (Xenial Xerus)
![]()
python-networkx (1.11-1ubuntu1)
![]()
python-neutron (2:8.4.0-0ubuntu7.5)
![]()
python-neutron-lbaas (2:8.3.0-0ubuntu3)
![]()
python-neutron-lib (0.0.2-2)
![]()
python-neutron-vpnaas (2:8.2.0-0ubuntu1)
![]()
python-newt (0.52.18-1ubuntu2)
![]()
python-newt-dbg (0.52.18-1ubuntu2)
![]()
python-nflog (0.2-3.1ubuntu2)
![]()
python-nibabel (2.0.2-2)
![]()
python-nids (0.6.1-1.1)
![]()
python-nifti (0.20100607.1-4.1)
![]()
python-nine (0.3.4-2)
![]()
python-nipy (0.3.0+git262-gbb838d7-1)
![]()
python-nipype (0.11.0-1)
![]()
python-nipype-doc (0.11.0-1)
![]()
python-nlopt (2.4.2+dfsg-2)
5. The same packages on other Linux Distributions
![]()
python-nfqueue (0.6-1build2) Ubuntu 18.04 LTS (Bionic Beaver)
Saved searches
Use saved searches to filter your results more quickly
You signed in with another tab or window. Reload to refresh your session. You signed out in another tab or window. Reload to refresh your session. You switched accounts on another tab or window. Reload to refresh your session.
Have a question about this project? Sign up for a free GitHub account to open an issue and contact its maintainers and the community.
By clicking “Sign up for GitHub”, you agree to our terms of service and privacy statement. We’ll occasionally send you account related emails.
Already on GitHub? Sign in to your account
Installation error «unable to locate package python-nfqeue» #18
Installation error «unable to locate package python-nfqeue» #18
Comments
I just installed and upgraded a fresh copy of Kali Linux from the official site. Then i cloneed your git and went through your installation guide. After i click «y» to install the dependencies automatically i get this error «unable to locate package python-nfqeue».
As a result i can never run your tool.
Pls help.
The text was updated successfully, but these errors were encountered:
root@kali:~/netattack2# python2 netattack2.py
ERROR: Modules missing.
Do you want to automatically install all requirements? (y/n): y
[*] Installing requirements, please stand by.
Requirement already satisfied: netifaces in /usr/local/lib/python2.7/dist-packages (0.10.9)
E: Unable to locate package python-nfqueue
root@kali:~/netattack2# python netattack2.py
ERROR: Modules missing.
Do you want to automatically install all requirements? (y/n): y
[*] Installing requirements, please stand by.
Requirement already satisfied: netifaces in /usr/local/lib/python2.7/dist-packages (0.10.9)
E: Unable to locate package python-nfqueue
Can you help me how to solve this problem ?
Hey ! It issues is easy to fix !
Just open the nettack2.py with the text editor of your choice ! After that, just remove every line, that contains « python-nfqueue »
After that save it. And re rune the command !
It should work just fine without it !
Hope this will fix your issues ! (It worked for me so should work for you with no problem ! ^^)
Глушим неприятельскую сеть Wi-Fi

В практике пентестера порой встречаются задачи, при которых надо заглушить тестируемую сеть Wi-Fi для разных целей. Как это сделать, мы поговорим в нашей статье.
Итак, заглушить Wi-Fi и обеспечить наблюдение за пользователями сети нам поможет программа LANs. Она персонально «травит» таблицы ARP роутера, целевой машины, и, если в этом возникнет необходимость, то и DNS-сервера. Программа не доставляет неудобств кому-нибудь ещё в сети и может применяться в целях постоянного глушения сетей Wi-Fi, расположенных рядом. Радиус действия зависит от мощности вашей карты Wi-Fi, но в среднем не превышает один квартал. Используя настройки, вы сможете глушить всех подряд либо одного клиента выборочно.
Установка
Для установки в Kali Linux выполняем следующие команды:
sudo apt install -y python-nfqueue python-scapy python-twisted nbtscan git clone https://github.com/DanMcInerney/LANs.py.git cd LANs.py/Запуск и глушение
Итак, выполняем запуск утилиты LANs с ключами -u - p:
Данные ключи обозначают активное обнаружение цели для ARP-спуфинга с последующим выводом всех интересных не HTTPS-данных, которые отправляются либо запрашиваются. Так как опции –ip нет, осуществляется ARP-сканирование сети с последующим сравнением с живым неразборчивым захватом и составлением списка всех клиентов сети.
После нажатия комбинации Ctrl+C произойдёт остановка поиска — таким образом будет построена активная карта, и вы сможете просмотреть списки подключенных клиентов. Но вообще, для решения этой задачи больше подойдёт nmap, впрочем, тут на ваше усмотрение.
Точечный вариант запуска:
lans --jam --accesspoint ROUTER_MAC -s MAC_адрес_для_пропускаДавайте рассмотрим, что тут у нас: • --jam: обеспечивается глушение всех либо некоторых беспроводных точек 2.4 GHz, а также клиентов в пределах досягаемости; • -s MAC_адрес_для_пропуска: задаётся MAC для исключения из деаутентификации. К примеру: -s 00:11:BB:33:44:AA; • --accesspoint ROUTER_MAC: здесь надо ввести MAC-адрес конкретной ТД в качестве цели.
Таким образом, LANs может применяться и для точечного подавления конкретной сети, и для массового глушения.
Чтобы заглушить все Wi-Fi-сети, выполняем запуск с ключом:
Если надо заглушить лишь одну точку доступа (роутер):
python Lans.py --jam --accesspoint 01:MA:C0:AD:DYДавайте рассмотрим ещё парочку опций: • -ch: ограничивает wifijammer одним каналом; • --directedonly: пакеты деаутентификации на широковещательные адреса ТД не отправляются, они отправляются лишь парам клиент/ТД; • --accesspoint ROUTER_MAC: вводится MAC-адрес конкретной ТД в качестве цели.
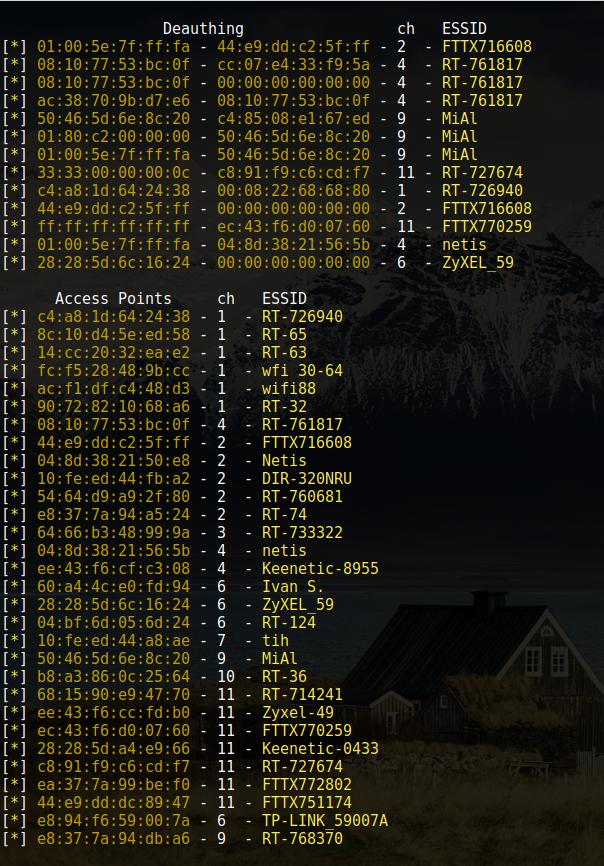
Скрипт wifijammer
Есть ещё одно средство глушения Wi-Fi. Это программа очень эффективна и проста в применении. Запустив её без опций, вы заглушите всё, что есть в радиусе досягаемости. При этом вы можете исключить ваш Wi-Fi-адаптер либо точку доступа, используя опцию –s. Конечно же, потребуется указать MAC-адрес, который хотите исключить.
Установка
Для установки в Kali Linux выполняем следующую команду:
git clone https://github.com/DanMcInerney/wifijammer.git cd wifijammer/ sudo python2 wifijammer.py --helpВот, как выглядит пример запуска wifijammer:
sudo python2 wifijammer.py -s CA:FE:DE:AD:BE:EF
Что же, пока всё. Надеемся, что вышеописанные лайфхаки пригодятся вам в практике пентеста. Также, возможно, вам будет интересна предыдущая статья на эту тему: «Фишки пентестера при работе с Wi-Fi: обнаружение скрытого SSID-идентификатора».