- Qemu linux tiny core
- Download TinyCoreLinux
- Download Qemu
- Create empty disk image
- Create launcher script
- Check
- First boot, and format virtual HDD
- Reboot and test
- References
- Simple Portable Linux QEMU VM on a USB Drive
- This article was last edited over 3 years ago. Information here may no longer be accurate. Please proceed with caution, and feel free to contact me.
- OS: Tiny Core Linux
- VM Platform: QEMU
- Create Virtual Hard Drive
- Run it!
- Windows
- OSX or Linux
- Format Virtual Hard Drive
- Done
- Qemu tips
- Tiny Core tips
Qemu linux tiny core
TinyCoreLinux is handy for various tasks. I use the dCore variant because it can use many of the packages from Debian.
Qemu is especially useful because it is portable (can run off a USB flash drive) and there are versions for multiple host OS’s (eg. Windows, Linux). The downside is that it’s a bit slow under Windows — it needs a suitable driver to use hardware virtualisation, and there doesn’t seem to be one for Windows hosts — still, it is fast enough to be useful.
This document was tested with the 25-May-2016 (v7.0?) release of dCore TinyCoreLinux, running under Qemu v2.5.0 on Windows 7 (64-bit).
Download TinyCoreLinux
Create a new directory for your VM — for this document I have used C:\dCore
As at time of writing, the download directory for dCore Jessie is http://tinycorelinux.net/dCore/x86/release/dCore-jessie
If that directory does not work, start at http://tinycorelinux.net, click «Downloads» (at top of page), then «Other Ports (x86-64, dCore, & Raspberry Pi)», then «Releases» in the «dCore x86» section, then «dCore-jessie»
Download these files and put them in C:\dCore :
dCore-jessie.gz vmlinuz-jessie Note that windows will probably rename the kernel from vmlinuz-jessie to vmlinuz-jessie.txt — you should rename it back to vmlinuz-jessie after download. If you’ve got file extensions turned off in Windows Explorer, then this will be inconvenient, and it’s probably less effort to edit the launcher script to include the .txt even though the kernel is not a text file.
If you’re being thorough, download the «md5» files and use them to check the integrity of the files.
Download Qemu
I use the build of qemu found at http://lassauge.free.fr/qemu
Download Qemu-2.5.0-windows.7z and extract it into C:\dCore — this will create a directory C:\dCore\Qemu-windows-2.5.0 containing the various qemu exe files and DLLs, etc.
Create empty disk image
We need to create a virtual hard drive to store persistent files in. Open a command prompt in C:\dCore and run the following qemu-img command (you may want to specify a size different than 4G, depending on requirements):
C:\dCore> Qemu-windows-2.5.0\qemu-img.exe create -f qcow2 sda.qcow2 4G Formatting 'sda.qcow2', fmt=qcow2 size=4294967296 encryption=off cluster_size=65536 lazy_refcounts=off refcount_bits=16 Close the command prompt window.
Create launcher script
Create a batch file » C:\dCore\go.cmd » and edit it to contain (or download):
@echo off :: cd into the directory where our files are cd /d %~dp0 :: define where qemu is set QEMUDIR=.\Qemu-windows-2.5.0 set QEMUEXE=qemu-system-x86_64w.exe start /b %QEMUDIR%\%QEMUEXE% ^ -L %QEMUDIR%\bios ^ -kernel vmlinuz-jessie ^ -initrd dCore-jessie.gz ^ -append " noswap tce=sda opt=sda home=sda showapps host=dcore xvesa=800x600x24 " ^ -hda sda.qcow2 ^ -k en-us ^ -display gtk ^ -m 512M ^ -name "dCore_x86_SSH22022" ^ -redir tcp:22022::22 Note: There can be no spaces at the end of the lines after ^
Things you might want/need to edit:
- QEMUDIR — if you’re using a different version of qemu, or have saved it somewhere else.
- QEMUEXE — if you’re not using 64-bit windows then you probably need qemu-system-i386.exe
- the name of the kernel / initrd if you’ve got a newer release of dCore than Jessie, or they have different names (like an unwanted .txt extension).
- change the -k line to change the keyboard layout — you can see the valid options in C:\dCore\Qemu-windows-2.5.0\Bios\keymaps
- change the -m line to change the amount of memory allocated to the VM.
- change the window title with the -name line.
- change the -redir line to alter port-forwarding — the line shown above redirects port 22022 on the host machine (your Windows computer) to port 22 inside the VM. This is no use right now, but will be useful if you install SSH inside the VM.
- in the -append line you can setup kernel command-line options.
- host=dcore sets the hostname of the VM.
- xvesa=800x600x24 sets the VM display resolution.
Check
Just as a cross-check of the above instructions, this is what my directory contains:
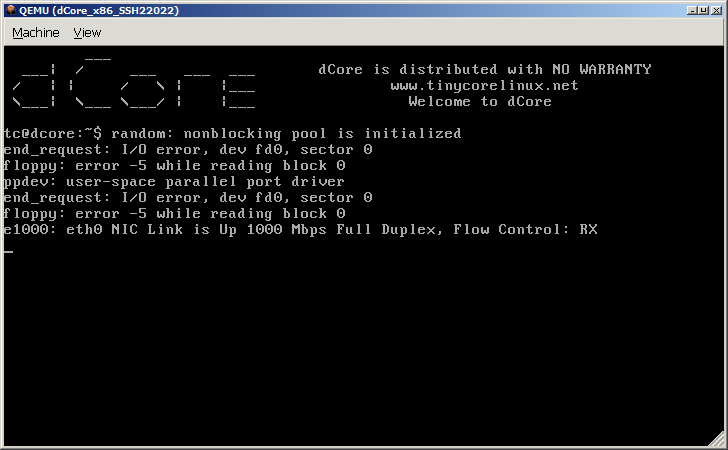
C:\dCore> dir Volume in drive C has no label. Volume Serial Number is DEAD-BEEF Directory of C:\dCore 2016-06-24 04:43 pm. . 2016-06-24 04:43 pm. .. 2016-06-24 04:35 pm. Qemu-windows-2.5.0 2016-06-24 04:19 pm. 13,400,343 dCore-jessie.gz 2016-06-24 04:42 pm. 583 go.cmd 2016-06-24 04:40 pm. 197,120 sda.qcow2 2016-06-24 04:17 pm. 3,465,360 vmlinuz-jessie 4 File(s) 17,063,406 bytes 3 Dir(s) 26,287,616 bytes freeFirst boot, and format virtual HDD
Double-click on go.cmd and wait for it to boot (takes about 30s on my machine). Note that the boot process is a little «messy» — you may have some messages appearing over the top of console. There are also error messages regarding the floppy drive (fd0), since it doesn’t exist.

Wait for it to stop printing things, then press [Enter] a few times to get a clean prompt.
On a normal system, we’d partition the HDD and install a bootloader — this is not necessary here because we have our kernel/initrd supplied externally to the VM. We create a filesystem directly on /dev/sda instead of the more usual /dev/sda1
Run the following (ignore the harmless partition table warning):
tc@dcore:~$ sudo mkfs.ext4 -L dcore /dev/sda mke2fs 1.42.12 (29-Aug-2014) Discarding device blocks: done Creating filesystem with 1048576 4k block and 262144 inodes Filesystem UUID: 20c4682a-98b3-4fd6-9105-10f44228b7f2 Superblock backups stored on blocks: 32768, 98304, 163840, 229376, 294912, 819200, 884736 Allocating group tables: done Writing inode tables: done Creating journal (32768 blocks): done Writing superblocks and filesystem accounting information: done sda: unknown partition tableReboot and test
Click in the qemu window and run the following:
The VM will now reboot. Wait for it to start up and then have a look at the sda mountpoint:
tc@dcore:~$ ls /mnt/sda home/ lost+found/ opt/ tce/You should see that TinyCoreLinux has created the home , opt , and tce directories. If you create some SCE files (with sce-import ), for example, they will be stored in /mnt/sda/tce/sce/
Similarly, your home folder files (for the default user » tc «) will be stored in /mnt/sda/home/tc/
References
- Qemu comes with a help file — refer to C:\dCore\Qemu-windows-2.5.0\Doc\qemu-doc.html or find online qemu docs at http://wiki.qemu.org/Manual
- http://wiki.tinycorelinux.net/wiki:start
- http://wiki.tinycorelinux.net/dcore:welcome
Simple Portable Linux QEMU VM on a USB Drive
This article was last edited over 3 years ago. Information here may no longer be accurate. Please proceed with caution, and feel free to contact me.
Create a Linux virtual machine that can run on a Windows, Linux, or Mac OSX host. The VM can be moved around on a USB drive or even synced via DropBox between machines.
OS: Tiny Core Linux
Tiny Core Linux is small and simple. Its size makes it the perfect guest OS for this project.
Create a directory called tc to store all the files for this project.
Once it is downloaded extract the vmlinuz and core.gz files from the iso to our tc folder. You can do this by mounting the iso or opening it in some sort of archive manager like 7-zip and copying the files out.
You should now have these files in the tc directory.
Those files are our kernel and initramfs, respectively.
VM Platform: QEMU
There are no official QEMU builds for Windows, but there are a number of unofficial builds .
The most important reason I am going to suggest using the “lassauge builds” for this project is that the files are entirely portable. No installation of any sort is required on Windows. Download and copy the QEMU files to our tc directory and you will have a simple, portable, working VM platform for Windows.
Your tc directory should look like this now.
Qemu-2.2.0-windows vmlinuz core.gzThere are a number of qemu-system-*.exe files in Qemu-2.2.0-windows that you do not need. You can safely delete all of them except for qemu-system-i386.exe . That is the only binary we need to run our VM. Deleting the other system binaries will save us a lot of space.
On Linux, QEMU should be installable through your preferred package manager. On OSX, you should be able to use something like brew to install QEMU as easily as you could on Linux.
Create Virtual Hard Drive
Let’s create a hard disk for our VM. You may use the qemu-img command that QEMU provides. This binary will either be in the Qemu-2.2.0-windows directory we extracted if you’re on Windows, or it should be installed system-wide if you’re using QEMU on a Mac or Linux host.
qemu-img create -f vpc tc.vhd 4GThat command should generate a 4GB sparse virtual hard disk file. The disk should only be a few KB large initially, but has the ability to grow up to 4GB. You can use whatever size or file format you prefer for the disk image, but I prefer vhd since Windows can natively handle that format as an added bonus.
Your tc directory should look like this now.
Qemu-2.2.0-windows vmlinuz core.gz tc.vhdRun it!
Now we can start our VM. You may prefer to script this so you don’t have to memorize the command.
Windows
Qemu-windows-2.2.0\qemu-system-i386 -L Qemu-windows-2.2.0\Bios -m 1024 -kernel vmlinuz -initrd core.gz -hda tc.vhd -append "home=sda1 opt=sda1 tce=sda1"OSX or Linux
qemu-system-i386 \ -m 1024 \ -kernel vmlinuz \ -initrd core.gz \ -hda tc.vhd \ -append "home=sda1 opt=sda1 tce=sda1"On Windows only, we need to specify the absolute path to the QEMU VM executable, and the -L flag is needed to specify the path to our QEMU Bios files (incuded with QEMU).
Regardless of the OS, we specify which file is our kernel, which is our initramfs, what to use as the primary hard drive, and finally, we pass some additional boot options to Tiny Core specifying where our home , opt , and tce directories live.
Format Virtual Hard Drive
Warning: You must run these commands inside the QEMU VM. If you run these commands on your host machine you may damage your system!
After you boot to the VM using the commands above, format the disk.
You can run these steps manually, but I am showing this single command to format the entire virtual hard drive.
printf "o\nn\np\n1\n\n\nw\n" | sudo fdisk /dev/sdaNext, create an ext4 filesystem on our newly created partition.
Then reboot so that Tiny Core can use that disk.
Done
At this point, you should be done, and just need to install packages to customize your VM as you see fit.
Qemu tips
Here are some neat things you can do with QEMU.
# Port forwarding, some ports require elevated permissions on your host. -redir tcp:80::80 -redir tcp:8000::8000# Create a "shrunken" copy of your VHD file. # Remove any reserved space from the sparse disk. qemu-img convert -O vpc tc.vhd tc.vhd.copyQemu has an awesome way to let you access just about any virtual hard disk using the “Network Block Device” protocol. This will work on a *nix system only.
sudo modprobe nbd max_part=16 sudo qemu-nbd -c /dev/nbd0 /path/to/tc/tc.vhd sudo mount /dev/nbd0p1 /mnt/10.0.2.2 is an IP address that can be used to access your host VM from within the QEMU guest.
Tiny Core tips
# Change the label of a partition to something like "hd01" sudo tune2fs /dev/sda1 -L hd01# Mount persistent partitions by label tce=LABEL=hd01# Specify an ISO image to mount when running the QEMU VM -cdrom /path/to/file.iso