- Qt for Linux/X11
- Supported Configurations
- Requirements for Development Host
- Debian/Ubuntu (apt-get)
- Fedora/RHEL/CentOS (yum)
- openSUSE (zypper)
- Building Qt from Source
- Deployment and Other Issues
- Where to Go from Here
- Install Qt5 and Qt Creator on Linux
- Background
- What do you need
- Installation of Qt5 and Qt Creator
- Install Qt5 and Qt Creator on openSUSE Tumbleweed and Leap
- Install Qt5 and Qt Creator on Fedora
- Install Qt5 and Qt Creator on Ubuntu and Debian
- Building your first Hello World Qt5 application with Qt Creator
- New project wizard
- Run, build and debug
- User interface design with Qt Designer
- Signals and slots
- Wrap up
Qt for Linux/X11
Qt’s support for different Linux platforms is extensive and mature.
To download and install Qt for Linux, follow the instructions on the Getting Started with Qt page.
Supported Configurations
The following configurations are supported.
| Distribution | Architecture | Compiler | Notes |
|---|---|---|---|
| Red Hat 8.4 | x86_64 | GCC 10 (toolset) | |
| Red Hat 9.0 | x86_64 | GCC 11 | |
| openSUSE 15.4 | x86_64 | GCC 9 | |
| SUSE Linux Enterprise Server 15 SP4 | x86_64 | GCC 10 | |
| Ubuntu 22.04 | x86_64 | GCC as provided by Canonical, GCC 11.x |
Requirements for Development Host
The Qt installers for Linux assume that a C++ compiler, debugger, make, and other development tools are provided by the host operating system. In addition, building graphical Qt applications requires OpenGL libraries and headers installed. Most Linux distributions do not install all of these by default, but setting up a development environment is still straightforward.
Use the following commands to install the basic requirements for building Qt applications:
Debian/Ubuntu (apt-get)
sudo apt-get install build-essential libgl1-mesa-dev
Fedora/RHEL/CentOS (yum)
sudo yum groupinstall "C Development Tools and Libraries" sudo yum install mesa-libGL-devel
openSUSE (zypper)
sudo zypper install -t pattern devel_basis
Building Qt from Source
You can also build Qt from the source package and configure it according to your target platform. The source packages are obtained from http://www.qt.io/download/.
Below, you will find more information about building Qt from source.
Deployment and Other Issues
The pages below covers specific issues and recommendations for creating Linux/X11 applications.
Where to Go from Here
We invite you to explore the rest of Qt. We prepared overviews which help you decide which APIs to use and our examples demonstrate how to use our API.
- Qt Overviews — list of topics about application development
- Examples and Tutorials — code samples and tutorials
- Qt Reference Pages — a listing of C++ and QML APIs
Qt’s vibrant and active community site, http://qt.io houses a wiki, a forum, and additional learning guides and presentations.
© 2023 The Qt Company Ltd. Documentation contributions included herein are the copyrights of their respective owners. The documentation provided herein is licensed under the terms of the GNU Free Documentation License version 1.3 as published by the Free Software Foundation. Qt and respective logos are trademarks of The Qt Company Ltd. in Finland and/or other countries worldwide. All other trademarks are property of their respective owners.
Install Qt5 and Qt Creator on Linux
Interested in developing a graphical user interface application for Linux? Not sure where to get started? If you know a little C++, you can’t go wrong with using the Qt5 programming library in combination with the Qt Creator integrated development environment. It’s what the entire KDE Plasma desktop environment and all its applications use under the hood. This article explains how to install the Qt5 development packages and the Qt Creator IDE on Debian, Ubuntu, Fedora and openSUSE.
Background
With the Qt5 programming library for C++, you can develop graphical user interface (GUI) application on Linux. Its included Qt Widgets form the primary building blocks for all user interface elements, such as menus, edit boxes, pushbuttons, etc. Qt5 also offers a unique and easy-to-use signals and slots mechanism for event generation and handling.
In case you never heard of Qt5 before, chances are that you, as a Linux desktop user, definitely used Qt5. It’s the foundation of the KDE Plasma desktop environment and all its applications. If you ever worked with Dolphin, Kate, Konsole, Krita or Kdenlive, you’ve used Qt.
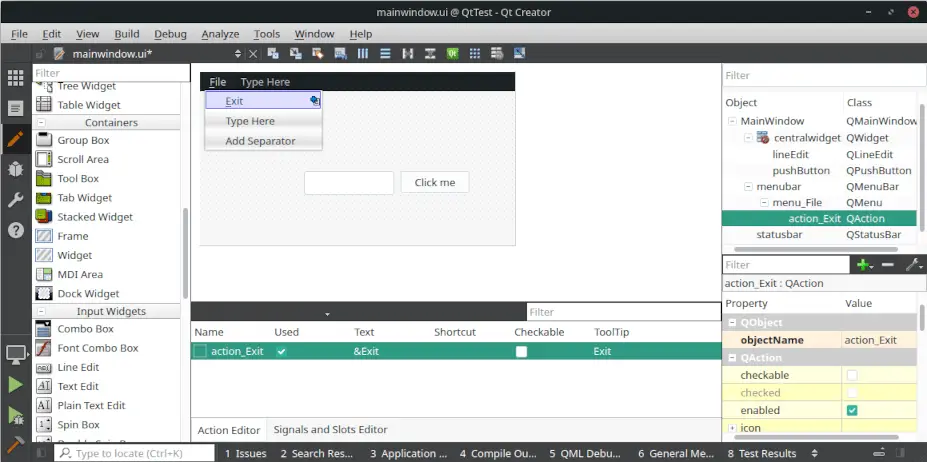
In addition to the Qt5 library itself, the creators offer a full featured integrated development environment: Qt Creator. Besides a mature and capable code editor and debugger, it also integrates the Qt Designer application. With Qt Designer you can visually design the user interface of your application’s main window and dialogs. The following screenshot gives you and idea of what the Qt Designer looks like:
The Qt5 library is cross-platform as well. This means that with little effort, you can rebuild your Linux GUI application on other platforms such as Windows and macOS. For those not too versed in C++, you can opt to develop in a different programming language. Qt language bindings exist for Python, Java, C#, Rust, Go and more.
Installing Qt5 and Qt Creator on Linux can be a bit tricky. Therefore, this article explains how to install the Qt5 development packages and the Qt Creator IDE on popular Linux distributions. We’ll cover Debian, Ubuntu, Fedora and openSUSE. Once installed, I’ll also help you get started with setting up a typical Hello World type GUI application.
What do you need
To follow along with the presented installation instructions of Qt5 and Qt Creator, all you really need is an Ubuntu, Debian, Fedora or openSUSE based Linux system with desktop environment. You can use whichever desktop environment you prefer. If you don’t yet want to install Qt5 and the Qt Creator on your Linux daily driver system, you can always try it out in a virtual machine first. In this case, consider installing openSUSE Tumbleweed in the virtual machine. It’s what I’ll be using for this article as well.
Installation of Qt5 and Qt Creator
Note that Qt Creator and the Qt5 development packages are essentially two separate things. They are often used together, but that’s not a requirement:
- You can develop Qt5 user interface applications, without using Qt Creator.
- You can develop C++ applications with Qt Creator, without using the Qt5 programming library.
This is important to understand, because just installing Qt Creator does not always automatically install the Qt5 development packages. In this case this would lead to a No Valid Kits Found error, when trying to create a new QWidgets application project in Qt Creator. The following sections explain how to properly install both the Qt5 development packages and the Qt Creator IDE on commonly used Linux distributions.
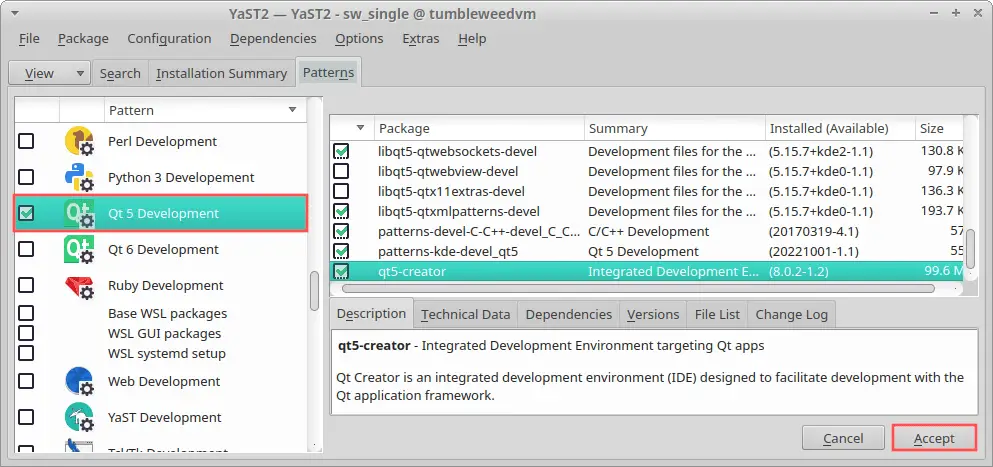
Install Qt5 and Qt Creator on openSUSE Tumbleweed and Leap
I’ll start with the openSUSE distributions for two reasons: (1) They are my personal favorites and (2) openSUSE makes it super easy to install Qt5 and Qt Creator. If you prefer installing packages through the Yast Software application, click the View→Patterns button on the toolbar. The left view now lists all installable patterns. Scroll down to the Development section and check the box next to Qt 5 Development. Finally, click the Accept button in the bottom-right corner to kick off the installation:
For those who prefer installing packages in the terminal, run this command:
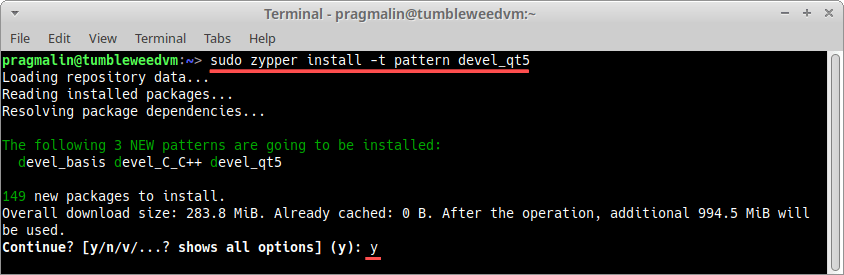
- sudo zypper install -t pattern devel_qt5
Install Qt5 and Qt Creator on Fedora
At this point Fedora does not offer a Qt5 development pattern for convenient installation. Not a major concern, because with the help of the wildcard character, you can easily install both the Qt5 development packages and Qt Creator with command:
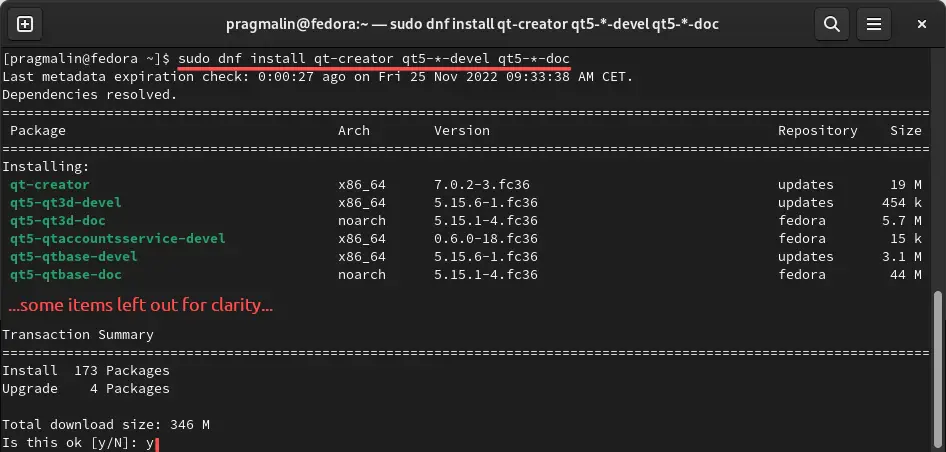
- sudo dnf install qt-creator qt5-*-devel qt5-*-doc
Install Qt5 and Qt Creator on Ubuntu and Debian
Debian and its derived distributions, such as Ubuntu and the Raspberry PI OS, make installing Qt5 and the Qt Creator a bit trickier. The Apt package manager does not feature a way to install the related packages as a group. Through regular expression patterns, Apt does enable you to install multiple packages in a creative way. However, I did not find a clean way to apply this to the Qt5 and Qt Creator related packages. This only leaves the option of installing all packages individually. For this reason, I’ll split up the installation in two parts:
- The essential packages needed to start development of Qt5 based applications.
- The extra packages that you might need down the road.
If you want to have everything Qt5 development related installed on your PC, simply complete the installation instructions from both parts.
Run the following command to install the essential packages:
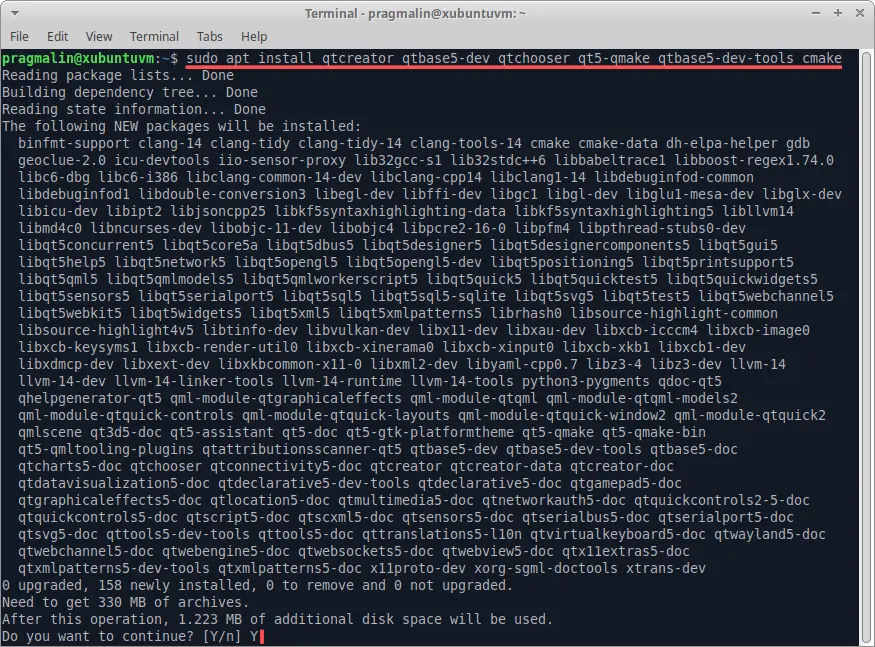
- sudo apt install qtcreator qtbase5-dev qtchooser qt5-qmake qtbase5-dev-tools cmake
And to install the extra packages run this command:
- sudo apt install libqt5charts5-dev libqt5datavisualization5-dev libqt5gamepad5-dev libqt5gstreamer-dev libqt5networkauth5-dev libqt5opengl5-dev libqt5remoteobjects5-dev libqt5scxml5-dev libqt5sensors5-dev libqt5serialbus5-dev libqt5serialport5-dev libqt5svg5-dev libqt5texttospeech5-dev libqt5virtualkeyboard5-dev libqt5waylandclient5-dev libqt5waylandcompositor5-dev libqt5webkit5-dev libqt5webchannel5-dev libqt5websockets5-dev libqt5webview5-dev libqt5x11extras5-dev libqt5xmlpatterns5-dev
Building your first Hello World Qt5 application with Qt Creator
Let’s take our freshly installed Qt Creator for a spin to create our first Qt5 Widgets based application.
New project wizard
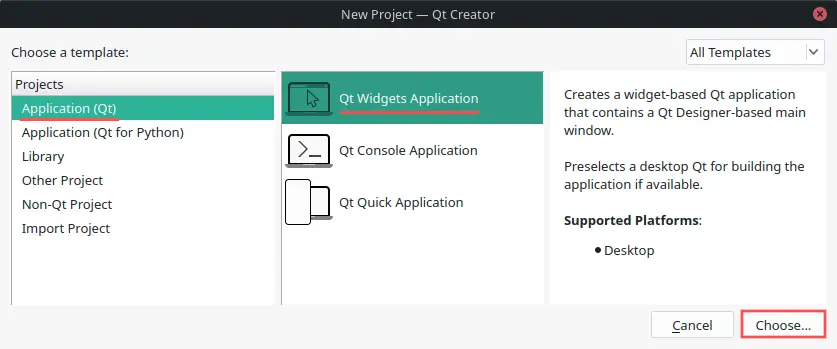
Open up Qt Creator and start the new project wizard by selecting File→New Project… from the menu. Select the Qt Widgets Application template and continue by clicking the Choose… button at the bottom of the dialog:
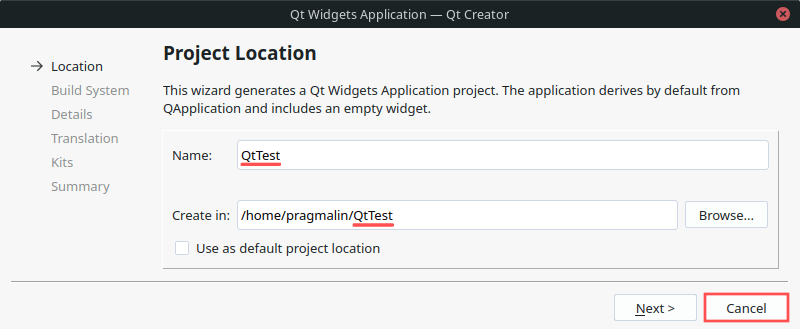
The wizard now prompts us to enter a project name and location. You can of course enter what you prefer. I opted for the name QtTest in a directory with the same name, inside my home directory. Once specified, click the Next button for the next step:
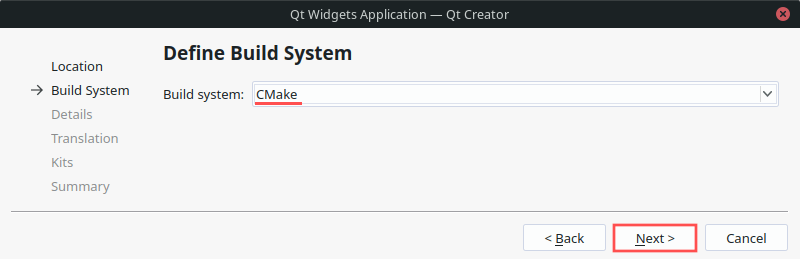
When asked to specify the build system, my recommendation is to go with CMake. Most C and C++ developers prefer CMake for new projects. However, if you personally prefer Qt’s qmake, select that one. After selecting the build system, click the Next button to move forward:
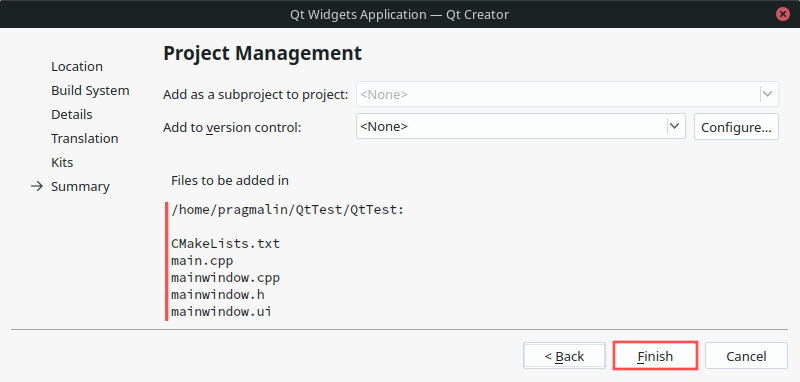
On the next screens of the new project wizard, you can simply accept all the defaults and just keep clicking the Next button. The last screen provides and overview with the files that the wizard intends to create for you. Click the Finish button to instruct the wizard the create the project:
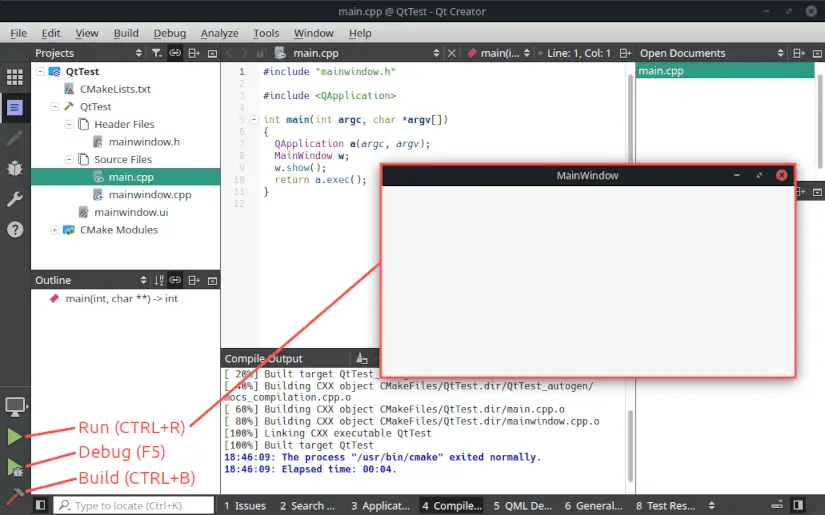
Run, build and debug
The three buttons on the bottom left side of the Qt Creator user interface enable you to build, run and debug the application. Go ahead and click the green play button. Qt Creator then builds and runs the application for you. It presents you with an empty application window. Think of it as your empty canvas that serves as a starting point for your own application:
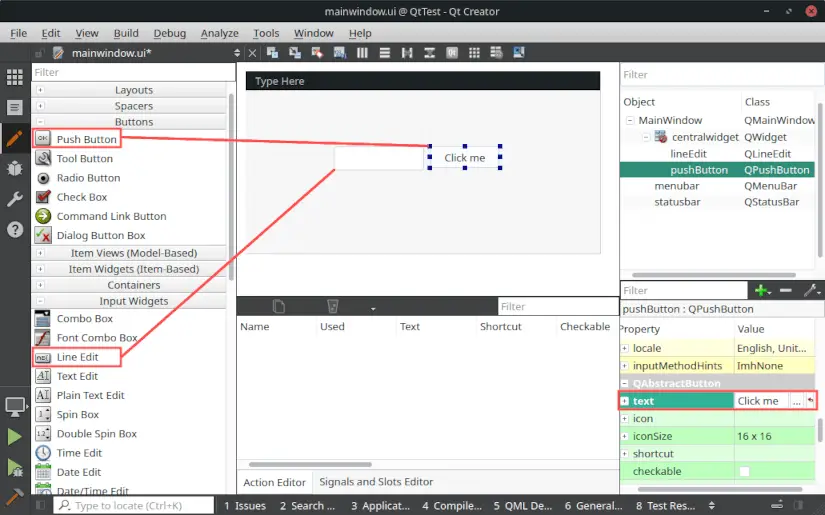
User interface design with Qt Designer
As a next step, we’ll use the Qt Designer to add a push button and a line edit widget to our application window. Double-click the mainwindow.ui file in the project explorer. This launches the Qt Designer tool, embedded within Qt Creator. Locate the Push Button and Line Edit widgets and drag one of each onto the form of our main window. Afterwards, select the push button on the form, locate its text property and change it to Click me :
If you now build and run the application, you’ll see the two newly added widgets on the application. The push button invites you to click on it. However, nothing happens. We’ll take care of that in the next section.
Signals and slots
Each Qt5 widget emits event related signals. For example, if you click on the push button, it emits the clicked() signal. Your application can respond to these events by connecting a slot to the signal. A slot is basically a class method that acts as the event handler for the signal that you connect it to. Let’s try this out.
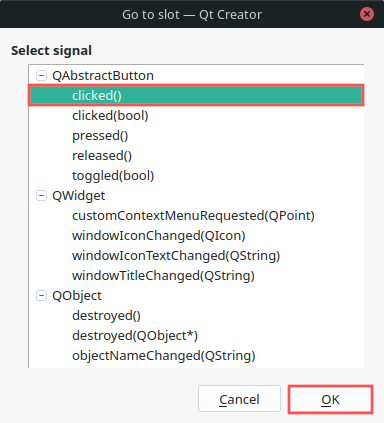
Select the push button on the form and click on it with your right mouse-button. A context menu appears, where you can select Go to slot…. This opens up the signal selection dialog. On the dialog you can see a list with all the signals that a push button generates. Select the clicked() signal and click the OK button:
This automatically creates the on_pushButton_clicked() method, inside our MainWindow class. Add the following implementation:
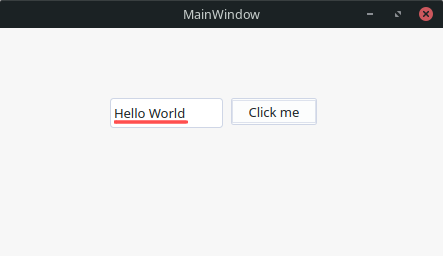
void MainWindow::on_pushButton_clicked() < ui->lineEdit->setText("Hello World"); > Next build and run the application again. If you now click on the push button, you’ll notice that the text Hello World shows up in the line edit widget:
Wrap up
In this article you learned how to install the Qt5 development packages and the Qt Creator integrated development environment on your Linux PC. All the way up to creating a new project and building a Hello World type user interface application. This completes the tutorial. It’s now up to you to unleash your creativity and build that one application that we all cannot live without.
Note that if you are interested in building cross-platform applications, the articles about Lazarus and wxWidgets might also appeal to you. With Lazarus you can build user interface applications even quicker. The only downside if that you can only use the Object Pascal programming language. From my personal experience, this is definitely worth the effort:
The other contender, wxWidgets, is more along the lines of Qt5. You build your application in C++. It’s not as widely used as Qt5, but comes with more liberate licensing terms: