- Qt creator linux уроки
- Регистрация программы установки
- Установка
- Создание проекта С++ в Qt Creator
- Qt Creator Tutorial
- How to Install Qt Creator?
- Create a Program with Qt Creator
- Conclusion
- About the author
- Shehroz Azam
- Basic Qt Programming Tutorial
- Before you start: Download and install Qt and Qt Creator
- Baby steps: Creating a new project
- Learning to crawl: Editing the project files
- Up and running: Building and running the application
Qt creator linux уроки
Одной из популярных сред разработки под С++ является среда Qt Creator. Qt Creator является кроссплатформенным, может работать на Windows, Linux и macOS и позволяет разрабатывать широкий диапазон приложений — десктопные и мобильные приложения, а также приложения для встроенных платформ. Рассмотрим, как создать простейшую программу на С++ в Qt Creator.
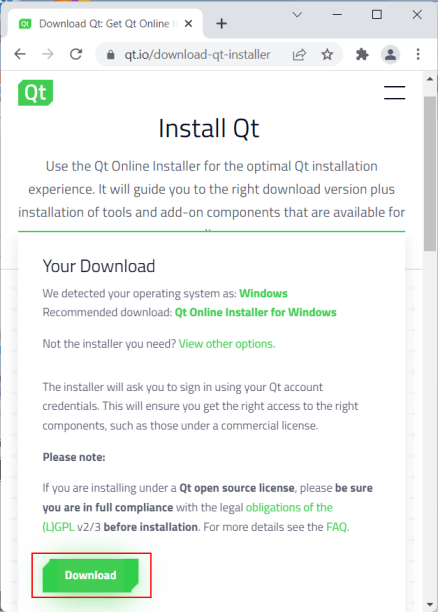
Загрузим программу установки. Для этого перейдем на страницу https://www.qt.io/download-qt-installer
Сайт автоматически определяет текущую операционную систему и предлагает для нее загрузить онлайн-установщик. Для загрузки нажмем на кнопку Download:
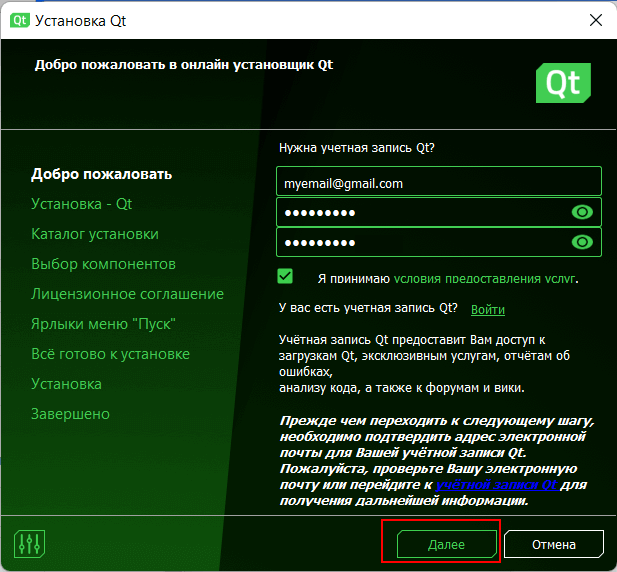
Регистрация программы установки
После загрузки запустим программу установки:
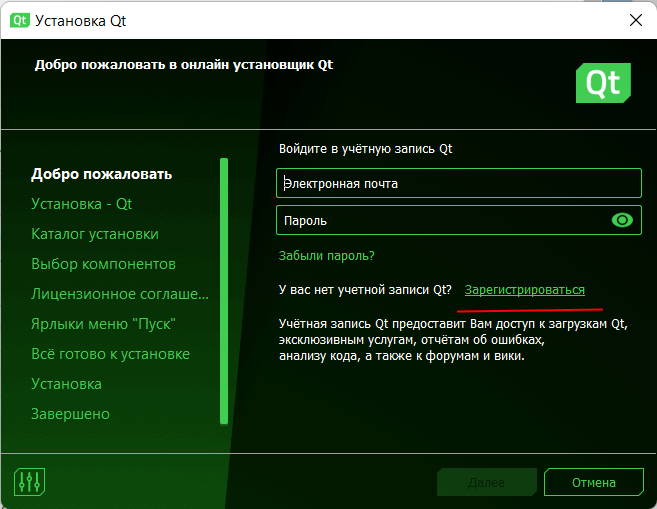
Вначале программа установки предложит осуществить вход с логином и паролем от учетной записи QT. Однако если у вас нет учетной записи QT, то необходимо зарегистрироваться. Для этого нажмем на ссылку «Зарегистрироваться». И в поля ввода введем логин-электронный адрес и пароль:
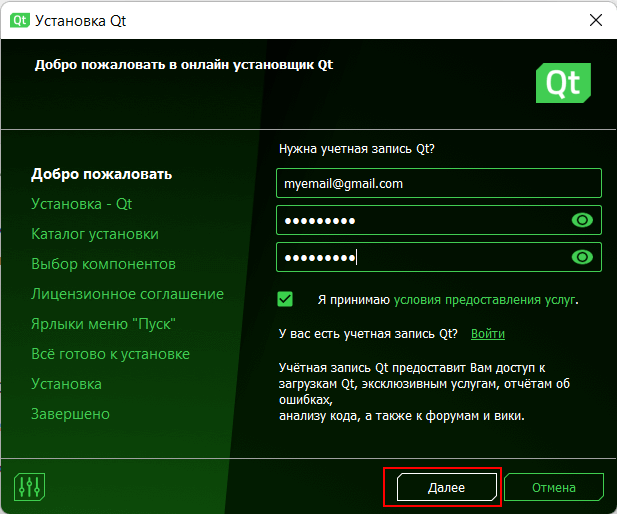
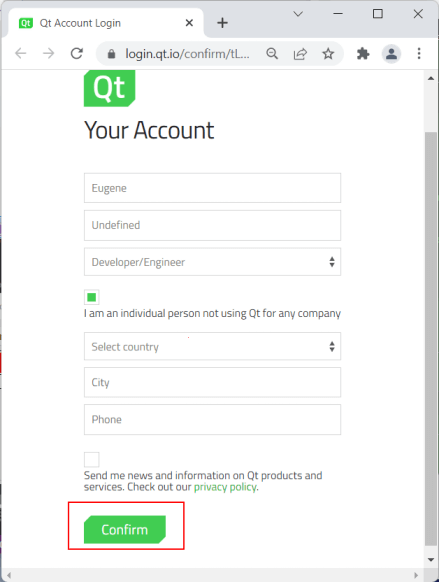
Нажмем на кнопку «Далее». После этого на указанный электронный адрес придет ссылка, по которой надо перейти для завершения регистрации.
После этого в программе установки QT снова нажмем на кнопку «Далее»
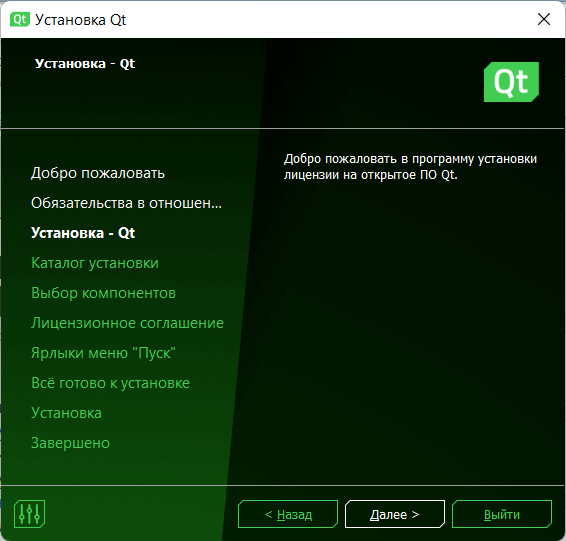
Установка
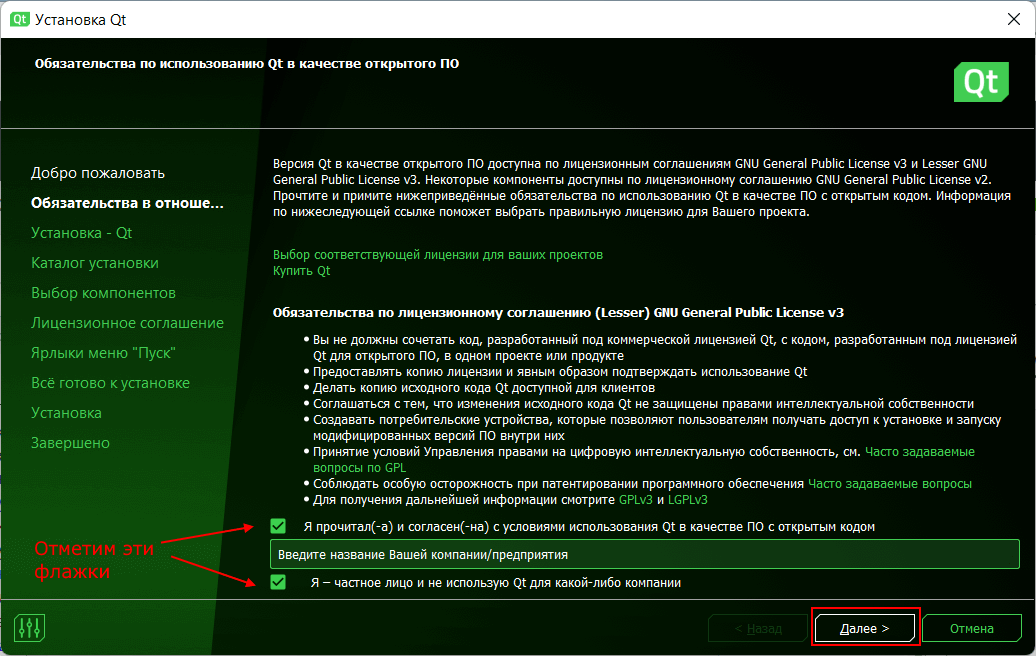
Затем отметим пару флажков и нажмем на кнопку «Далее»:
И после этого мы перейдем непосредственно к установке затем отметим пару флажков и нажмем на кнопку «Далее»:
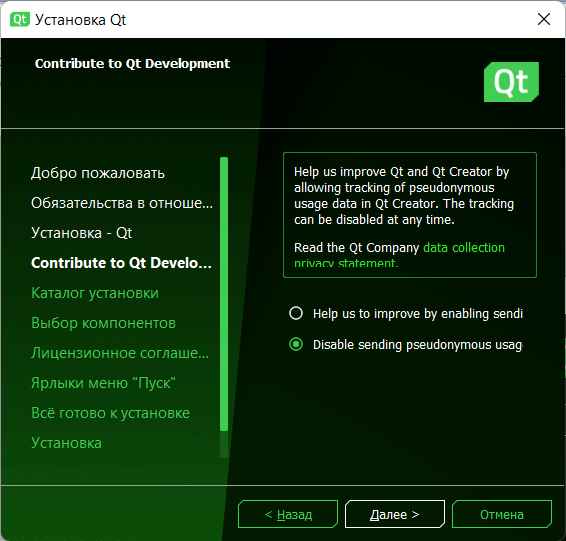
Затем нам будет предложено выбрать, надо ли отправлять отчет :
Далее надо будет указать каталог для установки (можно оставить каталог по умолчанию), а также тип установки:
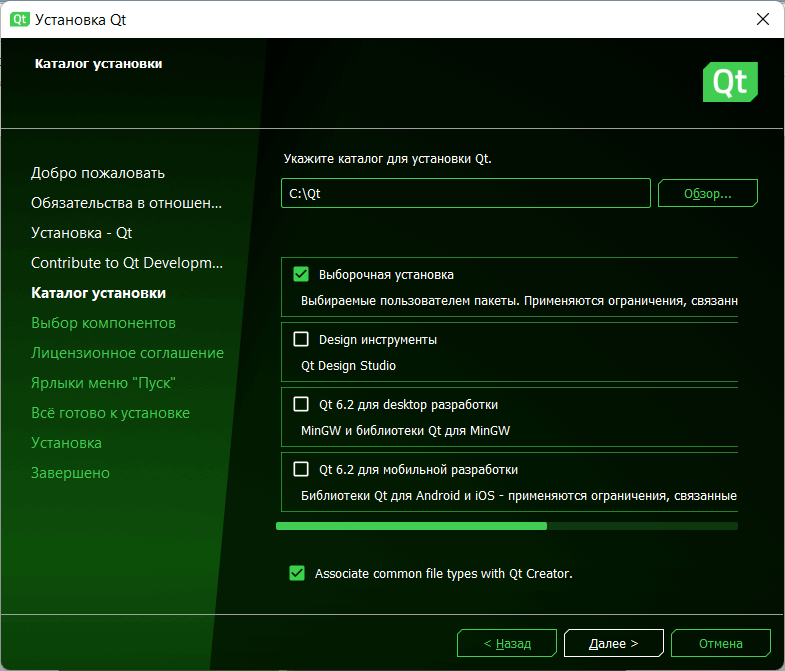
В качестве типа установки можно указать «Выборочная установка», тогда на следующем шаге необходимо будет указать устанавливаемые компоненты:
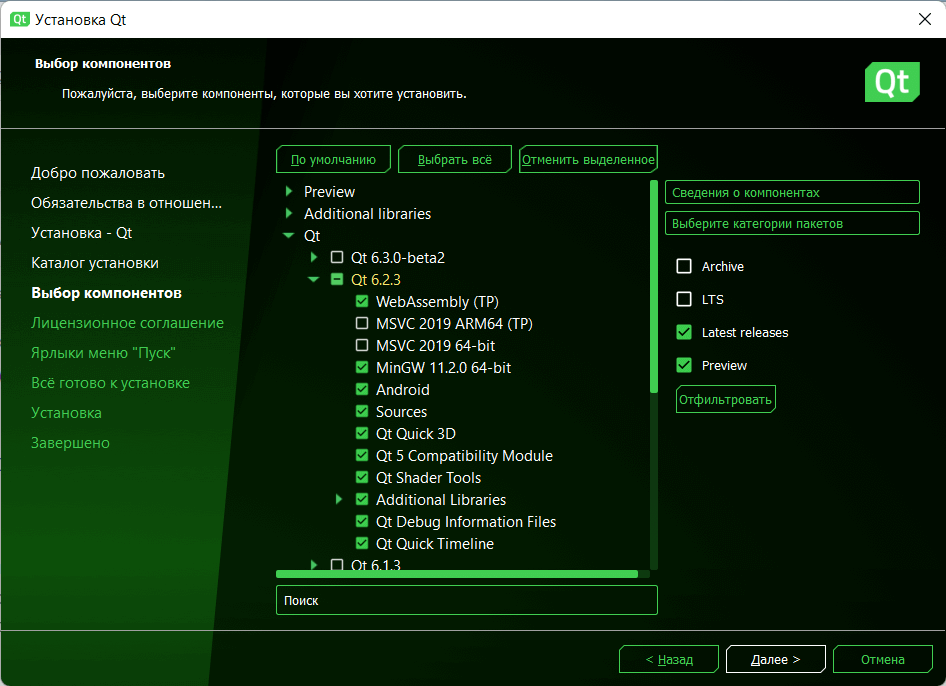
В данном случае я выбрал для установки последнюю на данный момент версию Qt — Qt 6.2.3 за исключением двух пакетов (MSVC 2019). При установке для Windows прежде всего стоит отметить пункт компилятора MinGW — на данный момент это MinGW 11.2.0. 64-bit . Остальные компоненты можно устанавливать при необходимости. При установки следует учитывать свободное место на жестком диске, так как некоторые компоненты занимают довольно многом места.
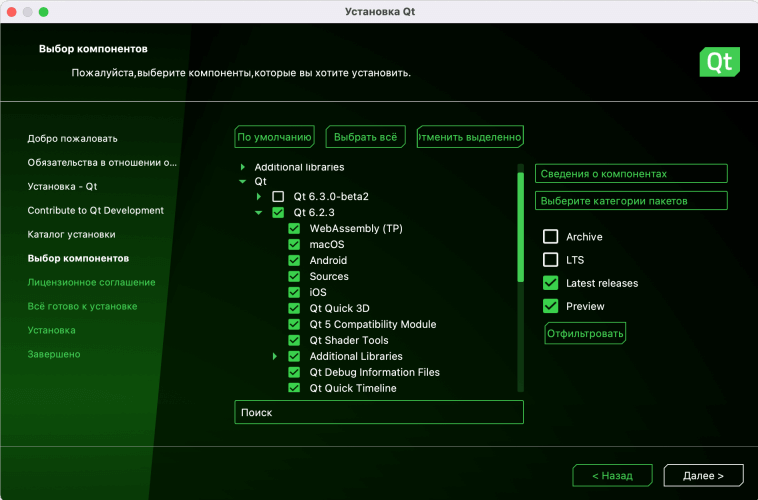
В зависимости от текущей операционной системы набор компонентов может отличаться. Например, набор компонентов для Qt 6.2.3 для MacOS:
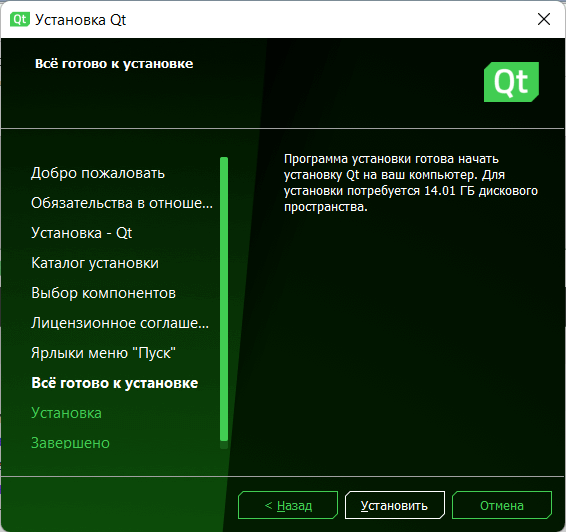
Затем надо принять лицензионное соглашение и настроить ярлык для меню Пуск. И далее нажмем на кнопку «Установить»:
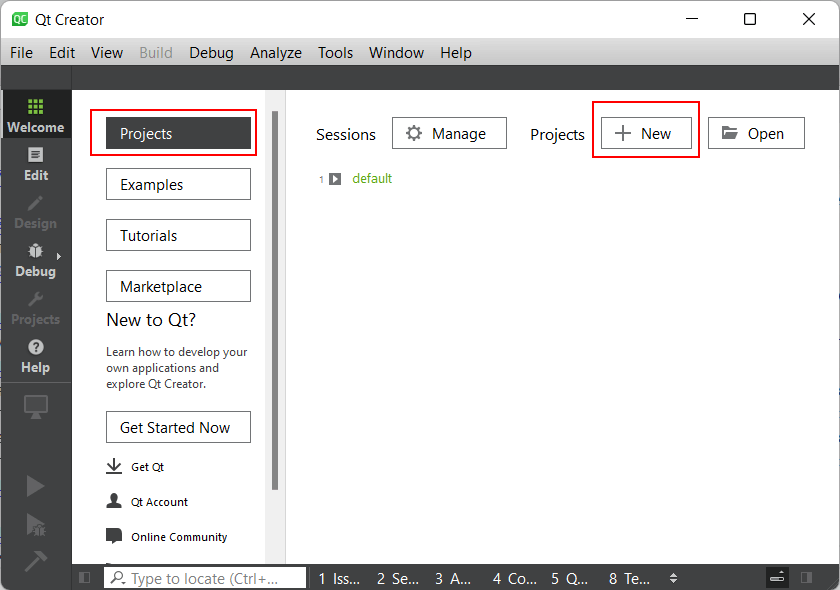
Создание проекта С++ в Qt Creator
После завершения установки запустим Qt Creator. На стартовом экране выберем вкладку Projects (Проекты), на которой нажмем на кнопку New (Создать):
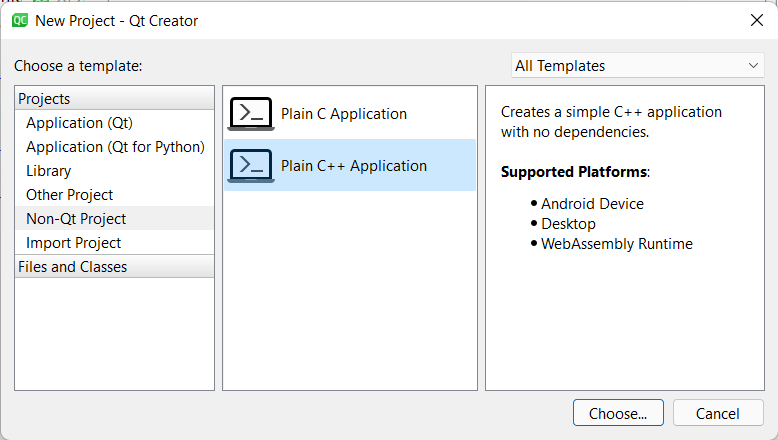
В окне создания нового проекта в качестве шаблона проекта выберем Plain C++ Application :
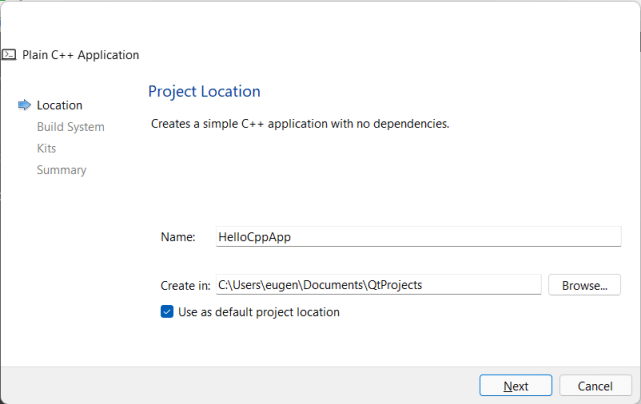
Далее надо будет задать имя проекта и каталог, где он будет располагаться:
На следующих шагах оставим все значения по умолчанию. И на последнем шаге нажмем на кнопку Finish для создания проекта:
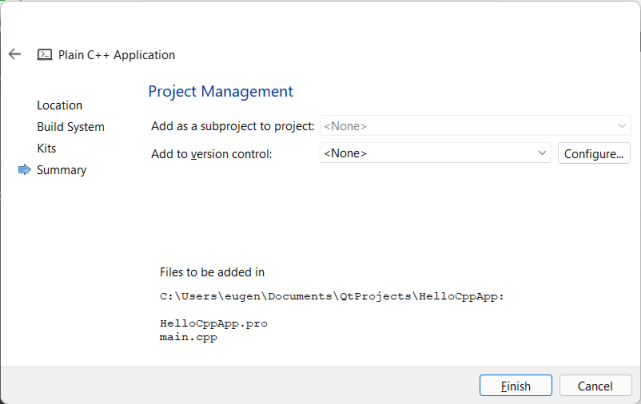
И нам откроется проект с некоторым содержимым по умолчанию:
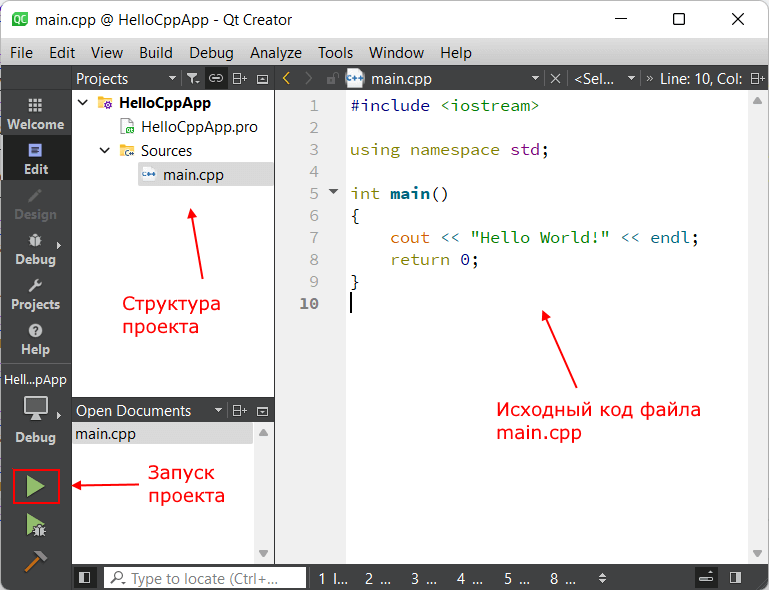
Проект будет иметь один файл — main.cpp , и в центральной части — текстовом редакторе будет открыт его код:
#include using namespace std; int main()
Запустим его, нажав на зеленую стрелку в нижнем левом углу Qt Creator. И в нижней части Qt Creator откроется окно Application Output с результатами работы скомпилированной программы
Qt Creator Tutorial
![]()
Linux provides its users with various applications and tools for building and developing programs on different operating systems. Many of these applications require components which are graphical and thus Linux provides us with Qt Creator.
Qt Creator is one of the popular application development frameworks available for Linux and other platforms for making graphical user interfaces. It allows users to use GUI as well as command line tools and server consoles for building applications. A lot of famous applications were built using Qt such as VLC(the famous multimedia player), Plasma, and the applications associated with it.
To integrate with the Qt developers and their needs, Qt Creator is available that makes the creation of various Qt applications faster. This tutorial will guide you through the installation as well as how to use Qt Creator for building an application.
How to Install Qt Creator?
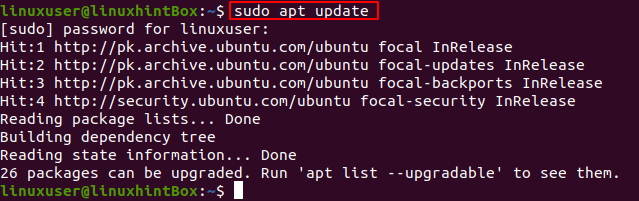
The installation of Qt Creator is a fairly easy step as it is available on the main distribution repository so we simply need to update our repository by running the command provided below:
Now install the Qt Creator by running the below command:

The installation process might take some time so be patient. Another thing that you need to install is qmake which makes the project file for Qt Creator and for that execute the below command:

You can also specify a particular version that you want to for example if you want to install Qt Creator 5, you can use the below command:
In case you want to create more complex projects you’ve to install the documentation and samples and for that you can use the below command:
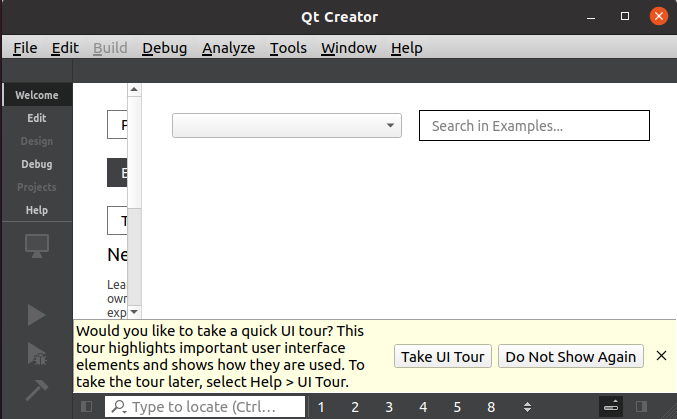
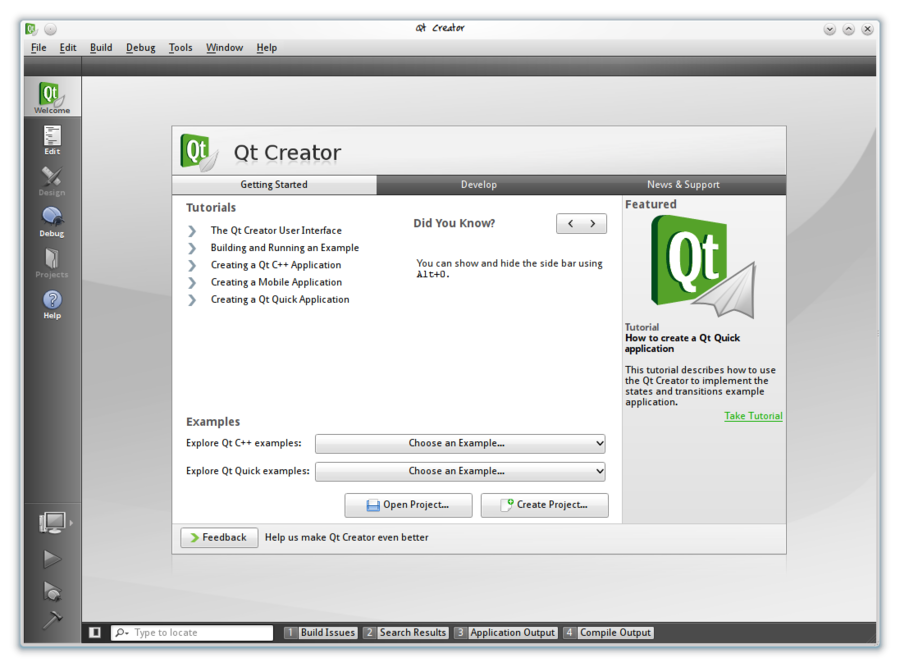
Now that the Qt Creator is installed you can launch it by searching on your system and the following window will be displayed:
Create a Program with Qt Creator
You can use both GUI as well as command line to create programs in Qt Creator but for this tutorial we will use command line to create a basic program to demonstrate the working.
Firstly you’ve to create a directory to host our Qt project and for that execute the below command:

Here we created a directory by the name “qtProject” and later using the command “ls” we verified if the directory is present or not. Now we’ve to move to the directory we created and in that directory we will create another file of extension “.cpp”:

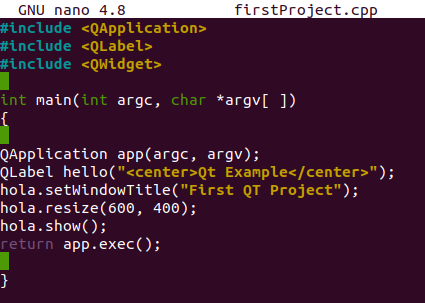
This command will open up a file where we’ve to write our code and for this purpose paste the below code in the file and save it:
int main ( int argc, char * argv [ ] )
{
QApplication app ( argc, argv ) ;
QLabel hello ( «
hola. setWindowTitle ( «First QT Project» ) ;
hola. resize ( 600 , 400 ) ;
hola. show ( ) ;
return app. exec ( ) ;
Now after saving the file we’ve to create a Qt project file inside the directory and or that you need to execute the below command:

You can verify if the file is created by using the command “ls”:

Here the above output shows that the file “qtProject” is created with the extension “.pro” which will be a basic skeleton for the Qt project. Now, to compile the project from the command line we’ve to add the line provided below to the “.pro” file and for this we will first open the .pro file:

This will open the file in which we need to paste the below line:
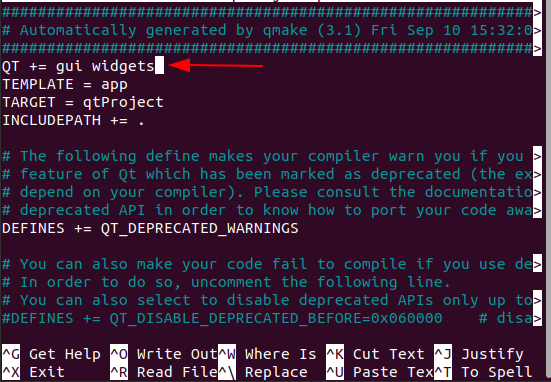
Now save the file and create an executable file for your project and for that execute the below command:
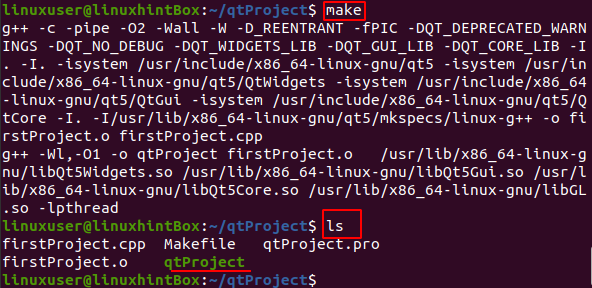
This command will create a file with name “Makefile” which you can verify by using the command “ls”:

Now after this run the below command to compile “MakeFile” in an executable program:
If no error occurred then you will have an executable program in the directory which you can check using command “ls”:
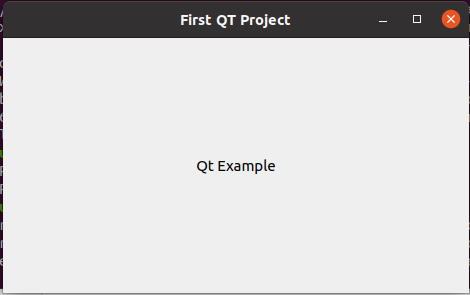
Here you can see the green colored file “qtProject” is an executable file that has been created in the directory. Now all we’ve to do is test the program that we created and for that run the below command:
This will pop up the window of our program:
This is all the steps you need to follow in order to create a Qt project using the command line. This was a simple example to demonstrate the use of Qt creator but you can create more complex programs.
Conclusion
Qt Creator is a framework that is available for various operating systems to help users develop graphical user interfaces for their program. In this tutorial we guided you through the installation of Qt Creator and further we created a simple program using Qt Creator through the command line and compiled it. Later we executed the program to show you the output. Following these steps you can also create programs that are more complex.
About the author
Shehroz Azam
A Javascript Developer & Linux enthusiast with 4 years of industrial experience and proven know-how to combine creative and usability viewpoints resulting in world-class web applications. I have experience working with Vue, React & Node.js & currently working on article writing and video creation.
Basic Qt Programming Tutorial
This tutorial will explain in detail how to take your first steps in programming with Qt using the Qt Creator integrated development environment (IDE).
If you want to learn how to make powerful GUIs with all the latest fancy technologies, this is not the tutorial for you. This is firmly intended as a gentle introduction to help beginners get up and running without scaring them.
We will begin by creating a new Qt-based project and modifying the generated code to show a very simple graphical user interface (GUI). Once our basic application project is in place and running, we will go back and modify it to do some slightly useful things.
We will start off simple and build up in complexity as you get more familiar with the widgets and other facilities at your disposal.
Before you start: Download and install Qt and Qt Creator
Grab yourself a copy of the Qt SDK or if you are on Linux the system-provided copy of Qt and a compiler.
If you are starting off you might want to consider the open source LGPL version.
The open source downloads can be found on the qt.io website here.
For commercial use consider getting a Qt Commercial license.
Baby steps: Creating a new project
Let’s try making a trivial application that has a single window that shows a QLabel and a QLineEdit. To do this follow these simple steps:
Go to File — New File or Project menu entry
Choose Qt Gui Application and choose a name for it:
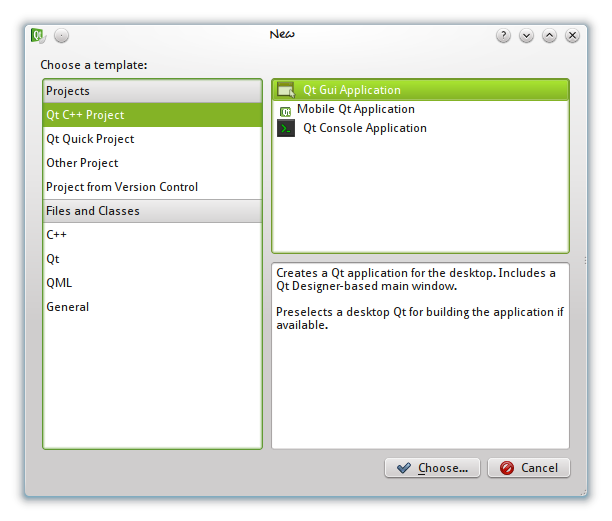
Enter a project name, «qt-tutorial-01», say.

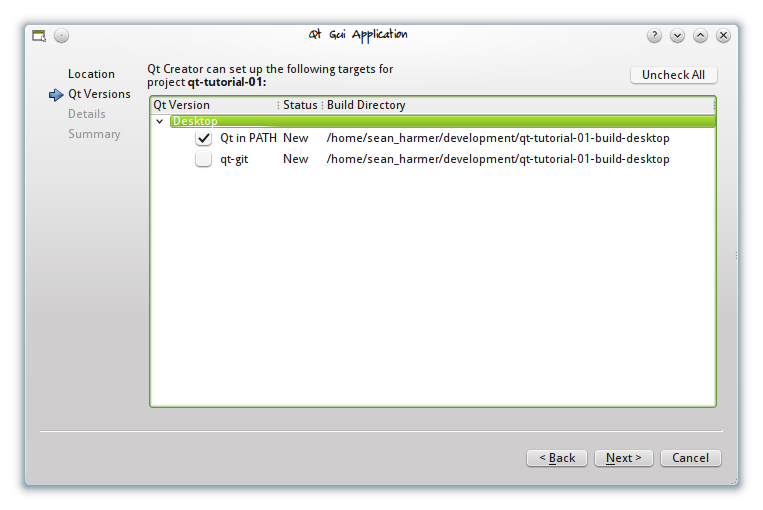
Select one or more versions of Qt to target. A desktop build is fine for this tutorial.
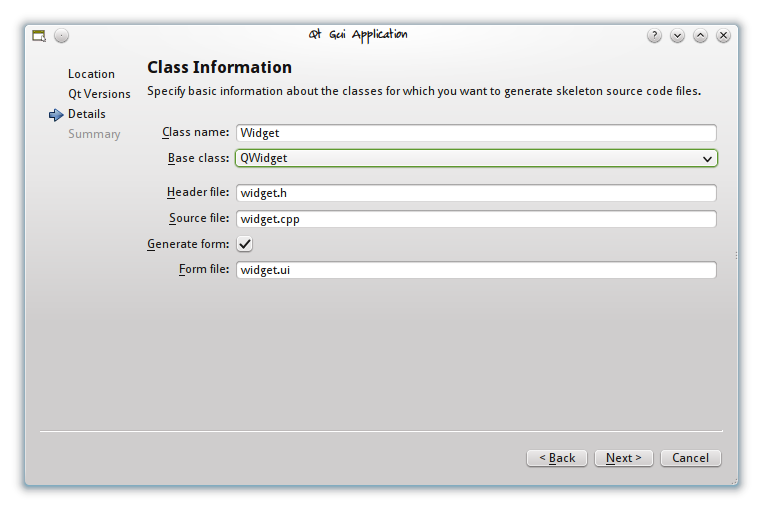
Select the base class to be QWidget (leave the class name as Widget which is the default).
Check project creation options on summary and click «Finish».
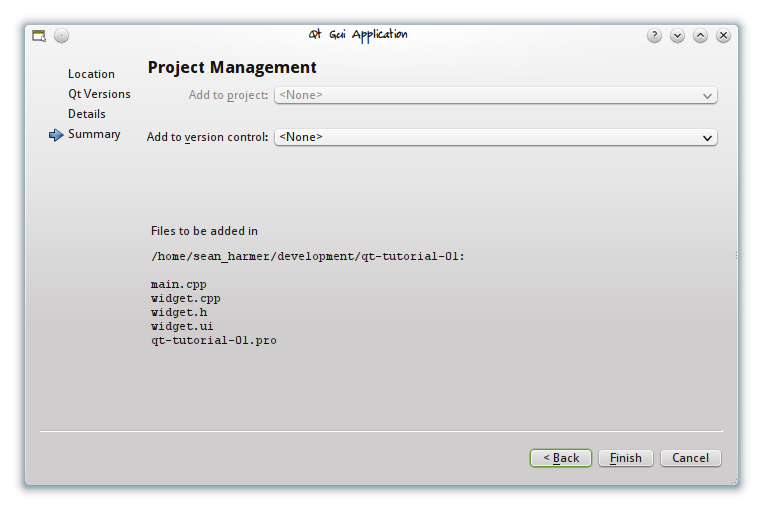
The above will create you a simple project consisting of four files:
Learning to crawl: Editing the project files
We will edit the widget.ui file first so:
Click on that and designer will switch to design mode and open up the file. You should see a blank widget. Now do this:

Using the toolbox on the left, drag a Label onto the widget form

Do similarly for a Line Edit and place it to the right of the Label. The exact position is not important.
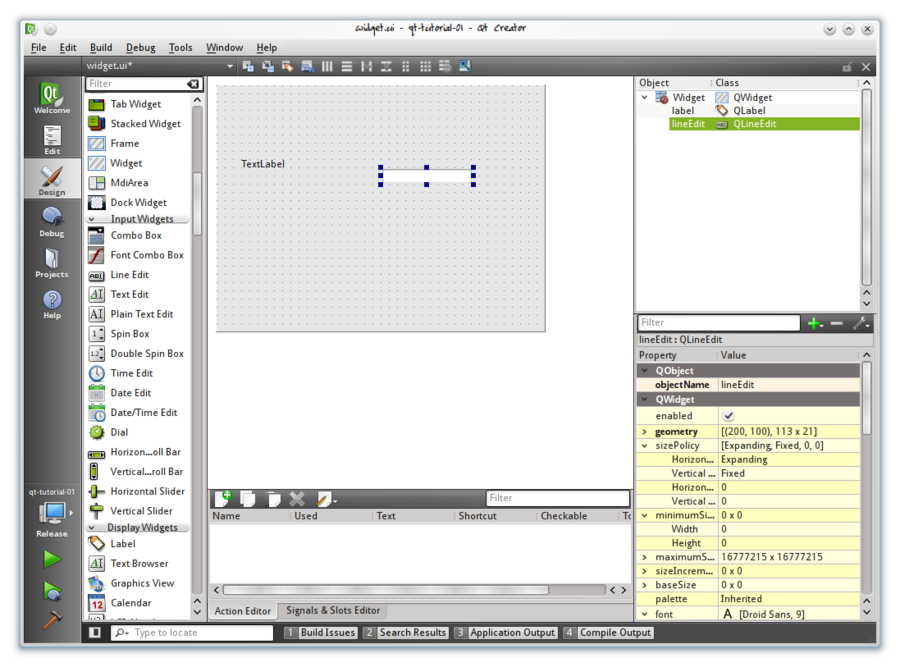
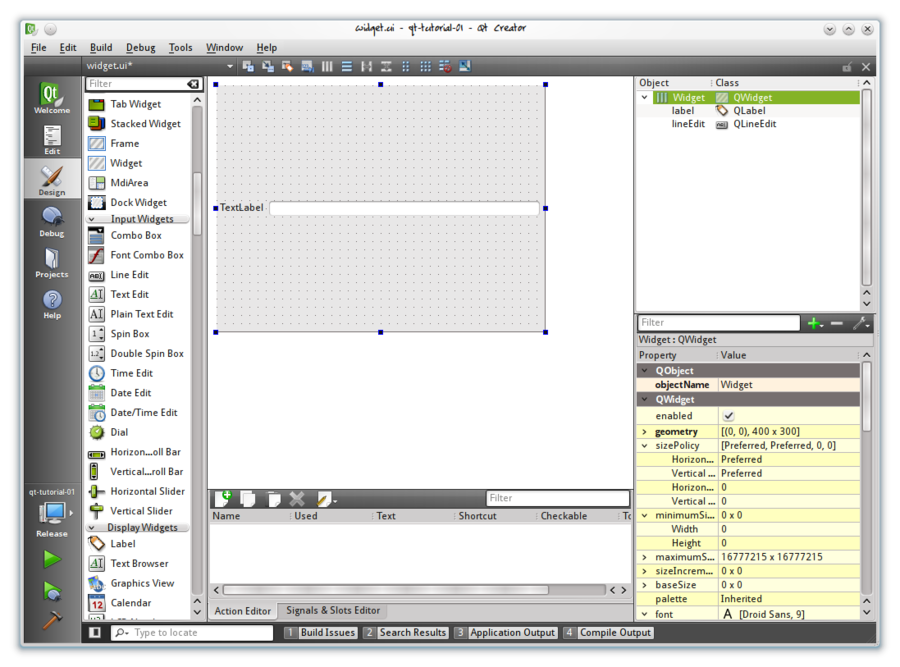
Click on the widget background so that both of your new widgets (the label and line edit) get deselected.

In the toolbar at the top click on the «Lay out Horizontally» button or press Ctrl-H to add all widgets to a horizontal layout. The layout will take care of resizing your widgets for you if the parent widget’s size changes.
Double click on the Label and it will switch to edit mode. Change the text to «My name is:»
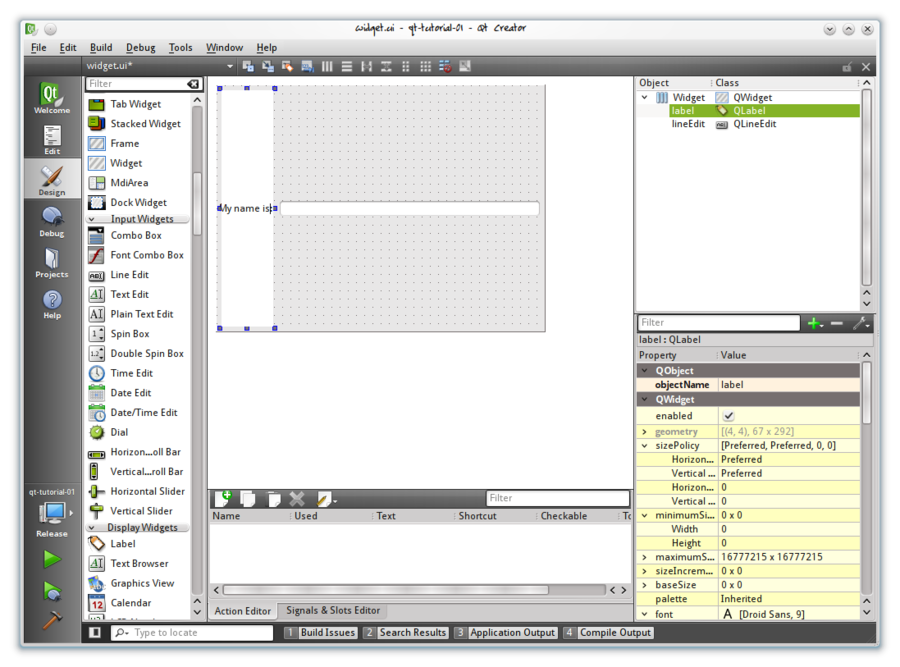
Press Ctrl-S to save the form.
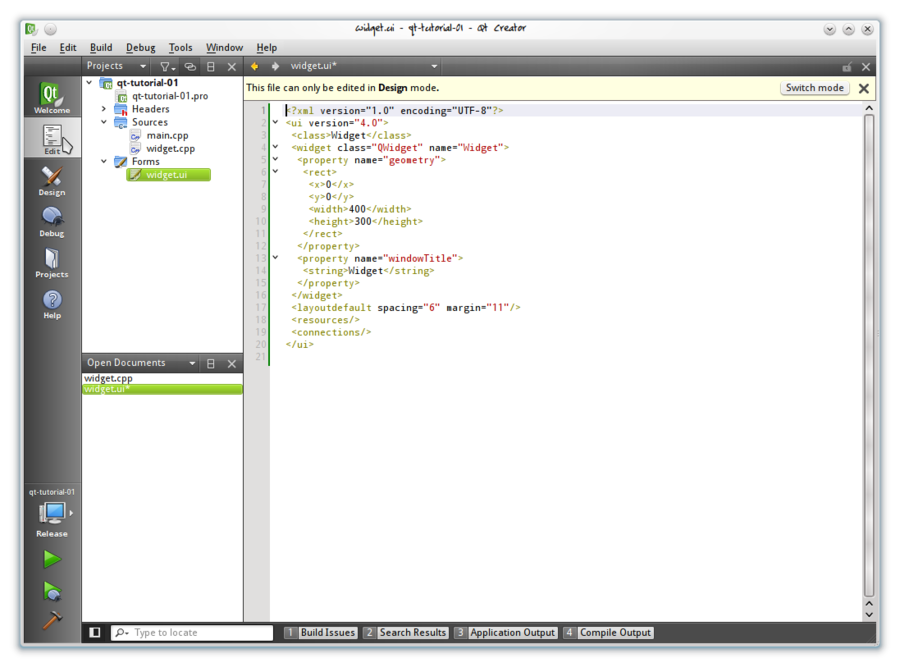
Click on the Edit mode button in the left hand panel of creator to switch back to the text editor. You will probably see the raw xml content of the UI file at this point. Just close it we are done with it for now.
Now open up the widget.h file and edit it so that it looks like this:
#ifndef WIDGET_H #define WIDGET_H #include namespace Ui class Widget; > class Widget : public QWidget Q_OBJECT public: explicit Widget(QWidget *parent = 0); ~Widget(); void setName(const QString &name); QString name() const; private: Ui::Widget *ui; >; #endif // WIDGET_H
Now edit the corresponding .cpp file to look like this:
#include "widget.h" #include "ui_widget.h" Widget::Widget(QWidget *parent) : QWidget(parent), ui(new Ui::Widget) ui->setupUi(this); > Widget::~Widget() delete ui; > void Widget::setName(const QString &name) ui->lineEdit->setText(name); > QString Widget::name() const return ui->lineEdit->text(); >
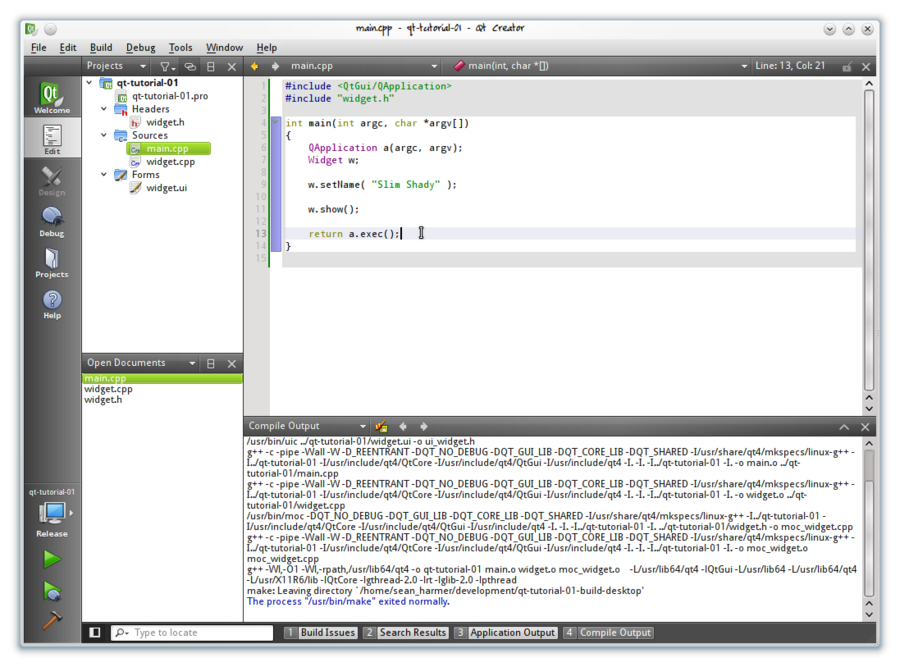
Finally edit main.cpp to this:
#include #include "widget.h" int main(int argc, char *argv[]) QApplication a(argc, argv); Widget w; w.setName("Slim Shady"); w.show(); return a.exec(); >
Up and running: Building and running the application
Now build (Hammer icon in lower left or default shortcut of Ctrl-Shift-B) and run the application (green «play» icon in lower left corner). You will see some compiler messages go past in the «Compile Output» panel at the bottom whilst building.
This is what the application looks like when it is executed:

As you can see the main() function is very simple. All we do is create a QApplication and then a Widget (this is our custom widget that we layed out in designer and added custom behaviour to in code with the name() and setName() functions).
We then just call our custom setName function on the widget. This in turn gets a pointer to the QLineEdit widget that we placed on the form and calls the setText() function of QLineEdit.
Finally we show the widget and enter the event loop by calling a.exec().
Once you understand how this simple app works then you can start adding some more bells and whistles like signal/slot connections.