- Развертывание Qt и QML приложений в Linux и Windows
- Для начала немного теории.
- Зачем это нужно?
- Теперь небольшое описание.
- Возьмем пример.
- MyApp (main.cpp)
- MyApp (main.qml)
- Общее
- Deploying to Remote Linux
- Adding Missing Files
- CMake Builds
- qmake Builds
- Deploy Steps
- Uploading Files
- Creating a Tarball
- Deploying Qt and QML Applications on Linux and Windows
- For a start, a little theory.
- Why is this needed?
- Now a little description.
- Let's take an example.
- MyApp (main.cpp)
- MyApp (main.qml)
- Total
Развертывание Qt и QML приложений в Linux и Windows
В этой статье мы рассмотрим, как правильно собрать все зависимости qt для вашего приложения, которое было собрано динамически.
Для начала немного теории.
Зачем это нужно?
- Статическая сборка.
Статическая сборка предполагает создание бинарника, в котором будут все необходимые ссылки на него. Другими словами, в нем будет лежать все, что нужно для его работы. Этот подход подходит для небольших консольных приложений, у которых мало зависимостей, иначе размер конечного бинарного файла будет чрезвычайно большим. - Динамичная сборка.
Отличается от статического тем, что в бинарнике будет только исходный код вашего приложения (размер бинарника будет минимальным), но при запуске такого приложения ему потребуются сторонние библиотеки, которые использовались при его написании.
Теперь небольшое описание.
Console-QtDeployer — это простая утилита, похожая на windeployqt и macdeployqt . Но в отличии от аналогов у него гораздо более гибкий интерфейс (флаги запуска) и более высокая скорость, к тому же он поддерживает 2 платформы windows и linux, а значит теперь мы можем строить зависимости для windows на линуксе и наоборот.
Возьмем пример.
Например, я написал простое qt-приложение с использованием qml — MyApp.
MyApp (main.cpp)
#include #include int main (int argc, char * argv []) < QCoreApplication :: setAttribute (Qt :: AA_EnableHighDpiScaling); QGuiApplication app (argc, argv); QQmlApplicationEngine engine; engine.load (QUrl (QStringLiteral ("qrc: /main.qml"))); if (engine.rootObjects (). isEmpty ()) return -1; return app.exec (); >MyApp (main.qml)
import QtQuick 2.9 import QtQuick.Controls 2.2 ApplicationWindow < visible: true width: 640 height: 480 title: qsTr ("Scroll") ScrollView < anchors.fill: parent ListView < width: parent.width model: 20 delegate: ItemDelegate < text: "Item" + (index + 1) width: parent.width >> > >MyApp подключается динамически, то есть для работы ему нужны библиотеки qt.
Если мы попытаемся запустить приложение, то сразу после сборки получим ошибку:~/build-MyApp-Desktop_Qt_5_11_1_GCC_64bit4-Release $ ./MyApp ./MyApp: /usr/lib/x86_64-linux-gnu/libQt5Qml.so.5: version `Qt_5 'not found (required by ./MyApp) ./MyApp: /usr/lib/x86_64-linux-gnu/libQt5Gui.so.5: version `Qt_5 'not found (required by ./MyApp) ./MyApp: /usr/lib/x86_64-linux-gnu/libQt5Core.so.5: version `Qt_5.11 'not found (required by ./MyApp) ./MyApp: /usr/lib/x86_64-linux-gnu/libQt5Core.so.5: version `Qt_5 'not found (required by ./MyApp)Из подобных текстов мы видим, что приложение зависит от графических библиотек qt и qml. Поиск и сборка всех ресурсов (библиотек и плагинов) займет много времени.
Для экономии времени и сил воспользуемся утилитой CQtDeployer (ее можно скачать здесь )
или установить в Snap Storecqtdeployer -bin myApp -qmake /media/D/Qt/5.12.3/gcc_64/bin/qmake -qmlDir ./После выполнения этой команды вы получите полностью готовое приложение для работы с готовым лаунчером, который настроит все необходимые окружения для работы вашего приложения на всех машинах под управлением Linux.
Общее
После запуска Консоли QtDeployer содержимое папки с вашим приложением должно выглядеть так:
drwxr-xr-x 7 andrei andrei 4096 May 24 12:22 ./ drwxrwxr-x 3 andrei andrei 4096 May 24 12:22 ../ drwxr-xr-x 2 andrei andrei 4096 May 24 12:22 bin/ drwxr-xr-x 2 andrei andrei 4096 May 24 12:22 lib/ -rwx---rwx 1 andrei andrei 433 May 24 12:22 myApp.sh* drwxr-xr-x 6 andrei andrei 4096 May 24 12:22 plugins/ drwxr-xr-x 5 andrei andrei 4096 May 24 12:22 qml/ drwxr-xr-x 2 andrei andrei 4096 May 24 12:22 translations/

- myApp.sh - скрипт запуска вашего приложения
- bin - папка с вашим бинарником
- lib - папка со всеми необходимыми зависимостями вашего приложения.
- plugins - qt плагины, необходимые для работы приложения
- qml - qml зависимости.
- translations - стандартные переводы qt.
Таким образом, вы можете подготовить свое приложение к упаковке в deb или snap пакет, после чего можете приступить к его распространению. Обратите внимание, что после запуска cqtdeployer ваше приложение должно быть запущено с помощью скрипта sh, который настроит необходимое окружение для вашего приложения.

Рекомендуем хостинг TIMEWEB
Стабильный хостинг, на котором располагается социальная сеть EVILEG. Для проектов на Django рекомендуем VDS хостинг.
Рекомендуемые статьи по этой тематике
По статье задано0 вопрос(ов)
Вам это нравится? Поделитесь в социальных сетях!
Deploying to Remote Linux
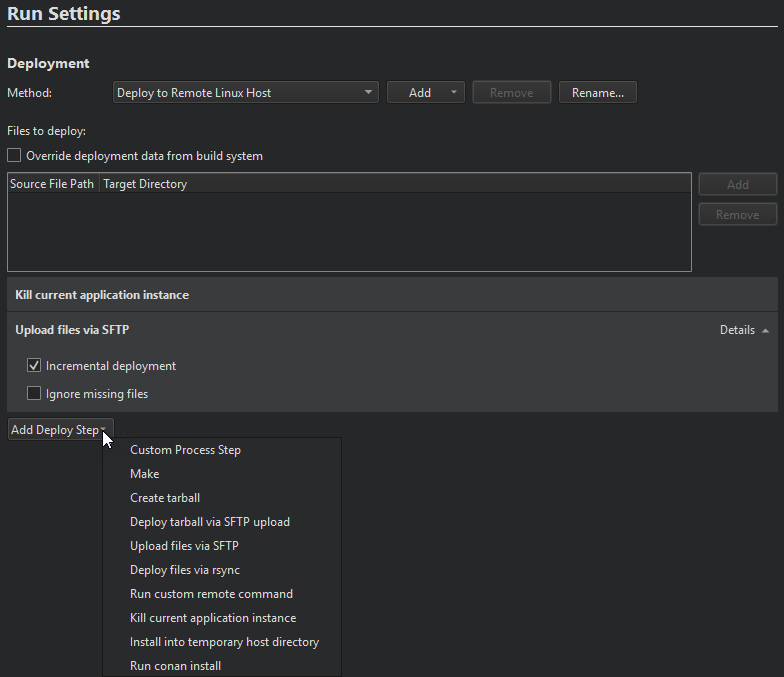
You can specify settings for deploying applications to generic remote Linux devices in the project configuration file and in the Projects mode, in Run Settings. The files to be installed are listed in the Deployment step, the Files to deploy field. The Source File Path field displays the location of the file on the development PC. The Target Directory field displays the directory where the file is installed on the device. Text in red color indicates that the information is missing. If the build system did not automatically detect the source and target directories, select Override deployment data from build system, and then select Add to enter them manually. To remove the selected paths from Files to deploy, select Remove.
Adding Missing Files
The process to add files to deploy depends on the build system you use. For more information, see Specifying Project Contents.
CMake Builds
When using CMake as the build system, use the install command in the CMakeLists.txt file to add the missing files. For example, add the following lines to the CMakeLists.txt file to install the binary of your project to the /opt directory on the remote device:
set(INSTALL_DESTDIR "/opt") install(TARGETS RUNTIME DESTINATION "$" BUNDLE DESTINATION "$" LIBRARY DESTINATION "$" )
qmake Builds
When using qmake, edit the INSTALLS variable in the project .pro file. When you run the application, Qt Creator copies the necessary files to the device and starts the application on it. For example, add the following lines to the .pro file to copy the binary of your project to the /opt directory on the remote device:
target.path = /opt INSTALLS += target
Deploy Steps
When you run the application on the device, Qt Creator first uploads the necessary files to it, as specified by the deploy steps.
Uploading Files
By default, Qt Creator copies the application files to the device by using the SSH file transfer protocol (SFTP), as specified by the Upload files via SFTP step.
Note: If the SFTP upload fails, make sure that the remote device has SFTP enabled in its SSH daemon. Some versions of Dropbear that come without SFTP support will crash when an SFTP upload is being attempted. This is not a bug in Qt Creator.
If you have a lot of data to copy, select Details in the Upload Files via SFTP step, and then select the Incremental deployment check box. Qt Creator takes note of the deployment time and only copies files that have changed since the last deployment. However, when you make major changes on the device, such as removing files from the device manually or flashing a new disk image, or when you use another device with the same IP address, deselect the check box once, to have Qt Creator deploy all files again.
Creating a Tarball
To only create a tarball and not copy the files to the device, select Add Deploy Step > Create tarball. Then remove all other deploy steps. The Deploy tarball via SFTP upload step specifies that Qt Creator uploads the tarball to the device and extracts it.
© 2023 The Qt Company Ltd. Documentation contributions included herein are the copyrights of their respective owners. The documentation provided herein is licensed under the terms of the GNU Free Documentation License version 1.3 as published by the Free Software Foundation. Qt and respective logos are trademarks of The Qt Company Ltd in Finland and/or other countries worldwide. All other trademarks are property of their respective owners.
Deploying Qt and QML Applications on Linux and Windows
In this article we will look at how to properly collect all qt dependencies for your application, which was collected dynamically.
For a start, a little theory.
Why is this needed?
There are several ways to build applications, the main ones are:
- Static build.
Static assembly involves the creation of a binary, which will be all the necessary links to it. In other words, all that is needed for his work will lie in it. This approach is suitable for small console applications that have few dependencies, otherwise the size of the final binary will be extremely large. - Dynamic build.
It differs from static in that only the source code of your application will be in the binary (the size of the binary will be minimal), but when you run such an application it will need third-party libraries that were used when writing it.
Now a little description.
Console-QtDeployer is a simple utility similar to windeployqt and macdeployqt . But unlike analogs, it has a much more flexible interface (launch flags) and higher speed, besides it supports 2 windows and linux platforms, which means that now we can build dependencies for windows on Linux and vice versa.
Let's take an example.
For example, I wrote a simple qt application using qml - MyApp.
MyApp (main.cpp)
#include #include int main (int argc, char * argv []) < QCoreApplication :: setAttribute (Qt :: AA_EnableHighDpiScaling); QGuiApplication app (argc, argv); QQmlApplicationEngine engine; engine.load (QUrl (QStringLiteral ("qrc: /main.qml"))); if (engine.rootObjects (). isEmpty ()) return -1; return app.exec (); >MyApp (main.qml)
import QtQuick 2.9 import QtQuick.Controls 2.2 ApplicationWindow < visible: true width: 640 height: 480 title: qsTr ("Scroll") ScrollView < anchors.fill: parent ListView < width: parent.width model: 20 delegate: ItemDelegate < text: "Item" + (index + 1) width: parent.width >> > >MyApp is linked dynamically, that is, it needs qt libraries to work.
If we try to start the application, right after the build we get an error:~/build-MyApp-Desktop_Qt_5_11_1_GCC_64bit4-Release $ ./MyApp ./MyApp: /usr/lib/x86_64-linux-gnu/libQt5Qml.so.5: version `Qt_5 'not found (required by ./MyApp) ./MyApp: /usr/lib/x86_64-linux-gnu/libQt5Gui.so.5: version `Qt_5 'not found (required by ./MyApp) ./MyApp: /usr/lib/x86_64-linux-gnu/libQt5Core.so.5: version `Qt_5.11 'not found (required by ./MyApp) ./MyApp: /usr/lib/x86_64-linux-gnu/libQt5Core.so.5: version `Qt_5 'not found (required by ./MyApp)From similar texts, we see that the application depends on the GUI qt libraries and qml libraries. Search and build all resources (libraries and plugins) will take a lot of time.
To save time and effort, we will use the CQtDeployer utility (you can download it here )
or install in Snap Storecqtdeployer -bin myApp -qmake /media/D/Qt/5.12.3/gcc_64/bin/qmake -qmlDir ./After executing this command, you will receive a fully ready application for work with a ready launcher, which will set up all the necessary environments for your application to work on all machines running Linux.
Total
After running the QtDeployer Console, the contents of the folder with your application should look like this:
drwxr-xr-x 7 andrei andrei 4096 May 24 12:22 ./ drwxrwxr-x 3 andrei andrei 4096 May 24 12:22 ../ drwxr-xr-x 2 andrei andrei 4096 May 24 12:22 bin/ drwxr-xr-x 2 andrei andrei 4096 May 24 12:22 lib/ -rwx---rwx 1 andrei andrei 433 May 24 12:22 myApp.sh* drwxr-xr-x 6 andrei andrei 4096 May 24 12:22 plugins/ drwxr-xr-x 5 andrei andrei 4096 May 24 12:22 qml/ drwxr-xr-x 2 andrei andrei 4096 May 24 12:22 translations/
- myApp.sh - your application launch script
- bin - folder with your binary
- lib - a folder with all the necessary dependencies of your application.
- plugins - qt plugins needed for the application to work
- qml - qml dependencies.
- translations - standard qt translations.
Thus, you can prepare your application for packaging in a deb or snap package, after which you can begin to distribute it. Note that after running cqtdeployer, your application must be launched using the sh script, which will set up the necessary environment for your application.
We recommend hosting TIMEWEB
Stable hosting, on which the social network EVILEG is located. For projects on Django we recommend VDS hosting.
Recommended articles on this topic
By article asked0 question(s)
Do you like it? Share on social networks!