- Install Eclipse on Linux
- Uninstallation Instructions for Linux Systems
- Upgrading Instructions for Linux Systems
- qt development on linux using eclipse?
- 2 Answers 2
- Qt
- Sources
- CMake generator
- Build
- Eclipse + QT: установка и настройка
- Prerequisites
- 1. MinGW
- 2. QT
- 3. Java Runtime Environment
- 4. Eclipse
- 5. Пакет интеграции QT для Eclipse
- 6. Компиляция простейшей программы
- Random Codes – Elementz Tech Blog
- Tech blog based on research and development done by the Elementz team.
- Developing UI Framework with Qt and Eclipse in Linux
Install Eclipse on Linux
If you installed Eclipse to e.g. /usr/local in step (1.), you will find the directory /usr/local/eclipse/plugins there. If you used the package management system of your Linux distribution to install Eclipse, this directory might possibly be /usr/lib/eclipse/plugins.
Go to the location where you found the eclipse/plugins directory (i.e. /usr/local or /usr/lib in the examples in step (4.) ) and untar the package, e.g.
cd /usr/local tar xzf ~/Downloads/qt-eclipse-integration-linux.x86-.tar.gz
You might need to be the root user to do that.
6. Start Eclipse with a clean configuration
It is highly recommended by us to start Eclipse once from the command line with
after you unpacked the Qt Eclipse Integration plugins and feature.
This will not change anything in your workspace but will clear Eclipse’s caches.
Uninstallation Instructions for Linux Systems
Go to the location where you installed the Qt Eclipse Integration package, e.g. /usr/local/eclipse or /usr/lib/eclipse, and remove all files/directories in plugins/ and features/ that start with com.trolltech.qtcpp
cd /usr/local/eclipse rm -r plugins/com.trolltech.qtcpp* rm -r features/com.trolltech.qtcpp*
2. Restart Eclipse with a clean configuration
It is highly recommended by us to start Eclipse once from the command line with
after you removed the Qt Eclipse Integration plugins and feature.
This will not change anything in your workspace but will clear Eclipse’s caches.
Upgrading Instructions for Linux Systems
If you want to upgrade your Qt Eclipse Integration installation we highly recommend to first uninstall the older version:
1. Remove the older installed plugins and feature
Like described in step (1.) of the ‘Uninstallation Instructions’.
2. Install the newer Qt Eclipse Integration
Like described in ‘Installation Instructions’.
3. Restart Eclipse with a clean configuration
qt development on linux using eclipse?
In Linux, How can I create QT applications in Eclipse? I’ve seen some integration plugins in eclipse.org however it seems they are discontinued and not supported anymore. Since I’m going to develop a project which it may be developed for some years from now, I want to find a suitable solution for this.
@Mitch I’m not familiar with QT Creator. Is it possible to develop standalone c++ application (which are not using QT) in QT Creator? Is it suitable for big C++ applications?
Is it possible to develop standalone c++ application (which are not using QT) in QT Creator? — Yes it is. As for eclipse(or any other IDE) — you have to link qt library to your project to use Qt.
2 Answers 2
How I do Linux + eclipse + Qt + CMake.
The good thing about it that the sources just use CMake, they are built like if it was just a plain CMake project. And you don’t pollute them with the eclipse stuff: the eclipse workspace and project files are outside.
Qt
- Get latest eclipse and then install the Qt package in it through «Help -> Install New Software».
- Create an empty «workspace» directory outside the CMake project source directory.
- Launch eclipse and switch to that «workspace» directory.
- Create a C++ -> Makefile Project -> Qt Makefile Project.
- Delete *.pro file, makefile and main.cpp from it.
Sources
- Go to Project Properties -> Paths and Symbols -> Source Location -> Link Folder.
- Check «Advanced» and link the source folder of CMake project like that: ../../myproject/ . It works because the workspace is just outside the CMake project directory.
CMake generator
- Create Release folder in the project.
- Go to «Make Target» view (Ctrl+3 and then type «Make Target» if it’s hard to find). «Make Target» view looks just like the project view.
- Right click on the «Release» folder and «New. «.
- Uncheck «Same as target name», uncheck «Use builder settings».
- Type in «Release» into «Target name» field, leave «Make target» empty, «Build command» is something like «cmake ../../../myproject/». Click ok.
- Double click on this «Release» make target that was just created in the Release folder. It should run cmake.
Build
- Go to Project Properties, create «Release» configuration.
- Make «Release» configuration active.
- For «Release» configuration uncheck «Generate Makefiles automatically».
- Set Build directory to «Release».
- Enable parallel build.
It should build now in «Release» directory. If it doesn’t, remove all from the «Release» directory and rerun cmake by double-clicking on «Release» target in the «Make Target» view as before.
CMakeLists editing is done by hand. So you can collaborate with anyone, because to build the software they only need the source files and CMakeLists.txt . (CMake is one of the most wide-spread C++ build systems)
I’d recommend using Qt Creator. Before I started with Qt development, I was also using Eclipse for a while, as well as Visual Studio. I tried to keep using these with Qt, but I ended up switching to Creator. It was weird at first, but once you get used to it, it’s much better (especially for developing Qt applications).
With Qt Creator, you can develop standalone C++ applications that aren’t using Qt. You have the choice of three build systems (that I know of): qmake, qbs and cmake.
As for developing big applications, many companies using Qt do so. Qt Creator itself (which is a massive project) is developed with Qt Creator. 🙂
A nice part about Creator is that a large portion of the development comes from third party contributors, so there’s reassurance that it’s easy to contribute patches for things you want to see added and/or fixed.
To get started, download it from here.
Eclipse + QT: установка и настройка
Достаточно давно стал присматриваться к кроссплатформенному С++ программированию. Не то, чтобы это было мне необходимо, но так для общего развития. И вот что я могу отметить: самая большая вещь, которая доставляет проблемы на этом пути — достаточно высокий порог вхождения в эту область именно по причине инструментария.
Если не рассматривать случай программирования в Emacs, что лично мне кажется пока неким толи анахронизмом, толи экстримом, постоянно сравнивая различные IDE с Visual Studio зачастую приходилось просто ужасаться. И главная проблема этих систем была в том, что за редким исключением они не работали из коробки без напильника.
Вторая проблема — юзабилити. Зачастую ниже среднего. Ранние версии KDevelop оставляли достаточно неоднозначное впечатление.
Третье, чего бы хотелось — интегрированного дизайнера интерфейсов. Его не было практически нигде, если не считать NetBeans (но только для Java), да MonoDevelop (GTK#). И хотя эти IDE весьма достойны, хотелось найти легкий способ программировать именно на C++ с минимальным количеством граблей.
В этой статье я хочу привести пошаговое руководство, что называется «для чайников», по установке на платформу Windows работоспособной конфигурации хорошей IDE Eclipse и хорошей библиотеки QT. Стартовую площадку, так сказать.
UPD: Что касается именно программирования в QT, то могу порекомендовать просто шикарную книжку на эту тему:
Jasmin Blanchette, Mark Summerfield: Разработка графического интерфейса с помощью QT3 (перевод Андрей Киселёв)
Prerequisites

Прежде всего, скачаем программы, которые понадобятся для дальнейших действий:
1. Automated MinGW Installer (140 кБ + накачает 19 МБ)
2. Qt/Windows Open Source Edition (149 МБ)
3. Java Runtime Environment (JRE) 6 Update 7 (16МБ)
4. Eclipse IDE for C/C++ Developers (72 МБ)
5. Qt Eclipse Integration for C++ (6 МБ)
1. MinGW

Первое, что нужно установить — набор GNU компиляторов для платформы Windows. По ссылке выше скачивается web-нисталлятор, в котором выбирается режим «скачать и установить»
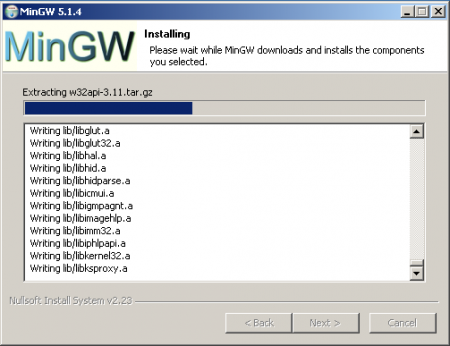
В процессе работы скачиваемые пакеты будут сложены в виде файлов tar.gz рядом с установщиком, после чего они установятся.
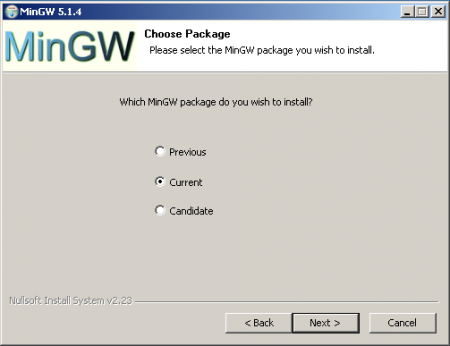
На следующем шаге выбирается скачиваемая версия компиляторов
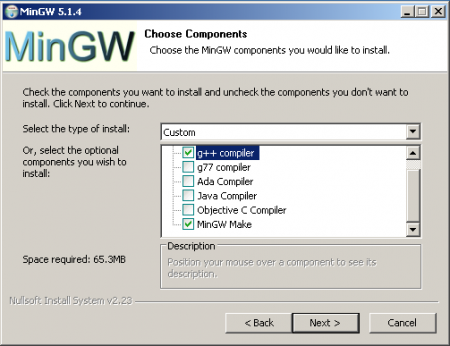
Далее нужно выбрать как минимум опции «g++» и «mingw-make»
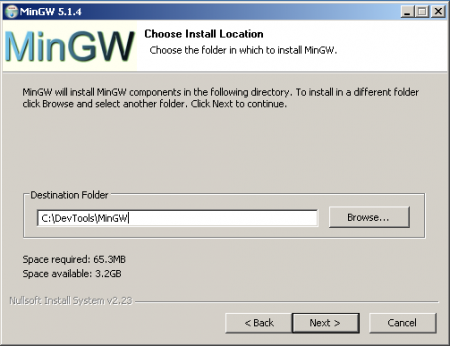
В качестве директории для установки я лично выбрал новую папку DevTools — не люблю свалку в корне диска C: 🙂 Вместе с тем, лучше, чтобы путь не содержал пробелов (зачастую именно они доставляют основное веселье и пляски с бубном)

После установки MinGW путь к его директории bin нужно занести в переменную среды PATH:
2. QT
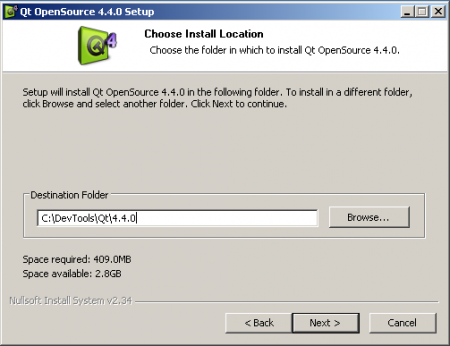
Поскольку мы собираемся устанавливать библиотеку QT, а платить не хотим, скачиваем бесплатную GPL версию по ссылке выше. Запускаем, не забыв скорректировать путь установки
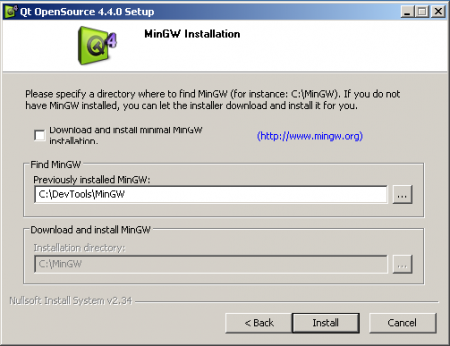
Указываем, где находится MinGW

После нажатия на кнопку «Install» скорее всего будет выведено сообщение об ошибке. Нажав на «Yes» проигнорируем его
Дальнейший процесс особых сложностей не вызывает.
3. Java Runtime Environment
Для функционирования Eclipse нужна установленная Java-машина. Скачиваем её с сайта Sun и устанавливаем.
4. Eclipse

Теперь переходим к установке Eclipse. Собственно вся установка заключается в том, чтобы распаковать содержимое zip архива в какую-нибудь папку. Не будем отступать от выбранной практики и распакуем его в папку C:\DevTools
5. Пакет интеграции QT для Eclipse
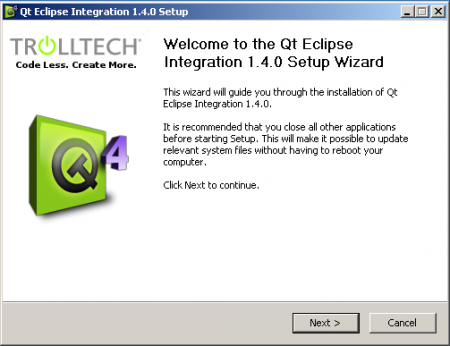
И вот предпоследний момент — установка пакета интеграции Eclpse и QT. Запускаем инсталлятор

Корректируем путь установки

Указываем пути к библиотеке и IDE
С этим всё. Теперь компьютер стоит перезагрузить, чтобы вступили в силу изменения PATH.
6. Компиляция простейшей программы

Запускаем свежеустановленный Eclipse

При первом запуске будет предложено выбрать расположение workspace
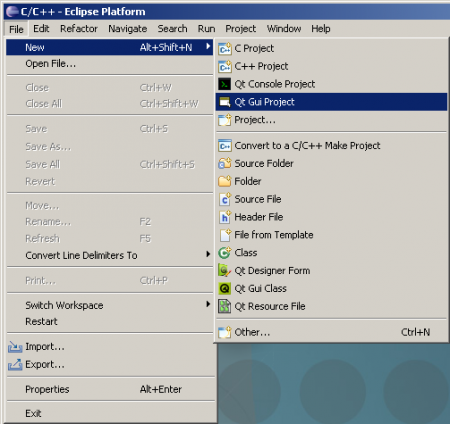
Создаём новый проект «QT GUI Project»
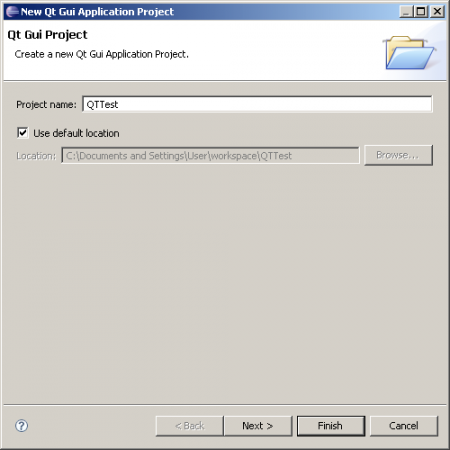
Называем его
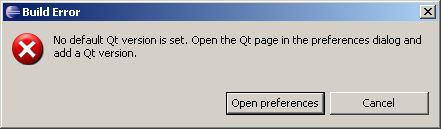
Опаньки! Ошибка

Хотя интегратор QT и спрашивал пути к библиотеке, они почему-то не установлены. Нужно добавить

Теперь все в порядке. Закроем окно «Welcome» и окажемся в рабочей среде
Если по какой-то причине на экране будут отсутствовать все окна или в результате неких действий их расположение испортится, то загрузить снова весь расклад можно через меню «Window» -> «Open Perspective» -> «Other. » -> «C/C++»
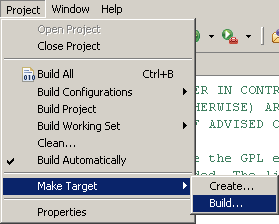
Теперь настало время для компиляции проекта: «Project» -> «Make Target» -> «Build. »
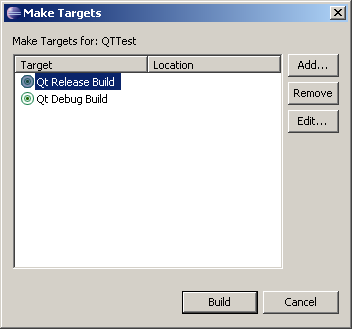
Далее выбирается «Release» и нажимается «Build»
Внимание! Компиляция «Debug» завершится ошибкой! Отладочные библиотеки с QT не поставляются. Их необходимо компилировать отдельно!

Если всё нормально, то нажатие на кнопку «плей» теперь запустит скомпилированную программу
UPD: Чтобы кнопка для запуска приложения приводила к компиляции и запуску Release-версии в настройках проекта «Project» — «Properties» — «C/C++ Make Project» в полях «Make Build Target» слово «debug» надо заменить на «release»
Random Codes – Elementz Tech Blog
Tech blog based on research and development done by the Elementz team.
Developing UI Framework with Qt and Eclipse in Linux
Qt is a cross-platform application and UI framework for developers using C++, which can be used to build UI solutions in Windows, Linux or Mac. This tutorial describes the necessary steps for setting a development environment using Eclipse IDE in Linux Machines.


These commands are tested in Ubuntu 13.10, LinuxMint 15 with Eclipse Juno 3.8.1
First step is to install Eclipse- C++ Development Tool in linux. Use the following command
sudo apt-get update
sudo apt-get install build-essential
sudo apt-get install eclipse-cdt
Install the Qt development tools by entering the command
sudo apt-get install libqt4-dev
Create new C++ executable project from Eclipse–> File –> New and create a source file main.cpp.
Under Project–>Properties–>C/C++ Build–>Settings–>GCC C++ Compiler–>Includes add the following include files
/usr/include/qt4
/usr/include/qt4/Qt
/usr/include/qt4/QtCore
/usr/include/qt4/QtGui

Under Project–>Properties–>C/C++ Build–>Settings–>GCC C++ Linker–>Libraries add the following

Copy the sample code below for getting started
#include
#include
int main(int argc, char *argv[]) QApplication a(argc, argv);
QLabel label;
label.setText(«Hello World»);
label.show(); a.exec();
>
Compile the program using Project–>Build All or by Ctrl+B shortcut. Program should be compiled successfully and an executable binary should be formed inside the Project Workspace.
Debug the program using Run–>Debug as–>Local C/C++Application.
You should see a Window Opened with “Hello World” displayed in it.