How to extract boot.img?
I am trying to see the content in a boot.img file from an Android image. I googled and found this article to extract system.img , but it doesn’t work for boot.img . When trying to do this for boot.img , it is showing the following:
Invalid sparse file format at header magi Failed to read sparse file - If so, Is there any other method to extract boot.img ?
- If not, what is the problem for not extracting boot.img ?
4 Answers 4
boot.img is a small(ish) file that contain two main parts.
Unpack boot.img :
It contains the following steps:
wget https://storage.googleapis.com/google-code-archive-downloads/v2/code.google.com/android-serialport-api/android_bootimg_tools.tar.gz tar xvzf android_bootimg_tools.tar.gz We can extract the ramdisk also, using the following command
gunzip -c boot.img-ramdisk.gz | cpio -i After changing the files, we can again pack those files as boot.img using mkbootimg
Getting the same error for step 3 on Mint 17 here. Tried running them by sudo and after chmod 755 to no avail.
Fix for: «unpackbootimg command not found», you are running 32bit binary on a 64 bit machine without 32bit dependencies. Install them with «apt-get install gcc-multilib»
Install abootimg (available as a package, for example in Debian/Ubuntu and openSUSE).
To extract (boot|recovery).img :
$ abootimg -x (boot|recovery).img $ ls boot.img bootimg.cfg initrd.img zImage To repack (boot|recovery).img after modifying one of bootimg.cfg , zImage or initrd.img :
abootimg --create (boot|recovery).img -f bootimg.cfg -k zImage -r initrd.img This project is not maintained and did not work with my boot.img file, however the answer from @cfig worked.
boot.img is not a compressed filesystem image like system.img . It is read by the bootloader, and contains little more than a kernel image and a ramdisk image.
Some binary distribution ship the kernel and ramdisk images separately. In that case you don’t need to do anything with boot.img , just regenerate a new one with mkbootimg .
If you need to extract information from a boot.img , try split_bootimg (by William Enck, via the Android wiki).
You can use the following tool to extract and re-pack Android boot image
$ git clone https://github.com/cfig/Android_boot_image_editor.git copy your boot.img to the cloned git repository. Run:
First time run will need to download necessary libs from internet, be patient. You can get the contents at «build/unzip_boot/», like this:
build/unzip_boot/ ├── bootimg.json (boot image info) ├── kernel ├── second (2nd bootloader, if exists) ├── boot.img.avb.json (AVB only) └── root How can I open binary Android ROM image files? (.img)
I’m a Windows/Mac/Ubuntu and Android user, so I know what I’m talking about, when I say: How do I open binary image files? (.img) They just won’t open, on any OS… I’m an Android dev… I’m currently working on a ROM, (I also program, using Windows) but I need to extract files, from .img files. I’ve converted them to .ext4.img but they just aren’t recognized by Linux (Definitly not by Android), by Mac OS or Windows. In other words, I can’t open, extract or mount them. Can anyone help me? I’m kinda confused…
the fact that the person with the most useful answer has to first guess what your question really is about, says it all. Please try to ask a more specific and detailed question than ‘How do I open binary image files’.
5 Answers 5
Short Answer is, there are 3 types:
- Regular filesystem images, that can be mounted with -o loop option
- YAFFS2 filesystem images, which currently cannot be mounted in Ubuntu and have to be unpacked
- EXT4 filesystem images that have been further processed by the Android toolchain and need to be converted to regular images with simg2img from the Android toolchain.
So, you have a binary image extracted from an Android device, is that correct?
What does the file command say about the file? Something like this?
$ file system.img system.img: VMS Alpha executable That system image is extracted via nandroid from a Samsung Galaxy i7500. Most of those old Android devices used yaffs as a file system. Knowing what you are dealing with greatly helps. (i.e. Which device are we talking about? Where is that image from?)
Converting images into other file systems will only produce garbage at best if you do not have installed support for the file system in question. Unfortunately there is no package for Ubuntu. But that question has already been asked and answered: Create yaffs2 file system on Ubuntu Server 11.10
There is also the possibility that this image is encrypted. But why would someone give you an encrypted image?
Since this is mostly about Android and you call yourself an Android Developer, please read the Android documentation, again. It’s supposed to be all in there. If not ask your question at android.stackexchange.com, XDA-Developers, RootzWiki and the like. And please do not put a ROM on the net for hundreds of people to use unless you REALLY know what you are doing and you read the documentation. Doing it for fame is dangerous and bad for the users!
Распаковать img прошивку linux
Образ по ссылке хоть и маленький, смотреть не буду из принципа. Раз есть вменяемые файлопомойки, не надо заливать на те, которые показывают всякие счетчики-«замедляторы» и отправляют кликать по ссылкам, пусть этим индусы занимаются.
Цитата:
| Раз есть вменяемые файлопомойки, не надо заливать на те, которые показывают всякие счетчики-«замедляторы» и отправляют кликать по ссылкам, пусть этим индусы занимаются. |
По всей вероятности это не образ, а какая то не понятная образина.
В общем дальше копайте сами.
можно ли в нее добавить дополнительно программу?
Кстати, мало-то — мало, но не ноль, почему вы не обратитесь туда, где есть еще обладатели таких устройств, на the-ebook.org, например.
А вообще, по-хорошему, если система на базе Линукса, то можете смело требовать у производителя исходники, по крайней мере, ядра. Но я так полагаю, там и прикладной софт на базе свободных решений.
Добавлено:
Ага. Ну узнать настоящую марку проблемы не составило.
Это Netronix EB-600. Ось на базе Андроида.
Добавлено:
Исходники ядра конкретно для EB-600 — https://github.com/atsidaev/linux-2.6-eb600. Но навряд-ли они вам нужны. Курите openinkpot.org. 😉
Добавлено:
А еще на Сорсфорже есть заброшенный проект «Eb600 Utils». Пытались наработать «useful utils for Netronix Eb600 hacking», но не задалось. Разработчики — русскоязычные.
The-ebook.org в основном не обсуждает вопросы программирования устройств — по-крайней мере серьезного обсуждения именно программирования устройств я не нашел. Тем более, что касается конкретно моего устройства — там пока никто ничего серьезного не раскрыл.
OpenInkpot пока не доработана под это устройство. Хотя там раскрываются многие вопросы — в особенности файлы запуска.
Двух последних ссылок у меня не было — почему-то не смог их найти ранее. Спасибо.
Это немного меня продвигает к моей цели, хотя придется еще немало полопатить.
Цитата:
| оригинальный производитель, конечно, Netronix |
Почему вы сразу не сказали, что речь о Netronix EB-600, а молчаливо предложили узнать это мне самому?
Цитата:
| OpenInkpot пока не доработана под это устройство. |
Доработана. Я же дал вам ссылку. Именно это, как я понял, у вас там сейчас и стоит.
Цитата:
| Но вот что касается упаковки в IMG — до сих пор остается непонятно чем файлы упакованы |
Какой-нибудь сжимающей рид-оунли ФС, очевидно. Файлы же — равки ПЗУ вашего девайса. Это может быть какая-нибудь cramfs, squashfs или еще что-то подобное.
С ходу ни как ни как cramfs, ни как squashfs оно не монтируется, но это не значит, что там что-то принципиально отличное.
Цитата:
| возможно еще, что IMG это не родное расширение данного формата — поэтому стандартными программами не определяется |
Чушь. Что еще за «родное расширение»?
Цитата:
| The-ebook.org в основном не обсуждает вопросы программирования устройств — по-крайней мере серьезного обсуждения именно программирования устройств я не нашел. Тем более, что касается конкретно моего устройства — там пока никто ничего серьезного не раскрыл. |
Да, в Рунете вы навряд ли что найдете. Идите куда-нибудь на mobileread.com и там ищите как и чем готовым можно перепрошить нетрониксовую читалку. Или вы мне предлагаете дальше за вас гуглить?
| Компьютерный форум Ru.Board » Операционные системы » UNIX » Чем распаковать Img для Linux |
Реклама на форуме Ru.Board.
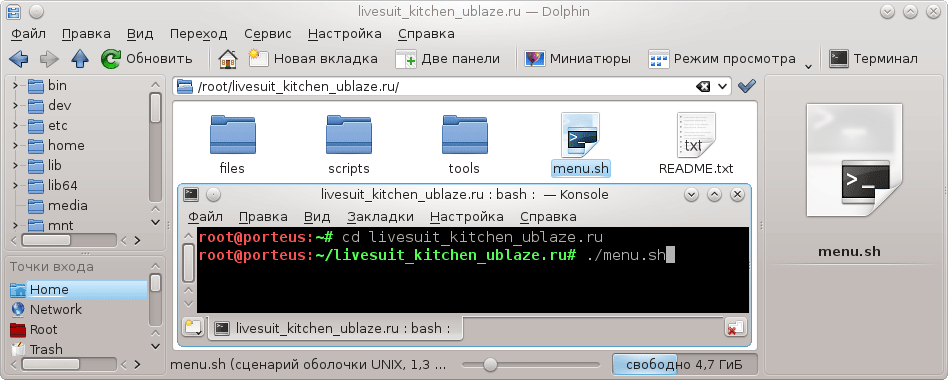
| Powered by Ikonboard «v2.1.7b» © 2000 Ikonboard.com Modified by Ru.B0ard © Ru.B0ard 2000-2023 Распаковка и запаковка img прошивок AllwinnerLiveSuit kitchen ublaze.ru for Linux — кухня под Linux для распаковки и запаковки img прошивок Android для Allwinner. Что можно делать в кухне: 1. Разбирать/собирать прошивку. Что нам потребуется:
Скачайте образ (лучше скачивайте CINNAMON, XFCE или MATE) 64-х битной версии (x86_64) дистрибутива Porteus-4.0 (UNIX система базирующаяся на Slackware, представляет собой LiveCD, USB ОС) из репозитория Blaze. В образ Porteus можно сразу добавить модуль compat32-libraries-3.0-x86_64-1sl.xzm. Для этого откройте образ Porteus с помощью программы UltraISO зайдите в директорию /porteus/modules/. Скачайте и перетащите туда модуль compat32-libraries-3.0-x86_64-1sl.xzm. Сохраните изменения в образе. Так же, можете скачать дополнительный софт для Porteus от сюда. С помощью UltraISO запишите образ Porteus на CD или DVD болванку (лучше записать на USB-флешку, для этого с помощью WinRar извлеките образ Porteus на флешку, зайдите в папку boot и запустите Porteus-installer-for-Windows.exe и в биосе выставите загрузку с USB). В Bios-e компьютера выставите загрузку с CD/DVD дисковода. Вставьте диск с записанным дистрибутивом Porteus. Включите компьютер, после чего должна начаться загрузка Porteus. Более подробно как установить Porteus читайте здесь. Зайдите на локальный диск D он же /mnt/sda5 (если не активировали модуль compat32-libraries-3.0-x86_64-1sl.xzm — активируйте его в Porteus) — откройте на рабочем столе Домашнюю папку и извлеките в корень домашней папки содержимое архива livesuit_kitchen_ublaze.ru.tar.bz В распакованную папку livesuit_kitchen_ublaze.ru скопируйте прошивку и переименуйте ее в original.img Запустите терминал Porteus и введите: su toor cd livesuit_kitchen_ublaze.ru где livesuit_kitchen_ublaze.ru путь до кухни
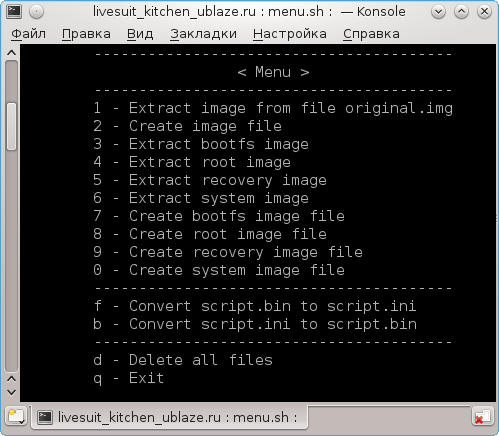
---------------------------------------- < Menu >---------------------------------------- 1 - Extract image from file original.img 2 - Create image file 3 - Extract bootfs image 4 - Extract root image 5 - Extract recovery image 6 - Extract system image 7 - Create bootfs image file 8 - Create root image file 9 - Create recovery image file 0 - Create system image file ---------------------------------------- f - Convert script.bin to script.ini b - Convert script.ini to script.bin ---------------------------------------- d - Delete all files q - Exit
1-2 - Разобрать/Собрать прошивку 3-6 - Разобрать разделы 7-0 Собрать разделы f - Конвертировать script.bin (работает только если сделать пункт 3) b - Конвертировать script.ini (работает только если сделать пункт 3) d - Удаляет все файлы, оставляет только original.img Распаковываются разделы в папку _temp там их можно модифицировать и делать все что угодно. Если у вас есть резервная копия заводских модулей (директория /system/vendor/modules), заводского init.sun 5 i.rc (в зависимости от процессора цифра может различаться) и заводской script.bin, то Вы сможете адаптировать прошивку, при условии, что прошивка будет с такой же версией Android. Какие модули у загружаются при загрузке планшета см. в заводском файле init.sun5i.rc. Например модули тача см. в секции #insmod key & tp driver, модули камеры в #csi module, модули gsensor-а в #insmod gsensor driver, модули интернета wifi и т.п. в #network module Adblockdetector |