- Raspberry Pi 3: настройка Wi-Fi на всех моделях в консоли и GUI
- Предупреждение
- Видеоверсия
- Проверка подключения
- Настройка интерфейса
- Получение списка сетей
- Подключение
- Через графический интерфейс
- Raspberry Pi WiFi Setup: Here are 5 Methods for Raspbian
- Raspberry Pi WiFi Setup in Headless Mode
- Method 1: Using wpa_supplicant File
- Set up WiFi on Raspbian Desktop
- Method 2: Configure WiFi using Welcome Wizard
- Method 3: Connecting from the Taskbar
- Set up WiFi on Raspbian Lite
- Method 4: Using raspi-config Tool
- Method 5: Manual Configuration
- Final Words
- About the Author: Vishnu Mohan
Raspberry Pi 3: настройка Wi-Fi на всех моделях в консоли и GUI
![]()
Приветствую! В этой статье мы посмотрим, как можно произвести настройку Wi-Fi в Raspberry Pi через консоль и не только. Аккуратно, точно, без воды от нашего вайфайного портала. Поехали!
Нашли ошибку? Есть дополнение? Обязательно напишите об этом в комментариях к этой статье. Помогите другим читателям решить их проблему!
Предупреждение
По умолчанию в Raspberry Pi нет Wi-Fi модуля. Он появляется только в модели Raspberry Pi 3. Для использования Wi-Fi можно использовать почти любой адаптер, подключенный через USB – донгл.
Ниже мы рассмотрим использование Wi-Fi для всех моделей. Просто напаситесь терпением или же перейдите сразу на интересующую вас главу. Будет рассмотрено подключение исключительно через консоль, так как через графический интерфейс особенных действий и не требуется – все понятно без лишних морок.
Видеоверсия
Проверка подключения
Прежде чем использовать Wi-Fi, предлагаю посмотреть, а находит ли его устройство вообще. Это очень актуально для подключаемых «свистков», но и на «третьей Малине» можно проверить – а вдруг с модулем что-то не в порядке.
Делаем так: подключаем наш модуль в USB порт, запускаем консоль через тот же Putty, вводим команду:
Должен вывестись список USB устройств, среди которых нам нужно найти наш адаптер, который обычно подписан как Wireless Adapter. Можно и сразу перейти во включенные адаптеры через команду:
Наш беспроводной адаптер обычно обозначается как wlan0 (стандартно для Linux, на котором и основан Raspbian). Здесь же уже после настройки конфигурационных файлов будет написан выданный IP адрес в случае удачного подключения. Рекомендую по завершению и перезагрузке еще раз воспользоваться этой командой.
Настройка интерфейса
Если с модулем все в порядке, и он отображается среди подключенных, значит самое время посмотреть настройки интерфейса. Обычно там все в полном порядке, но как-то с вузовских времен пальцы тянутся взглянуть на них.
Его содержание должно быть примерно таким (верхнюю часть не трогаем, нас интересуют именно эти 4 строчки):
allow-hotplug wlan0
iface wlan0 inet manual
wpa-roam /etc/wpa_supplicant/wpa_supplicant.conf
iface default inet dhcp
auto wlan0
iface wlan0 inet dhcp
wpa-conf /etc/wpa_supplicant/wpa_supplicant.conf
Получение списка сетей
Едем дальше, попробуем просканировать все окружающие нас сети через этот модуль:
Нашли нужную сеть? Запомнили ее SSID (имя сети)? Переходим непосредственно к подключению.
Подключение
На Linux удобно вводить данные для доступа к сети заранее. Делается это в файле:
В секции network здесь и указываются данные для авторизации в сети:
network= ssid=”имя_сети”
psk=”пароль_сети”
proto=WPA
key_mgmt=WPA-PSK
pairwise=TKIP
group=TKIP
id_str=”имя_сети”
>
На самом деле минимально достаточно ввести два поля – ssid и psk, все остальное определится уже в процессе. Здесь показан вариант очень точной настройки в случае возникновения необходимости.
Если данные сохранены в файле верно (считайте, что это сделали автоматическое запоминание сети), то для подключения к любой доступной сети в нашем поле зрения достаточно выполнить команду:
Найдет известные сети и попробует подключиться к ним. А можно и просто перезагрузить через
Т.к. в конфигурации у нас указано dhcp – все найдет и подключится тоже самостоятельно.
Через графический интерфейс
Здесь все зависит от вашей версии операционной системы, но обычно подключение выглядит вот так:
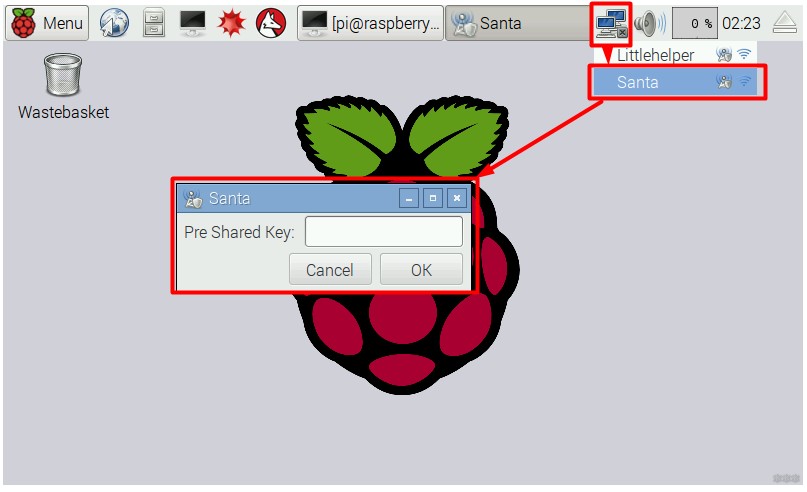
Т.е. привычно – щелкнули по значку, выбрали нужную сеть среди доступных, ввели от нее пароль. Никаких предварительных настроек и изменений файла не требуется. В случае же необходимости точной настройки (как правило ручного назначения IP адреса) лучше это сделать через правую кнопку мыши и выйти вот на такое меню:
Вот и все. Если есть что дополнить или остались вопросы – пишите смело в комментарии. Вместе мы можем помочь друг другу и разрешить все вопросы в этой сфере!
Raspberry Pi WiFi Setup: Here are 5 Methods for Raspbian

Setting up a proper WiFi connection on Raspberry Pi is somewhat tricky for beginners. They often face some issues while trying to connect Raspberry Pi to WiFi. One of the main questions I’m receiving from the newbies is Raspberry Pi is not connecting to WiFi, what should I do?
And some others are asking to give a proper Raspberry Pi WiFi setup that they can follow easily. Since I’m getting questions like this regularly, I decided to write a detailed guide to set up a WiFi connection on the Raspberry Pi.
Here I’m gonna hold your hands and walk you through 5 different ways by which you can set up a WiFi connection on Raspberry Pi OS or Raspbian. Note that this is not for any specific Raspberry Pi models (but for Raspbian only) so this will work on all models that support WiFi connectivity.
Raspberry Pi WiFi Setup in Headless Mode
Method 1: Using wpa_supplicant File
Here we going headless mode means we are not gonna use or need a monitor/ display connected to your Pi. This method is applicable if you have just flashed your SD card and want to connect it with WiFi in its first boot. However, it also works with an older sd card that you used on any other wireless network.
All you need to do here is to create a raspberry pi wifi setup wpa_supplicant file and copy it to your SD card. Nothing else. This file will hold the WiFi credentials and tell the Pi to connect automatically at the next booting.
- First, you need to open a text editor (like Notepad) on your computer and copy the following code into it.
country=IN ctrl_interface=DIR=/var/run/wpa_supplicant GROUP=netdev update_config=1 network=
- Now replace YOURSSID and YOURPASSWORD with your WiFi network name and password respectively. The SSID is nothing but Service Set IDentifier and is your network’s name. Also, change the country code if needed.
- Save the file with the name: wpa_supplicant.conf (the file name should be exactly like this).
- Insert your SD card into your computer and copy the wpa_supplicant.conf file into the boot partition.
In case if you want to enable SSH automatically, then you need to create and copy another file named ssh into the same boot partition. You don’t actually need any content in that file. Just create an empty file and you’re done.
Set up WiFi on Raspbian Desktop
Method 2: Configure WiFi using Welcome Wizard
For this method of WiFi configuration on your Pi, we need a desktop connection so that we can directly set it up from the welcome wizard.
If this is your first boot after flashing the SD card, then you will surely come across a welcome wizard with a message like “Welcome to Raspberry Pi”. Subsequently, it will ask for setting up your system.
After booting, once you choose your language and country, you will be taken to a window like this:
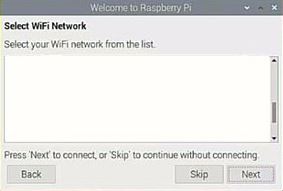
Here select your WiFi network name (SSID) from the list and enter the password. That’s all. Wait for a few moments and you’ll be connected to the network.
Method 3: Connecting from the Taskbar
Just in case you missed the welcome wizard or this is not your first boot, you can configure and connect at any time from the taskbar. For this:
- Click on the network symbol at the top of the main panel near the clock.
- You will now see a list of WiFi networks available.
- Choose your preferred network, enter the password.
Set up WiFi on Raspbian Lite
If you are running on the Raspbian Lite version, then you may need some additional help you find out and configure the WiFi properly. On Raspbian Lite, there are 2 methods by which you can do the same. Let’s check it out.
Method 4: Using raspi-config Tool
The raspi-config is a great tool available on Raspbian by default. This will help you configure your wireless network with ease.
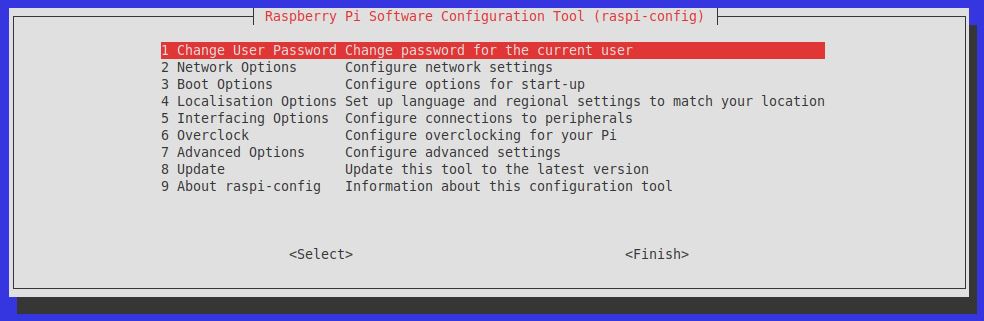
- Navigate to the Network Options > Wi-Fi
- Then type your SSID and password.
- Exit the tool.
Your Pi will now connect to the WiFi network and you can proceed with that.
Method 5: Manual Configuration
This method is a bit difficult but may be useful for connecting to big networks that need secure authentication or other complexities.
For manual configuration, the first part is the same as we did in method 1 that is editing the wpa_supplicant.conf file with your desired configuration. The file will be available at /etc/wpa_supplicant/ and you can edit it using the Nano editor. For this, you can use this command:
sudo nano /etc/wpa_supplicant/wpa_supplicant.confThis will open the file and you can see the same content as we have seen in method 1. That’s actually a basic configuration.
If you are interested, you can refer to some more examples here to adapt the configurations to your network for security options like WEP, EAP, etc.
Now, when coming to the network configuration, if you wish to set a static IP on your network, the configuration can be performed in dhcpcd.conf file. Type this command to open the file:
Now scroll down and find the “Example static IP configuration” line and uncomment every line of code that you need. This may include routers, DNS, IP address, etc. Modify the values and save them.
To reflect the changes, just reboot your Pi using the below command.
Final Words
Hopefully, by now you have familiarised all the 5 methods that can be used for Raspberry Pi WiFi setup. Now you can try this yourself and configure your WiFi according to your needs.
Wherever possible, try to use the desktop methods which will be the easiest ones for beginners. For advanced users, they can use any of the methods at any time. But before proceeding with complicated experimentation or modification, consider creating a backup of your sd card. This will be useful at times when you mess up with something.
If you have any comments, drop them in the comment section below.
Found an issue with this article? Report it here, so that I can resolve it.
About the Author: Vishnu Mohan
Vishnu Mohan is an ardent hobbyist of Raspberry Pi projects, who hails from God’s Own Country. He is kind of a minimalist person who believes in keeping things simple & elegant in life. Apart from the techy things, he is passionate about music and cricket. In his free time, he likes to read books and spend quality time with his family and friends.