- Operating system images
- Raspberry Pi OS
- Raspberry Pi OS with desktop
- Raspberry Pi OS with desktop and recommended software
- Raspberry Pi OS Lite
- Raspberry Pi OS
- Install Raspberry Pi OS using Raspberry Pi Imager
- Manually install an operating system image
- Raspberry Pi Desktop for PC and Mac
- Help
- How to Install Raspbian on Raspberry Pi
- How to Install Raspbian on Raspberry Pi
- Step 1: Download Raspbian
- Step 2: Prepare your SD Card
- Formatting on Windows
- Formatting on Linux
- Formatting on Mac
- Step 3: Burn the Image
- Step 4: Put the microSD card in your Pi and Boot up
- About the Author: Vishnu Mohan
Operating system images
Many operating systems are available for Raspberry Pi, including Raspberry Pi OS, our official supported operating system, and operating systems from other organisations.
Raspberry Pi Imager is the quick and easy way to install an operating system to a microSD card ready to use with your Raspberry Pi. Alternatively, choose from the operating systems below, available to download and install manually.
Raspberry Pi OS
Our recommended operating system for most users.
Raspberry Pi OS with desktop
- Release date: May 3rd 2023
- System: 32-bit
- Kernel version: 6.1
- Debian version: 11 (bullseye)
- Size: 872 MB
Show SHA256 file integrity hash: 38a66ed777a1f4e4c07f7dcb2b2feadfda4503d5e139f675758e0e91d34ed75f
Raspberry Pi OS with desktop and recommended software
- Release date: May 3rd 2023
- System: 32-bit
- Kernel version: 6.1
- Debian version: 11 (bullseye)
- Size: 2,701 MB
Show SHA256 file integrity hash: 67abd3bc034faf85b59b8e4a28982cb0ab1bc0504877ec3d426e05f6402ed225
Raspberry Pi OS Lite
- Release date: May 3rd 2023
- System: 32-bit
- Kernel version: 6.1
- Debian version: 11 (bullseye)
- Size: 364 MB
Show SHA256 file integrity hash: b5e3a1d984a7eaa402a6e078d707b506b962f6804d331dcc0daa61debae3a19a
Raspberry Pi OS
Your Raspberry Pi needs an operating system to work. This is it. Raspberry Pi OS (previously called Raspbian) is our official supported operating system.
Install Raspberry Pi OS using Raspberry Pi Imager
Raspberry Pi Imager is the quick and easy way to install Raspberry Pi OS and other operating systems to a microSD card, ready to use with your Raspberry Pi. Watch our 45-second video to learn how to install an operating system using Raspberry Pi Imager.
Download and install Raspberry Pi Imager to a computer with an SD card reader. Put the SD card you’ll use with your Raspberry Pi into the reader and run Raspberry Pi Imager.
To install on Raspberry Pi OS, type
sudo apt install rpi-imager
in a Terminal window.

Manually install an operating system image
Browse a range of operating systems provided by Raspberry Pi, and download them to install manually.
Raspberry Pi Desktop for PC and Mac
Debian with Raspberry Pi Desktop is our operating system for PC and Mac. It provides the Raspberry Pi OS desktop, as well as most of the recommended software that comes with Raspberry Pi OS, for any PC or Apple Mac computer.

Help
How to Install Raspbian on Raspberry Pi
Raspberry Pi is undoubtedly the most popular single-board computer out there in today’s market. It’s having a wide spectrum of uses like a home media center, desktop computer, automation system, game server, etc.
Installing Raspbian is the very first thing that you need to do if your Raspberry Pi comes without an SD card preloaded with NOOBS. Even though you can run several types of OSes on your Pi. Raspbian is the OS officially recommended by the Raspberry Foundation. It’s a Debian-based OS specifically developed for Raspberry Pi boards.
Raspbian comes with a plethora of pre-installed software for various purposes like development, multimedia, education, etc. This makes it the best general-purpose OS for Raspberry Pi users. So, in this tutorial, I’ll show you how to install Raspbian Os on your Raspberry Pi board. It’s very simple as burning the OS image file to your SD card.
Since this tutorial is made for beginners and students in mind, I’ll show you the exact step-by-step procedure to get the Raspbian installed on your Pi.
How to Install Raspbian on Raspberry Pi
Here are the step-by-step instructions to install Raspbian on the Raspberry Pi. You can also read my article on how to set up raspberry pi where I explained (with screenshots) how to install Raspberry Pi OS (formerly Raspbian) with Raspberry Pi Imager software.
Step 1: Download Raspbian
Head over to the official Raspbian download page and select the one which is suitable for you. If you want your Raspberry to use as a desktop PC, then download any one of the desktop images. For any other uses that don’t require a GUI, then download the Lite version.
Step 2: Prepare your SD Card
Since the Raspberry Pi bootloader only supports the FAT file system, you have to format it to the FAT32 file system before burning the OS. If you are using an SD card of 64 GB or more ensure that it is formatted to FAT32 and not to exFAT.
Formatting on Windows
On Windows, the formatting can be done using the standard disk management tool.
- Connect your SD card to your PC.
- Search for “Disk” in the search bar and select the “Create and format hard disk partitions” option from the results.
- Right-click on the unallocated space and start it by clicking on New Simple Volume and then Next.
- You will be asked for the volume size required. Choose the default option and click Next.
- Now you will be prompted for specifying the mount path. Click Next.
- Then select the FAT32 system > Next > Finish. This will not work for 64GB or higher cards. so format it to exFAT first and then convert it to FAT32 using this tool.
Formatting on Linux
On Linux, you can do it with command-line tools like fdisk or parted.
- As usual, mount your card in your sd card drive.
- Find the name of your card using the command.
Output NAME MAJ:MIN RM SIZE RO TYPE MOUNTPOINT . rbe 8:16 1 59.6G 0 disk . sudo parted /dev/rbe --script -- mklabel msdos sudo parted /dev/rbe --script -- mkpart primary fat32 1MiB 100%Formatting on Mac
On Mac OS you can do the formatting using the command line.
- Connect your SD card to the macOS SD card drive.
- Open Terminal and issue the command to find the sd card name.
sudo diskutil eraseDisk FAT32 RPI MBRFormat /dev/disk2Step 3: Burn the Image
Though there are several applications available for burning image files to SD cards we recommend using Etcher as it supports Windows, Linux, and Mac.
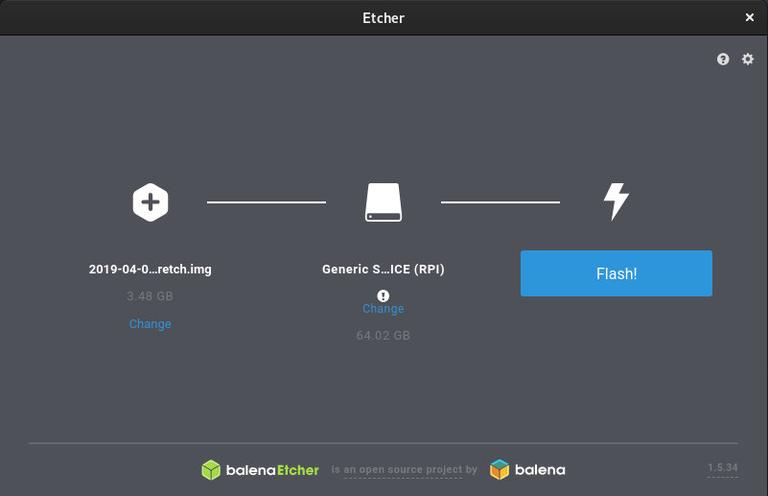
- Firstly, download and install the most recent version of Etcher for your OS from this link.
- Connect your SD card to the SD card drive and open Etcher.
- Etcher will automatically detect the SD card if there is only one card connected. Otherwise, select the correct drive manually. Now select the downloaded Raspbian image file.
- Click the blue Flash button to start burning the image. It may take a while depending on the size of the file and the card speed. Wait for the process to complete.
On Raspbian, the SSH access will be disabled by default. If you are using a headless Raspberry Pi setup you can refer to my article on enabling ssh on Raspberry Pi to get ssh server activated.
Once done, you will be ready with a bootable Raspbian on your Pi.
Step 4: Put the microSD card in your Pi and Boot up
Once the image file is written on the SD card, you are ready to go. Just put the card in your Pi and boot it up.
I hope the article helped you to install Raspbian on Raspberry Pi. If you have any doubts just leave a comment below. Also, you can share your views as well.
Found an issue with this article? Report it here, so that I can resolve it.
About the Author: Vishnu Mohan
Vishnu Mohan is an ardent hobbyist of Raspberry Pi projects, who hails from God’s Own Country. He is kind of a minimalist person who believes in keeping things simple & elegant in life. Apart from the techy things, he is passionate about music and cricket. In his free time, he likes to read books and spend quality time with his family and friends.