- Raspberry pi wifi no password
- Re: Raspberry 3+ open WIFI no password
- Re: Raspberry 3+ open WIFI no password
- Re: Raspberry 3+ open WIFI no password
- Raspberry Pi WiFi Setup: Here are 5 Methods for Raspbian
- Raspberry Pi WiFi Setup in Headless Mode
- Method 1: Using wpa_supplicant File
- Set up WiFi on Raspbian Desktop
- Method 2: Configure WiFi using Welcome Wizard
- Method 3: Connecting from the Taskbar
- Set up WiFi on Raspbian Lite
- Method 4: Using raspi-config Tool
- Method 5: Manual Configuration
- Final Words
- About the Author: Vishnu Mohan
Raspberry pi wifi no password
Hi, i started doing this for a frined for some sort of freetime hobby.
Friend said he needs a 24/7 slideshow to some nonprofit organization meeting.
Well i donated for this raspberry slideshow to get my hands on things.
Well, all of a sudden im handicapped by open wifi settings. i cant get the raspberry to connect to this place
open wifi network where ssid is not hidden and no password is needed to get into the network.
is there some wifi with raspberry for dummies manual ive tried all kinds of approaches and googled for hours but didnt find a single one that would have worked? i can how ever from command line get the network connected and get an ip and get connectivity.
but i would love to see how it is done properly and with when the system reboots i would have to go in and do it manually.
DougieLawson Posts: 42531 Joined: Sun Jun 16, 2013 11:19 pm Location: A small cave in deepest darkest Basingstoke, UK
Re: Raspberry 3+ open WIFI no password
Open an LXterminal window.
Use sudo nano /etc/wpa_supplicant/wpa_supplicant.conf and add
Languages using left-hand whitespace for syntax are ridiculous
DMs sent on https://twitter.com/DougieLawson or LinkedIn will be answered next month.
Fake doctors — are all on my foes list.
The use of crystal balls and mind reading is prohibited.
Re: Raspberry 3+ open WIFI no password
That was one of the 300+ diffrent ways i tried.
funny is that i can get it to work manually like this:
wpa_supplicant -i wlan0 -c /etc/wpa_supplicant/wpa_supplicant.conf -D wext
now running it with screen in startup but i guess this isnt the correct way
DougieLawson Posts: 42531 Joined: Sun Jun 16, 2013 11:19 pm Location: A small cave in deepest darkest Basingstoke, UK
Re: Raspberry 3+ open WIFI no password
Languages using left-hand whitespace for syntax are ridiculous
DMs sent on https://twitter.com/DougieLawson or LinkedIn will be answered next month.
Fake doctors — are all on my foes list.
The use of crystal balls and mind reading is prohibited.
- Community
- General discussion
- Announcements
- Other languages
- Deutsch
- Español
- Français
- Italiano
- Nederlands
- 日本語
- Polski
- Português
- Русский
- Türkçe
- User groups and events
- The MagPi
- Using the Raspberry Pi
- Beginners
- Troubleshooting
- Advanced users
- Assistive technology and accessibility
- Education
- Picademy
- Teaching and learning resources
- Staffroom, classroom and projects
- Astro Pi
- Mathematica
- High Altitude Balloon
- Weather station
- Programming
- C/C++
- Java
- Python
- Scratch
- Other programming languages
- Windows 10 for IoT
- Wolfram Language
- Bare metal, Assembly language
- Graphics programming
- OpenGLES
- OpenVG
- OpenMAX
- General programming discussion
- Projects
- Networking and servers
- Automation, sensing and robotics
- Graphics, sound and multimedia
- Other projects
- Gaming
- Media centres
- AIY Projects
- Hardware and peripherals
- Camera board
- Compute Module
- Official Display
- HATs and other add-ons
- Device Tree
- Interfacing (DSI, CSI, I2C, etc.)
- Raspberry Pi 400
- Raspberry Pi Pico
- General
- SDK
- MicroPython
- Other RP2040 boards
- Operating system distributions
- Raspberry Pi OS
- Raspberry Pi Desktop for PC and Mac
- Other
- Android
- Debian
- FreeBSD
- Gentoo
- Linux Kernel
- NetBSD
- openSUSE
- Plan 9
- Puppy
- Arch
- Pidora / Fedora
- RISCOS
- Ubuntu
- Ye Olde Pi Shoppe
- For sale
- Wanted
- Off topic
- Off topic discussion
- News
- Contact us
- Trademark
- About us
- Our Approved Resellers
- Jobs
- Accessibility
- Site use terms and conditions
- Acceptable use
- Cookies
- Licensing
- Terms and conditions of sale
- Privacy
- Security
- Verify our bank details
Raspberry Pi WiFi Setup: Here are 5 Methods for Raspbian

Setting up a proper WiFi connection on Raspberry Pi is somewhat tricky for beginners. They often face some issues while trying to connect Raspberry Pi to WiFi. One of the main questions I’m receiving from the newbies is Raspberry Pi is not connecting to WiFi, what should I do?
And some others are asking to give a proper Raspberry Pi WiFi setup that they can follow easily. Since I’m getting questions like this regularly, I decided to write a detailed guide to set up a WiFi connection on the Raspberry Pi.
Here I’m gonna hold your hands and walk you through 5 different ways by which you can set up a WiFi connection on Raspberry Pi OS or Raspbian. Note that this is not for any specific Raspberry Pi models (but for Raspbian only) so this will work on all models that support WiFi connectivity.
Raspberry Pi WiFi Setup in Headless Mode
Method 1: Using wpa_supplicant File
Here we going headless mode means we are not gonna use or need a monitor/ display connected to your Pi. This method is applicable if you have just flashed your SD card and want to connect it with WiFi in its first boot. However, it also works with an older sd card that you used on any other wireless network.
All you need to do here is to create a raspberry pi wifi setup wpa_supplicant file and copy it to your SD card. Nothing else. This file will hold the WiFi credentials and tell the Pi to connect automatically at the next booting.
- First, you need to open a text editor (like Notepad) on your computer and copy the following code into it.
country=IN ctrl_interface=DIR=/var/run/wpa_supplicant GROUP=netdev update_config=1 network=
- Now replace YOURSSID and YOURPASSWORD with your WiFi network name and password respectively. The SSID is nothing but Service Set IDentifier and is your network’s name. Also, change the country code if needed.
- Save the file with the name: wpa_supplicant.conf (the file name should be exactly like this).
- Insert your SD card into your computer and copy the wpa_supplicant.conf file into the boot partition.
In case if you want to enable SSH automatically, then you need to create and copy another file named ssh into the same boot partition. You don’t actually need any content in that file. Just create an empty file and you’re done.
Set up WiFi on Raspbian Desktop
Method 2: Configure WiFi using Welcome Wizard
For this method of WiFi configuration on your Pi, we need a desktop connection so that we can directly set it up from the welcome wizard.
If this is your first boot after flashing the SD card, then you will surely come across a welcome wizard with a message like “Welcome to Raspberry Pi”. Subsequently, it will ask for setting up your system.
After booting, once you choose your language and country, you will be taken to a window like this:
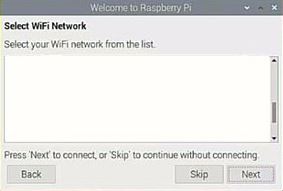
Here select your WiFi network name (SSID) from the list and enter the password. That’s all. Wait for a few moments and you’ll be connected to the network.
Method 3: Connecting from the Taskbar
Just in case you missed the welcome wizard or this is not your first boot, you can configure and connect at any time from the taskbar. For this:
- Click on the network symbol at the top of the main panel near the clock.
- You will now see a list of WiFi networks available.
- Choose your preferred network, enter the password.
Set up WiFi on Raspbian Lite
If you are running on the Raspbian Lite version, then you may need some additional help you find out and configure the WiFi properly. On Raspbian Lite, there are 2 methods by which you can do the same. Let’s check it out.
Method 4: Using raspi-config Tool
The raspi-config is a great tool available on Raspbian by default. This will help you configure your wireless network with ease.
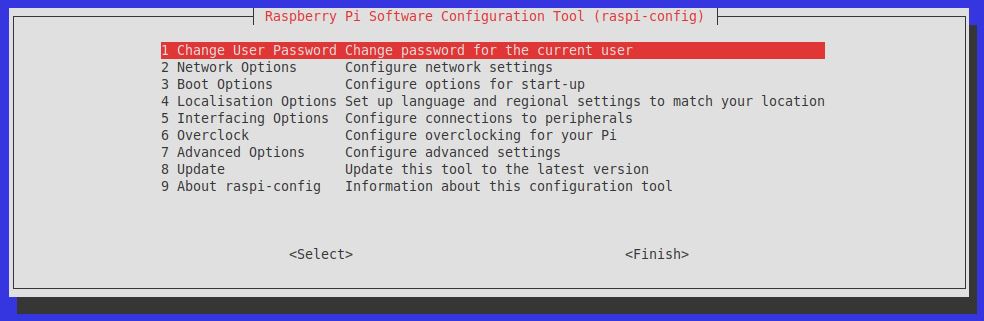
- Navigate to the Network Options > Wi-Fi
- Then type your SSID and password.
- Exit the tool.
Your Pi will now connect to the WiFi network and you can proceed with that.
Method 5: Manual Configuration
This method is a bit difficult but may be useful for connecting to big networks that need secure authentication or other complexities.
For manual configuration, the first part is the same as we did in method 1 that is editing the wpa_supplicant.conf file with your desired configuration. The file will be available at /etc/wpa_supplicant/ and you can edit it using the Nano editor. For this, you can use this command:
sudo nano /etc/wpa_supplicant/wpa_supplicant.confThis will open the file and you can see the same content as we have seen in method 1. That’s actually a basic configuration.
If you are interested, you can refer to some more examples here to adapt the configurations to your network for security options like WEP, EAP, etc.
Now, when coming to the network configuration, if you wish to set a static IP on your network, the configuration can be performed in dhcpcd.conf file. Type this command to open the file:
Now scroll down and find the “Example static IP configuration” line and uncomment every line of code that you need. This may include routers, DNS, IP address, etc. Modify the values and save them.
To reflect the changes, just reboot your Pi using the below command.
Final Words
Hopefully, by now you have familiarised all the 5 methods that can be used for Raspberry Pi WiFi setup. Now you can try this yourself and configure your WiFi according to your needs.
Wherever possible, try to use the desktop methods which will be the easiest ones for beginners. For advanced users, they can use any of the methods at any time. But before proceeding with complicated experimentation or modification, consider creating a backup of your sd card. This will be useful at times when you mess up with something.
If you have any comments, drop them in the comment section below.
Found an issue with this article? Report it here, so that I can resolve it.
About the Author: Vishnu Mohan
Vishnu Mohan is an ardent hobbyist of Raspberry Pi projects, who hails from God’s Own Country. He is kind of a minimalist person who believes in keeping things simple & elegant in life. Apart from the techy things, he is passionate about music and cricket. In his free time, he likes to read books and spend quality time with his family and friends.