- Raspberry Pi Not Connecting to Wi-Fi
- Configuring Wi-Fi using wpa_supplicant
- Incorrect Country Code in wpa_supplicant.conf File
- Using Invalid Group in the wpa_supplicant.conf File
- wlan0 Not Getting IP Address Automatically via DHCP
- Wi-Fi Not Connecting Automatically
- Raspberry Pi is Out of Wi-Fi Range
- Conclusion
- About the author
- Shahriar Shovon
- How to Fix Raspberry Pi Not Connecting to WiFi? [4 Solutions]
- Solution 1. Restart Your WiFi Router
- Solution 2. Check the Ethernet Port and Cable
- Solution 3. Check SSID for Issues
- Solution 4. Reinstall Raspbian
Raspberry Pi Not Connecting to Wi-Fi
![]()
If you’re using Raspberry Pi for your projects, you may face many wireless or Wi-Fi network connectivity issues once in a while. These issues may be difficult to solve for you.In this article, I am going to talk about different Wi-Fi network connectivity issues and show you how to solve them. So, let’s get started.
Configuring Wi-Fi using wpa_supplicant
If you’re using an operating system on Raspberry Pi like Raspberry Pi OS, Ubuntu 20.04 LTS, Kali Linux, or Manjaro with a desktop environment installed, then you can connect to a Wi-Fi network from the graphical user interface very easily. But if you’re using a headless operating system on your Raspberry Pi like Raspberry Pi OS Lite or Ubuntu 20.04 LTS or Debian, then you will have to configure the Wi-Fi network interface manually to connect to a Wi-Fi network.
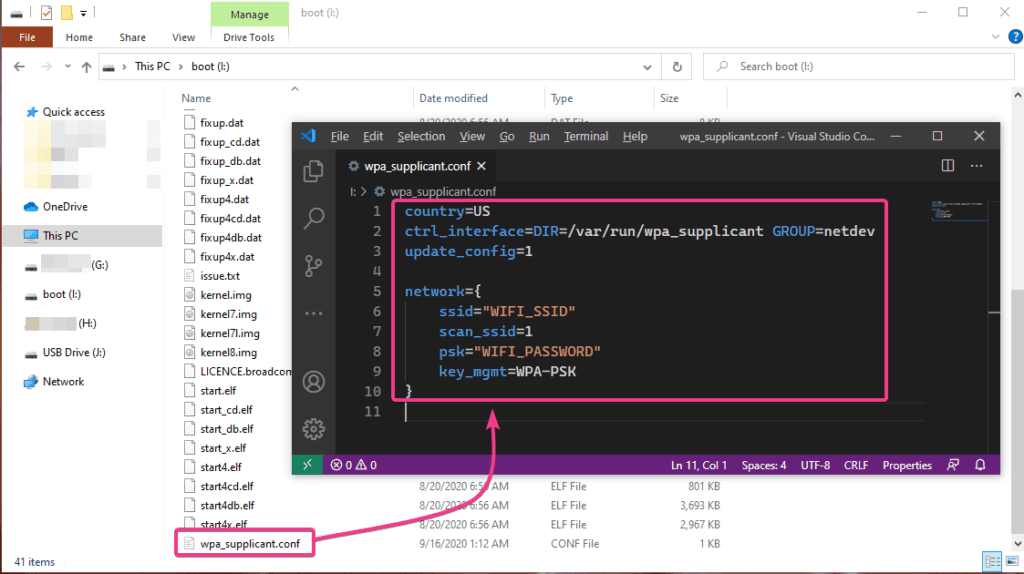
On Raspberry Pi OS, you can create a wpa_supplicant.conf file in the boot partition of the microSD card to configure the Wi-Fi network interface of your Raspberry Pi.
Once you’ve created the configuration file, type in the following lines of codes in the wpa_supplicant.conf file. Once you’re done, change the Wi-Fi SSID (ssid) and password (psk).
country=US
ctrl_interface=DIR=/var/run/wpa_supplicant GROUP=netdev
update_config=1
network= ssid=»Linked_89″
scan_ssid=1
psk=»1122304p»
key_mgmt=WPA-PSK
>
On Debian, you can add your Wi-Fi network details in the /etc/network/interfaces.d/wlan0 file to configure your Wi-Fi network interface very easily.
To do that, open the /etc/network/interfaces.d/wlan0 configuration file with nano text editor as follows:

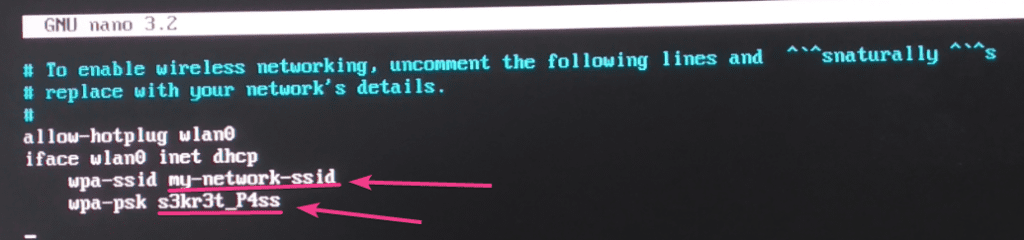
Then, remove the # sign from each of the lines as marked in the screenshot below.
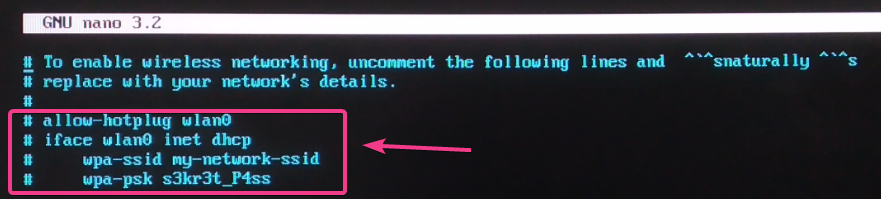
Change the wpa-ssid to your Wi-Fi SSID and wpa-psk to your Wi-Fi password.
Once you’re done, press + X followed by Y and to save the /etc/network/interfaces.d/wlan0 configuration file.
For the changes to take effect, reboot your Raspberry Pi with the following command:

On Ubuntu, you can configure your Wi-Fi network interface using Cloud-Init.
To do that, open the Cloud Init network configuration file /etc/netplan/50-cloud-init.yaml with the following command:

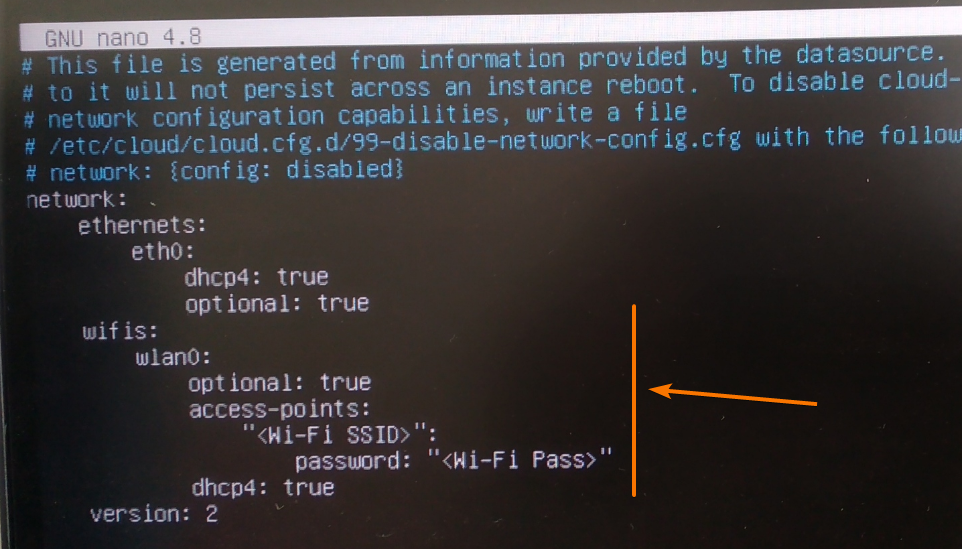
By default, the file 50-cloud-init.yaml should look as shown in the screenshot below.
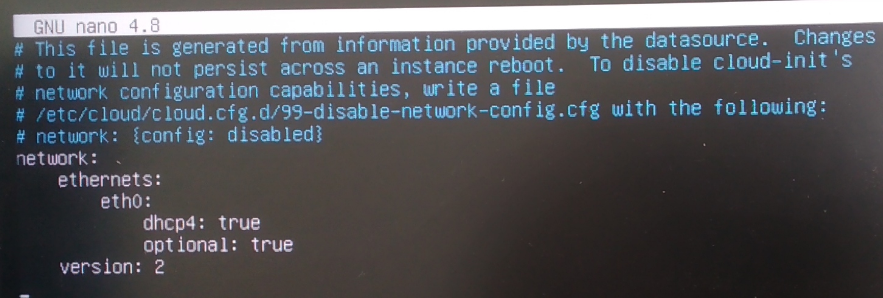
Add the lines as marked in the screenshot below to configure the Wi-Fi network interface wlan0 using Cloud-Init. Don’t forget to replace the with the SSID of the Wi-Fi network you want to connect and > with the password of the Wi-Fi network you want to connect.
NOTE: Remember to keep the correct indentation using (spaces) in every line as in the screenshot below. Otherwise, Cloud-Init will not work. In YAML configuration files, indentation is very important.
Once you’re done, press + X followed by Y and to save the 50-cloud-init.yaml file.
For the changes to take effect, reboot your Raspberry Pi with the following command:
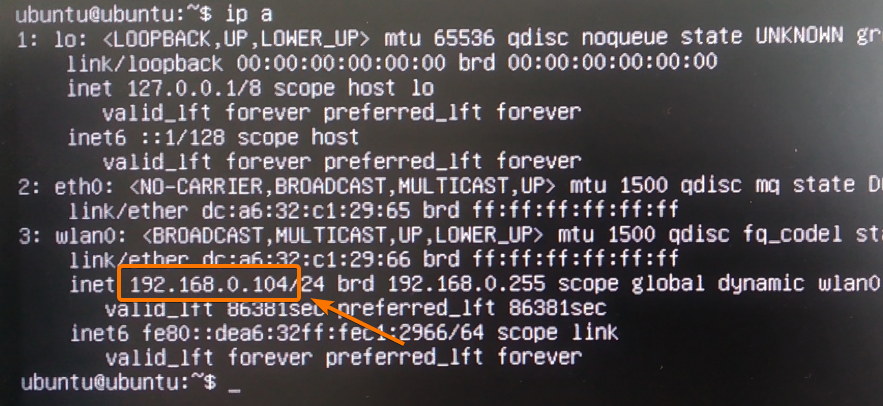
Once your Raspberry Pi boots, it should automatically connect to your desired Wi-Fi network and configure itself via DHCP as you can see in the screenshot below.
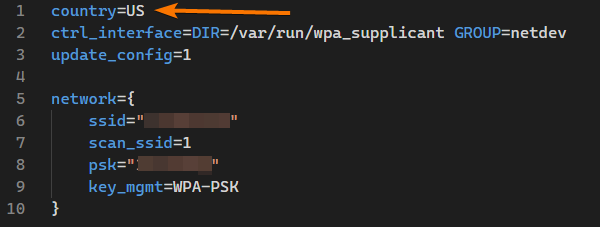
Incorrect Country Code in wpa_supplicant.conf File
If you’re configuring Wi-Fi on your Raspberry Pi using wpa_supplicant, then you have to define a 2-letter country code on your wpa_supplicant.conf configuration file.
For example, if you’re living in the United States of America (USA), then the 2-letter country code is the US. If you’re living outside the US, then you can find the 2-letter country code for your country in the link List of country codes by alpha-2, alpha-3 code (ISO 3166).
Sometimes your Raspberry Pi may fail to connect to your Wi-Fi network if you have incorrect country code in the wpa_supplicant.conf file even when everything else if correct.
So, make sure to set the correct 2-letter country code in the wpa_supplicant.conf file if you’re having Wi-Fi connectivity issues in your Raspberry Pi.
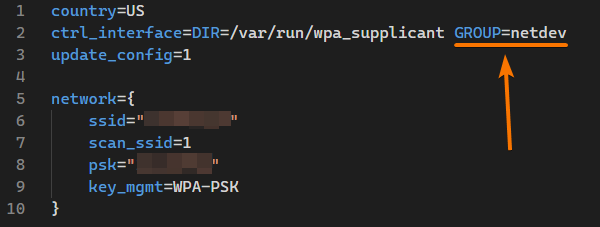
Using Invalid Group in the wpa_supplicant.conf File
You will need operating-system-level privileges to be able to connect to a Wi-Fi network and configure the Wi-Fi interface. The root user can do anything. No problems here. But, if you want to make system-level changes (like configuring the Wi-Fi network interface) as an ordinary user, you may need to be a member of some pre-defined groups.
On Raspberry Pi OS or Debian, the group you need to be a member of to configure the Wi-Fi network interface is netdev.
On Ubuntu, the group is called the wheel.
If you’re having Wi-Fi connectivity issues, make sure that you have the right GROUP (depending on your operating system) in the wpa_supplicant.conf file.
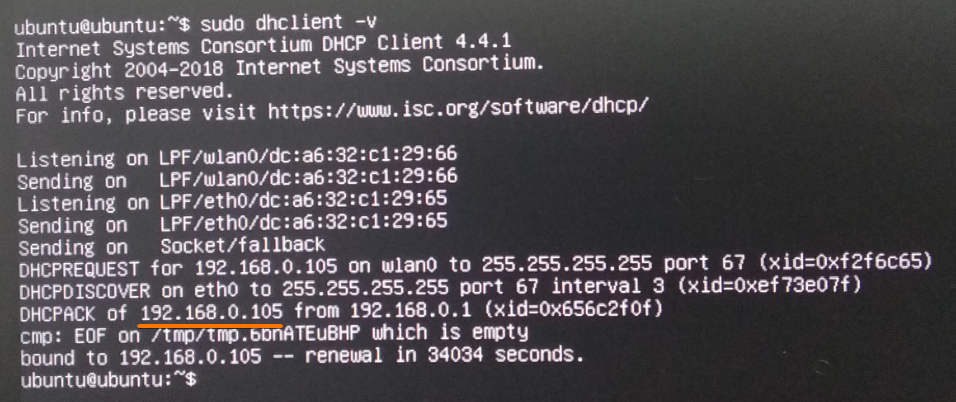
wlan0 Not Getting IP Address Automatically via DHCP
At times, your Raspberry Pi will connect to your desired Wi-Fi network but won’t get any IP addresses. Without an IP address assigned to your Wi-Fi network interface, you won’t be able to connect to the internet.
If for some reason the DHCP client program on your Raspberry Pi is not working correctly, this may happen.
To solve this problem, you can manually ask the DHCP client program to request IP address information from the Wi-Fi router your Raspberry Pi is connected to.
To do that, run the following command:

The Wi-Fi network interface should configure itself using the IP address information from the DHCP server running on your Wi-Fi router.
Wi-Fi Not Connecting Automatically
At times, your Raspberry Pi may not connect to the Wi-Fi network automatically on boot.
If you’re facing that problem, I would suggest you check whether you have the correct Wi-Fi SSID and password in your Wi-Fi network configuration files wpa_supplicant.conf or /etc/netplan/50-cloud-init.yaml or /etc/network/interfaces.d/wlan0. You or your neighbor or your ISP may change the SSID or password of the Wi-Fi router or access point. Make sure to keep your Wi-Fi network configuration files up to date.
If you’re using wpa_supplicant for Wi-Fi network configuration on Raspberry Pi OS, Debian, or Ubuntu, this may happen if you any syntax error in the wpa_supplicant.conf file.
If you’re using Cloud-Init on Ubuntu for configuring the Wi-Fi network interface, make sure you have the correct indentation on each line of the /etc/netplan/50-cloud-init.yaml file. Incorrect indentations in the YAML configuration file is one of the most common reasons for these problems.
Raspberry Pi is Out of Wi-Fi Range
Every Wi-Fi network device has a range of limitations. If you have kept the Raspberry Pi too far away from the Wi-Fi router or the access point, due to a weak network, your Raspberry Pi may get a disconnect.
To solve this problem, make sure your Raspberry Pi is not too far away from your Wi-Fi router or access point. If the distance is too long for your Raspberry Pi, consider using a wired Ethernet network instead of Wi-Fi.
Conclusion
In this article, I have discussed the common Wi-Fi network connectivity issues of Raspberry Pi as well as how to solve these. This article will help you to diagnose Wi-Fi connectivity issues for your Raspberry Pi.
About the author
Shahriar Shovon
Freelancer & Linux System Administrator. Also loves Web API development with Node.js and JavaScript. I was born in Bangladesh. I am currently studying Electronics and Communication Engineering at Khulna University of Engineering & Technology (KUET), one of the demanding public engineering universities of Bangladesh.
How to Fix Raspberry Pi Not Connecting to WiFi? [4 Solutions]
Lots of users complain that Raspberry Pi won’t connect to WiFi. What causes Raspberry Pi not connecting to WiFi? How to fix the issue? Now, let’s explore these questions together with MiniTool.
After analyzing many user reports and posts, we find the Raspberry Pi not connecting to WiFi issue is mainly caused by the issues with SSID. Moreover, network inconsistency, incorrect network configuration, corrupt Ethernet cable, and even hardware issues are responsible for Raspberry Pi 3 won’t connect to WiFi. Don’t worry. Here are 5 applicable ways to fix it.
![How to Set up a Raspberry Pi Plex Server? [Complete Guide]](https://www.partitionwizard.com/images/uploads/2021/09/raspberry-pi-plex-server-thumbnail.jpg)
A great many people don’t know how to set up a Raspberry Pi Plex server. Are you also trying to figure it out? This post provides you with a full guide.
Solution 1. Restart Your WiFi Router
An inconsistent network connection is the main reason you can’t find Raspberry Pi on network. Resetting the WiFi router can remove all the internet cache and help improve the internet speed, which may fix the issue. Let’s have a try.
Step 1. Turn off the router and unplug the power cable from the wall socket.
Step 2. Hold the Power button on the back of your router for about 15 seconds until the router is turned off completely. Or, you can disconnect the Ethernet cable from your modem.
Step 3. Then wait for about 5 minutes, and plug the power cable into the socket again and press the Power button to restart it.
After that, you can check if the “Raspberry Pi not showing up on network” problem is fixed.
Solution 2. Check the Ethernet Port and Cable
You also need to check if the connection is loosened or the Ethernet cable is unplugged by mistake or damaged. To do so, you can try using a different Ethernet cable on the router or connect it to another port. If you still can’t find Raspberry Pi on network, you can try updating the router’s firmware or move down to the following potential fixes.
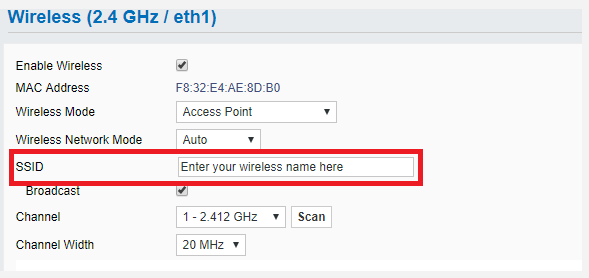
Solution 3. Check SSID for Issues
As mentioned above, the improper SSID settings can cause the “Raspberry Pi not connecting to WiFi” issue. To check it, open your Wireless Settings window, and then go to the SSID/Wireless Network Name (SSID) section and make sure your name doesn’t have any underscores or other invalid characters. If there is an underscore, remove it and connect your Raspberry Pi to WiFi again, and see if the issue gets fixed.
Solution 4. Reinstall Raspbian
Sometimes the Raspberry Pi can’t connect to WiFi when your Raspbian image gets corrupted. In this case, you can try reinstalling Raspbain by the following steps.
Step 1. Click here to download the latest version of Raspberry Pi Imager.
Step 2. Launch the installer to install the imager. Once installed, connect your SD card to the Raspberry Pi.
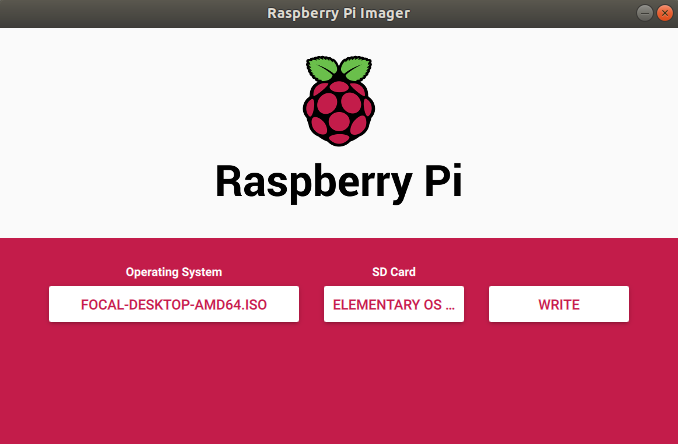
Step 3. Run the Raspberry Pi Imager and select the required OS from the drop-down menu.
Step 4. Select the SD card and click on Write to start installing the OS on the SD card.
Once done, you can restart your Raspberry Pi using the SD card and check if the “Raspberry Pi won’t connect to WiFi” problem is resolved. If the “Raspberry Pi 3 won’t connect to WiFi” issue still occurs, you can try downgrading to an earlier version of Raspbain to see if it works.
![How to Install Windows 10 on Raspberry Pi 4 [Full Guide]](https://www.partitionwizard.com/images/uploads/2021/08/windows-10-on-raspberry-pi-4-thumbnail.jpg)
A great many people want to install Windows 10 on Raspberry Pi 4. It is a relatively long process, but this post guides you through the whole installation.