- Saved searches
- Use saved searches to filter your results more quickly
- rijinmk/guide-to-wifi-terminal-rpi3
- Name already in use
- Sign In Required
- Launching GitHub Desktop
- Launching GitHub Desktop
- Launching Xcode
- Launching Visual Studio Code
- Latest commit
- Git stats
- Files
- README.md
- About
- Raspberry Pi 3: настройка Wi-Fi на всех моделях в консоли и GUI
- Предупреждение
- Видеоверсия
- Проверка подключения
- Настройка интерфейса
- Получение списка сетей
- Подключение
- Через графический интерфейс
- How to Connect Raspberry Pi to WiFi Using Terminal
- How to Connect Raspberry Pi to WiFi by Using a Terminal
- Conclusion
- About the author
- Zahra Zamir
- Connect Raspberry Pi To WiFi Via The Command Line
Saved searches
Use saved searches to filter your results more quickly
You signed in with another tab or window. Reload to refresh your session. You signed out in another tab or window. Reload to refresh your session. You switched accounts on another tab or window. Reload to refresh your session.
Instructions on how to connect to wifi networks using the terminal, on your Raspberry Pi 3.
rijinmk/guide-to-wifi-terminal-rpi3
This commit does not belong to any branch on this repository, and may belong to a fork outside of the repository.
Name already in use
A tag already exists with the provided branch name. Many Git commands accept both tag and branch names, so creating this branch may cause unexpected behavior. Are you sure you want to create this branch?
Sign In Required
Please sign in to use Codespaces.
Launching GitHub Desktop
If nothing happens, download GitHub Desktop and try again.
Launching GitHub Desktop
If nothing happens, download GitHub Desktop and try again.
Launching Xcode
If nothing happens, download Xcode and try again.
Launching Visual Studio Code
Your codespace will open once ready.
There was a problem preparing your codespace, please try again.
Latest commit
Git stats
Files
Failed to load latest commit information.
README.md
To connect to Wifi [Using terminal]
This guide is to connect ONLY to WPA/WPA2 wifi networks. This guide will show you how to connect to the Wifi on a Raspberry Pi 3. This is for people who already has an OS installed on their Raspberry Pi and don’t have a mouse to navigate through and click on the wifi icon OR anyone who wants to learn to connect using the terminals.
- Insert your SD card with the OS in it.
- Power up your Raspberry Pi 3 using a Micro USB charger.
- Connect your keyboard.
- Connect your screen to see whats happening.
- Open terminals by pressing CTRL + ALT + T.
STEP 2 — TERMINAL COMMANDS
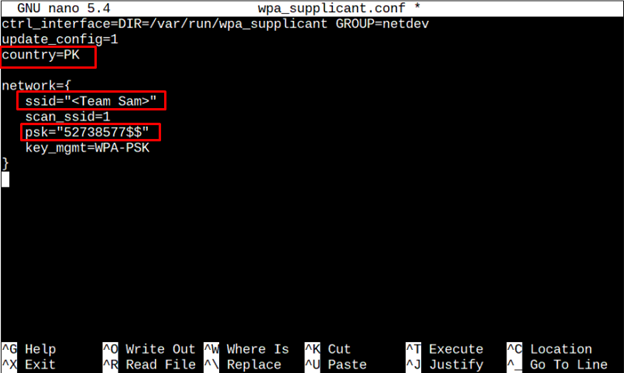
- Here you have to edit the file named wpa_supplicant.conf
- To do so, we use terminals nano text editor.
- We have to be a Super User to make changes to this file, hence we have to use sudo
sudo nano wpa_supplicant.conf
ctrl_interface=DIR=/var/run/wpa_supplicant GROUP=netdev update_config=1 country=GB network=< ssid="wifi-1-ssid" psk="wifi-1-password" key_mgmt=wifi-password-security-type > network=< ssid="wifi-2-ssid" psk="wifi-2-password" key_mgmt=wifi-password-security-type >
- If not, you wont see the network=
- What we have to understand is that network= is EACH network that we connected to in the past.
- Now, We have to add our own network= , We can do that by adding this to the end of the file:
ctrl_interface=DIR=/var/run/wpa_supplicant GROUP=netdev update_config=1 country=GB network=< ssid="wifi-1-ssid" psk="wifi-1-password" key_mgmt=wifi-password-security-type > network=< ssid="wifi-2-ssid" psk="wifi-2-password" key_mgmt=wifi-password-security-type > #Add it here.. network=< ssid="new-wifi-2-ssid" psk="new-wifi-2-password" key_mgmt=new-wifi-password-security-type >
- «new-wifi-2-ssid» will be your Wifi name which you want to connect to.
- «new-wifi-2-password» will be your Wifi password of the wifi you want to connect to.
- wifi-password-security-type will be the security type: WPA/WPA2
- Now we have to reconfigure, We can do that by
About
Instructions on how to connect to wifi networks using the terminal, on your Raspberry Pi 3.
Raspberry Pi 3: настройка Wi-Fi на всех моделях в консоли и GUI
![]()
Приветствую! В этой статье мы посмотрим, как можно произвести настройку Wi-Fi в Raspberry Pi через консоль и не только. Аккуратно, точно, без воды от нашего вайфайного портала. Поехали!
Нашли ошибку? Есть дополнение? Обязательно напишите об этом в комментариях к этой статье. Помогите другим читателям решить их проблему!
Предупреждение
По умолчанию в Raspberry Pi нет Wi-Fi модуля. Он появляется только в модели Raspberry Pi 3. Для использования Wi-Fi можно использовать почти любой адаптер, подключенный через USB – донгл.
Ниже мы рассмотрим использование Wi-Fi для всех моделей. Просто напаситесь терпением или же перейдите сразу на интересующую вас главу. Будет рассмотрено подключение исключительно через консоль, так как через графический интерфейс особенных действий и не требуется – все понятно без лишних морок.
Видеоверсия
Проверка подключения
Прежде чем использовать Wi-Fi, предлагаю посмотреть, а находит ли его устройство вообще. Это очень актуально для подключаемых «свистков», но и на «третьей Малине» можно проверить – а вдруг с модулем что-то не в порядке.
Делаем так: подключаем наш модуль в USB порт, запускаем консоль через тот же Putty, вводим команду:
Должен вывестись список USB устройств, среди которых нам нужно найти наш адаптер, который обычно подписан как Wireless Adapter. Можно и сразу перейти во включенные адаптеры через команду:
Наш беспроводной адаптер обычно обозначается как wlan0 (стандартно для Linux, на котором и основан Raspbian). Здесь же уже после настройки конфигурационных файлов будет написан выданный IP адрес в случае удачного подключения. Рекомендую по завершению и перезагрузке еще раз воспользоваться этой командой.
Настройка интерфейса
Если с модулем все в порядке, и он отображается среди подключенных, значит самое время посмотреть настройки интерфейса. Обычно там все в полном порядке, но как-то с вузовских времен пальцы тянутся взглянуть на них.
Его содержание должно быть примерно таким (верхнюю часть не трогаем, нас интересуют именно эти 4 строчки):
allow-hotplug wlan0
iface wlan0 inet manual
wpa-roam /etc/wpa_supplicant/wpa_supplicant.conf
iface default inet dhcp
auto wlan0
iface wlan0 inet dhcp
wpa-conf /etc/wpa_supplicant/wpa_supplicant.conf
Получение списка сетей
Едем дальше, попробуем просканировать все окружающие нас сети через этот модуль:
Нашли нужную сеть? Запомнили ее SSID (имя сети)? Переходим непосредственно к подключению.
Подключение
На Linux удобно вводить данные для доступа к сети заранее. Делается это в файле:
В секции network здесь и указываются данные для авторизации в сети:
network= ssid=”имя_сети”
psk=”пароль_сети”
proto=WPA
key_mgmt=WPA-PSK
pairwise=TKIP
group=TKIP
id_str=”имя_сети”
>
На самом деле минимально достаточно ввести два поля – ssid и psk, все остальное определится уже в процессе. Здесь показан вариант очень точной настройки в случае возникновения необходимости.
Если данные сохранены в файле верно (считайте, что это сделали автоматическое запоминание сети), то для подключения к любой доступной сети в нашем поле зрения достаточно выполнить команду:
Найдет известные сети и попробует подключиться к ним. А можно и просто перезагрузить через
Т.к. в конфигурации у нас указано dhcp – все найдет и подключится тоже самостоятельно.
Через графический интерфейс
Здесь все зависит от вашей версии операционной системы, но обычно подключение выглядит вот так:
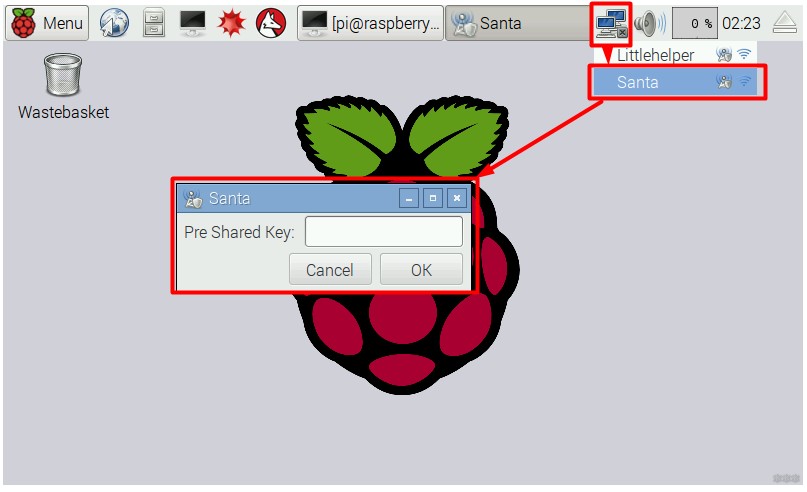
Т.е. привычно – щелкнули по значку, выбрали нужную сеть среди доступных, ввели от нее пароль. Никаких предварительных настроек и изменений файла не требуется. В случае же необходимости точной настройки (как правило ручного назначения IP адреса) лучше это сделать через правую кнопку мыши и выйти вот на такое меню:
Вот и все. Если есть что дополнить или остались вопросы – пишите смело в комментарии. Вместе мы можем помочь друг другу и разрешить все вопросы в этой сфере!
How to Connect Raspberry Pi to WiFi Using Terminal
![]()
WiFi is important for any system, including the Raspberry Pi as well, since it allows users to perform various features like online chatting, web search, installing applications, and others. Further, most of the tasks perform on Raspberry Pi system easily be done through terminal. Thus, if you are looking for a way to connect your Raspberry Pi to WiFi through terminal, you should follow this guide as this will also help you in connecting the WiFI on Raspberry Pi lite version.
How to Connect Raspberry Pi to WiFi by Using a Terminal
To connect Raspberry Pi to WiFi using the terminal, follow the below-mentioned steps:
Step 1: Check the Available Networks
Before connecting to WiFi if you want to check all the available networks in our area, use the below-mentioned command
Step 2: Open the Configuration File
To configure the WiFi network, we need to create a “wpa_suuplicant .conf” file and for that follow the below-mentioned command:

By using the above command a blank config file will appear on the screen.
Step 3: Configuring the File
Now, finally it is time to configure the .conf file according to the available network. For configuration, at the top of the file, add the country code and network details as shown below:
ctrl_interface = DIR = / var / run / wpa_supplicant GROUP =netdev
Note: Remember that “country”, “ssid”, and “psk” will be set according to user requirements.
Now, rress the keys “Ctrl + X” and then “Y” to save the file. Finally, press “Enter” to get back to the terminal.
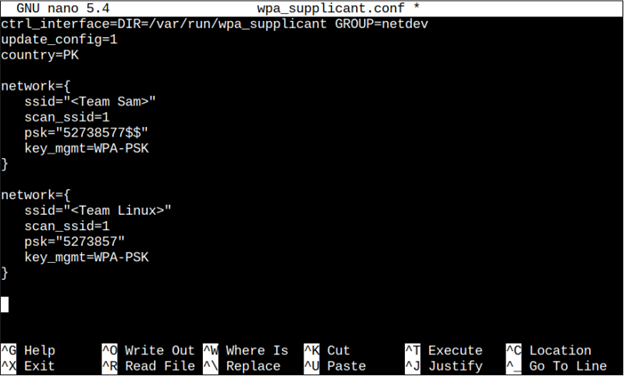
Just like above, multiple networks can also be added to the system so in case if one network is not working fine it automatically gets connected to another one without bothering a user. To add more than 1 network you can just simply copy the above network code (with the credentials of the second network) below the first network’s credential code.
Step 4: Reboot
It is always recommended to reboot the system after configuring the WiFi network so that the changes can successfully be applied. To reboot, follow the below mentioned-command

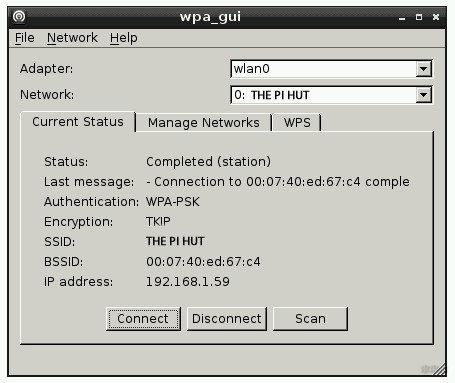
Step 5: Verifying Network
Now to verify the network, we will check the network connection and for that follow the below command
Check the IP address written in front of inet to verify the network.

Conclusion
To connect Raspberry Pi to WiFi using a terminal, the user simply has to open the terminal first. Afterward, he/she has to enter the command to open the conf file, and then add the network credentials inside the file including the ssid, password and location. After saving the changes, he/she must reboot the system to ensure Raspberry Pi is connected to the WiFi network.
About the author
Zahra Zamir
An Electronics graduate who loves to learn and share the knowledge, my passion for my field has helped me grasp complex electronics concepts and now I am here to share them with others.
Connect Raspberry Pi To WiFi Via The Command Line
Using Ethernet cable to connect with the Internet is too old fashion and does not provide mobility. So the best option we have is to connect Raspberry Pi To WiFi network. This article will help you connect your Raspberry Pi to Wifi network via the command line in your Raspberry Pi. We assume you have already set up your Raspberry Pi, if not then visit this link if you want to headless setup Raspberry Pi in a matter of time.
This is a very easy trick and has only a few steps (commands). Let’s get you to familiarize with the whole process.
In this article, we will show you how you can get the list of the WiFi networks that you can connect your RaspberryPi too from the terminal only. After that, we will update one network configuration file in the RaspberryPi system files to allow it to connect automatically to the WPA network whenever it restarts without asking for the password every time. Please keep in mind that to if you don’t know the password of the network then this article won’t be able to help you to connect your RaspberryPi to the required WiFi network. Once you successfully update the file, RaspberryPi automatically would try to the network or else you can force the connection process by restarting the RaspberryPi if you don’t have enough patience.
Step 1: Turn Raspberry Pi ON and start it’s terminal or any terminal which is connected to the Raspberry Pi (If you are using it headlessly).
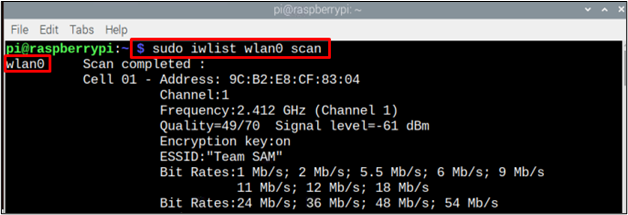
Step 2: Enter the command given below in the command line to list all available WiFi networks to find your network’s ESSID.
sudo iwlist wlan0 scan
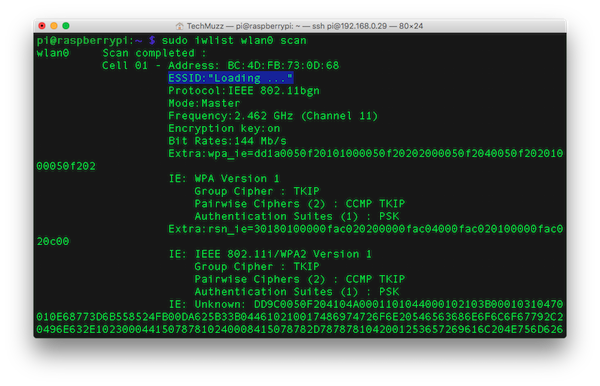
Step 3: Find or trace your network’s ESSID by find option in terminal or manually to copy it so there will be no chances of failure.
Step 4: Open the WPA-supplicant configuration file in nano.
sudo nano /etc/wpa_supplicant/wpa_supplicant.conf
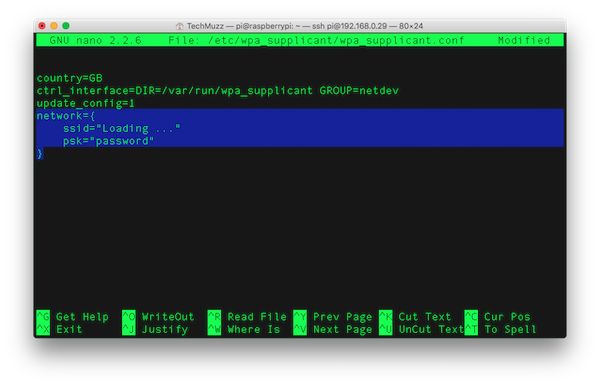
Step 5: Add the code given below at the end of the file with correct information.
Step 6: Now press Ctrl + X Exit the File.
Step 7: It will ask to save the changes or not, Press Y to save the changes in the file. Then Hit Enter/Return.
Step 8: That’s all. Your work is over.
After a few seconds, the wpa-supplicant file will notice some changes have occurred so it will try to connect to the network.
NOTE: Don’t forget to attach WiFi Connector to your Raspberry Pi else it won’t be able to connect to WiFi.
If it is not getting connected and you want to force connect, then reboot your Raspberry Pi with sudo reboot command in the command line.
If Raspberry Pi is still not connected To WiFi network, check your password and ESSID are correct.
If you have any query related to this article then feel free to ask in the comment section. We will be glad to help you out.