Расшарить папку linux debian
DOCUMENTATION Going further
The Samba server is extremely configurable and versatile, and can address a great many different use cases matching very different requirements and network architectures. This book only focuses on the use case where Samba is used as a standalone server, but it can also be an NT4 Domain Controller or a full Active Directory Domain Controller, or a simple member of an existing domain (which could be managed by a Windows server).
The samba package contains all the necessary manual pages and in /usr/share/doc/samba/examples/ a wealth of commented example files. If you are looking for a more comprehensive documentation, you may check the Samba website.
TOOL Authenticating with a Windows Server
Winbind gives system administrators the option of using a Windows server as an authentication server. Winbind also integrates cleanly with PAM and NSS. This allows setting up Linux machines where all users of a Windows domain automatically get an account.
More information can be found in the /usr/share/doc/libpam-winbind/examples/pam_winbind/ directory of the libpam-winbind package.
11.5.1.1. Configuring with debconf
The package sets up a minimal configuration during the initial installation in /etc/samba/smb.conf by plainly copying /usr/share/samba/smb.conf . So you should really run dpkg-reconfigure samba-common to adapt it:
On first installation the only piece of required information is the name of the workgroup where the Samba server will belong (the answer is FALCOTNET in our case).
In case of a package update (from the old stable Debian version) or if the SMB server has already been configured to use a WINS server ( wins server ), the package also proposes identifying the WINS server from the information provided by the DHCP daemon. The Falcot Corp administrators rejected this option, since they intend to use the Samba server itself as the WINS server.
11.5.1.2. Configuring Manually
11.5.1.2.1. Changes to smb.conf
The requirements at Falcot require other options to be modified in the /etc/samba/smb.conf configuration file. The following excerpts summarize the changes that were effected in the [global] section.
[. ] [global] ## Browsing/Identification ### # Change this to the workgroup/NT-domain name your Samba server will part of workgroup = FALCOTNET [. ] # Windows Internet Name Serving Support Section: # WINS Support - Tells the NMBD component of Samba to enable its WINS Server wins support = yes[. ] ####### Authentication ####### # Server role. Defines in which mode Samba will operate. Possible # values are "standalone server", "member server", "classic primary # domain controller", "classic backup domain controller", "active # directory domain controller". # # Most people will want "standalone server" or "member server". # Running as "active directory domain controller" will require first # running "samba-tool domain provision" to wipe databases and create a # new domain. server role = standalone server obey pam restrictions = yes [. ] # "security = user" is always a good idea. This will require a Unix account # in this server for every user accessing the server. security = user

Indicates that Samba should act as a Netbios name server (WINS) for the local network. This option had been removed from the default configuration in Buster and must be added manually if desired.

This is the default value for this parameter; however, since it is central to the Samba configuration, filling it explicitly is recommended. Each user must authenticate before accessing any share.
11.5.1.2.2. Adding Users
Each Samba user needs an account on the server; the Unix accounts must be created first, then the user needs to be registered in Samba’s database. The Unix step is done quite normally (using adduser for instance).
Adding an existing user to the Samba database is a matter of running the smbpasswd -a user command; this command asks for the password interactively.
A user can be deleted with the smbpasswd -x user command. A Samba account can also be temporarily disabled (with smbpasswd -d user ) and re-enabled later (with smbpasswd -e user ).
11.5.2. Samba Client
The client features in Samba allow a Linux machine to access Windows shares and shared printers. The required programs are available in the cifs-utils and smbclient packages.
11.5.2.1. The smbclient Program
The smbclient program queries SMB servers. It accepts a -U user option, for connecting to the server under a specific identity. smbclient //server/share accesses the share in an interactive way similar to the command-line FTP client. smbclient -L server lists all available (and visible) shares on a server.
11.5.2.2. Mounting Windows Shares
The mount command allows mounting a Windows share into the Linux filesystem hierarchy (with the help of mount.cifs provided by cifs-utils ).
Example 11.21. Mounting a Windows share
mount -t cifs //arrakis/shared /shared \ -o credentials=/etc/smb-credentials
username = user password = password
Other options can be specified on the command-line; their full list is available in the mount.cifs (1) manual page. Two options in particular can be interesting: uid and gid allow forcing the owner and group of files available on the mount, so as not to restrict access to root.
//server/shared /shared cifs credentials=/etc/smb-credentials
11.5.2.3. Printing on a Shared Printer
CUPS is an elegant solution for printing from a Linux workstation to a printer shared by a Windows machine. When the smbclient is installed, CUPS allows installing Windows shared printers automatically.
Enter the name that will uniquely identify this printer. Then enter the description and location of the printer. Those are the strings that will be shown to end users to help them identify the printers.
Indicate the manufacturer/model of the printer, or directly provide a working printer description file (PPD).
Как сделать общую сетевую папку в Linux (настройка SMB в Linux)
Начните с установки пакетов samba и smbclient.
В Debian, Linux Mint, Ubuntu, Kali Linux и их производных для установки samba выполните команду:
sudo apt install samba smbclient
В Arch Linux, BlackArch и их производных выполните команду:
sudo pacman -S samba smbclient
Следующая команда не сработает, если отсутствует файл /etc/samba/smb.conf. Если у вас тоже нет этого файла, то создаёте его заглушку — к настройке самого файла smb.conf мы вернёмся позже:
sudo touch /etc/samba/smb.conf
Теперь нужно добавить пароль для пользователя Samba. Действует следующее правило: имя пользователя должно быть таким же, как у вашего текущего пользователя, а пароль можно установить иной, отличный от вашего системного пароля.
Для установки пароля Samba, выполните следующую команду:
Если вы хотите, чтобы у пользователя не было пароля, то укажите опцию -n.
Создайте папку, которая станет совместно используемой:
Узнаем абсолютный путь до папки ~/linuxshare:
Откройте для редактирования файл /etc/samba/smb.conf:
sudo gedit /etc/samba/smb.conf
Добавьте туда строки вида:
[ИМЯ_ПАПКИ] comment = Samba на Linux path = /home/ИМЯ_ПОЛЬЗОВАТЕЛЯ/ИМЯ_ПАПКИ valid users = ИМЯ_ПОЛЬЗОВАТЕЛЯ read only = no browsable = yes
Обратите внимание, что все пробелы в строках выше являются обязательными.
Для моих данных это строки:
[linuxshare] comment = Samba на Linux path = /home/mial/linuxshare valid users = mial read only = no browsable = yes
Теперь запустим службу SMB:
sudo systemctl start smb.service
Для добавления службы в автозагрузку выполните:
sudo systemctl enable smb.service
Для подключения к этой общей сетевой папке на Linux нужно использовать IP адреса компьютера Linux.
Создадим файл, чтобы сетевая папка не была пустой:
echo "Документ на Linux" > ~/linuxshare/document.txt
Посмотрите локальный IP адрес компьютера, на котором запущена Linux:
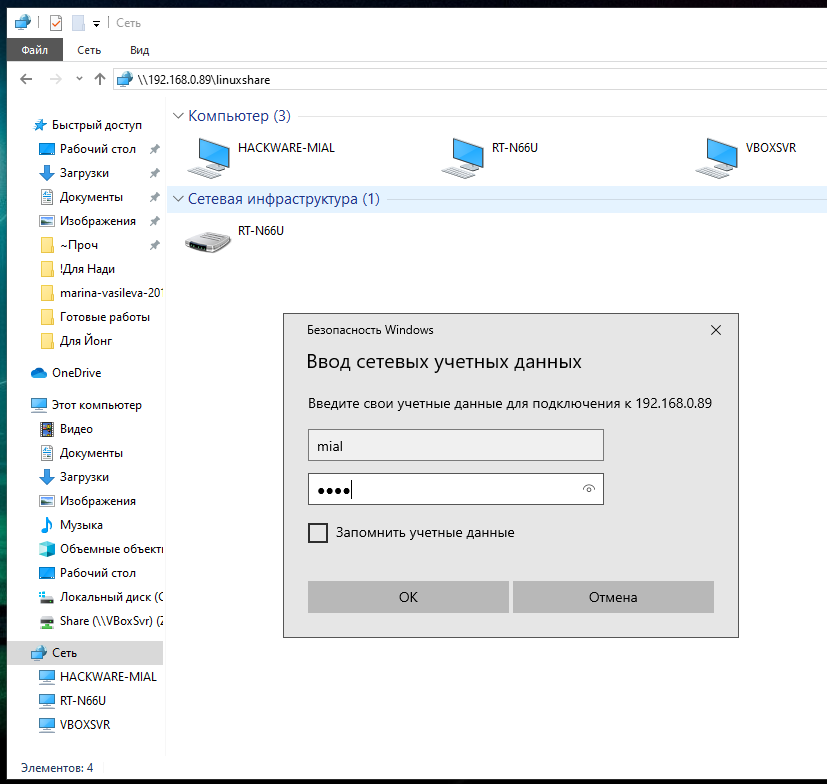
У меня этим IP является 192.168.0.89, а папку, как мы помним, я создал с именем linuxshare, тогда в Windows я перехожу в проводнике во вкладку «Сеть» и подключаюсь к этой папке следующим образом:
Вводим учётные данные (которые мы установили командой smbpasswd):
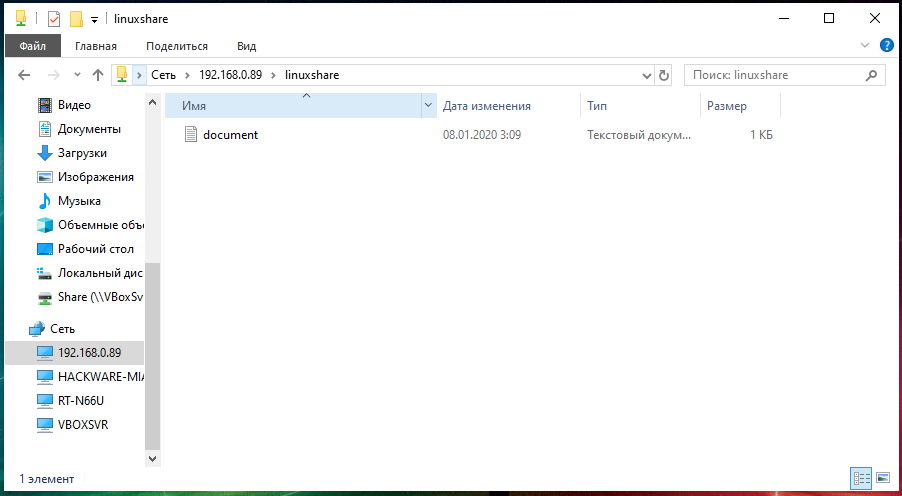
Видим содержимое совместно используемой папки, размещённой на Linux с помощью SMB:
Для подключения к сетевой папке из консоли Linux, запустите команду вида:
sudo smbclient //IP_АДРЕС/Папка -U ПОЛЬЗОВАТЕЛЬ
sudo smbclient //192.168.0.89/linuxshare -U mial
После ввода пароля нам становится доступным содержимое сетевой папки.