Создаем приложение используя GTK в Линуксе
Разрабатывать приложения в Линуксе можно с помощью фреймворка GTK. Эта библиотека предназначенная для построения графического интерфейса пользователя. GTK — это свободное программное обеспечение, которое распространяется по лицензии GNU LGPL, что позволяет создавать как бесплатные так и коммерческие приложения.
С документациею и описанием библиотеки, Вы можете ознакомиться по следующей ссылке: https://www.gtk.org
Перед написанием приложения необходимо подготовить среду разработки. Для этих целей буду использовать ОС Ubuntu 22.04. Так как приложение будет разрабатываться на языке программирования Си необходимо установить необходимые пакеты и компилятор.
Откройте терминал от имени пользователя root и введите следующую команду:
sudo apt-get install build-essential
Также нам необходимо установить пакеты GTK для разработки приложения. Вводим следующую команду в терминале:
sudo apt-get install -y libgtk-3-dev
Теперь все готово для написания первого приложения. Открываем любой текстовый редактор и пишем следующий код:
#include int main (int argc, char *argv[])
Этот код создает окно. Но прежде чем выполнить приложение, давайте разберемся немного с кодом.
#include — здесь мы подключаем библиотеку gtk. Без этой библиотеки не будет работать графическое окно и мы не сможем запустить приложение;
GtkWidget *window; — задаем имя/метку окна;
window = gtk_window_new(GTK_WINDOW_TOPLEVEL); — эта строка создает стандартное окно с рамкой;
gtk_widget_show(window); — отображаем окно на дисплее.
Теперь давайте запустим приложение. Я сохранил код приложения в файле ex1.c в домашней папки.
Открывает терминал и вводим следующие команды:
gcc ex1.c -o ex1 `pkg-config —cflags —libs gtk+-3.0
Теперь давайте улучшим код и создадим текстовую метку.
#include int main (int argc, char *argv[])
GtkWidget *label1; — задаем имя текстовой метки;
label1 = gtk_label_new(«Hello! My first Program»); — создаем текстовую метку;
gtk_container_add(GTK_CONTAINER(window), label1); — эта строка кода добавляет метку в контейнер;
gtk_widget_show(label1); — отображаем метку в окне.
Надеюсь эта публикация была полезная. Так как фреймворк GTK имеет очень много полезных и интересных функций, что не дает возможности объяснить все в одной публикации.
How to Create GUI Applications Under Linux Desktop Using PyGObject – Part 1
Creating applications on Linux can be done using different ways, but there are a limited ways of doing, so using the simplest and the most functional programming languages and libraries, that’s why we’re going to have a quick look about creating applications under the Linux desktop using the GTK+ library with Python programming language which is called “PyGObject”.
PyGObject uses the GObject Introspection to create binding for programming languages like Python, PyGObject is the next generation from PyGTK, you can say that PyGObject = Python + GTK3.
Today, we’re going to start a series about creating GUI (Graphical User Interface) applications under the Linux desktop using GTK+ library and PyGobject language, the series will cover the following topics:
About Python
First of all, you must have some basic knowledge in Python; Python is a very modern and easy to use programming language. It’s one of the most famous programming languages in the world, using Python, you will be able to create many great applications & tools. You may take some free courses like those at codeacademy.com or you may read some books about Python at:
About GTK+
GTK+ is an open-source cross-platform toolkit to create graphical user interfaces for desktop applications, it was first started in 1998 as a GUI toolkit for the GIMP, later, it was used in many other applications and soon became one of the most famous libraries to create GUIs. GTK+ is released under the LGPL license.
Creating GUI Applications Under Linux
There are 2 ways for creating the applications using GTK+ & Python:
- Writing the graphical interface using code only.
- Designing the graphical interface using the “Glade” program; which is RAD tool to design GTK+ interfaces easily, Glade generates the GUI as a XML file which can be used with any programming language to build the GUI, after exporting the GUI’s XML file, we’ll be able to link the XML file with our program to do the jobs we want.
We’ll explain both ways in short.
The Code-Only Way
Writing the GUI using code only can be little bit hard for noob programmer’s and very time-wasting, but using it, we can create very functional GUIs for our programs, more than those we create using some tools like Glade.
Let’s take the following example.
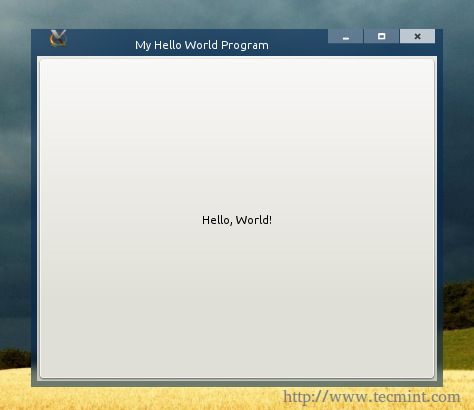
#!/usr/bin/python # -*- coding: utf-8 -*- from gi.repository import Gtk class ourwindow(Gtk.Window): def __init__(self): Gtk.Window.__init__(self, title="My Hello World Program") Gtk.Window.set_default_size(self, 400,325) Gtk.Window.set_position(self, Gtk.WindowPosition.CENTER) button1 = Gtk.Button("Hello, World!") button1.connect("clicked", self.whenbutton1_clicked) self.add(button1) def whenbutton1_clicked(self, button): print "Hello, World!" window = ourwindow() window.connect("delete-event", Gtk.main_quit) window.show_all() Gtk.main() Copy the above code, paste it in a “test.py” file and set 755 permission on the test.py file and run the file later using “./test.py”, that’s what you will get.
# nano test.py # chmod 755 test.py # ./test.py
By clicking the button, you see the “Hello, World!” sentence printed out in the terminal:
Let me explain the code in detailed explanation.
- #!/usr/bin/python: The default path for the Python interpreter (version 2.7 in most cases), this line must be the first line in every Python file.
- # -*- coding: utf-8 -*-: Here we set the default coding for the file, UTF-8 is the best if you want to support non-English languages, leave it like that.
- from gi.repository import Gtk: Here we are importing the GTK 3 library to use it in our program.
- Class ourwindow(Gtk.Window): Here we are creating a new class, which is called “ourwindow”, we are also setting the class object type to a “Gtk.Window”.
- def __init__(self): Nothing new, we’re defining the main window components here.
- Gtk.Window.__init__(self, title=”My Hello World Program”): We’re using this line to set the “My Hello World Program” title to “ourwindow” window, you may change the title if you like.
- Gtk.Window.set_default_size(self, 400,325): I don’t think that this line need explanation, here we’re setting the default width and height for our window.
- Gtk.Window.set_position(self, Gtk.WindowPosition.CENTER): Using this line, we’ll be able to set the default position for the window, in this case, we set it to the center using the “Gtk.WindowPosition.CENTER” parameter, if you want, you can change it to “Gtk.WindowPosition.MOUSE” to open the window on the mouse pointer position.
- button1 = Gtk.Button(“Hello, World!”): We created a new Gtk.Button, and we called it “button1”, the default text for the button is “Hello, World!”, you may create any Gtk widget if you want.
- button1.connect(“clicked”, self.whenbutton1_clicked): Here we’re linking the “clicked” signal with the “whenbutton1_clicked” action, so that when the button is clicked, the “whenbutton1_clicked” action is activated.
- self.add(button1): If we want our Gtk widgets to appear, we have to add them to the default window, this simple line adds the “button1” widget to the window, it’s very necessary to do this.
- def whenbutton1_clicked(self, button): Now we’re defining the “whenbutton1_clicked” action here, we’re defining what’s going to happen when the “button1” widget is clicked, the “(self, button)” parameter is important in order to specific the signal parent object type.
- print “Hello, World!”: I don’t have to explain more here.
- window = ourwindow(): We have to create a new global variable and set it to ourwindow() class so that we can call it later using the GTK+ library.
- window.connect(“delete-event”, Gtk.main_quit): Now we’re connecting the “delete-event” signal with the “Gtk.main_quit” action, this is important in order to delete all the widgets after we close our program window automatically.
- window.show_all(): Showing the window.
- Gtk.main(): Running the Gtk library.
That’s it, easy isn’t? And very functional if we want to create some large applications. For more information about creating GTK+ interfaces using the code-only way, you may visit the official documentation website at:
The Glade Designer Way
Like I said in the beginning of the article, Glade is a very easy tool to create the interfaces we need for our programs, it’s very famous among developers and many great applications interfaces were created using it. This way is called “Rapid applications development”.
You have to install Glade in order to start using it, on Debian/Ubuntu/Mint run:
$ sudo apt-get install glade
On RedHat/Fedora/CentOS, run:
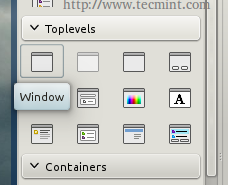
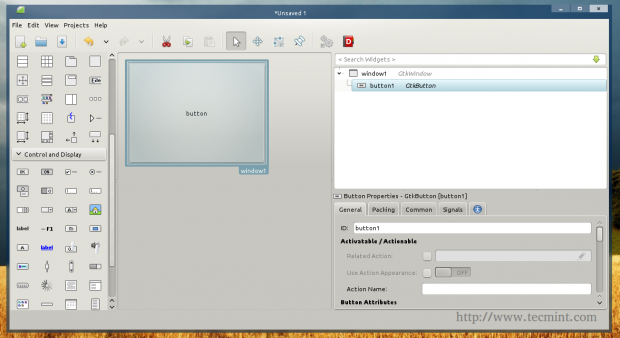
After you download and install the program, and after you run it, you will see the available Gtk widgets on the left, click on the “window” widget in order to create a new window.
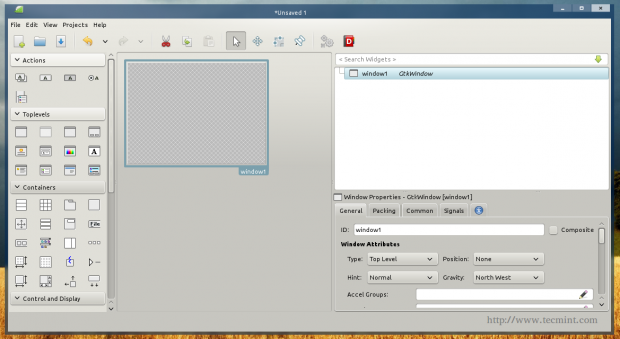
You will notice that a new empty window is created.
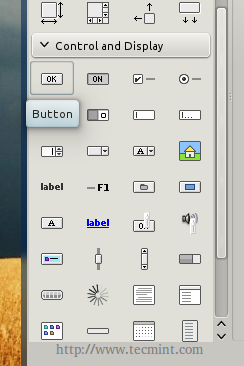
You can now add some widgets to it, on the left toolbar, click on the “button” widget, and click on the empty window in order to add the button to the window.
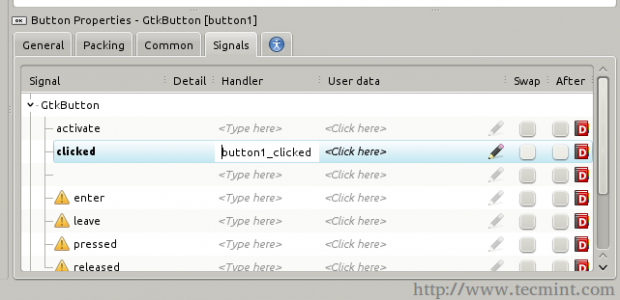
You will notice that the button ID is “button1”, now refer to the Signals tab in the right toolbar, and search for the “clicked” signal and enter “button1_clicked” under it.
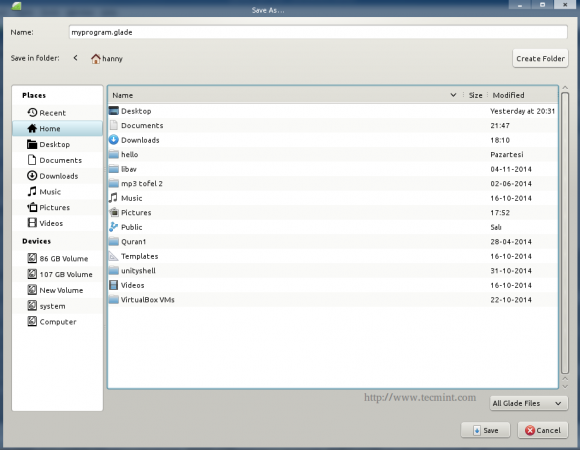
Now that we’ve created our GUI, let’s export it. Click on the “File” menu and choose “Save”, save the file in your home directory in the name “myprogram.glade” and exit.
Now, create a new “test.py” file, and enter the following code inside it.
#!/usr/bin/python # -*- coding: utf-8 -*- from gi.repository import Gtk class Handler: def button_1clicked(self, button): print "Hello, World!" builder = Gtk.Builder() builder.add_from_file("myprogram.glade") builder.connect_signals(Handler()) ournewbutton = builder.get_object("button1") ournewbutton.set_label("Hello, World!") window = builder.get_object("window1") window.connect("delete-event", Gtk.main_quit) window.show_all() Gtk.main() Save the file, give it 755 permissions like before, and run it using “./test.py”, and that’s what you will get.
# nano test.py # chmod 755 test.py # ./test.py
Click on the button, and you will notice that the “Hello, World!” sentence is printed in the terminal.
Now let’s explain the new things:
- class Handler: Here we’re creating a class called “Handler” which will include the the definitions for the actions & signals, we create for the GUI.
- builder = Gtk.Builder(): We created a new global variable called “builder” which is a Gtk.Builder widget, this is important in order to import the .glade file.
- builder.add_from_file(“myprogram.glade”): Here we’re importing the “myprogram.glade” file to use it as a default GUI for our program.
- builder.connect_signals(Handler()): This line connects the .glade file with the handler class, so that the actions and signals that we define under the “Handler” class work fine when we run the program.
- ournewbutton = builder.get_object(“button1”): Now we’re importing the “button1” object from the .glade file, we’re also passing it to the global variable “ournewbutton” to use it later in our program.
- ournewbutton.set_label(“Hello, World!”): We used the “set.label” method to set the default button text to the “Hello, World!” sentence.
- window = builder.get_object(“window1”): Here we called the “window1” object from the .glade file in order to show it later in the program.
And that’s it! You have successfully created your first program under Linux!
Of course there are a lot more complicated things to do in order to create a real application that does something, that’s why I recommend you to take a look into the GTK+ documentation and GObject API at:
Have you developed any application before under the Linux desktop? What programming language and tools have used to do it? What do you think about creating applications using Python & GTK 3?


