- How to mount a disk image from the command line?
- 4 Answers 4
- Как установить операционку в img-виде?
- Create, Mount And Unmount .img Files In Ubuntu
- How would I extract a .img file
- 5 Answers 5
- You can use kpartx — create device maps from partition tables
- You can clone from the image file to a drive
- How can I mount a disk image?
- 5 Answers 5
How to mount a disk image from the command line?
I know how to mount a drive that has a corresponding device file in /dev, but I don’t know how to do this for a disk image that does not represent a physical device and does not have an analogue in /dev (e.g. an ISO file or a floppy image). I know I can do this in Mac OS X by double-clicking on the disk image’s icon in Finder, which will mount the drive automatically, but I would like to be able to do this from the terminal. I’m not sure if there is a general Unix way of doing this, or if this is platform-specific.
Do you mean you want to do it on the command line on OS X? You mention it, but it might be better to be explicit if the question is specific to a certain os. Also, what type of a disk image do you mean? .iso?
4 Answers 4
If it was a hard-drive image with a MBR partition table, I would fdisk the image to find the offset for the partition I need to mount.
Then I would mount it passing the offset.
mount -o loop,offset=xxxx /path/disk.img /mnt/disk.img.partition The offset value is in bytes, whereas fdisk shows a block count, so you should multiply the value from the «Begin» or «Start» column of the fdisk output by 512 (or whatever the block size is) to obtain the offset to mount at.
+1 This is the solution that worked for me. Thank you for including details on how to calculate the offset as well.
On most modern GNU system the mount command can handle that:
mount -o loop file.iso /mnt/dir to unmount you can just use the umount command
If your OS doesn’t have this option you can create a loop device:
losetup -f # this will print the first available loop device ex:/dev/loop0 losetup /dev/loop0 /path/file.iso #associate loop0 with the specified file mount /dev/loop0 /mnt/dir #It may be necessary specify the type (-t iso9660) umount /mnt/dir losetup -d /dev/loop0 If the file have partitions, example a HD image, you can use the -P parameter (depending on you OS), it will map the partitions in the file content:
losetup -P /dev/loop0 /path/file.iso # will create /dev/loop0 ls /dev/loop0p* #the partitions in the format /dev/loop0pX losetup and mount -o loop are Linux specific. It won’t work on GNU distributions using a different kernel (like hurd, illumos or kFreeBSD though illumos and FreeBSD will have the equivalent with a different syntax)
I don’t understand the meaning of a «loop device» nor why you need -o loop to mount the image file as one. Can you explain please? I see the Wikipedia link but still don’t understand. I have an embedded Linux rootfs.ext2 roof filesystem image, and it doesn’t seem to make any difference when I mount it with vs without -o loop to inspect the files.
losetup -P automation for multi partition images
How to mount a disk image from the command line? | Unix & Linux Stack Exchange mentioned losetup -P , and here are some handy Bash functions to further automate things. Usage:
$ los my.img /dev/loop0 /mnt/loop0p1 /mnt/loop0p2 $ ls /mnt/loop0p1 /whatever /files /youhave /there $ sudo losetup -l NAME SIZELIMIT OFFSET AUTOCLEAR RO BACK-FILE DIO /dev/loop1 0 0 0 0 /full/path/to/my.img $ # Cleanup. $ losd 0 $ ls /mnt/loop0p1 $ ls /dev | grep loop0 loop0 los() ( img="$1" dev="$(sudo losetup --show -f -P "$img")" echo "$dev" for part in "$dev"?*; do if [ "$part" = "$p*" ]; then part="$" fi dst="/mnt/$(basename "$part")" echo "$dst" sudo mkdir -p "$dst" sudo mount "$part" "$dst" done ) losd() ( dev="/dev/loop$1" for part in "$dev"?*; do if [ "$part" = "$p*" ]; then part="$" fi dst="/mnt/$(basename "$part")" sudo umount "$dst" done sudo losetup -d "$dev" ) Как установить операционку в img-виде?
Наткнулся на операционку, которая представлена только в одном формате — IMG.
И как же устанавливать?


Это что же за система такая?
Про установку сказано очень кратко:
Если Вы используете Ubuntu, зайдите в приложение «Диски», выберите цель, куда будете устанавливать образ и нажмите «Восстановить образ»
Впервые слышу про приложение «Диски», у меня такого нет.
Это я знаю, но что мне даст ISO?

Если убунта, то найди приложение «Диски». Или кликни правой кнопкой мыши и выбери «Запись дискового образа» или «Восстановление дискового образа». На крайняк скачай etcher.io и запиши им.
Просто скопируй ее на другой винт. ВНИМАНИЕ: все разделы будут уничтожены!
sudo dd if=/путь_к_образу_img of=/dev/sd_номер_винта
Уже пробовал «Диски». Записанная флешка даже не думает грузится.
Пошел искать Etcher.

sudo dd if=image.img of=/dev/sdX/dev/sdX — твоя флешка, или куда там образ раскатывать надо.
Есть еще вариант, что надо записывать не диск, а раздел.
В любом случае сделай file your_image.img и посмотри, что там вообще запихано.
Да этот сайт видел, конечно, но я пошел искать эту утилиту в репах Дебиана или Убунту.
Ни в тех, ни в других она не просматривается.
Нету в репах. Качаешь оттуда файл, делаешь chmod +x и sudo ./etcherapp. ну ты понял.
А еще попытался использовать UnetBootIn — как была она корявой, так и осталась.
Потому что утилита «Диски» видит воткнутую флешку, а UnetBootIn в упор не замечает.
Да понять-то понял, видел ее мануал по использованию, но надеялся, что она уже появилась в репах.
Без них как-то стремно ее использовать. может, это ботнет какой-то..
Скачай исходники и посмотри
Шутник 🙂 Что я там пойму в этих исходниках..
Там внезапно LVM с одним разделом. Зачем-то запихнули webmin, куча всякого говна в хомяке.
Какой-то ЖМУ/Линакс Васян Эдишн.
Так быстро разобрался в потрохах? 🙂
Да, это необычный дистр. И больше всего он вызывает опасения, что он майнит не только на пользователя, но и на неизвестного «дядю».
Зато очень удобен по сравнению с этим жутким месивом —
http://spacience.blogspot.de/2015/05/ethereum-gpu-mining-ubuntu-1404-lts.html
По установке дистра — разобрался. Дело было не в бабине 😉
Оказывается, в глубинах БИОСа содержалась еще одна хитрая опция — как представлять флешку — как CD-ROM или как HDD.
Переключил на HDD — и загрузка пошла.

по сравнению с этим жутким месивом
А не нужно делать согласно этому месиву. geth не нужен; ethminer можно поставить из уже готового пакета, просто подключив репозиторий.
он майнит . на неизвестного «дядю»
Зато очень удобен
Тогда проще и надёжнее свою систему собрать, поглядывая на состав этого.
Портативная платформа для майнинга Эфириума
Так влом гуглить. Для Ъ: что это такое? Зачем тебе эта система?
Create, Mount And Unmount .img Files In Ubuntu
Recently I moved from Windows to Ubuntu on one of my laptops and since then I was trying to look for the way to create a VHDs or some sort of image files that I can use as a container. So I looked up for the solution and found a working solution scattered though places. So here I am putting it in a blog post to have all it in one place.
First we need to create an image file (.img) by using the dd command. The dd command is used to copy and convert the file. The reason it is not called cc is because it is already being used by C compiler. Here goes the command.
$ dd if=/dev/zero of=cdata.img bs=1G count=5
Note: The command execution time depends on the size of the image you have opted out for.
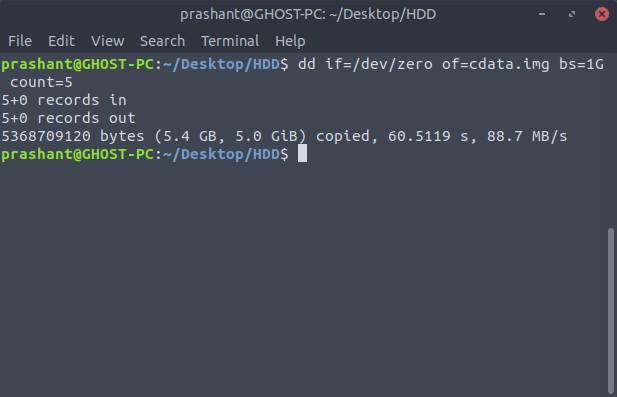
The if param stands for input file to refer the input file. As if , of stands for output file and this will create the .img file with the name you specify. The third param bs stands for block size . This will let you set the size of the image file. The G in the above command stands for GigaByte (GB). You can set the image size by specifying the block size. In this case G stands for GigaBytes (GB), K for KiloBytes (KB), T for TeraBytes (TB), P for Petabytes (PB) and so on. Here I am creating a 5 blocks of 1 GB each for the image file name cdata .
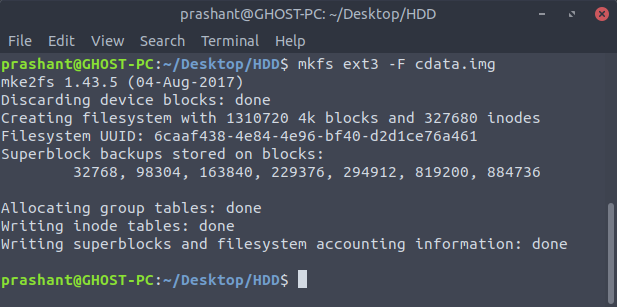
This command will create the .img file but you cannot mount this file as of yet. To do that you have to format the image so that it can have a file system. To do this make use of mkfs command.
I am creating an ext3 filesystem on my image file. -F is to force the operation. Here is the output of the command.
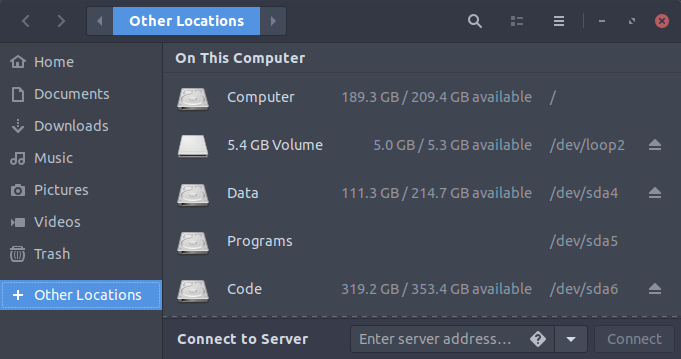
Now we can mount the image file by using the mount command:
$ sudo mount -o loop cdata.img ~/Desktop/HDD/
With the success of the above command, you can see the image mounted on your desktop. You can unmount the image by clicking the eject or unmount button as shown in the below screenshot or you can execute the umount command to do that.
Unmounting the image by using command line.
How would I extract a .img file
I am trying to extract a .img file (hard disk image with with Chromium OS on it). I have not been able to find any way to do this other than mounting it but that is not usable because it shows up as multiple drives so I cannot repack it.
5 Answers 5
You do not extract an .img ; you mount it. Example:
mkdir /mnt/ChromeOS mount -o loop image.img /mnt/ChromeOS/ and this will list the contents:
Mind that .img can also be zipped. If that is the case (unlikely though) you also need to gunzip it.
This does not work if the img contains multiple partitions, at least it fails for me. Using kpartx works instead.
You can use kpartx — create device maps from partition tables
Install the package kpartx and run
kpartx [-a | -d | -l] [-v] wholedisk DESCRIPTION
This tool, derived from util-linux’ partx, reads partition tables on specified device and creates device maps over partitions segments detected. It is called from hotplug upon device maps creation and deletion.
EXAMPLE
To mount all the partitions in a raw disk image:
You can clone from the image file to a drive
You can clone from the .img [image] file to a drive, for example a USB pendrive, that is big enough. This is the basic intention of the file.
You can use mkusb for that purpose. It works with compressed image files too (when compressed with gzip and xz ), .img.gz and .img.xz files.
After the cloning you will see the partitions for example with
sudo lsblk -f sudo lsblk -m sudo parted -ls After cloning you can mount and unmount the partition(s) on the drive ‘as usual’.
How can I mount a disk image?
I have a disk image myimage.disk which contains the partition table and a primary partition (i.e. a FAT32 filesystem). Think that as a USB pen image. I want to mount the primary partition to a local directory. I know how to mount a partition image using the loop utils but here I have disk image. My guess is that I have to mount the image «skipping» the partition table but how can I do that?
See also superuser.com/questions/117136/… You may want to use simply losetup —partscan —find —show disk.img followed by mount /dev/loop0p1 /mnt/disk
5 Answers 5
The kpartx tool makes this easier. It creates loop devices in /dev/mapper for each partition in your image. Then you can mount the loop device that corresponds with your desired partition without having to calculate the offset manually.
For example, to mount the first partition of the disk image:
kpartx -a -v myimage.disk mount /dev/mapper/loop0p1 /mnt/myimage When you’re done with the image, remove the loop devices:
umount /mnt/myimage kpartx -d -v myimage.disk Alternatively, if you have a recent kernel, and pass loop.max_part=63 on boot (if loop is built-in) or to modprobe (if loop is a module), then you can do it this way:
losetup /dev/loop0 myimage.disk partprobe /dev/loop0 # Re-read partition table if /dev/loop0 was used with a different image before mount /dev/loop0p1 /mnt/myimage When you’re done with the loop: