- Installing xRDP on Kali Linux
- Install xRDP
- “Authentication is required to create a color managed device”
- Open your Firewall
- Connecting via an SSH tunnel
- Install PuTTY & Set Up
- Create a Private Key file with PuTTYGen
- Connect the tunnel
- Last bits of security
- Set SSH to accept Certificates only
- Set xRDP to require SSH tunnels
- Packages and Binaries:
Installing xRDP on Kali Linux
There are a lot of complicated tutorials on how to get xRDP working on Kali Linux. I suspect the tutorials have become complicated as they address a variety of bugs that xRDP and connecting software has had over time, but there isn’t much you actually need to do.
Note that if you are using Gnome, you’ll run into issues. I have got RDP working with Gnome before, but I haven’t been able to create a reliable set of steps to replicate it, as it usually starts working after several hours of messing around. If this is you, then you can try the below, but it may just be your starting point.
Install xRDP
The only package you need is xrdp, which you should enable after installation.
sudo apt update sudo apt install xrdp sudo systemctl enable xrdp sudo systemctl restart xrdp “Authentication is required to create a color managed device”
If you get this message there are a few potential fixes. The one I use is to add the following file to policy kit, and restart it:
# Create /etc/polkit-1/rules.d/02-allow-colord.rules, # and insert the following as its contents: polkit.addRule(function(action, subject) if ((action.id == "org.freedesktop.color-manager.create-device" || action.id == "org.freedesktop.color-manager.create-profile" || action.id == "org.freedesktop.color-manager.delete-device" || action.id == "org.freedesktop.color-manager.delete-profile" || action.id == "org.freedesktop.color-manager.modify-device" || action.id == "org.freedesktop.color-manager.modify-profile") && subject.isInGroup("sudo")) return polkit.Result.YES; > >); # Note that 'sudo' can be any group, but since your normal user is likely in that group, this # setting should work. # Then restart policy kit sudo systemctl restart polkit Open your Firewall
If you are using UFW, you’ll need to open up a port.
Then in Windows, you’ll need to lower your color depth in the RDP settings when you make a connection:
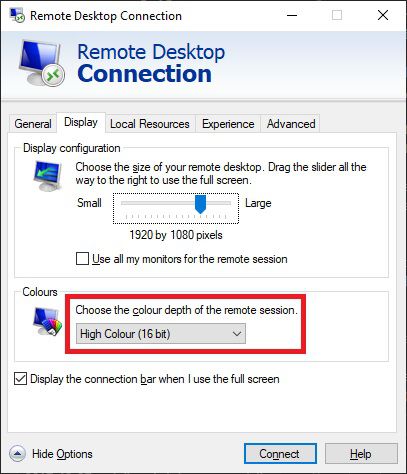
And it should work from this point.
Connecting via an SSH tunnel
xRDP transport is encrypted using TLS by default, and should be as secure as RDP is on windows, but if you open it up to the internet you can expect to be subject to ongoing brute force attacks. If a vulnerability is found, you can expect it to be used against you pretty soon. A safer option is to connect using an SSH tunnel, and secure that using certificates instead of passwords.
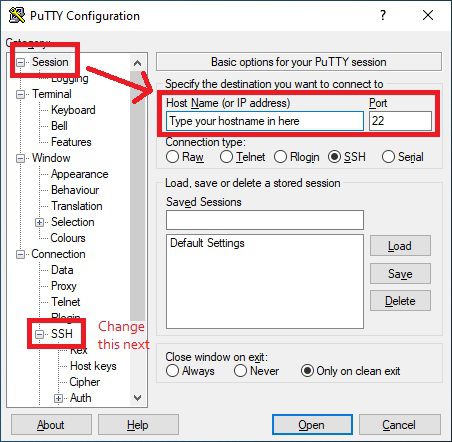
Install PuTTY & Set Up
I’m assuming you know how to set up port forwarding on your router, and how to install puTTY. If not, Google is your friend. First step is just to put in your IP address (take a look at duckdns.org if you need a static one) and the external port that you’ve chosen into puTTY.
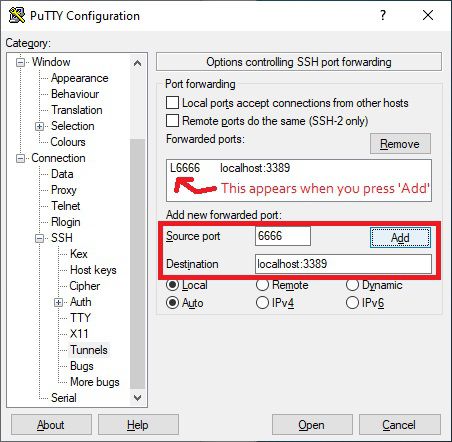
Next, you need to go into Tunnel under SSH. Here you need to add a Source port, which can be any port you have available on Windows. I’ve used 6666 in this example. Then under destination, add localhost:3389 .
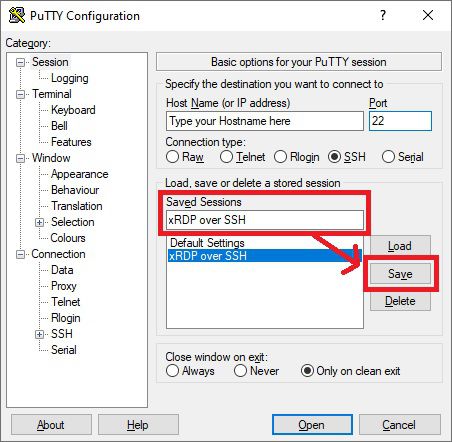
Under Session, you will probably want to save these settings so that you don’t need to do the setup every time.
Create a Private Key file with PuTTYGen
Press the Windows key and type in ‘PuttyGen’, which should open up the following program:
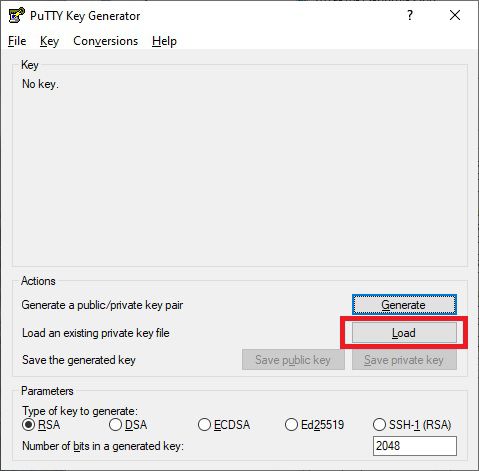
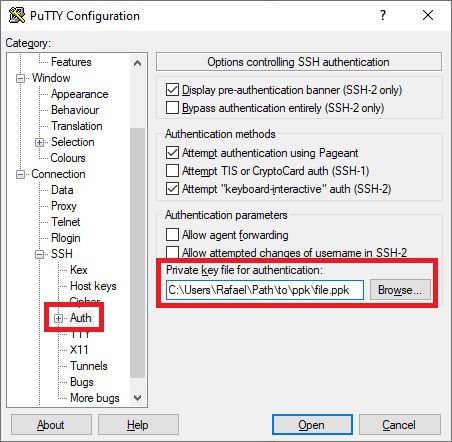
Click on Load, and select your private ‘id_rsa’ key that you normally use for logging in via SSH. You can then save this as a .ppk file. Once you have this, under SSH and Auth, add the .ppk key file.
Again, you’ll want to go back to Session and save this.
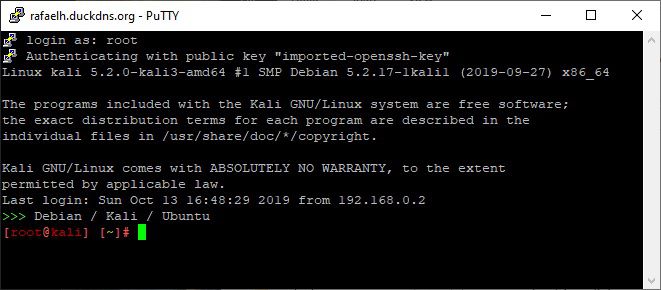
Connect the tunnel
Now that this is set up, connect using puTTY by pressing ‘Open’. You’ll get a black window, asking you for the username, which will probably be ‘root’ for Kali.
Now that the connection is established, go into RDP and use localhost and the port you configured in puTTY to connect:
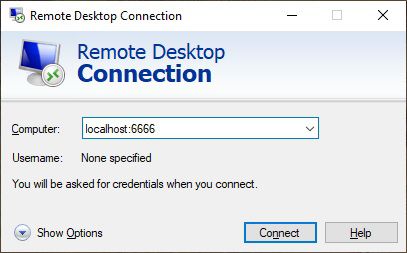
And all being well, you should successfully connect to xRDP via an SSH tunnel at this point
Last bits of security
Set SSH to accept Certificates only
You will need to edit the SSH daemon config and restart it. Make sure you have certificates set up and can authenticate without a password before you turn this off.
# in /etc/ssh/sshd_config, set the following: PasswordAuthentication no # Then reload the daemon systemctl restart ssh Set xRDP to require SSH tunnels
The last bit of security you can apply is to force xRDP to require a tunnel by constraining it to accept local connections only.
# Under /etc/xrdp/xrdp.ini, add the following line to the [globals] section: address=127.0.0.1 # and reload xRDP systemctl restart xrdp Hopefully that’s all you’ll need to connect in a reasonably secure fashion to your Kali box over the internet.
Packages and Binaries:
rdesktop is an open source client for Windows NT/2000 Terminal Server and Windows Server 2003/2008. Capable of natively speaking its Remote Desktop Protocol (RDP) in order to present the user’s Windows desktop. Unlike Citrix ICA, no server extensions are required.
Installed size: 683 KB
How to install: sudo apt install rdesktop
- libasound2
- libc6
- libgmp10
- libgnutls30
- libgssapi-krb5-2
- libhogweed6
- libnettle8
- libpcsclite1
- libtasn1-6
- libx11-6
- libxcursor1
- libxrandr2
rdesktop
Remote Desktop Protocol client
[email protected]:~# rdesktop --help rdesktop: invalid option -- '-' rdesktop: A Remote Desktop Protocol client. Version 1.9.0. Copyright (C) 1999-2016 Matthew Chapman et al. See http://www.rdesktop.org/ for more information. Usage: rdesktop [options] server[:port] -u: user name -d: domain -s: shell / seamless application to start remotely -c: working directory -p: password (- to prompt) -n: client hostname -k: keyboard layout on server (en-us, de, sv, etc.) -g: desktop geometry (WxH[@DPI][+X[+Y]]) -i: enables smartcard authentication, password is used as pin -f: full-screen mode -b: force bitmap updates -L: local codepage -A: path to SeamlessRDP shell, this enables SeamlessRDP mode -V: tls version (1.0, 1.1, 1.2, defaults to negotiation) -B: use BackingStore of X-server (if available) -e: disable encryption (French TS) -E: disable encryption from client to server -m: do not send motion events -M: use local mouse cursor -C: use private colour map -D: hide window manager decorations -K: keep window manager key bindings -S: caption button size (single application mode) -T: window title -t: disable use of remote ctrl -N: enable numlock synchronization -X: embed into another window with a given id. -a: connection colour depth -z: enable rdp compression -x: RDP5 experience (m[odem 28.8], b[roadband], l[an] or hex nr.) -P: use persistent bitmap caching -r: enable specified device redirection (this flag can be repeated) '-r comport:COM1=/dev/ttyS0': enable serial redirection of /dev/ttyS0 to COM1 or COM1=/dev/ttyS0,COM2=/dev/ttyS1 '-r disk:floppy=/mnt/floppy': enable redirection of /mnt/floppy to 'floppy' share or 'floppy=/mnt/floppy,cdrom=/mnt/cdrom' '-r clientname=': Set the client name displayed for redirected disks '-r lptport:LPT1=/dev/lp0': enable parallel redirection of /dev/lp0 to LPT1 or LPT1=/dev/lp0,LPT2=/dev/lp1 '-r printer:mydeskjet': enable printer redirection or mydeskjet="HP LaserJet IIIP" to enter server driver as well '-r sound:[local[:driver[:device]]|off|remote]': enable sound redirection remote would leave sound on server available drivers for 'local': alsa: ALSA output driver, default device: default '-r clipboard:[off|PRIMARYCLIPBOARD|CLIPBOARD]': enable clipboard redirection. 'PRIMARYCLIPBOARD' looks at both PRIMARY and CLIPBOARD when sending data to server. 'CLIPBOARD' looks at only CLIPBOARD. '-r scard[:"Scard Name"="Alias Name[;Vendor Name]"[. ]] example: -r scard:"eToken PRO 00 00"="AKS ifdh 0" "eToken PRO 00 00" -> Device in GNU/Linux and UNIX environment "AKS ifdh 0" -> Device shown in Windows environment example: -r scard:"eToken PRO 00 00"="AKS ifdh 0;AKS" "eToken PRO 00 00" -> Device in GNU/Linux and UNIX environment "AKS ifdh 0" -> Device shown in Microsoft Windows environment "AKS" -> Device vendor name -0: attach to console -4: use RDP version 4 -5: use RDP version 5 (default) -o: name=value: Adds an additional option to rdesktop. sc-csp-name Specifies the Crypto Service Provider name which is used to authenticate the user by smartcard sc-container-name Specifies the container name, this is usually the username sc-reader-name Smartcard reader name to use sc-card-name Specifies the card name of the smartcard to use -v: enable verbose logging