- Saved searches
- Use saved searches to filter your results more quickly
- License
- peasoft/rtw89-kali
- Name already in use
- Sign In Required
- Launching GitHub Desktop
- Launching GitHub Desktop
- Launching Xcode
- Launching Visual Studio Code
- Latest commit
- Git stats
- Files
- README.md
- About
- Как установить драйвер для W-Fi для карт с чипсетами RTL8812AU/RTL8821AU (Alfa AWUS036ACH, Alfa AWUS036AC)
- Какой чипсет в Alfa AWUS036ACH и Alfa AWUS036AC
- Как установить драйвер rtl8812au в Kali Linux
- Как установить драйвер rtl8812au в Arch Linux, BlackArch
- Как установить драйвер rtl8812au в Debian, Linux Mint, Ubuntu
- Как установить драйвер rtl8812au в For Raspberry (RPI)
- Настройка TX power в rtl88xxau
- Переключение между режимами USB в rtl88xxau
- Управление LED (светодиодом) в rtl88xxau
- NetworkManager
- Как перевести Wi-Fi адаптер в режим монитора
- Связанные статьи:
Saved searches
Use saved searches to filter your results more quickly
You signed in with another tab or window. Reload to refresh your session. You signed out in another tab or window. Reload to refresh your session. You switched accounts on another tab or window. Reload to refresh your session.
Driver for Realtek 8852AE, an 802.11ax device on Kali Linux
License
peasoft/rtw89-kali
This commit does not belong to any branch on this repository, and may belong to a fork outside of the repository.
Name already in use
A tag already exists with the provided branch name. Many Git commands accept both tag and branch names, so creating this branch may cause unexpected behavior. Are you sure you want to create this branch?
Sign In Required
Please sign in to use Codespaces.
Launching GitHub Desktop
If nothing happens, download GitHub Desktop and try again.
Launching GitHub Desktop
If nothing happens, download GitHub Desktop and try again.
Launching Xcode
If nothing happens, download Xcode and try again.
Launching Visual Studio Code
Your codespace will open once ready.
There was a problem preparing your codespace, please try again.
Latest commit
Git stats
Files
Failed to load latest commit information.
README.md
A repo for the newest Realtek rtlwifi codes.
This branch was created from the version merged into the wireless-drivers-next repo, which is in the 5.16 kernel. IF YOU USE DRIVERS FROM THIS REPO FOR KERNELS 5.16+, YOU MUST BLACKLIST THE KERNEL VERSIONS. FAILING TO DO THIS WILL RESULT IN ALL MANNER OF STRANGE ERRORS.
This code will build on any kernel 5.7 and newer as long as the distro has not modified any of the kernel APIs. IF YOU RUN UBUNTU, YOU CAN BE ASSURED THAT THE APIs HAVE CHANGED. NO, I WILL NOT MODIFY THE SOURCE FOR YOU. YOU ARE ON YOUR OWN.
I am working on fixing builds on older kernels.
This repository includes drivers for the following card:
Realtek 8852AE, 8852BE, and 8853CE
If you are looking for a driver for chips such as RTL8188EE, RTL8192CE, RTL8192CU, RTL8192DE, RTL8192EE, RTL8192SE, RTL8723AE, RTL8723BE, or RTL8821AE, these should be provided by your kernel. If not, then you should go to the Backports Project (https://backports.wiki.kernel.org/index.php/Main_Page) to obtain the necessary code.
You will need to install «make», «gcc», «kernel headers», «kernel build essentials», and «git».
For Ubuntu: You can install them with the following command
sudo apt-get update sudo apt-get install make gcc linux-headers-$(uname -r) build-essential git For Fedora: You can install them with the following command
sudo dnf install kernel-headers kernel-devel sudo dnf group install "C Development Tools and Libraries" For openSUSE: Install necessary headers with
sudo zypper install make gcc kernel-devel kernel-default-devel git libopenssl-devel
For Arch: After installing the necessary kernel headers and base-devel,
git clone https://aur.archlinux.org/rtw89-dkms-git.git cd rtw89-dkms-git makepkg -sri If any of the packages above are not found check if your distro installs them like that.
git clone https://github.com/lwfinger/rtw89.git cd rtw89 make sudo make install Installation with module signing for SecureBoot
git clone https://github.com/lwfinger/rtw89.git cd rtw89 make sudo make sign-install You will be promted a password, please keep it in mind and use it in next steps. Reboot to activate the new installed module. In the MOK managerment screen:
- Select «Enroll key» and enroll the key created by above sign-install step
- When promted, enter the password you entered when create sign key.
- If you enter wrong password, your computer won’t not bebootable. In this case, use the BOOT menu from your BIOS, to boot into your OS then do below steps:
Restart your computer Use BOOT menu from BIOS to boot into your OS In the MOK managerment screen, select reset MOK list Reboot then retry from the step make sign-install
How to unload/reload a Kernel module
sudo modprobe -rv rtw_8852ae sudo modprobe -rv rtw_core #These two statements unload the module Due to the behavior of the modprobe utility, it takes both to unload. sudo modprobe -v rtw_8852ae #This loads the module A single modprobe call will reload the module.
Problem with recovery after sleep or hibernation
Some BIOSs have trouble changing power state from D3hot to D0. If you have this problem, then
sudo cp suspend_rtw89 /usr/lib/systemd/system-sleep/.
That script will unload the driver before sleep or hibernation, and reload it following resumption.
If it turns out that your system needs one of the configuration options, then do the following:
sudo nano /etc/modprobe.d/dev_name>.conf There, enter the line below:
options driver_name> <driver_option_name>>= The available options for rtw89pci are disable_clkreq, disable_aspm_l1, and disable_aspm_l1ss. The available options for rtw89core are debug_mask, and disable_ps_mode
Normally, none of these will be needed; however, if you are getting firmware errors, one or both of the disable_aspm_* options may help. Thay are needed when a buggy BIOS fails to implement the PCI specs correctly.
When your kernel changes, then you need to do the following:
cd ~/rtw89 git pull make clean make sudo make install ;or sudo make sign-install
Remember, this MUST be done whenever you get a new kernel — no exceptions.
These drivers will not build for kernels older than 5.4. If you must use an older kernel, submit a GitHub issue with a listing of the build errors. Without the errors, the issue will be ignored. I am not a mind reader.
When you have problems where the driver builds and loads correctly, but fails to work, a GitHub issue is NOT the best place to report it. I have no idea of the internal workings of any of the chips, and the Realtek engineers who do will not read these issues. To reach them, send E-mail to linux-wireless@vger.kernel.org. Include a detailed description of any messages in the kernel logs and any steps that you have taken to analyze or fix the problem. If your description is not complete, you are unlikely to get any satisfaction. One other thing — your mail MUST be plain test. HTML mail is rejected.
DKMS packaging for ubuntu/debian
DKMS on debian/ubuntu simplifies the secure-boot issues, signing is taken care of through the same mechanisms as nVidia and drivers. You won’t need special reboot and MOK registration.
Additionally DKMS ensures new kernel installations will automatically rebuild the driver, so you can accept normal kernel updates.
A few packages are required to build the debs from source:
sudo apt install dkms debhelper dh-modaliases
# If you've already built as above clean up your workspace or check one out specially (otherwise some temp files can end up in your package) git clean -xfd dpkg-buildpackage -us -uc sudo apt install ../rtw89-dkms_1.0.2-2_all.deb ../rtw89-firmware_1.0.2-2_all.deb That should install the package, and build the module for your currently active kernel. You should then be able to modprobe as above.
Missing firmware for RTW8852BE Thae necessary firmwar3e file should be in package firmware-realtek of linux-firmware-realtek; however some versions of some distros have been extremely slow to pick up this firmware file, even though it has been in the official linux-firmware repo at vger.kernel.org since Oct. 27, 2022. If your distro is one of these, you can download the firmware from https://lwfinger.com/download/rtw8852b_fw.bin, and copy it to /lib/firmware/rtw89/.
About
Driver for Realtek 8852AE, an 802.11ax device on Kali Linux
Как установить драйвер для W-Fi для карт с чипсетами RTL8812AU/RTL8821AU (Alfa AWUS036ACH, Alfa AWUS036AC)
Какой чипсет в Alfa AWUS036ACH и Alfa AWUS036AC
Чипсет RTL8812AU имеют следующие W-Fi адаптеры:
Они особенно полюбились тем, кто тестирует на безопасность Wi-Fi сети, поскольку это современные беспроводные адаптеры, которые могут переходить в режим монитора и выполнять беспроводные инъекции.
Различие между RTL8812AU и RTL8814AU чипсетами в способности поддерживать различное количество антенн. На RTL8812AU поддерживается до 2 антенн, а Realtek RTL8814AU поддерживает до 4 антенн. В некоторых случаях, в зависимости от дизайна схемотехники производителя устройства или прошивки, одна антенна может использоваться только для передачи, а другая только для приёма. Также некоторые устройства работают только в одном диапазоне по выбору, другие — в двух диапазонах одновременно. Это также нужно учитывать при покупке устройств.
Как установить драйвер rtl8812au в Kali Linux
Если вы купили двухдиапазонный (2.4GHz & 5.0GHz) адаптер с чипсетом RTL8812AU/21AU, вам нужно установить драйвер rtl8812au. В Kali Linux вы можете сделать это командой:
sudo apt install realtek-rtl88xxau-dkms
После установки перезагрузите вашу систему или отключите/подключите адаптер.
Как установить драйвер rtl8812au в Arch Linux, BlackArch
Начните с установки программы pikaur по статье «Автоматическая установка и обновление пакетов AUR». Программа pikaur — это аналог pacman, но для работы с AUR, она позволяет автоматически устанавливать и обновлять программы из AUR. Вы обязательно полюбите pikaur!
pikaur -S rtl88xxau-aircrack-dkms-git
Как установить драйвер rtl8812au в Debian, Linux Mint, Ubuntu
Для установки драйвера rtl8812au выполните следующие команды.
sudo apt update sudo apt install git build-essential libelf-dev linux-headers-`uname -r` debhelper dpkg-dev dkms bc
Скачайте исходный код драйвера:
git clone https://github.com/aircrack-ng/rtl8812au cd rtl*
Установите драйвер как модуль DKMS — это означает, что при обновлении ядра вам не придётся вручную перекомпилировать драйвер под новую версию ядра. Это автоматически будет делать модуль DKMS. Также обратите, что команда make не нужна, поскольку компиляцию выполнить модуль DKMS.
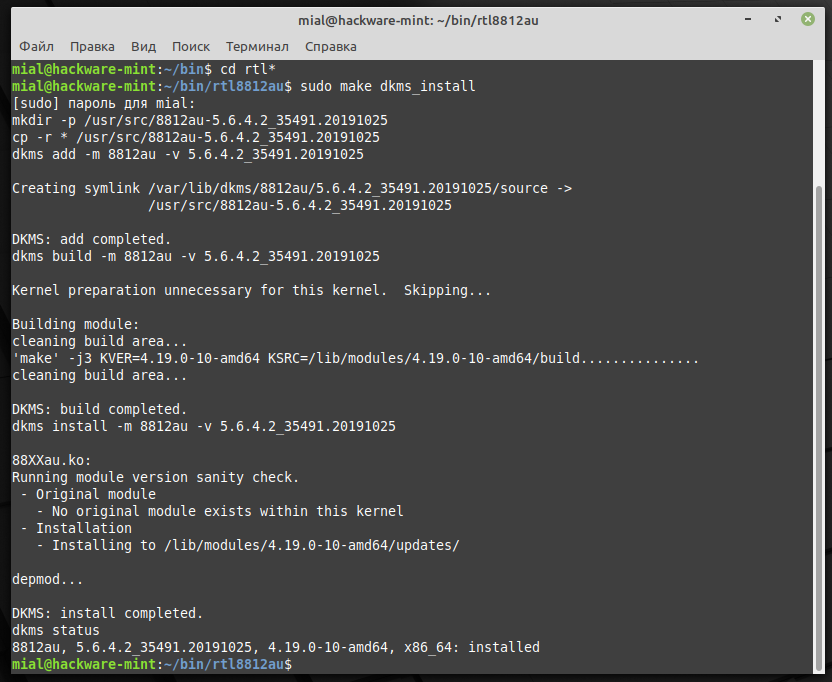
DKMS: install completed. dkms status 8812au, 5.6.4.2_35491.20191025, 4.19.0-10-amd64, x86_64: installed
DKMS сообщает, что установка завершена и что статус для 8814au «установлено».
Удаление драйвера
Чтобы удалить драйвер из вашей системы, откройте терминал в каталоге с исходным кодом и выполните следующую команду:
Как установить драйвер rtl8812au в For Raspberry (RPI)
sudo apt update sudo apt install raspberrypi-kernel-headers
Скачайте исходный код драйвера:
git clone https://github.com/aircrack-ng/rtl8812au cd rtl*
Необходимо внести изменения в файле Makefile для смены архитектуры процессора.
sed -i 's/CONFIG_PLATFORM_I386_PC = y/CONFIG_PLATFORM_I386_PC = n/g' Makefile sed -i 's/CONFIG_PLATFORM_ARM_RPI = n/CONFIG_PLATFORM_ARM_RPI = y/g' Makefile
Но для RPI 3B+ и 4B вам нужно будет запустить другие команды, которые приведены ниже, они собирают драйвер Arch ARM64:
sed -i 's/CONFIG_PLATFORM_I386_PC = y/CONFIG_PLATFORM_I386_PC = n/g' Makefile sed -i 's/CONFIG_PLATFORM_ARM64_RPI = n/CONFIG_PLATFORM_ARM64_RPI = y/g' Makefile
Кроме того, если вы получаете сообщение об ошибке о нераспознанном параметре командной строки «-mgeneral-regs-only» (например, Raspbian Buster), вам необходимо выполнить следующие команды:
sed -i 's/^dkms build/ARCH=arm dkms build/' Makefile sed -i 's/^MAKE="/MAKE="ARCH=arm\ /' dkms.conf
Установите драйвер как модуль DKMS — это означает, что при обновлении ядра вам не придётся вручную перекомпилировать драйвер под новую версию ядра. Это автоматически будет делать модуль DKMS. Также обратите, что команда make не нужна, поскольку компиляцию выполнить модуль DKMS.
Удаление драйвера
Чтобы удалить драйвер из вашей системы, откройте терминал в каталоге с исходным кодом и выполните следующую команду:
Настройка TX power в rtl88xxau
sudo iw wlan0 set txpower fixed 3000
Переключение между режимами USB в rtl88xxau
sudo rmmod 88XXau sudo modprobe 88XXau rtw_switch_usb_mode:ЧИСЛО
Где ЧИСЛО может быть:
- 0: не использовать переключение
- 1: переключение с usb2.0 на usb 3.0
- 2: переключение с usb3.0 на usb 2.0
Управление LED (светодиодом) в rtl88xxau
Можно контролировать LED статично, указав параметр модуля в /etc/modprobe.d/8812au.conf или в аналогичном файле, например так:
options 88XXau rtw_led_ctrl=0
Значения могут быть 0 или 1.
Также вы можете контролировать LED динамически, меняя значения в /proc/net/rtl8812au/$(ИМЯ ВАШЕГО ИНТЕРФЕЙСА)/led_ctrl, например:
sudo sh -c "echo "0" > /proc/net/rtl8812au/$(ИМЯ ВАШЕГО ИНТЕРФЕЙСА)/led_ctrl"
Значения могут быть 0 или 1.
Для проверки текущего значения:
cat /proc/net/rtl8812au/$(ИМЯ ВАШЕГО ИНТЕРФЕЙСА)/led_ctrl
NetworkManager
Более новые версии NetworkManager переключаются на случайный MAC-адрес. Некоторые пользователи предпочли бы использовать фиксированный MAC-адрес. Просто добавьте эти строки ниже в конце файла /etc/NetworkManager/NetworkManager.conf:
[device] wifi.scan-rand-mac-address=no
и перезапустите NetworkManager с помощью команды:
sudo systemctl restart NetworkManager
Как перевести Wi-Fi адаптер в режим монитора
Главное, что нужно уже усвоить, используйте команды «ip» и «iw» вместо «ifconfig» и «iwconfig» — это касается работы со всеми Wi-Fi адаптерами.
Подробности смотрите в статьях: