- How to Reset or Change the Root Password in Linux
- Changing Your Root Password in Ubuntu
- Step 1: Open a Terminal Window
- Step 2: Change Your Root Password
- Resetting a Root Password in Ubuntu
- Step 1: Boot to Recovery Mode
- Step 2: Drop Out to Root Shell
- Step 3: Remount the File System with Write-Permissions
- Step 4: Change the Password
- Changing the Root Password in CentOS
- Step 1: Access the Command Line (Terminal)
- Step 2: Change the Password
- Reset Root Password in CentOS
- Step 1: Access Boot Menu
- Step 2: Edit Boot Options
- Step 3: Remount the Drive
- Step 4: Changing the Password
- Step 5: Restart
- How to reset Ubuntu’s forgotten password
- Booting into Ubuntu recovery mode:
- Root shell prompt:
- Remount root filesystem with write access:
- Reset username or password:
- Possible Error:
- Alternate method for resetting the password:
- Step 1
- Step 2
- Step 3
- Step 4
- Conclusion:
- About the author
- Sidratul Muntaha
How to Reset or Change the Root Password in Linux
In Linux, root privileges (or root access) refers to a user account that has full access to all files, applications, and system functions.
Most basic Linux user accounts run with limited privileges. This keeps users from making mistakes or accidentally exposing the system to vulnerabilities.
To use protected operating system features, a Linux user has to temporarily elevate their privileges using a command like sudo . The sudo command tells the system to run a command as a superuser, or root user. When you run a function using sudo , you’ll usually have to enter your password.
Some versions of Linux will elevate your user privileges for a set amount of time around (15 minutes) before reverting. Other versions only perform a single task with elevated privileges.
It’s a good idea to change your passwords regularly and consider using enterprise password management software.
This guide will help you change your Linux root password in Ubuntu or CentOS, or reset the password.
Changing Your Root Password in Ubuntu
Step 1: Open a Terminal Window
Right-click the desktop, then left-click Open in terminal.
Alternately, you can click Menu > Applications > Accessories > Terminal.
Step 2: Change Your Root Password
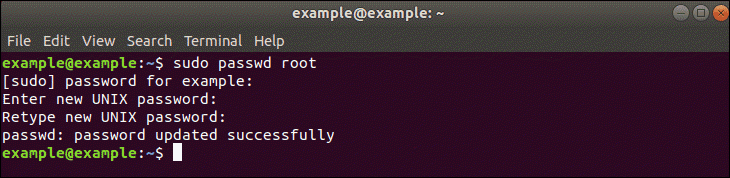
In the terminal window, type the following:
The system will prompt you to enter your password – this is the same password you use to log in to the system.
Next, the system will prompt you to enter a new password. Do so, and then re-enter it exactly the same when the system prompts you to retype the password. This double-entry confirms that you have typed the password correctly.
Resetting a Root Password in Ubuntu
In some situations, you may need to access an account for which you’ve lost or forgotten a password.
Step 1: Boot to Recovery Mode
Restart your system. Once you see the splash screen for the computer manufacturer, hold down the shift key. The system should come up with a black and white GRUB, or boot menu, with different Linux kernel versions displayed.
Select the second one from the top – the highest revision, followed by (recovery mode). Press Enter.
Step 2: Drop Out to Root Shell
The system should display a menu with different boot options. Use the arrow keys to navigate to the option labeled root and press Enter.
The system should respond by giving you a command-line interface with a prompt.
Step 3: Remount the File System with Write-Permissions
Right now, your system only has read-only access to your system. That means it can look at the data, but cannot make any changes. But we need write-access to change the password, so we’ll need to remount the drive with the appropriate permissions.
Press Enter. This should allow you to make changes to the data on the hard drive.
Step 4: Change the Password
Substitute the name of the user for username, then press Enter. The system asks you to type a new UNIX password and then to retype it.
Once you’ve entered and confirmed the new password, reboot the system by entering the following:
Hit Enter, and your system should restart. Don’t press any keys, let the system come up to the login screen, and test to make sure the new password works.
Note: Learn how to use the chpasswd command. Chpasswd is helpful for managing multiple passwords and making multiple changes.
Changing the Root Password in CentOS
Changing a password in CentOS is almost identical to changing it in Ubuntu.
Step 1: Access the Command Line (Terminal)
Right-click the desktop, then left-click Open in Terminal. Or, click Menu > Applications > Utilities > Terminal.
Step 2: Change the Password
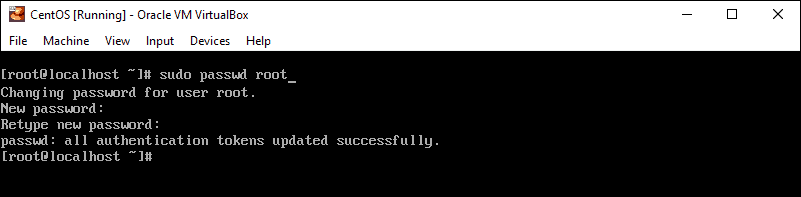
At the prompt, type the following, then press Enter:
The system should prompt you to enter your existing password. Do so, then follow the prompts to enter and confirm a new root password.
Reset Root Password in CentOS
This is a similar process as in Ubuntu, with a couple of variations.
Step 1: Access Boot Menu
Restart the system, then tap the Esc key about once per second to launch the GRUB menu.
Step 2: Edit Boot Options
Use the arrows to highlight the version of Linux you boot into, then press e.
Use the arrows to highlight the line that starts with kernel or Linux.
At the end of the line, add a space then type single. Press Enter, then boot into single-user mode by pressing Ctrl-X or B. (The system will display the command to use.)
Step 3: Remount the Drive
You should have a command line, and you’ll have root privileges. To enable read/write access on your hard drive, type the following:
Step 4: Changing the Password
Press Enter, and the system should prompt you to enter and confirm a new password.
Step 5: Restart
Type the following, pressing enter after each line:
Your system should restart. Confirm that your new password works by logging in.
Note: If you ever come across a Linux boot failure, be sure to save our guide on using GRUB rescue to troubleshoot it.
If you already have access to your user account, resetting or changing your password in Linux is simple.
It can be more challenging if you’ve lost or forgotten a password, but with a little creative restarting and editing, you shouldn’t find it too hard.
Sofija Simic is an experienced Technical Writer. Alongside her educational background in teaching and writing, she has had a lifelong passion for information technology. She is committed to unscrambling confusing IT concepts and streamlining intricate software installations.
In Linux, special tools were developed for managing applications. Application software for Linux typically.
The find command is a useful command-line tool in Linux. It allows you to use the terminal to search for a .
There’s a reason that tech support asks you if you’ve rebooted your Linux server. It’s cliched but true.
This guide is for users who have already configured a CentOS server and installed the Apache HTTP services.
How to reset Ubuntu’s forgotten password
![]()
If you’ve ever lost your password, you’re not the only one. It’s definitely one of the most popular issues with tech support that people have throughout the years. The good thing is that, due to a forgotten password, you do not have to reinstall the whole operating system. In Ubuntu, they have made it extremely easy to restore your password. In VMware, single or dual boot, the methods listed here work to restore the Ubuntu password, and you’ll be able to restore your login credentials within minutes.
Let’s start by demonstrating Ubuntu Password Reset from Recovery Mode.
Booting into Ubuntu recovery mode:
Turn on your computer system and go to the grub menu. Mostly it appears immediately, but if that doesn’t happen, press escape or hold the shift key down until it appears. While working on VM-ware or VirtualBox, when the Oracle or VM-ware logo appears, you have to press the shift key. GRUB menu will be prompted to your screen, here select “Advance Options for Ubuntu“.
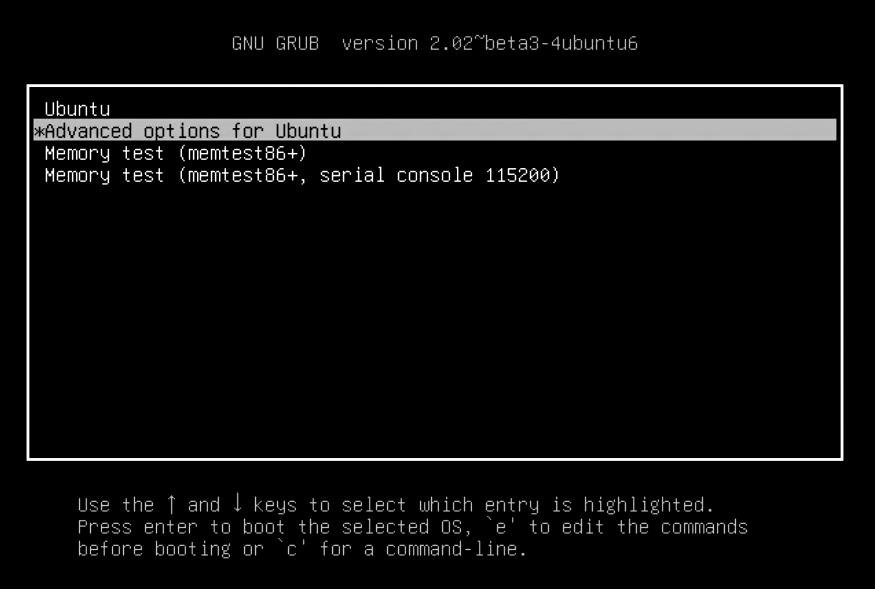
Now an option will be displayed, select it to go to the recovery mode:

You will see a black screen with a flash showing multiple lines of data. Here, wait for some time.
Root shell prompt:
You will be provided with numerous recovery mode options here. Select the one named “Root – Drop to Root Shell Prompt” from the given options. Press enter, and you’re all set.
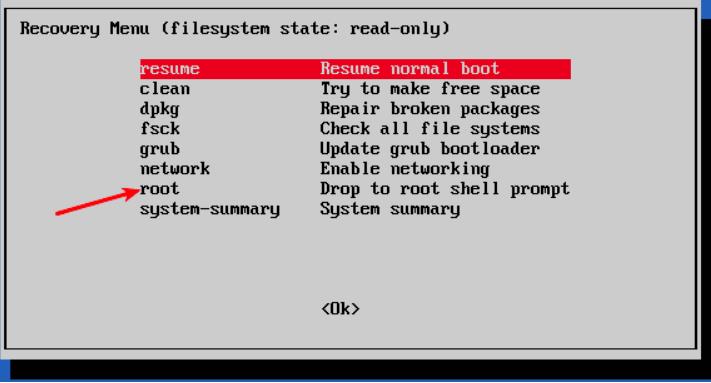
You’ll see that there is an option to enter commands at the bottom when you choose the root shell prompt option. This is the prompt for your shell, and here you will be doing some magic to restore your forgotten password.
Remount root filesystem with write access:
By default, the root partition has given read-only privileges. But here you have to provide root and write access too. To remount it with write permission, use the following command:
Reset username or password:
List the available users using the following command once you will be provided with the root access :
Or you can see the available users by displaying the contents of /etc/passwd file using the following command:
From the usernames accessible, select the one for which you’d prefer to reset the password. Now, reset the password for the chosen username by typing the following command:
It will ask you for a new password. Type the new password once and then again to confirm it:
You have restored your password successfully. Enter the Exit command for exiting the root shell.
On entering exit command, we will prompt back to the Recover Boot menu. Now, choose the standard boot option on the screen. There will be an alert about compatibility with the graphics mode. You don’t have to worry about it. A reboot will solve all these compatibility issues. Now we just have to log in with the password we just have set.
Possible Error:
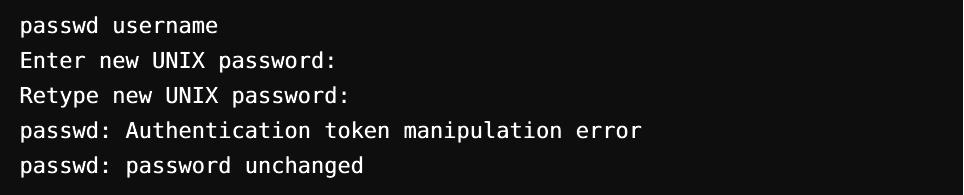
The cause for this error is that it is still mounted with Read-Only access. To overcome this, just type the command for remounting the file system and modify the access.

Alternate method for resetting the password:
If you have trouble changing the password via root shell for some reason, you should follow these steps:
Step 1
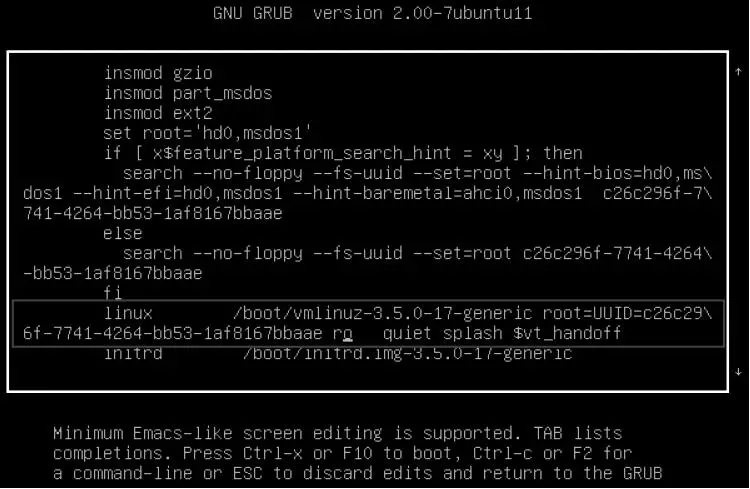
Get the computer rebooted. To bring up the grub screen, hold the shift key for some time. To edit the Grub panel, click E.
Step 2
From the given set of lines, find any line starting with “Linux” using the up and down arrow keys and change access from read-only to read-write by just replacing ro recovery nomodeset to rw init=/bin/bash.
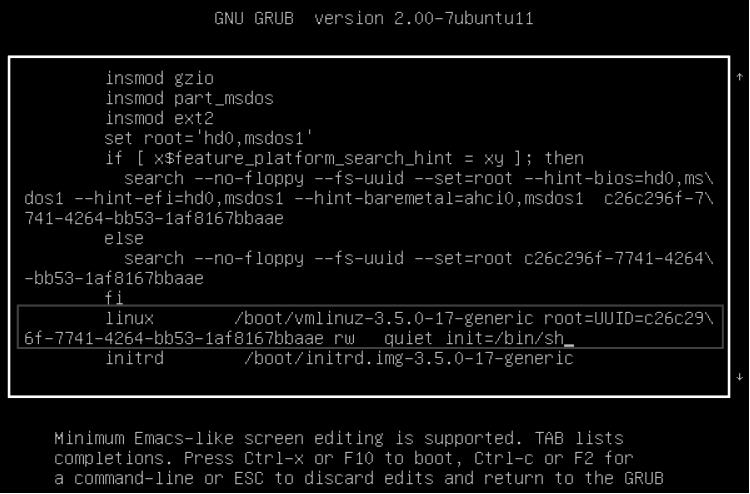
Step 3
To save the changes and to boot, press ctrl-x. You are now booting with both read and write access into a Linux kernel, here you can use the bash shell instead of GUI. In other words, a passwordless root shell will boot into your system.
Step 4
Type your username into the passwd command. If the username is unknown, search with the ‘ls /home’ or ‘cat /etc/passwd | grep -i bash’ command. Now reset the password and then exit the terminal. After it’s done, reboot using the following commands and you are good to go.
ubuntu@ubuntu:~$ shutdown -r now
Conclusion:
Ubuntu’s root account will be locked as it does not have a root password by default. A user account you set up before installing Ubuntu is included as an administrator with sudo privileges. Yet, in any capacity, it doesn’t imply that you are root. This absence of a root password is an intended feature of Ubuntu. “The boot menu for “Ubuntu Advanced Options” allows you to perform certain root-related functions from the “root shell prompt.” This is why you can reset the Ubuntu password from this method.
Question is If it’s this quick and easy to restore Ubuntu passwords, isn’t this a security risk? The major security threat is if someone breaks into your account from a different location through the internet. It’s not occurring here. In case that some malicious entity has physical access to your computer system, its security is already at extreme risk. Well, if you want not to have this feature, you can disable it by encrypting your Hard Drive via LUKS encryption while installing Ubuntu.
About the author
Sidratul Muntaha
Student of CSE. I love Linux and playing with tech and gadgets. I use both Ubuntu and Linux Mint.