- How to boot Ubuntu Core in recovery mode
- What you’ll learn
- What you’ll need
- 2. Understanding Recovery Mode
- Run mode
- Recovery mode
- Reinstall mode
- 3. Using recovery hidden boot menu
- Accessing recovery hidden boot menu
- 4. Using console
- SSH in
- Listing recovery points
- Recovery mode from console
- 5. Using Recovery mode
- 6. Wrapping up
- Further reading
- Using recovery modes
- System mode selection menu
- Recovery modes from snap reboot
- Using recovery keys
- How to Boot Ubuntu into Recovery Mode
- How to Boot Ubuntu into Recovery Mode
- Resume:
- Clean:
- Dpkg:
- Fsck:
- Grub:
- Network:
- Root:
- Conclusion:
- About the author
- Syeda Wardah Batool
How to boot Ubuntu Core in recovery mode
In this tutorial we cover device recovery fundamentals on Ubuntu Core and show you how to use the different recovery modes offered by Ubuntu Core for restoring a device to a safe system.
Bear in mind, Ubuntu Core is production-friendly, not necessarily developer-friendly. We recommend you use Ubuntu Core for “fire and forget” purposes where you won’t want to iterate on the software.
With Ubuntu Core, you are able to execute remote updates and patches for your appliances and devices, but for development and prototyping, we recommend Ubuntu Server. Let’s start!
What you’ll learn
What you’ll need
- A device with an installed and configured Ubuntu Core image
- A monitor with HDMI interface
- An HDMI cable
- A keyboard
2. Understanding Recovery Mode
Ubuntu Core 20 is inherently robust. But if data-corruption issues do occur, either on boot or on data partitions, Ubuntu Core can still access recovery mode to help repair, restore or reinstall on an impaired device.
The following booting modes are currently available on boot:
- Run mode: Normal boot mode
- Recovery mode: reboot into recovery mode for maintenance or repairing the system
- Reinstall mode: initialise the device from an onboard system image
These functions can be used with any of the following methods:
- Recovery hidden menu on boot
- Snap reboot command from console
- Snapd REST API
After a clean Ubuntu Core installation, a first recovery system is created so that it is possible to recreate a clean factory system at any time with the Reinstall mode.
Run mode
When booting in run mode, the device attempts to boot normally, with no option to recover or reinstall the system.
Recovery mode
In recovery mode, the device boots to a temporary system and operates as it would from a pristine initial installation, including its snaps. This allows you to log in to the system using prior credentials to recover your data, either via SSH or locally after setting up a password for the user.
Modifications done to the system during recovery mode are temporary and are lost once the device is rebooted.
Reinstall mode
In reinstall mode, all existing user data on the device is removed and the device is initialised from the recovery system image.
The full process of installation and configuration is followed in a similar way to a first boot after Ubuntu Core installation.
3. Using recovery hidden boot menu
Accessing recovery hidden boot menu
If you prefer to recover the system when booting or if the system is no longer accessible via the network, you can use the recovery hidden menu:
- Start or reboot the device with the ‘1’ key held on a connected keyboard. In some systems or with some keyboards it is necessary to press the key repeatedly.
- After the initial boot process completes, a status screen appears to show “System mode selection triggered. Proceed to select one of the available systems and actions.”. Press OK.


If “Run normally” has been selected, the system boots in run mode.
If “Recover” has been selected, the system boots in recovery mode.
If “Reinstall” has been selected, the system boots in reinstall mode.
4. Using console
SSH in
First you have to log into your device using SSH. Run the ssh command which will be something like:
And you should be welcome to Ubuntu Core:

Listing recovery points
Once you are in the device console, you can check the list of recovery systems that can be used for recovering.
Which should show a list of labels like this

Recovery mode from console
The snap reboot command allows you to boot in the different booting modes (run, recovery, install) from the console. The procedure is as simple as just typing the following command:
sudo snap reboot --recover 20210112 The system shows a message on the console indicating that it is going to reboot with the system indicated in the label.
This process takes some time. The device will be accessible via SSH but the snaps take some time to install and update.
You can check by running the command “snap list” until the full list of packages is up to date.

5. Using Recovery mode
Once the system has booted in recovery mode, you can access via SSH with your prior credentials, and have a clean system where the desired maintenance action can be performed.
For exiting recovery mode, you can use any of the following options:
Either method returns the system to run mode, and all changes done to the temporary system are lost.
Alternatively, if a normal reboot is done with the command sudo reboot , the system eventually stops on the next boot showing the ‘Recovery chooser’ menu, so this method is not recommended.
6. Wrapping up
Ubuntu Core offers the ability to repair, recover or reinstall the system, should any corruption happen to the device. Recovery modes described in this tutorial guarantee that the system can always be restored to a safe or known state.
Further reading
Using recovery modes
Ubuntu Core is inherently robust. But if data corruption issues do occur, even on boot or data partitions, it can still access a recovery mode to help repair, restore or reinstall an impaired device.
These recovery modes can be accessed in three different ways:
- Boot into the system mode selection menu
Start or reboot the device with the ‘1’ key held on a connected keyboard - Snap reboot
Run snap reboot on the device with either —recover or —install arguments. - Snapd REST API
Use the REST API to call either the recover , install , factory-reset or reboot functions.
Recovery modes are only available on Ubuntu Core 20 and Ubuntu Core 22
Device manufacturers may choose to implement alternative methods to access recovery functionality. These will be specific to those devices.
See Recovery modes for more details on each supported recovery mode, what they do, and how they can be used.
System mode selection menu
To access the system mode selection menu, start or reboot the device with the ‘1’ key held on a connected keyboard. If the chooser fails to launch, try pressing 1 repeatedly from boot. It needs to be captured by Ubuntu Core boot process.
After the initial boot process completes, a status screen will appear showing “System mode selection triggered. Proceed to select one of the available systems and actions.”

The menu system requires that you tab or cursor to highlight your chosen option. Ensure ‘OK’ is highlighted and press Enter to continue, after which you’ll be presented first with the recovery chooser and the option to either run normally, enter recovering mode, or reinstall.
Selecting an option followed by ‘Confirm’ will reboot the device into the selected mode (see below).
Recovery modes from snap reboot
Alongside using sudo snap reboot to reboot the system, the following arguments can be added to select a recovery mode with or without an additional system label for the target system:
The recover and run modes are only available for the current system.
When called without a system label, reboot will use the current system to enter the given mode. System labels are listed with the snap recovery command:
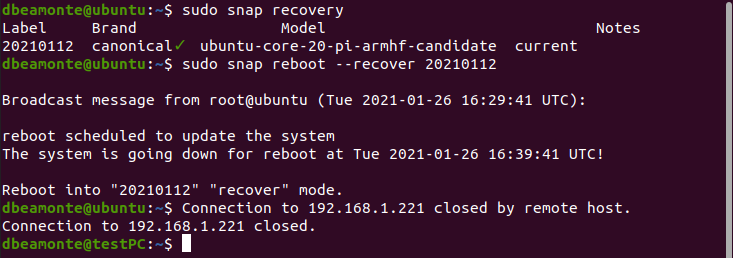
$ sudo snap recovery Label Brand Model Notes 20201117 ubuntu-core-20-amd64 current To reboot the above system into recover mode, for example, enter the following:
$ sudo snap reboot --recover 20201117 Broadcast message from root@ubuntu (Wed 2020-11-25 13:15:51 UTC): reboot scheduled to update the system The system is going down for reboot at Wed 2020-11-25 13:25:51 UTC! Reboot into "20201117" "recover" mode. Using recovery keys
When using Full Disk Encryption, a device’s Trusted Platform Module (TPM) stores the encryption keys necessary to decrypt and boot the device.
These keys can be retrieved with the snap recovery —show-keys command:
$ sudo snap recovery --show-keys recovery: 55055-39320-64491-48436-47667-15525-36879-32875 If a TPM becomes reinitialised or reconfigured, the TPM-stored keys will be lost and Ubuntu Core will not be able to decrypt and boot the device.
During boot, Ubuntu Core will instead ask for the recovery key for specific encrypted partitions. The same keys recovered with snap recovery —show-keys can then be entered to restore the device:
🔐 Please enter the recovery key for disk /dev/disk/by-partuuid/c7f7971b: (press TAB for no echo) After entering a valid key, Ubuntu Core will decrypt the device, proceed with the boot, and restore the TPM from the recovered key. The recovery keys will remain the same and do not need to be retrieved again.
How to Boot Ubuntu into Recovery Mode
![]()
Every device comes up with the “Recovery Mode” feature which has the capability to perform different operations. These operations include cleaning the junk data, update installation, data restoration, back up or device reset.
Similarly, in Linux distributions, we also have the accessibility of the “Recovery Mode” feature. It allows the user to reboot the system and get it with a new setup.
We may need “recovery mode” at any time in the system. There could be many possibilities, i.e when the system slows down, it fails to start up for any reason, or if you find any glitches, then it means your system needs to recover. You can also recover broken files and test if the memory is working correctly or not.
How to Boot Ubuntu into Recovery Mode
To get the recovery mode option, you need to access the Grub boot-loader. Reboot the system to have the Grub menu.
For this, you can either restart the Ubuntu machine or use the following command in the terminal:

After typing the password, the system will restart. To get the Grub menu, press the “Esc” button quickly; when BIOS loading has finished, a Grub menu window will come with few options as shown in the image below:

From the menu, select the “Advanced options for Ubuntu” by using the down arrow key and press “Enter”.

After selecting, you will get the sub-menu window of the “Advanced options for Ubuntu” entry.
Use the down arrow key to navigate towards “Ubuntu, with Linux 5.8.0-50-generic (recovery mode)” and hit Enter.
This recovery mode allows the user to convert the boot system into recovery mode to resolve quickly.
In the Recovery mode, you will find multiple options. Select according to the issue you are facing:
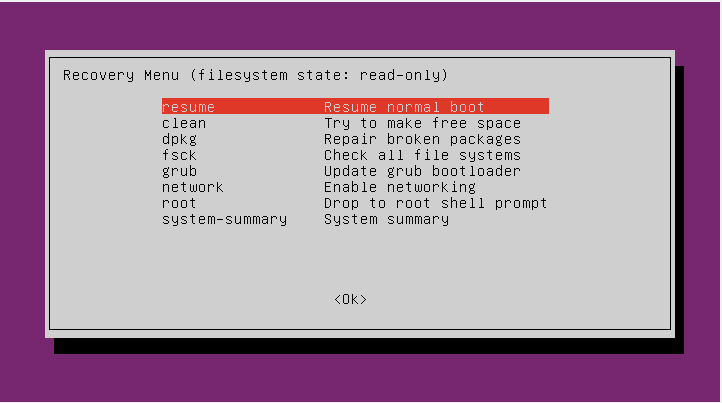
Let’s define each of the option that might help you to select.
Resume:
The resume option will end the recovery mode and allow the system to boot again.
Clean:
The clean option will help you to free up space from the system. If the system’s storage is about to end, it will help to get free space.
Dpkg:
Select the “dpkg” category if the package you installed fails and won’t allow the system to work properly. Moreover, if you have broken packages in the system, the “dpkg” option will help resolve this.
Fsck:
The “fsck” option is used for the configuration of graphics drivers, or if your hard drive is corrupted, it might help.
Grub:
Use the “grub” option to update the Grub boot loader. It will scan the system and upgrade the Grub boot loader automatically.
Network:
The “network” option helps to enable networking which is disabled by default in the system.
Root:
Sometimes, the system fails to boot due to some errors. For this purpose, “root” entry is used; it allows the system to open write mode and resolve the issues using commands.
If all the above options are not resolving the errors, there would be some significant complications with your operating system. In this case, the best chance to restore the system is to reinstall it.
Conclusion:
We have learned how to use the “Recovery Mode” feature to resolve Ubuntu machine errors. You can get recovery mode by restarting the machine and pressing the “Esc” key repeatedly.
The Grub boot-loader menu has multiple choices and can be selected according to need. Follow the guide carefully to get the “recovery mode” menu list. There are several options, i.e., clean, dbkg, fsck, network, grub, and root. We can fix most of the issues using these options.
About the author
Syeda Wardah Batool
I am a Software Engineer Graduate and Self Motivated Linux writer. I also love to read latest Linux books. Moreover, in my free time, i love to read books on Personal development.