- 4.20. Настройка сети
- Chapter 3. Configuring and managing network access
- 3.1. Configuring the network and host name in the graphical installation mode
- 3.2. Configuring an Ethernet connection with a static IP address by using nmcli
- 3.3. Configuring an Ethernet connection with a dynamic IP address by using nmtui
- 3.4. Configuring an Ethernet connection with a static IP address by using nmtui
- 3.5. Managing networking in the RHEL web console
- 3.6. Managing networking using RHEL System Roles
4.20. Настройка сети
If you do not have a network device, this screen does not appear during your installation and you should advance to Раздел 4.21, «Настройка часового пояса».
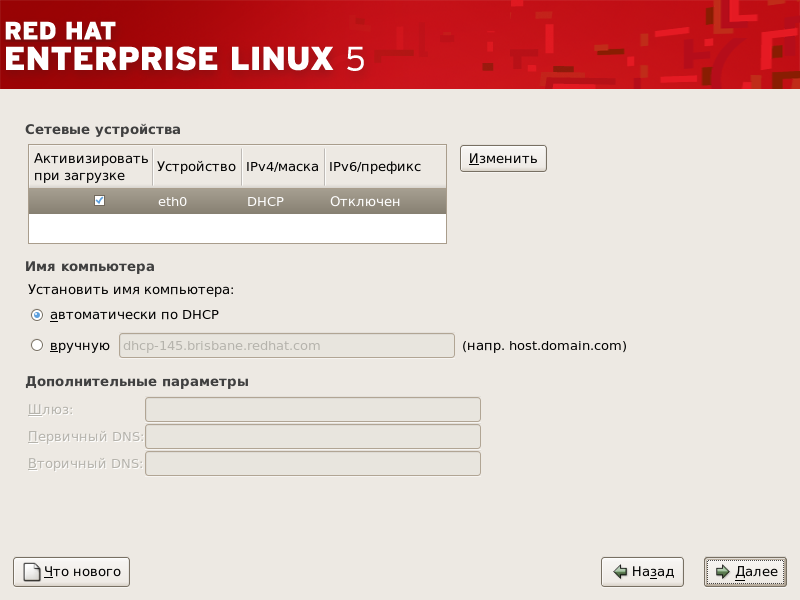
Рисунок 4.19. Настройка сети
Программа установки автоматически определяет все присутствующие сетевые платы и отображает их в списке Сетевые устройства .
Выбрав сетевую плату, нажмите кнопку Изменить . Во всплывающем диалоге Правка интерфейса вы можете определить, будет ли IP адрес и маска сети назначаться через DHCP или вручную (если DHCP не используется), и будет ли устройство запущено при загрузке системы. Если вы установите флажок Активизировать при загрузке , сетевой интерфейс будет запущен при старте системы. Если вы не можете получить DHCP настройки или не уверены, какие значения параметров использовать, обратитесь к вашему сетевому администратору.
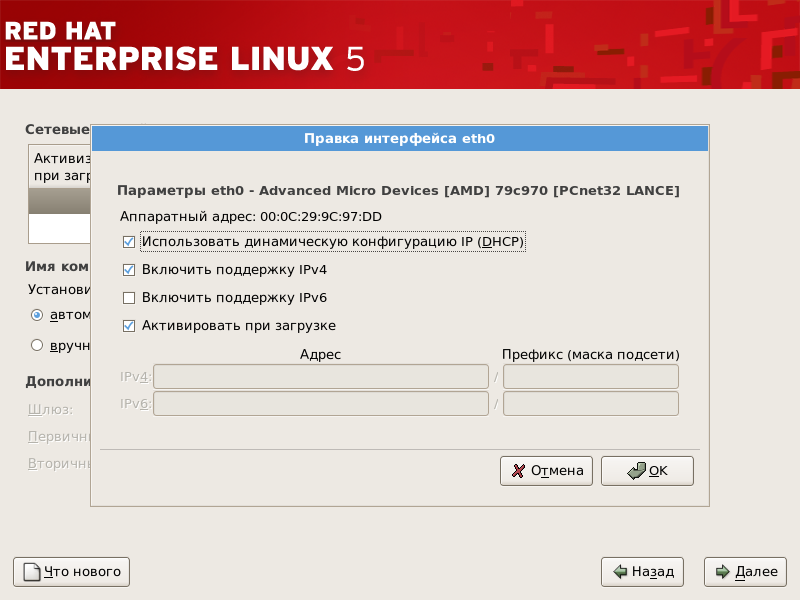
Рисунок 4.20. Модификация сетевого устройства
Не используйте числа, приведенные в этом примере. Эти значения могут не соответствовать вашей сетевой конфигурации. Если вы не знаете, какие значения вводить, обратитесь за помощью к вашему сетевому администратору.
Если вы знаете полностью определенное доменное имя сетевого устройства, вы можете задать его автоматическое определение через DHCP (Dynamic Host Configuration Protocol) или указать напрямую в поле имени узла.
И наконец, если вы ввели IP адрес и маску сети вручную, вы также можете заполнить адрес шлюза и адреса трех DNS-серверов (первичного, вторичного и третичного).
Даже если ваш компьютер не является частью сети, вы сможете задать в своей системе имя узла. Если вы не воспользуетесь этой возможностью, ваша система будет иметь имя localhost .
Чтобы изменить параметры сети после завершения установки, воспользуйтесь утилитой настройки сети .
Выполните в приглашении оболочки команду system-config-network для запуска утилиты настройки сети . Если вы не являетесь пользователем root, для продолжения будет предложено ввести пароль root.
Chapter 3. Configuring and managing network access
This section describes different options on how to add Ethernet connections in Red Hat Enterprise Linux.
3.1. Configuring the network and host name in the graphical installation mode
Follow the steps in this procedure to configure your network and host name.
- From the Installation Summary window, click Network and Host Name .
- From the list in the left-hand pane, select an interface. The details are displayed in the right-hand pane.
- There are several types of network device naming standards used to identify network devices with persistent names, for example, em1 and wl3sp0 . For information about these standards, see the Configuring and managing networking document.
The installation program automatically detects locally accessible interfaces, and you cannot add or remove them manually.
- The host name can either be a fully qualified domain name (FQDN) in the format hostname.domainname , or a short host name without the domain. Many networks have a Dynamic Host Configuration Protocol (DHCP) service that automatically supplies connected systems with a domain name. To allow the DHCP service to assign the domain name to this system, specify only the short host name.
- When using static IP and host name configuration, it depends on the planned system use case whether to use a short name or FQDN. Red Hat Identity Management configures FQDN during provisioning but some 3rd party software products may require short name. In either case, to ensure availability of both forms in all situations, add an entry for the host in /etc/hosts` in the format IP FQDN short-alias .
- The value localhost means that no specific static host name for the target system is configured, and the actual host name of the installed system is configured during the processing of the network configuration, for example, by NetworkManager using DHCP or DNS.
- Host names can only contain alphanumeric characters and — or . . Host name should be equal to or less than 64 characters. Host names cannot start or end with — and . . To be compliant with DNS, each part of a FQDN should be equal to or less than 63 characters and the FQDN total length, including dots, should not exceed 255 characters.
Additional resources
3.2. Configuring an Ethernet connection with a static IP address by using nmcli
To configure an Ethernet connection on the command line, use the nmcli utility.
For example, the procedure below creates a NetworkManager connection profile for the enp7s0 device with the following settings:
- A static IPv4 address — 192.0.2.1 with a /24 subnet mask
- A static IPv6 address — 2001:db8:1::1 with a /64 subnet mask
- An IPv4 default gateway — 192.0.2.254
- An IPv6 default gateway — 2001:db8:1::fffe
- An IPv4 DNS server — 192.0.2.200
- An IPv6 DNS server — 2001:db8:1::ffbb
- A DNS search domain — example.com
Prerequisites
- Add a new NetworkManager connection profile for the Ethernet connection:
# nmcli connection add con-name Example-Connection ifname enp7s0 type ethernet # nmcli connection modify Example-Connection ipv4.addresses 192.0.2.1/24 # nmcli connection modify Example-Connection ipv6.addresses 2001:db8:1::1/64 # nmcli connection modify Example-Connection ipv4.method manual # nmcli connection modify Example-Connection ipv6.method manual
# nmcli connection modify Example-Connection ipv4.gateway 192.0.2.254 # nmcli connection modify Example-Connection ipv6.gateway 2001:db8:1::fffe
# nmcli connection modify Example-Connection ipv4.dns "192.0.2.200" # nmcli connection modify Example-Connection ipv6.dns "2001:db8:1::ffbb"
# nmcli connection modify Example-Connection ipv4.dns-search example.com # nmcli connection modify Example-Connection ipv6.dns-search example.com
# nmcli connection up Example-Connection Connection successfully activated (D-Bus active path: /org/freedesktop/NetworkManager/ActiveConnection/13)
Verification
- Display the status of the devices and connections:
# nmcli device status DEVICE TYPE STATE CONNECTION enp7s0 ethernet connected Example-Connection
# ping host_name_or_IP_address Troubleshooting
- Verify that the network cable is plugged-in to the host and a switch.
- Check whether the link failure exists only on this host or also on other hosts connected to the same switch.
- Verify that the network cable and the network interface are working as expected. Perform hardware diagnosis steps and replace defect cables and network interface cards.
- If the configuration on the disk does not match the configuration on the device, starting or restarting NetworkManager creates an in-memory connection that reflects the configuration of the device. For further details and how to avoid this problem, see NetworkManager duplicates a connection after restart of NetworkManager service.
Additional resources
3.3. Configuring an Ethernet connection with a dynamic IP address by using nmtui
The nmtui application provides a text-based user interface for NetworkManager. You can use nmtui to configure an Ethernet connection with a dynamic IP address on a host without a graphical interface.
- Navigate by using the cursor keys.
- Press a button by selecting it and hitting Enter .
- Select and deselect checkboxes by using Space .
Prerequisites
- A physical or virtual Ethernet device exists in the server’s configuration.
- A DHCP server is available in the network.
- If you do not know the network device name you want to use in the connection, display the available devices:
# nmcli device status DEVICE TYPE STATE CONNECTION enp7s0 ethernet unavailable -- .
Verification
- Display the status of the devices and connections:
# nmcli device status DEVICE TYPE STATE CONNECTION enp7s0 ethernet connected Example-Connection
# ping host_name_or_IP_address Troubleshooting
- Verify that the network cable is plugged-in to the host and a switch.
- Check whether the link failure exists only on this host or also on other hosts connected to the same switch.
- Verify that the network cable and the network interface are working as expected. Perform hardware diagnosis steps and replace defect cables and network interface cards.
- If the configuration on the disk does not match the configuration on the device, starting or restarting NetworkManager creates an in-memory connection that reflects the configuration of the device. For further details and how to avoid this problem, see NetworkManager duplicates a connection after restart of NetworkManager service.
Additional resources
3.4. Configuring an Ethernet connection with a static IP address by using nmtui
The nmtui application provides a text-based user interface for NetworkManager. You can use nmtui to configure an Ethernet connection with a static IP address on a host without a graphical interface.
- Navigate by using the cursor keys.
- Press a button by selecting it and hitting Enter .
- Select and deselect checkboxes by using Space .
Prerequisites
- If you do not know the network device name you want to use in the connection, display the available devices:
# nmcli device status DEVICE TYPE STATE CONNECTION enp7s0 ethernet unavailable -- .
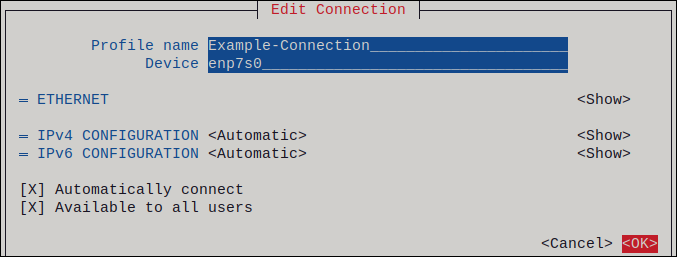
- Press the Automatic button, and select Manual from the displayed list.
- Press the Show button next to the protocol you want to configure to display additional fields.
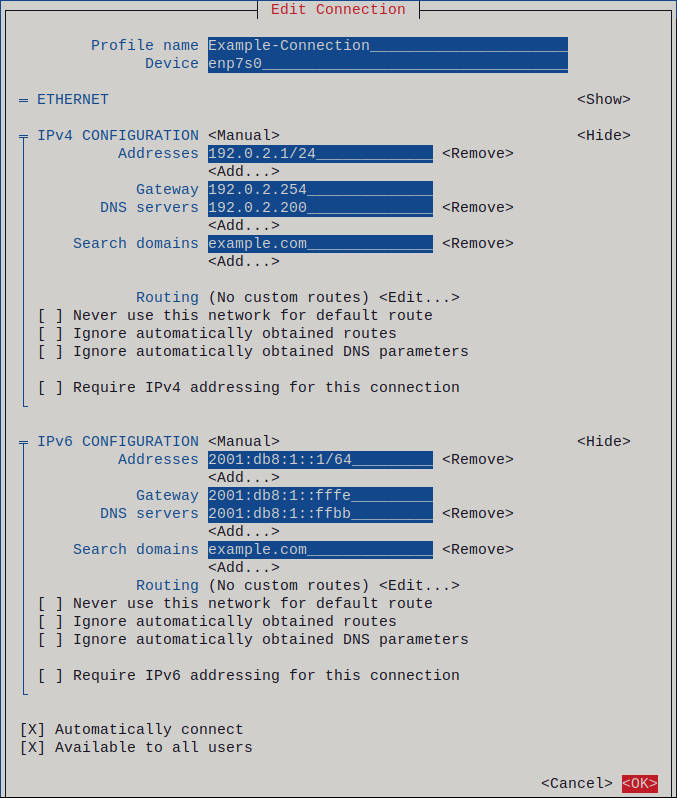
- Press the Add button next to Addresses , and enter the IP address and the subnet mask in Classless Inter-Domain Routing (CIDR) format. If you do not specify a subnet mask, NetworkManager sets a /32 subnet mask for IPv4 addresses and /64 for IPv6 addresses.
- Enter the address of the default gateway.
- Press the Add button next to DNS servers , and enter the DNS server address.
- Press the Add button next to Search domains , and enter the DNS search domain.
Figure 3.1. Example of an Ethernet connection with static IP address settings
Verification
- Display the status of the devices and connections:
# nmcli device status DEVICE TYPE STATE CONNECTION enp7s0 ethernet connected Example-Connection
# ping host_name_or_IP_address Troubleshooting
- Verify that the network cable is plugged-in to the host and a switch.
- Check whether the link failure exists only on this host or also on other hosts connected to the same switch.
- Verify that the network cable and the network interface are working as expected. Perform hardware diagnosis steps and replace defect cables and network interface cards.
- If the configuration on the disk does not match the configuration on the device, starting or restarting NetworkManager creates an in-memory connection that reflects the configuration of the device. For further details and how to avoid this problem, see NetworkManager duplicates a connection after restart of NetworkManager service.
Additional resources
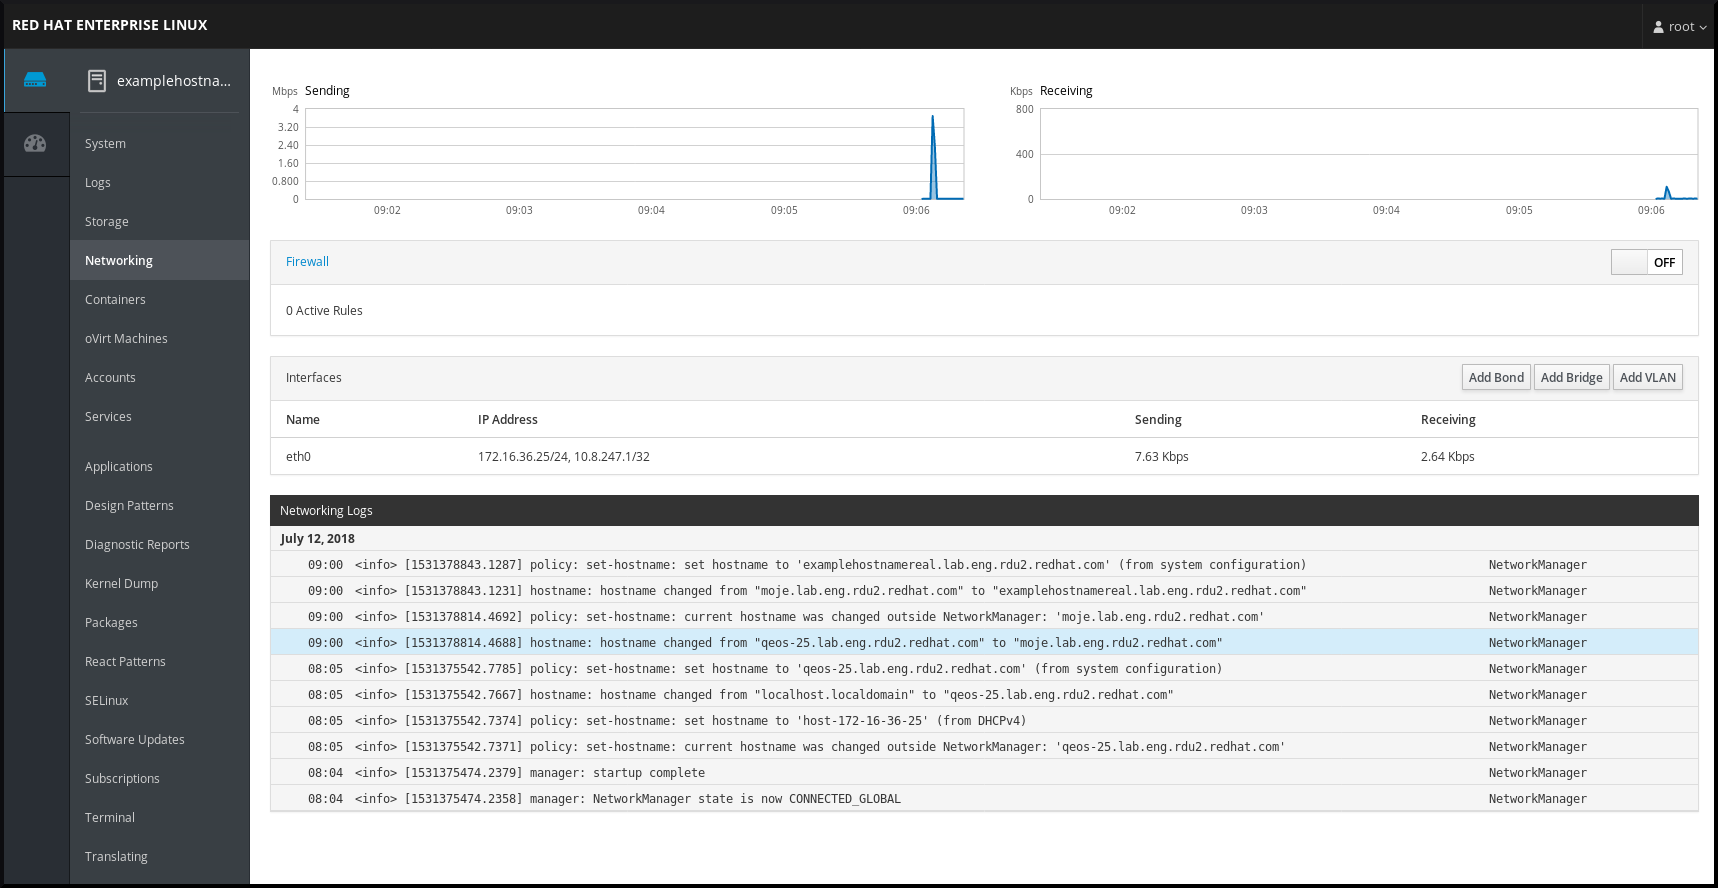
3.5. Managing networking in the RHEL web console
In the web console, the Networking menu enables you:
- To display currently received and sent packets
- To display the most important characteristics of available network interfaces
- To display content of the networking logs.
- To add various types of network interfaces (bond, team, bridge, VLAN)
Figure 3.2. Managing Networking in the RHEL web console
3.6. Managing networking using RHEL System Roles
You can configure the networking connections on multiple target machines using the network role.
The network role allows to configure the following types of interfaces:
The required networking connections for each host are provided as a list within the network_connections variable.
The network role updates or creates all connection profiles on the target system exactly as specified in the network_connections variable. Therefore, the network role removes options from the specified profiles if the options are only present on the system but not in the network_connections variable.
The following example shows how to apply the network role to ensure that an Ethernet connection with the required parameters exists:
An example playbook applying the network role to set up an Ethernet connection with the required parameters
# SPDX-License-Identifier: BSD-3-Clause --- - hosts: managed-node-01.example.com vars: network_connections: # Create one Ethernet profile and activate it. # The profile uses automatic IP addressing # and is tied to the interface by MAC address. - name: prod1 state: up type: ethernet autoconnect: yes mac: "00:00:5e:00:53:00" mtu: 1450 roles: - rhel-system-roles.network Additional resources