- 10.6. Configuring Fonts
- 10.6.1. Adding Extra Fonts for All Users
- 10.6.2. Adding Extra Fonts for All Users Using Alternative Directories
- 10.6.3. Adding Extra Fonts for Individual Users
- 10.6.4. Substituting Fonts
- 10.6.5. Configuring Font Aliases
- 10.6.6. Multiple Language Ordering
- 10.6.7. Configuring Font Properties
- Chapter 6. Fonts
- 6.1. Adding new fonts for a user
- 35.4. Fonts
- 35.4.1. Fontconfig
- 35.4.1.1. Adding Fonts to Fontconfig
10.6. Configuring Fonts
Red Hat Enterprise Linux 7 uses the fontconfig utility for font management and customization. fontconfig simplifies font management and provides display features, such as anti-aliasing. This section describes the following font management tasks:
To compile a list of fonts available on the system, fontconfig searches directories that are by default listed in the /etc/fonts/fonts.conf configuration file.
To list all fonts installed on the system that are known to fontconfig , you can use the fc-list command:
10.6.1. Adding Extra Fonts for All Users
You can install an extra font which will be available to users in applications that use fontconfig for font handling.
Procedure 10.12. Installing an Extra Font
Create a subdirectory for each font-family you are installing as some fonts have multiple files for bold, italic, and so on.
#fc-cache /usr/local/share/fonts/
fontconfig will detect the new fonts and make them available. Unlike user sessions, some applications might need to be restarted before they will allow you to use the new fonts, though.
10.6.2. Adding Extra Fonts for All Users Using Alternative Directories
Alternatively, you can also install fonts in another system directory than /usr/local/share/fonts/ if that directory is listed in the /etc/fonts/fonts.conf file.
If that directory is not listed in the /etc/fonts/fonts.conf file, you need to create your own machine-wide configuration file in /etc/fonts/local.conf .
Do not edit the /etc/fonts/fonts.conf file because it will be replaced when the fontconfig library is updated.
Procedure 10.13. Installing an Extra Font
As the root user, create your own machine-wide /etc/fonts/local.conf configuration file including the directory with fonts.
# chmod -R 755 /PATH/TO/YOUR/DIRECTORY_NAME
10.6.3. Adding Extra Fonts for Individual Users
You can install an extra font which will be available to a specific user on your system in applications that use fontconfig for font handling.
Procedure 10.14. Installing an Extra Font
$fc-cache ~/.local/share/fonts
fontconfig will detect the new fonts and make them available. You may need to restart running applications to see the changes. User sessions do not need to be restarted.
10.6.4. Substituting Fonts
When an application requests a font that is not available on the system, fontconfig reads the /etc/fonts/fonts.conf configuration file to determine the most similar available font to substitute for the requested font. Individual characters can also be substituted if they are not present in the requested font.
To configure a font substitution for a specific font, you can use the Fonts Tweak Tool . Note that the tool can only be used for per-user configuration.
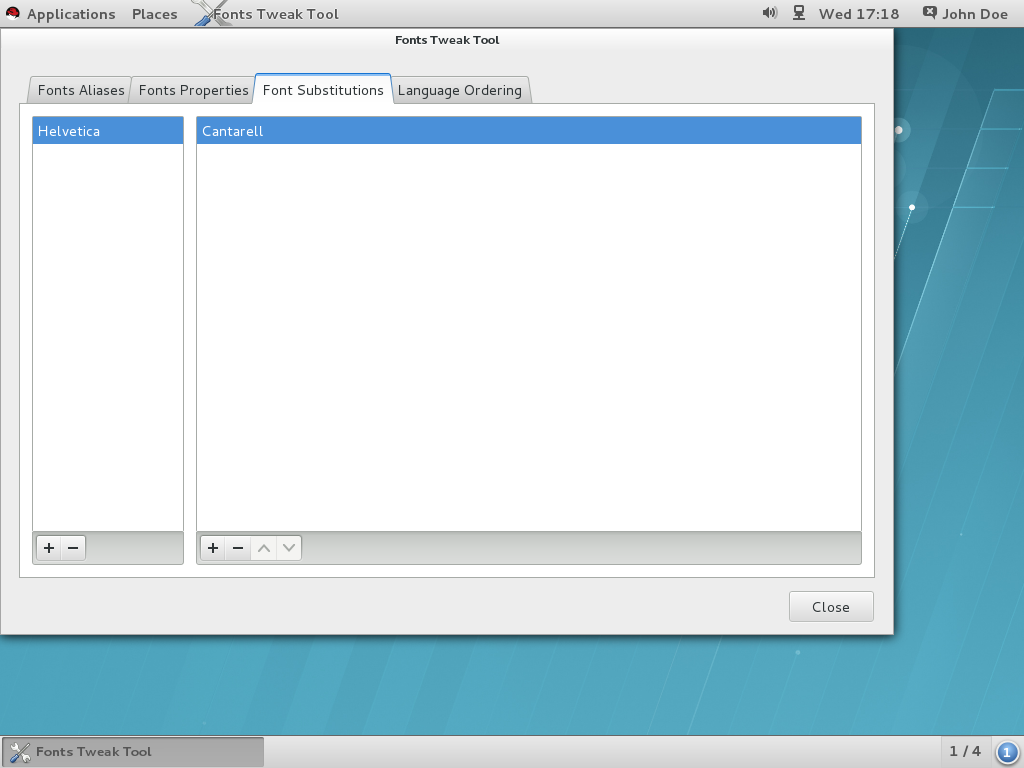
Figure 10.1. Substituting Fonts with Fonts Tweak Tool
Fonts Tweak Tool may not be installed by default on the system, to install it, run the following command:
#yum install fonts-tweak-tool
Procedure 10.15. Substituting a Font
Start the Fonts Tweak Tool by pressing the Super key to enter the Activities Overview , type Fonts Tweak Tool , and then press Enter .
Click the + button at the bottom left of the left pane, select or type the name of the font you want to substitute, and then click Add .
Click the + button at the bottom left of the right pane, select the name of the font you want to use to substitute for the first font, and then click Add .
10.6.5. Configuring Font Aliases
For each locale, Fonts Tweak Tool allows the individual users to configure different font aliases:
These aliases are used to represent common types of fonts, such as the serif and monospace types. Applications as well as users can then refer to these aliases instead of having to specify a particular font installed on the system.
Fonts Tweak Tool may not be installed by default on the system, to install it, run the following command:
#yum install fonts-tweak-tool
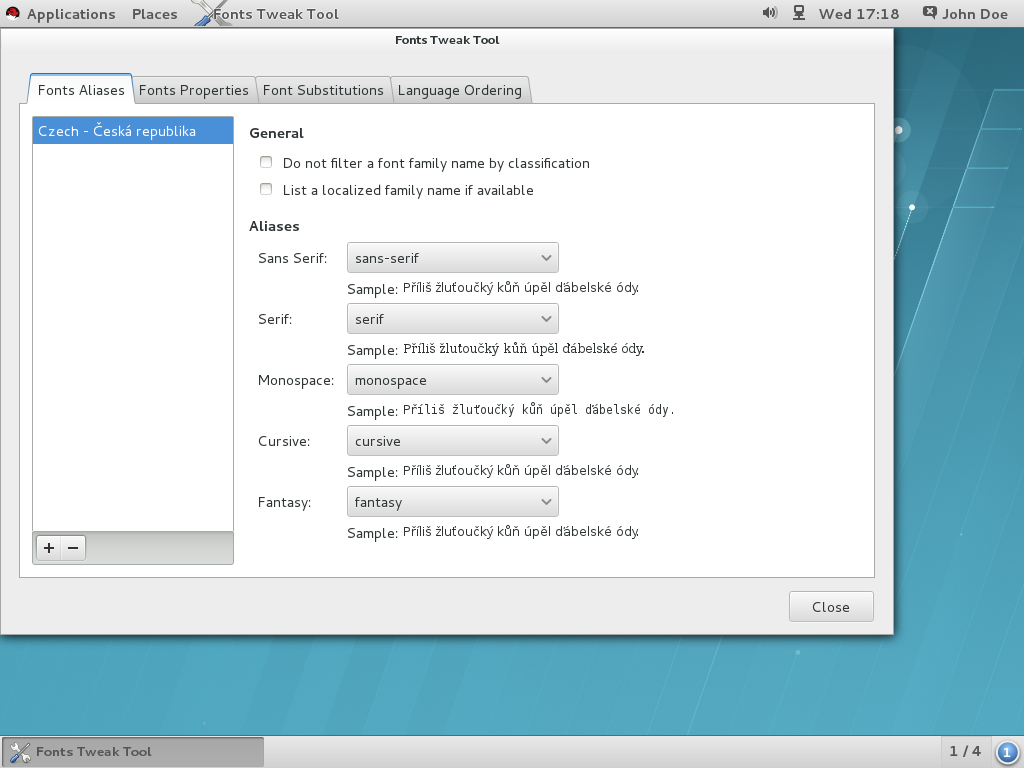
Figure 10.2. Configuring a Font Alias with Fonts Tweak Tool
Procedure 10.16. Configuring a Font Alias
Start the Fonts Tweak Tool by pressing the Super key to enter the Activities Overview , type Fonts Tweak Tool , and then press Enter .
Click the + button at the bottom left of the left pane, select or type the name of the locale you want to configure the font aliases for, and then click Add .
To configure default font aliases regardless of the used locale, select Default from the list of locales.
At the right pane, locate the font alias you want to override the system defaults for, and select the custom font from the drop-down list.
10.6.6. Multiple Language Ordering
Fonts Tweak Tool allows users who have multiple languages configured for the user interface to change the order in which the languages are displayed in applications. This feature is especially useful for users who use both Latin and non-Latin based fonts and do not want to use the non-Latin based fonts to display Latin characters.
For example, if you have Japanese and English configured as your languages, and you want to avoid displaying English Latin characters with your Japanese non-Latin based fonts, configure English as the primary language, and Japanese as secondary. The Latin-based fonts will then be used to display English characters, and the non-Latin based fonts will only be used to display Japanese characters.
Fonts Tweak Tool may not be installed by default on the system, to install it, run the following command:
#yum install fonts-tweak-tool
Procedure 10.17. Configuring Multiple Languages
Start the Fonts Tweak Tool by pressing the Super key to enter the Activities Overview , type Fonts Tweak Tool , and then press Enter .
Click the + button at the bottom left of the window, select or type the name of the language you want to configure as primary, and then click Add .
To add another language, click the + button at the bottom left of the window, select the name of the language you want to configure as secondary, and then click Add .
For the user interface, you have now set your preferences in the order in which the languages are displayed in applications.
When multiple languages are configured, some applications (such as xterm and other Xft applications) may not display all characters for the user’s languages properly. This is due to the lack of support for fallback fonts in those applications, or in the rendering libraries the applications are using.
10.6.7. Configuring Font Properties
Fonts Tweak Tool lets users change various font properties, allowing for fine-grained per-user font configuration.
Fonts Tweak Tool may not be installed by default on the system, to install it, run the following command:
#yum install fonts-tweak-tool
Procedure 10.18. Changing the Font Properties
Start the Fonts Tweak Tool by pressing the Super key to enter the Activities Overview , type Fonts Tweak Tool , and then press Enter .
Click the + button at the bottom left of the window, select or type the name of the font you want to change the properties for, and then click Add .
Depending on the added font, some of the font properties that the user can configure in the Fonts Properties tab include:
This is useful for users who prefer bitmap fonts over outline fonts. To use the embedded bitmap font, add a suitable font and click Use embedded bitmap font if any .
To use Japanese glyphs from the JIS X 2013:2004 standard, rather than from JIS X 2013:2000 or older, add a font that supports JIS X 2013:2004, and then click on jp04 in the Features list.
Chapter 6. Fonts
By default installing support for an internationalized language in Red Hat Enterprise Linux 5 also installs the required fonts for the selected language. Table 2.1, “Red Hat Enterprise Linux 5 International Languages” summarizes a list of the fonts installed for supported languages. This chapter also explains how to install additional fonts.
A common sign that proper fonts for a particular language are not installed is characters appear as boxes with numbers. This is the unicode box which indicates that the fonts required to display the text are missing. The figure below illustrates an example.

Figure 6.1. Fonts Missing
Please ensure that you have the correct language support packages installed for your language to display content correctly.
Red Hat Enterprise Linux uses two subsystems to manage and display fonts on the Desktop: Fontconfig and the core X Fonts system. The newer Fontconfig font subsystem simplifies font management and provides advanced display features, such as anti-aliasing. This system is used automatically for modern applications developed using the (Qt 3) or (GTK+ 2) graphical toolkits. For backward compatibility with older legacy X applications, Red Hat Enterprise Linux includes the original font subsystem, called the Core X Font subsystem. This system is provided through the X Font Server (xfs). The xfs service manages the look and scalability of older fonts within some X applications. Legacy fonts will be discussed later in this chapter.
By default, the xfs service is configured to run by default in runlevels 2, 3, 4 and 5 and can be managed using initscript utilities such as chkconfig and the Services Configuration Tool ( system-config-services ). The X Window System requires the xfs service in order to run.
6.1. Adding new fonts for a user
To add fonts for an individual user, copy the new fonts into the ~/.fonts/ directory in the user’s home directory. Use the fc-cache command to update the font information cache, as in the following example:
The new fonts you install should be usable by most GNOME applications. Some applications may have to be restarted to use the newly added fonts.
35.4. Fonts
Red Hat Enterprise Linux uses two subsystems to manage and display fonts under X: Fontconfig and xfs .
The newer Fontconfig font subsystem simplifies font management and provides advanced display features, such as anti-aliasing. This system is used automatically for applications programmed using the Qt 3 or GTK+ 2 graphical toolkit.
For compatibility, Red Hat Enterprise Linux includes the original font subsystem, called the core X font subsystem. This system, which is over 15 years old, is based around the X Font Server (xfs).
35.4.1. Fontconfig
The Fontconfig font subsystem allows applications to directly access fonts on the system and use Xft or other rendering mechanisms to render Fontconfig fonts with advanced anti-aliasing. Graphical applications can use the Xft library with Fontconfig to draw text to the screen.
The Fontconfig font subsystem does not yet work for OpenOffice.org , which uses its own font rendering technology.
It is important to note that Fontconfig uses the /etc/fonts/fonts.conf configuration file, which should not be edited by hand.
Due to the transition to the new font system, GTK+ 1.2 applications are not affected by any changes made via the Font Preferences dialog (accessed by selecting System (on the panel) > Preferences > Fonts ). For these applications, a font can be configured by adding the following lines to the file ~/.gtkrc.mine :
style "user-font" < fontset replaceable">" > widget_class "*" style "user-font"
Replace with a font specification in the style used by traditional X applications, such as -adobe-helvetica-medium-r-normal—*-120-*-*-*-*-*-* . A full list of core fonts can be obtained by running xlsfonts or created interactively using the xfontsel command.
35.4.1.1. Adding Fonts to Fontconfig
To add fonts system-wide, copy the new fonts into the /usr/share/fonts/ directory. It is a good idea to create a new subdirectory, such as local/ or similar, to help distinguish between user-installed and default fonts.
To add fonts for an individual user, copy the new fonts into the .fonts/ directory in the user’s home directory.
In this command, replace with the directory containing the new fonts (either /usr/share/fonts/local/ or /home/ /.fonts/ ).
Individual users may also install fonts graphically, by typing fonts:/// into the Nautilus address bar, and dragging the new font files there.
If the font file name ends with a .gz extension, it is compressed and cannot be used until uncompressed. To do this, use the gunzip command or double-click the file and drag the font to a directory in Nautilus .