- 22.2. Выполнение установки VNC
- How to connect to a remote computer using VNC in Linux
- Great Linux resources
- A connection in two parts
- Configure GNOME
- Configure the firewall
- GNOME Connections
- Chapter 5. Accessing the desktop remotely
- 5.1. Remote desktop access options
- 5.2. Remotely accessing the desktop as a single user
- 5.2.1. Enabling desktop sharing on the server using GNOME
- 5.2.2. Connecting to a shared desktop using GNOME
- 5.2.3. Disabling encryption in GNOME VNC
- 5.3. Remotely accessing the desktop as multiple users
- 5.3.1. The mapping of port and display numbers to users in VNC
- Глава 22. Установка с помощью VNC
- 22.1. Установка клиента VNC
22.2. Выполнение установки VNC
Anaconda поддерживает два режима VNC-установки — прямой режим и режим ожидания. Эти режимы отличаются только способом установки соединения. Так, в прямом режиме клиент VNC инициирует подключение к устанавливаемой системе, а в режиме ожидания — наоборот, устанавливаемая система сама подключается к клиенту VNC. Выбор режима определяется конфигурацией индивидуального окружения.
В прямом режиме Anaconda начинает установку и ожидает подключения клиента. Необходимые для соединения данные (IP-адрес и порт) будут доступны в устанавливаемой системе, поэтому для их просмотра необходим интерактивный доступ.
В этом случае клиент VNC работает в режиме прослушивания, ожидая подключения к определенному порту. Имя узла и порт клиента передаются в Anaconda с помощью параметров загрузки или в файле кикстарта. Программа установки устанавливает соединение с заданным клиентом, система которого, в свою очередь, должна разрешать входящие подключения.
Рекомендации по выбору режима
Если устанавливаемая система защищена межсетевым экраном, запрещающим входящие подключения, надо использовать прямой режим или отключить межсетевой экран. При этом следует помнить, что отключение экрана снижает уровень защиты системы.
Если система клиента VNC не может установить соединение вследствие ограничений межсетевого экрана, отключите экран или выберите прямой режим.
Запуск установки с использованием VNC выполняется с помощью параметров загрузки, которые могут отличаться в зависимости от архитектуры:
How to connect to a remote computer using VNC in Linux
Configure your system for screen sharing using Virtual Network Computing (VNC) in GNOME Connections and troubleshoot when things go wrong.

The Wayland protocol is the latest graphical server software for Linux computers, and it has replaced the X11 system in most major distributions. Old tricks like X Forwarding over SSH and logging in through xhost are on the way out, and remote access is now provided by the remote frame buffer protocol and Virtual Network Computing (VNC).
Great Linux resources
Now that VNC is the primary means of remote graphical login for Linux, new VNC applications are being written to integrate it with the rest of the desktop. This also means that Linux users and admins need to learn about new configuration options so that their computers can connect with one another.
There’s not much to it, so this article demonstrates how to configure your system for screen sharing and troubleshoot when things go wrong.
A connection in two parts
There are two components to connecting over VNC, and you can use one or both components.
The remote host is the computer you’re connecting to. You must configure it to allow connection requests. These configurations include screen-sharing permissions, internal firewall rules, and possibly external firewall rules and port forwarding.
The local host is the computer you’re using when you want to reach out and connect to a remote screen. It must have an application to make and manage the VNC request. The GNOME desktop provides the Connections application to help you connect to remote machines from your local host.
Configure GNOME
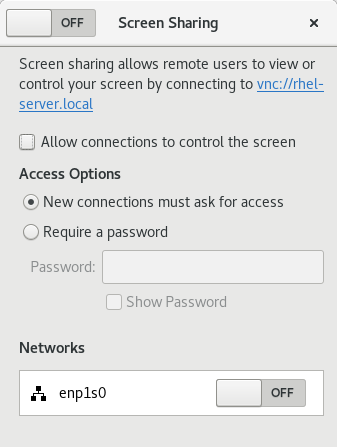
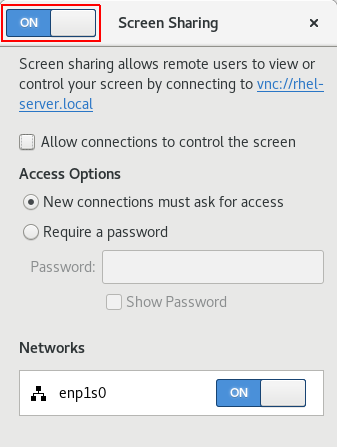
You must enable screen sharing on the remote machine before it even considers a VNC connection request. To allow screen sharing, open the Settings application from the Activities menu of the computer’s GNOME desktop. If you’ve never had access to the remote computer, you’ll have to talk the user through these steps or send them my Opensource.com article Share screens on Linux with GNOME Connections.
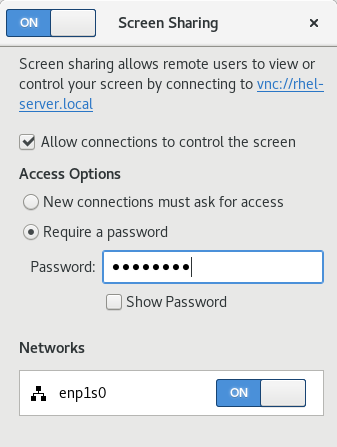
In GNOME Settings, click Sharing in the list in the left column. In Sharing, click on Screen Sharing. In the Screen Sharing window that appears, choose whether you want to require the user to accept a connection request by clicking an onscreen button or whether you prefer to create a password for entry.

Configure the firewall
VNC uses port 5900 by default, and the local firewall usually blocks that. You can open that port using firewall-cmd:
$ sudo firewall-cmd --add-service vnc-serverAlternately, you can use the Firewall application. The firewalld application is relatively simple. Find the service you want to add (vnc-server) and then click to enable it. After adding vnc-server , open the Options menu and select Runtime to permanent if you want the rule to persist after a reboot.

You have now configured the remote host to accept VNC requests.
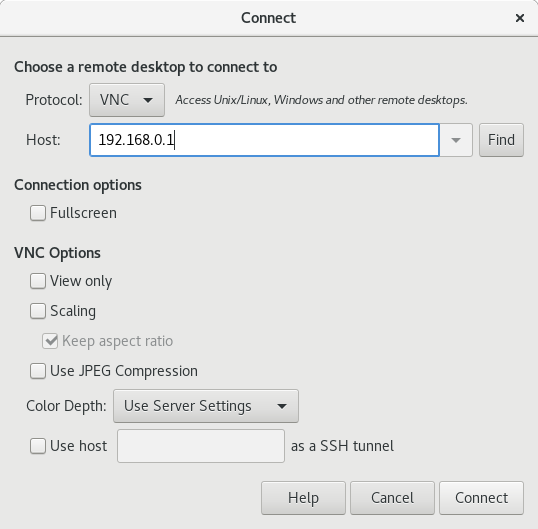
GNOME Connections
On your local computer, install the GNOME Connections application from GNOME Software or use your package manager:
$ sudo dnf install gnome-connectionsChapter 5. Accessing the desktop remotely
You can connect to the desktop on a RHEL server from a remote client.
5.1. Remote desktop access options
RHEL provides several options for remotely connecting to the desktop. Each option fits a different use case:
This method enables remote access on the client and the server using graphical GNOME applications. It configures a Virtual Network Computing (VNC) session so that only a single user can connect to the desktop on the server at a given time.
Depending on the session type, this method uses different components to implement screen sharing:
- In an X11 session, it uses the vino component.
- In a Wayland session, it uses the gnome-remote-desktop component. This method always uses display number 0. As a consequence, the VNC session always connects to the user who is logged into the server system. The VNC client application must support tls_anon connections. For example, you can use the Remote Desktop Viewer ( vinagre ) application on Linux systems. Before you can connect from Microsoft Windows clients, such as RealVNC , you must disable the VNC encryption on the server.
This method configures a VNC session so that multiple remote clients can connect to the server in parallel. You must first enable the VNC access on the client and the server using command-line tools.
Any VNC client application can connect to a server configured using this method.
Accessing a single application using X11 forwarding over SSH
This method executes an SSH command on the client that launches an individual graphical on the server. The application window opens on the client.
This method is useful when you do not require a full remote desktop session.
5.2. Remotely accessing the desktop as a single user
You can remotely connect to the desktop on a RHEL server using graphical GNOME applications. Only a single user can connect to the desktop on the server at a given time.
5.2.1. Enabling desktop sharing on the server using GNOME
This procedure configures a RHEL server to enable a remote desktop connection from a single client.
- Configure a firewall rule to enable VNC access to the server:
# firewall-cmd --permanent --add-service=vnc-server success # firewall-cmd --reload success 
5.2.2. Connecting to a shared desktop using GNOME
This procedure connects to a remote desktop session using the Remote Desktop Viewer application ( vinagre ). It connects to the graphical session of the user that is currently logged in on the server.
Prerequisites
- A user is logged into the GNOME graphical session on the server.
- The desktop sharing is enabled on the server. For details, see Section 5.2.1, “Enabling desktop sharing on the server using GNOME”.
- Install the Remote Desktop Viewer application on the client:

Verification steps

- On the client, check that you can see the shared server desktop.
- On the server, a screen sharing indicator appears on the right side of the top panel: You can control the screen sharing in the system menu.
5.2.3. Disabling encryption in GNOME VNC
You can disable encryption in the GNOME remote desktop solution. This enables VNC clients that do not support the encryption to connect to the server.
- As the server user, set the encryption key of org.gnome.desktop.remote-desktop.vnc GSettings schema to [‘none’] .
$ gsettings set org.gnome.desktop.remote-desktop.vnc encryption "['none']" # ssh -N -T -L 5901:server-ip-address:5901 user@server-ip-address 5.3. Remotely accessing the desktop as multiple users
You can remotely connect to the desktop on a RHEL server and open multiple sessions as different users at the same time.
Prerequisites
[root]# yum install tigervnc-server [root]# yum install tigervnc 5.3.1. The mapping of port and display numbers to users in VNC
With VNC, the client can connect to the desktop sessions of different users on the server. A display number and a TCP port number are attached to each server user that exports a VNC session. The client uses the port number to specify which server user it connects to.
If several clients connect using the same port number, they all open a VNC session to the same server user.
You must configure a mapping for each server user that exports a VNC session. For every such user, you must pick a unique port and display number.
The recommended mapping
Red Hat recommends that you start with port number 5902 and display number 2 for the first user, and increment the numbers by one for each additional server user.
Port number 5900 and display number 0 represent the server user that is currently logged into the graphical session. You cannot start a VNC server for the user who is already logged into the graphical session.
Table 5.1. Port and display number pairs
Глава 22. Установка с помощью VNC
Как уже говорилось, установку Red Hat Enterprise Linux рекомендуется выполнять в графическом режиме. Однако в некоторых случаях это невозможно — например, если корпоративные серверы IBM Power Systems и IBM System z не предусматривают возможность подключения монитора и клавиатуры. В этом случае VNC является единственным вариантом осуществления интерактивной установки.
Anaconda предоставляет режим VNC (Virtual Network Computing), позволяющий запустить графическую установку локально с перенаправлением вывода на удаленный дисплей.
В этой главе рассказывается, как включить режим VNC в устанавливаемой системе и подключиться к ней с помощью программы-клиента VNC.
22.1. Установка клиента VNC
Для удаленного доступа к установке потребуется программа-клиент VNC. Подобные программы обычно включены в стандартные репозитории большинства дистрибутивов Linux, в то время как для других операционных систем доступны бесплатные версии.
TigerVNC (пакет tigervnc ) — платформонезависимая программа доступа к удаленному рабочему столу.
Vinagre (пакет vinagre ) — программа доступа к удаленному рабочему столу GNOME .
KRDC (пакет kdenetwork-krdc ) — программа доступа к удаленному рабочему столу KDE .
Приведенные в этой главе инструкции используют TigerVNC . Общая последовательность действий останется неизменной независимо от выбранной программы.