- SSHFS: How to Mount Remote File Systems Over SSH
- What is SSHFS?
- Install SSHFS
- Mount a Remote File System on Linux
- Step 1: Create Mount Point
- Step 2: Mount the Remote File System Using SSHFS
- Step 3: Check Mounted File System
- Step 4: Unmount a Remote File System on Linux
- Mount a Remote File System on Windows via Windows Explorer
- Step 1: Map Network Drive
- Step 2: Mount the Remote File System Using SSHFS
- Step 3: Check Mounted File System
- Step 4: Unmount a Remote File System on Windows via Explorer
- Mount a Remote File System on Windows via CMD
- Step 1: Mount the Remote File System With net use
- Step 2: View the Mounted Device(s)
- Step 3: Unmount a Remote File System on Windows via CMD
- Mount a Remote File System on Windows via SSHFS-Win Manager
- Step 1: Locate and Run the SSHFS-Win Manager
- Step 2: Add a Connection
- Step 3: Mount the Remote File System and View the Contents
- Step 4: Unmount a Remote File System on Windows via SSHFS Win-Manager
- How to do remote file access on Linux?
- How to read or write from a remote file system:
SSHFS: How to Mount Remote File Systems Over SSH
SSHFS (SSH File System) is a client for mounting a file system located on a remote machine onto your local system through an SSH connection. Using the SFTP (SSH file transfer protocol), the SSHFS command-line tool mounts a physical or virtual disk locally, allowing file transfer between a local and remote machine.
This article demonstrates the installation and usage of SSHFS to mount a remote folder or file system over SSH.

- Access to the command line with administrator privileges.
- A remote folder or file system to mount for transferring files.
- The username and host address of the remote server.
What is SSHFS?
SSHFS is a command-line tool for safely mounting a remote folder from a server to a local machine. The client extends the SSH file transfer protocol, which helps locally mount a remote file system as a disk image securely.
SSHFS allows accessing, transferring, and manipulating files as if working on a local disk. This approach is handy when moving a lot of content to and from a remote machine.
SSH offers two ways to establish a connection:
Note: Follow our tutorials on how to generate SSH key pairs:
For Linux and macOS, the best way to mount a remote directory is through the terminal. On the other hand, Windows offers several solutions, including the command line, Windows Explorer, and a GUI.
Install SSHFS
SSHFS is not available by default on most machines. Different packages exist based on the operating system of the local machine.
To install SSHFS on Ubuntu/Debian systems using the apt package manager, run:
For CentOS based systems, install SSHFS using the yum package manager:
sudo yum install fuse-sshfsTo install SSHFS on MacOS, download the latest stable release of FUSE and SSHFS packages. Run the FUSE installer first (dmg file) and the SSHFS (pkg file) second.
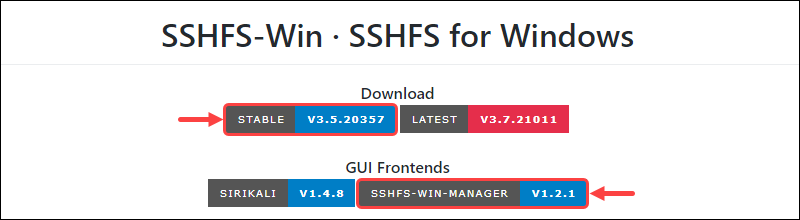
To use SSHFS on Windows, download and install:
- The latest stable version of WinFS.
- The newest stable version of SSHFS-Win is compatible with your system. Optionally, the SSHFS-Win Managerfrontend interface is available as well. The interface provides a convenient GUI interface for establishing and managing connections.
Mount a Remote File System on Linux
Mounting and unmounting a remote file system with SSHFS is a simple process. The outlined steps also work on a macOS machine.
Step 1: Create Mount Point
Create a mount point directory in the mnt folder where the remote file system will be mounted:
Step 2: Mount the Remote File System Using SSHFS
Mount the remote file system to the created mount point using the SSHFS tool:
Enter the login password when requested if using password authentication. If the remote server uses SSH key authorization, provide the path of the private key. For example:
sudo sshfs -o allow_other,IdentityFile=/home/kb/.ssh/id_rsa ubuntu@131.153.142.254:/home/ubuntu/ /mnt/test/
The above command mounts a remote directory located at 131.153.142.254 under the name ubuntu to the /mnt/test/ mount point.
The -o tag indicates the presence of added options:
- The allow_other option allows access to users other than root.
- The IdentityFile= option is for file systems with configured access via SSH. If the private key is under the root user, the command accepts a relative path. Otherwise, use the full link.
For a comprehensive list of available options, run:
Note: Getting a connection error? Try troubleshooting through one of our guides:
Step 3: Check Mounted File System
Check if the file system mapped correctly by navigating to the directory using the cd command:

Alternatively, navigate to the folder using the GUI:

Step 4: Unmount a Remote File System on Linux
Lastly, when finished with the mount point, unmount the remote file system with:

Note: Still mounted? Double-check if you typed the umount command correctly. There is no letter N.
Mount a Remote File System on Windows via Windows Explorer
The most common way to mount a remote file system on Windows is through Windows Explorer.
Step 1: Map Network Drive
Open the file explorer. Right-click This PC from the menu on the left pane and select the option Map Network Drive.
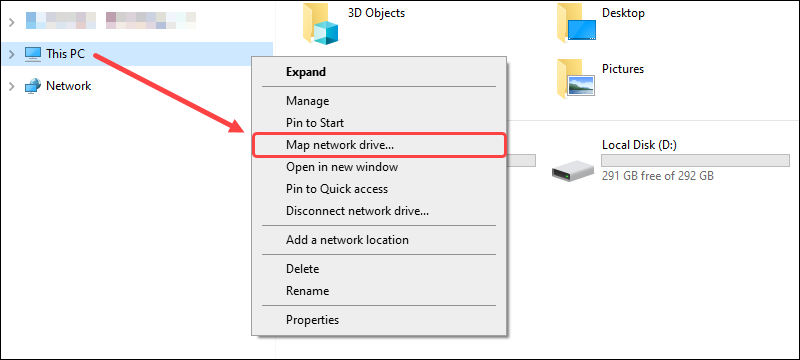
A dialog box appears for network mapping.
Step 2: Mount the Remote File System Using SSHFS
Select the letter of the drive to which you’d like to map the remote folder. In the Folder box, type in the sshfs command:
Note: The default port for SSH connections is 22. Hackers are aware of this, too. Change the default port if transferring sensitive information.
Depending on your use case, the sshfs command offers a few options:
- sshfs maps the remote user’s home directory.
- sshfs.r connects to the remote user’s root directory.
- sshfs.k maps the remote user’s home directory and uses the SSH key stored in /.ssh/id_rsa.
- sshfs.kr adds the remote user’s root directory and uses the locally stored SSH key.

Click Finish to map the remote file system. A dialog box appears when attempting to make a connection. Upon successfully connecting, the remote file system opens in the Windows Explorer.
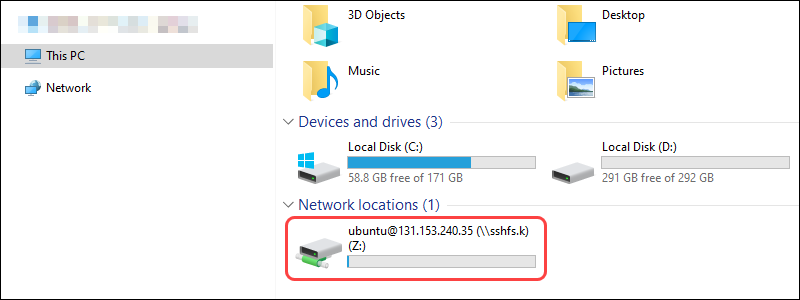
Step 3: Check Mounted File System
The newly mounted file system is visible from This PC in Windows Explorer under Network locations:
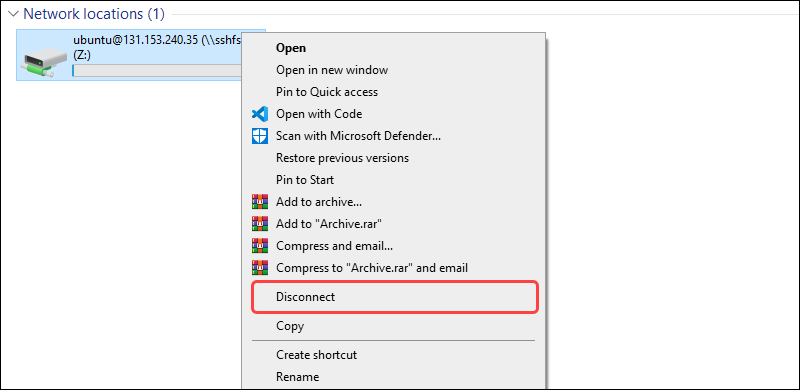
Step 4: Unmount a Remote File System on Windows via Explorer
To unmount the disk, right-click the mounted device and select the option Disconnect:
Mount a Remote File System on Windows via CMD
Mounting a remote file system in Windows via the command line is a quick and simple process.
Step 1: Mount the Remote File System With net use
Use the net use command to mount the remote file system:
net use : \\sshfs[.option]\@[!port][\path]net use X: \\sshfs.k\ubuntu@131.153.240.35The command does the following:
- X: represents the drive letter on the local machine.
- sshfs.k indicates the use of an SSH key stored in /.ssh/id_rsa.
- ubuntu@131.153.240.35 is the remote user and host.

The output of the command informs of a successful connection.
Step 2: View the Mounted Device(s)
To view the currently mounted disks through SSHFS, run:
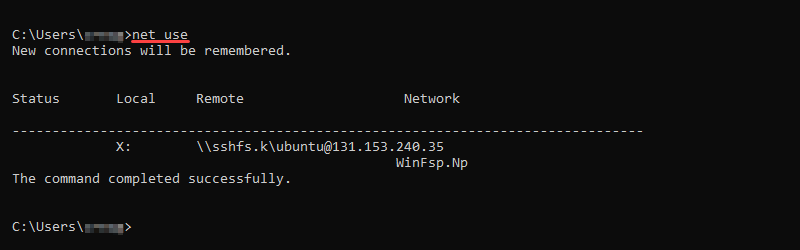
The command outputs the local mount point name and the remote connection point.
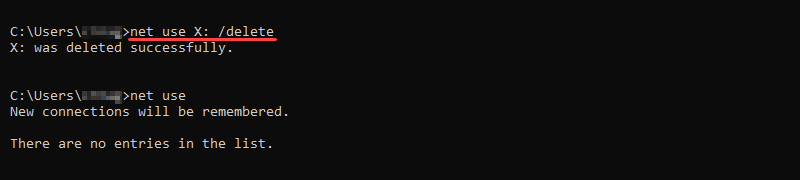
Step 3: Unmount a Remote File System on Windows via CMD
To remove the mapped device from your system, run:
For example, if the remote file system is on the drive X, use:
Mount a Remote File System on Windows via SSHFS-Win Manager
The SSHFS-Win Manager offers a convenient and easy-to-use GUI for establishing and managing remote server connections.
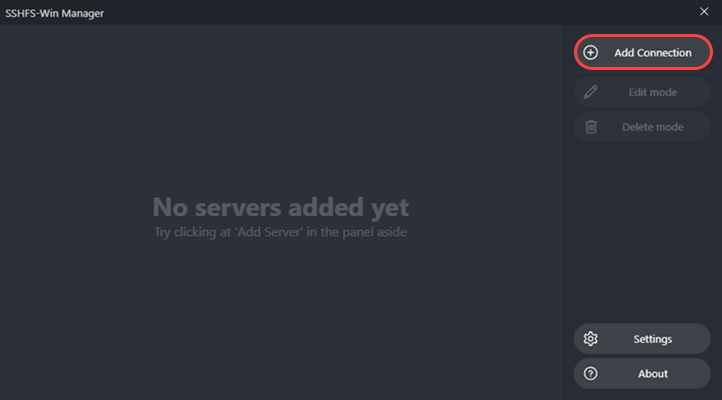
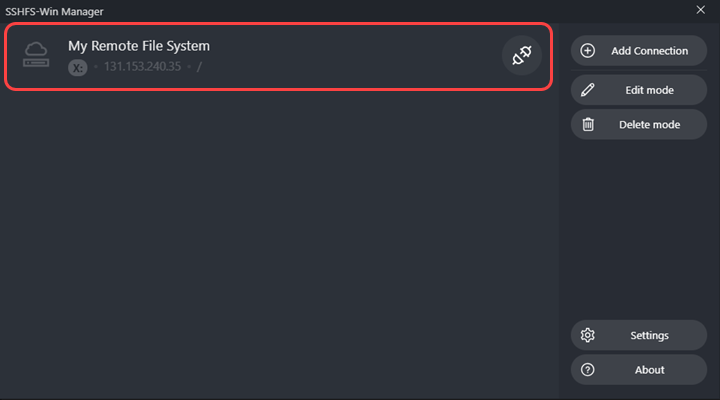
Step 1: Locate and Run the SSHFS-Win Manager
Search for SSHFS-Win Manager in the Start menu and run the program. A GUI interface opens for managing device connections.
Step 2: Add a Connection
Add a new connection by clicking the Add Connection button on the right menu.
A form menu pops out. Fill out the provided fields and select the options for your situation:
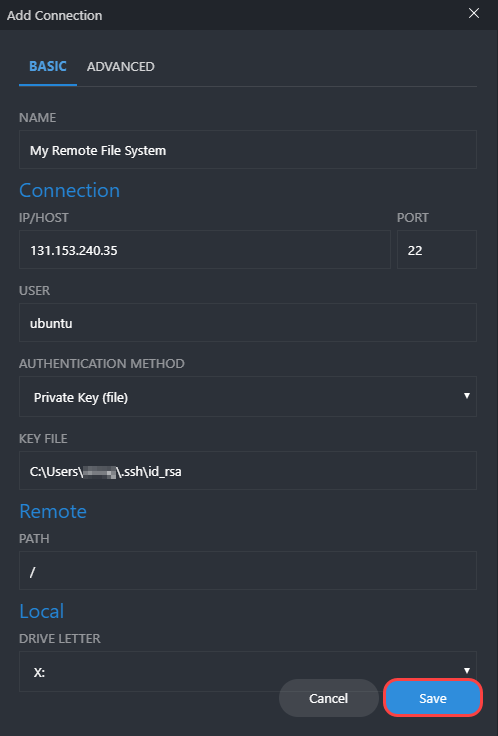
- Name is a custom name for your connection.
- IP/Host is the host address.
- Port is 22 by default for SSH connections. Leave as-is unless you specifically changed the port.
- The User is the username of the remote system.
- The Authentication method is either through a private key file or password. If using the secret key file, provide the path. Alternatively, the password option allows providing a password immediately or when establishing a connection.
- The Remote path is the path to the remote file system.
- Local Drive letter is a list of locally available drive letters for a mount point.
Lastly, Click Save when done filling out the fields. The newly created server connection shows up in the main menu.
Step 3: Mount the Remote File System and View the Contents
Click the socket icon next to your connection name to establish a connection. If the connection succeeds, the socket icon changes to a green connected socket, and a folder icon appears:
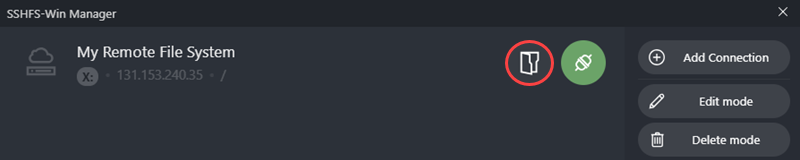
Click the folder icon to view the contents of the remote file system.
Step 4: Unmount a Remote File System on Windows via SSHFS Win-Manager
To unmount the server connection, click the socket icon in the SSHFS Win-Manager menu. If the connection is no longer needed, delete the information using the Delete mode button.
SSHFS provides a secure way to mount a remote folder to a local machine. The connection uses the SSH file transfer protocol for each transferred file, ensuring secure communication between two points.
An alternative way to transfer files via SSH is through remote sync. Check out our guide: How to Transfer Files with Rsync and see which method works best for you.
How to do remote file access on Linux?
We briefly touched the topic of remote file access before but we still get a lot of questions like “How can I access files on a remote Linux device behind a firewall?” or “What can I do if I want to copy files from a device that is not in my local network?”. In this short summary we want to give you quick answers how you can easily read and write files achieving full remote file access on any embedded Linux device across any network. This works even if a device is behind a firewall or NAT.
How can I access files remotely on a Linux device behind a firewall?
In essence we do the same thing you would do in a local network using scp or rsync . The only difference being that we use qbee.io to create a secure VPN between the remote device and your local machine. So just install qbee.io on your remote devices and qbee-connect on your desktop machine. This works for all OS (Linux, macOS and Windows). Please see our documentation for more information. Then you can use the built-in capabilities of ssh to achieve remote file access.
How to read or write from a remote file system:
These are different ways of accessing files remotely across a firewall or network:
- use the built-in web ssh terminal of qbee to do a remote ssh login through the web application. Alternatively, start a terminal session with qbee-connect on your local machine. This is simple, secure and quick, especially through the browser but might not offer the convenience you want.
- use scp for doing a secure remote two-way file access as described in this guide. This has the advantage that files can easily be uploaded or downloaded according to need. So you can both read and write files to the remote embedded Linux device.
- rsync is a tool for remote two-way synchronisation. It works on files and folders. How to use this is described here. rsync has some advantages. It has built-in compression and you can sync whole folders. In later operations only the differences are transmitted reducing bandwidth. We recommend this method if you want an identical, synchronised copy of folders or files on a local machine.
- if you want to browse files and file systems remotely without downloading everything then sshfs is the tool of choice as described here. sshfs mounts a remote file system from the remote device into your local machine. This allows you to browse the file system of the remote Linux device locally. If a file of interest is located it can be opened on the local machine. Many customers are astonished by the convenience of this method.
Here is a list of tools to use to achieve this. The list is not complete:
So yes, using a smart remote access tool like qbee it is possible to read and write remote Linux file systems even behind a firewall. All these solutions are convenient and secure and the best solution for you is determined if you want to browse files, synchronise files and folders or do a simple copy operation.
Just sign up for our free 30 day qbee trial and explore the opportunities.