- How to Boot into Emergency Mode on CentOS 8
- How to Boot into rescue mode
- Boot into emergency mode
- Conclusion
- About the author
- Shehroz Azam
- Rescue mode linux centos
- Friday, 24 December 2021
- How to Boot CentOS 8 in Rescue Mode Step by Step
- ⛑️ Как загрузить в Rescue Mode и Emergency Mode через Systemd в CentOS / RHEL 7 и 8
- Загрузка в аварийный режим
- Загрузка в режим Rescue
- Загрузка в Debug Shell
- Переключиться в аварийный режим
- Переключиться в режим восстановления
How to Boot into Emergency Mode on CentOS 8
![]()
In the latest CentOS, i.e., CentOS 8 emergency mode and rescue mode has replaced the idea of run levels. Runlevels were different modes used for various tasks. In CentOS 8, Rescue mode is the equivalent of single-user mode, and emergency boot mode provides a minimal environment to repair your system.
Today we will learn how to boot CentOS 8 into rescue and emergency mode.
How to Boot into rescue mode
Rescue mode requires the root password for authentication and allows you to restore your system when the normal booting process is not working. Rescue mode will attempt to set up all local file systems and initiate a few essential system services. Rescue mode does not start network interfaces and does not permit multiple users to be logged in.
Boot up your computer and wait for the GRUB menu to show up.

Now press ‘e’ to open the editing menu:
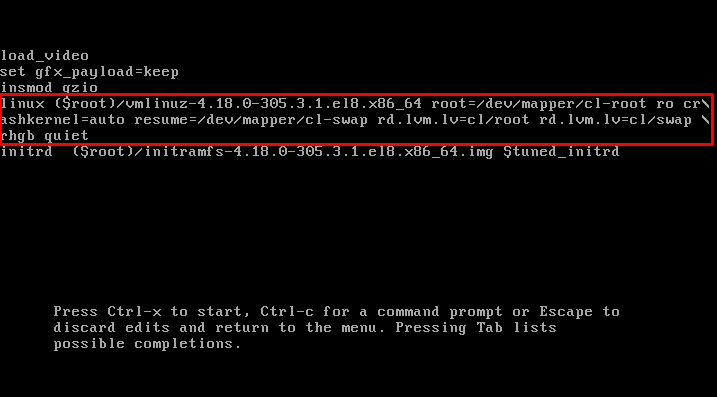
Now, locate the line that starts with the “Linux” keyword, shown in the screenshot below:

Go to the end of the line by using the end button on your keyboard and add the following parameter at the end of the line:

Press Ctrl+x to start the system, but this time with the new parameter will let you enter the rescue mode.

The operating system will ask for the root password. You will enter into the rescue mode once you provide the password.

Now, you can repair your system in rescue mode.
Once you are done with the rescue mode, you can exit from the rescue/emergency mode by running the “exit” command.
This is how you can boot into the Rescue Mode on CentOS 8 and repair your system. Now, let’s see how to boot into Emergency mode on CentOS 8.
Boot into emergency mode
The emergency mode gives the most minimal environment to restore your system when even the rescue mode is not working. Emergency mounts the root files as read-only and does not try to mount local file systems. The emergency mode also does not start up the network interfaces.
The process of booting up your system into emergency mode is identical to that of rescue mode.
First, boot up your computer and wait for the GRUB menu to show up:
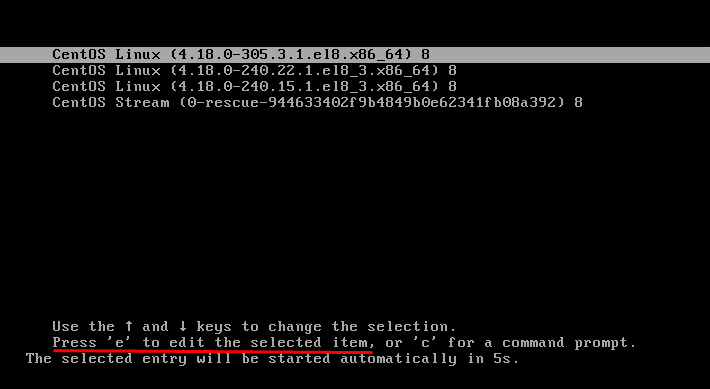
Now press ‘e’ to open the editing menu:

Now locate the line that starts with the “Linux” keyword, shown in the screenshot below:

Go to the end of the line by using the end button on your keyboard and add the following parameter at the end of the line:

Press Ctrl+x to start the system, but this time with the new parameter will let you enter the Emergency mode.

You will enter into the emergency mode once you provide the password.

Now, you can repair your system in emergency mode when even the rescue mode is not working.
Once you are done with the emergency mode, you can exit from the rescue/emergency mode by running the “exit” command.
This is how you can boot into the Emergency Mode on CentOS 8 and repair your system even when the rescue mode is not working.
Conclusion
This article has a detailed explanation of how to enter the rescue and emergency boot mode to repair your system. These boot modes can come in handy in case the normal booting process is not working. The process of entering into the rescue or emergency boot menu is simply just a three-step process.
About the author
Shehroz Azam
A Javascript Developer & Linux enthusiast with 4 years of industrial experience and proven know-how to combine creative and usability viewpoints resulting in world-class web applications. I have experience working with Vue, React & Node.js & currently working on article writing and video creation.
Rescue mode linux centos

Friday, 24 December 2021
How to Boot CentOS 8 in Rescue Mode Step by Step
Rescue mode provide facility to boot a small CentOS 8 Linux environment from boot method using ISO Image or bootable media. CentOS 7 and CentOS 8 steps are quite similar to boot in rescue mode.
Step 1. Downloading ISO Image: Download ISO image from the Centos official site and boot the virtual machine from the downloaded ISO image.
Step 2. Begin booting in Rescue Mode: Attach the ISO image into virtual machine and start/reboot the virtual machine and follow the instructions. Select “Troubleshooting” and press [Enter] key as shown in below screenshot
Step 3. Rescue Mode Selection: Follow the instructions and Select “Rescue a CentOS Linux system” and press [Enter] key as shown in below screenshot.
Step 4. Local Environ selection: The rescue mode attempt to locate the old installation and mount it with read write mode under /mnt/sysimage directory, select 1 and press [Enter] as shown in below screenshot:
Step5: Entering in Local Root Environment: Now you can run chroot /mnt/sysimage to change root directory from rescue mode to installed old root file system as shown in below screenshot:
⛑️ Как загрузить в Rescue Mode и Emergency Mode через Systemd в CentOS / RHEL 7 и 8

В этой статье объясняется, как загрузить систему CentOS / RHEL 7 и 8 в режим восстановления или аварийный режим.
В CentOS / RHEL 7 и 8 режим восстановления ( Rescue ) и аварийный режим ( Emergency ) являются системными целями, которые заменили концепцию уровней запуска в предыдущих версиях CentOS / RHEL.
Режим восстановления эквивалентен однопользовательскому режиму и требует пароля root.
Режим восстановления позволяет восстановить систему в ситуациях, когда она не может завершить обычный процесс загрузки.
Режим восстановления попытается смонтировать все локальные файловые системы и запустить некоторые важные системные службы, но он не активирует сетевые интерфейсы и не позволяет входить нескольким пользователям.
Аварийный режим обеспечивает минимально возможную среду и позволяет восстанавливать систему даже в тех случаях, когда система не может войти в режим восстановления.
В аварийном режиме система монтирует корневую файловую систему только для чтения, не пытается монтировать другие локальные файловые системы, не активирует сетевые интерфейсы.
Загрузка в аварийный режим
1. Во время загрузки, когда появляется меню GRUB2, нажмите клавишу e для редактирования.
2. Добавьте следующий параметр в конец строки linux16 в системах x86-64 или строку linuxefi в системах UEFI:
systemd.unit=emergency.target
Нажмите Ctrl + a (или Home) и Ctrl + e (или End), чтобы перейти к началу и концу строки.
3. Нажмите Ctrl + x, чтобы загрузить систему с параметром.

Загрузка в режим Rescue
1. Во время загрузки, когда появляется меню GRUB2, нажмите клавишу e для редактирования.
2. Добавьте следующий параметр в конец строки linux16 в системах x86-64 или строк
в системах UEFI: Нажмите Ctrl + a (или Home) и Ctrl + e (или End), чтобы перейти к началу и концу строки.
3. Нажмите Ctrl + x, чтобы загрузить систему с параметром.

Загрузка в Debug Shell
Debug shell systemd обеспечивает shell в процессе запуска, которую можно использовать для диагностики проблем загрузки, связанных с systemd.
Попав в этот шелл, команды systemctl, такие как systemctl list-jobs и systemctl list-unit, могут использоваться для диагностики проблем с загрузкой.
Во время загрузки, когда появляется меню GRUB2, нажмите клавишу e для редактирования.
Добавьте следующий параметр в конце строки linux16 в системах на базе BIOS x86-64 или в строке linuxefi в системах UEFI:
Переключиться в аварийный режим
# systemctl emergency Broadcast message from root@dhcp-cn-10-182-71-190.cn.oracle.com on pts/1 (Mon 2016-06-27 00:44:58 EDT): The system is going down to emergency mode NOW!
# systemctl --no-wall emergency # systemctl isolate emergency.target
Переключиться в режим восстановления
# systemctl rescue Broadcast message from root@dhcp-cn-10-182-71-190.cn.oracle.com on pts/0 (Mon 2016-06-27 00:22:44 EDT): The system is going down to rescue mode NOW!
# systemctl --no-wall rescue # systemctl isolate rescue.target