- Resetting Windows 10/8/7 Password with Ubuntu Linux USB
- How to Reset Windows 10/8/7 Password with Ubuntu Linux
- Alternative to Ubuntu for Windows Password Reset
- Conclusion:
- 1denwin’s blog
- Популярные сообщения
- Linux: Устанавливаем подключение L2TP/IPSec на Mint/Ubuntu
- Linux: Как подружить Thunderbird и MS Exchange при помощи Davmail
- Сброс пароля, редактирование реестра Windows из Ubuntu
- Редактирование реестра:
- Сброс пароля:
- Сразу привожу места в реестре где могут скрываться записи о запуске вирусов:
- BootDev
- System Rescue CD
- Сброс Пароля
- Итог
Resetting Windows 10/8/7 Password with Ubuntu Linux USB
If you forgot Windows 10 local account password, you might be worried that you have to reinstall Windows all over again and lose precious data. That’s not true because there are several other options open to you, many of which will help you preserve all data on the locked PC. One of these is a very popular method amongst Linux users and is known as the Ubuntu LiveCD USB for resetting a Windows 10 local account password.
This approach involves using the LiveCD to create the pre-installation environment required for another utility — the chntpw password reset tool — to unlock the computer. Essentially, once you create the disk, you’ll be booting Windows 10 machine from it. Within the pre-installation environment, the tool then sets about blanking the password for any local account that you specify. Technical expertise is not a pre-requisite, but it’s desired. You’ll be working with ISO files and burning software, not to mention doing command line inputs and booting from an external device.
How to Reset Windows 10/8/7 Password with Ubuntu Linux
Step 1: On a secondary PC where admin privilege is granted, download a LiveCD from Ubuntu official website.
Step 2: Go and find a ISO burning software such as UUByte ISO Editor to burn the Ubuntu LiveCD to an USB stick.
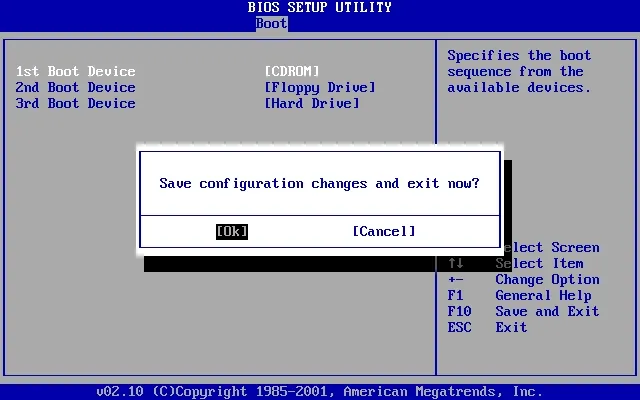
Step 3: Now that you have the Ubuntu LiveCD USB in hand, boot the locked PC from Ubuntu USB. To do this, you can hit F2 or other pre-defined special key to enter the BIOS Setup Utility menu, where you can change the boot sequence so the computer boots from the USB drive.
Step 4: Once your computer boots off the drive, click Try Ubuntu in the welcome screen of Ubuntu LiveCD.
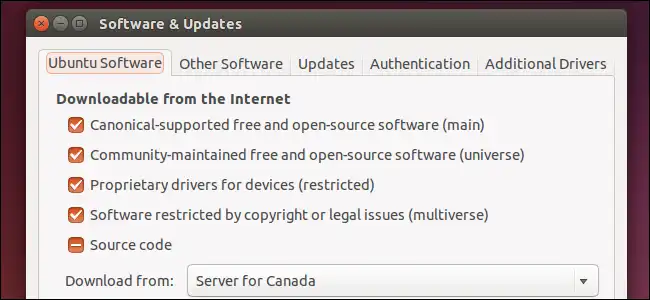
Step 5: Go to System Settings > Software and Updates. In the new window, tick the box next to the option call «Community-maintained free and open-source software» and click Close to exit. At the warning prompt, click on Reload to refresh the information about available software.
Step 6: Now open a Terminal utility and install the chntpw package with the following command : sudo apt-get install chntpw
Step 7: In file navigator, go to this location ( Windows\System32\Config )and right-click on a blank area. Select Open in Terminal.
Step 8: In the new Terminal window, type this command to reset user password: chntpw -u user_name SAM
Step 9: To blank the password for that user, type 1 and hit Enter. Next, type q and Enter. Finally, type y to overwrite the hive files.
The password for that account has now been blanked. You will need to remove the USB drive from your computer and restart it. You should be able to login without a password. The password resetting process is a complex one that happens behind the scenes, but the software makes it possible to use a workaround for a locked PC.
As you can see, using the Ubuntu LiveCD USB to reset a Windows 10 local password requires a lot of attention and care, especially if you’re not familiar with the process. If you were not satisfied with Ubuntu Linux, then please give a try of PassGeeker Windows Password Recovery.
Alternative to Ubuntu for Windows Password Reset
PassGeeker Windows Password Recovery is an award-winning password reset utility for Windows 10 and older versions right up to Windows XP. The stand-out feature is how easy it makes the task of creating a password reset disk on a different computer. No knowledge of ISO files required, no need to learn about burning ISO files to create bootable media, no additional tools required and no command line work! All that complex stuff is pushed to the background so the user only has to make a few mouse clicks and manipulate a USB pen drive.
The software works on local user and admin accounts, as well as Windows server accounts. That’s what makes it stand apart from most other utilities. It uses a thoroughly tested three-step process to unlock any locked PC. Second, boot your locked Windows 10 PC from the reset disk.
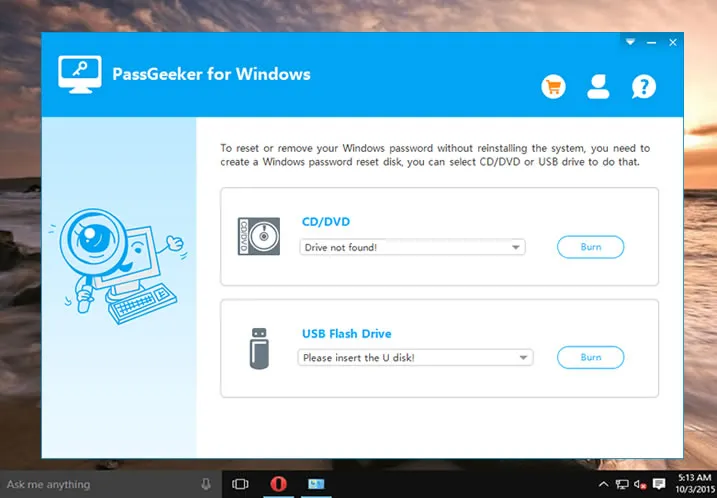
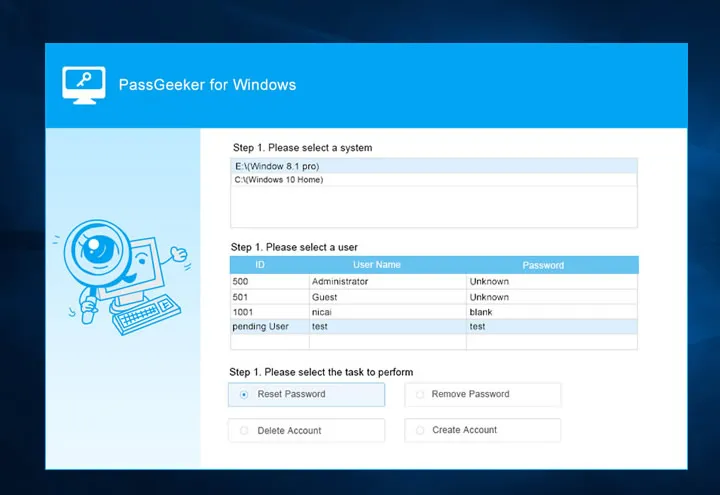
Step 1: Install PassGeeker software on a different Windows PC. The initial user interface is shown as the following screenshot.
Step 2: Insert an blank USB stick to the computer and click Burn USB option to make a password reset USB. You can also do this with CD/DVD.
Step 3: This step is crucial so please read it carefully. Insert the password reset disk on the PC you forgot the password. Then boot it up and open boot menu or BIOS by clicking a special key like Esc, F11. You can see the key at the boot up. If not search it in Google. Once the settings is done, the computer should load PassGeeker software on screen.
Step 4: When PassGeeker appears on the screen, select the Windows version and account to be unlocked, click on Reset Password, remove the disk and restart your PC.
That’s all there is to it, and it’s a great alternative to the Ubuntu LiveCD method that takes less time and more secure.
Conclusion:
Resetting Windows password with Ubuntu Live CD is not straightforward as expected. And it is not fun at all. In addition, if the command was not typed correctly, it is possible to crash the computer. So my recommendation is using a safe third-party software like PassGeeker to reset forgotten or lost Windows password.
1denwin’s blog

Бывают такие ситуации, когда вы забыли пароль к системе Windows или вам необходимо получить доступ, но вы не знайте пароль учетной записи с правами Администратора. При помощи Fedora Linux, можно быстро и просто сбросить пароль на любой версии Windows. Для этого понадобится сделать загрузочную флешку или записать диск с образом Linux. Записать образ на флешку, можно при помощи утилиты etcher, после чего подключить ее в ПК и следовать действиям описанным ниже. Для описания примера сброса пароля использовался Windows 10 и дистрибутив Linux — Fedora 27.
01. Подключаем загрузочную флешку и перезагружаем ПК.
02. Загружаемся с флешки и выбираем «Start Fedora-Workstation-Live 27» и выбираем «Try Fedora«.

sudo su sudo dnf install -y chntpw


mkdir /mnt/windows mount /dev/sda2 /mnt/windows
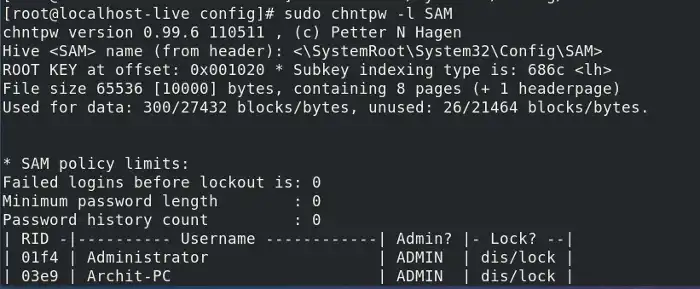
cd /mnt/windows/Windows/System32/config/ chntpw -l SAM

09. Из списка предложных действий выбираем [1]
10. Вводим необходимое имя пользователя из предложенного списка (forbiddenaccess):

11. Далее выбираем опцию [1] для того, что бы сбросить пароль выбранной учетной записи.
12. Вводим !, затем q и сохраняем изменения в SAM — y
13. Перезагружаем ПК при помощи следующей команды:
14. Система Windows загружается без запроса ввода пароля

- Получить ссылку
- Электронная почта
- Другие приложения
Популярные сообщения
Linux: Устанавливаем подключение L2TP/IPSec на Mint/Ubuntu
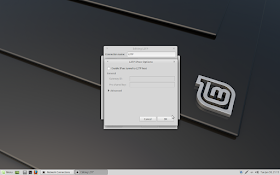
L2TP — туннельный протокол, использующийся для поддержки виртуальных частных сетей. Главное достоинство L2TP состоит в том, что этот протокол позволяет создавать туннель не только в сетях IP, но и в таких, как ATM, X.25 и Frame Relay. Но компания Canonical почему-то решила не добавлять данный протокол в настройки VPN, поэтому в Ubuntu и Linux Mint по умолчанию с этим проблема, ну тогда добавляем L2TP/IPSec самостоятельно. Для того что бы добавить L2TP/IPSec, выполните следующие команды: sudo add-apt-repository ppa:nm-l2tp/network-manager-l2tp sudo apt update sudo apt install network-manager-l2tp network-manager-l2tp-gnome Как только дополнительные компоненты будут уставлены, следует перезагрузить компьютер, после чего у настройках VPN появится подключение L2TP.
Linux: Как подружить Thunderbird и MS Exchange при помощи Davmail
MS Office — один из тех комплектов ПО от Microsoft, с которого достаточно тяжело перейти на бесплатные аналоги, крайне тяжело перейти с доменной почты, с которой MS Outlook справляется на ура. Тут вы получайте и почту, и календари, и список контактов, в общем все, с чем может интернироваться Outlook. Очень долгое время, мне приходилось пользоваться Thunderbird , который забирал и отправлял почту через IMAP/SMTP, а так же не очень круто работающим календарем Lightning . Без поддержки Exchange, работать с почтой через данное ПО было крайне не удобно, приходилось пользоваться ресурсом OWA, что бы корректно пользоваться календарем и иметь доступ к контактам. Боль и страдания были не долгими, так как удалось случайно наткнуться на Davmail Gateway при помощи которого можно сделать нормальную поддержку календаря, контактов, работы с почтой и тд.. Для того. что бы подружить Thunderbird и Exchange, нужно сделать следующее: 01. Установить Thunderbird. sudo apt install thunderbird -y 02
Сброс пароля, редактирование реестра Windows из Ubuntu
В связи с вирусами в винде и невозможностью запусить regedit, понадобилась возможность редактировать реестр извне. Нашел, пока, единственную утилиту в линуксе chntpw, которая изначально разрабатывалась для сброса паролей, а потом приобрела функцию редактирования реестра.
Редактирование реестра:
1. Загружаемся с LiveCD или устанавливаем второй системой Ubuntu
2. Устанавливаем утилиту chntpw
3. Подключаем раздел windows
Смотрим где он:
sudo fdisk -l
ищем ntfs раздел и монтируем:
$ sudo mkdir /media/windows
$ sudo mount /dev/sda2 /media/windows
4. Редактируем реестр
chntpw -l /media/windows/Windows/system32/config/software
Редактирование осуществляется перемещением по веткам, например:
cd Microsoft\Windows NT\CurrentVersion\Winlogon
и самим редактированием ключей, например:
ed Shell
Сброс пароля:
1. Пункты 1-3 предыдущего параграфа
4. Смотрим у какого пользователя будем менять пароль
5. Сбрасываем пароль
chntpw /media/windows/Windows/system32/config/SAM -u Administrator
Сразу привожу места в реестре где могут скрываться записи о запуске вирусов:
HKLM\SOFTWARE\Microsoft\Windows NT\CurrentVersion\Winlogon\Notify
HKLM\SOFTWARE\Microsoft\Windows NT\CurrentVersion\Winlogon\Userinit
HKLM\SOFTWARE\Microsoft\Windows NT\CurrentVersion\Winlogon\Shell
HKLM\SOFTWARE\Microsoft\Windows\CurrentVersion\Run HKLM\SOFTWARE\Microsoft\Active Setup\Installed Components
HKLM\SOFTWARE\Microsoft\Windows\CurrentVersion\Explorer\SharedTaskScheduler
HKLM\SOFTWARE\Microsoft\Windows\CurrentVersion\ShellServiceObjectDelayLoad
HKCU\Software\Microsoft\Windows\CurrentVersion\Run
Значения по умолчанию в Regedit:
[HKLM\Software\Microsoft\Windows NT\CurrentVersion\Winlogon]
«Shell»=»Explorer.exe»
«Userinit»=»C:\WINDOWS\system32\userinit.exe»
Проверьте файл Explorer.exe на наличие двойника… правильно лежать ему в папке Windows\ но не в Windows\System32\.
Эта статья была написана в дополнение темы борьбы с вирусами и sms-вымогателями
Очистка windows от вирусов с помощью Ubuntu
BootDev
Продолжение темы сброса пароля учетной записи Windows. Теперь все действия будут проводится не через WinPE, как это делалось ранее, а через Linux окружение. В качестве дистрибутива будет использоваться SystemRescueCD.

System Rescue CD
Данный livecd предназначен для восстановления работоспособности операционных систем Linux и Windows. Скачать iso-образ данного можно по ссылке http://www.system-rescue-cd.org/Download/.

Сброс Пароля
Как и прежде, сброс пароля будет проводится на операционной системе Windows 10. Приступим.

Загружаем SystemRescueCD.

Выведем информацию о диска системы, чтобы определить целевой, с установленной операционной системой Windows.

Из вывода, видно, что целевой диск /dev/sda, а необходимый раздел, с ОС Windows, /dev/sda2.
Смонтируем раздел /dev/sda2 для выполнения дальнейших манипуляций над ним.
mount /dev/sda2 /mnt/windows

Перейдем в папку /Windows/System32/config.
cd /mnt/windows/Windows/System32/config

Проверяем наличие файла SAM.

Создаем резервную копию файла SAM. На всякий случай.

Выполняем вывод учетных записей файла SAM, чтобы определить необходимую.

Узнав данные необходимой учетной записи (имя или RID), переходим к ее редактированию.
chntpw -u BootDevRU SAM

Откроется интерактивный режим. Перед нами будет меню из шести пунктов. Сброс пароля расположен под номером 1. Вводим данную цифру и нажимаем ENTER .

Программа выдаст сообщение что пароль успешно сброшен. Выполняем выход из интерактивного режима введя букву q. Соглашаемся с внесением изменений введя y.

Выполняем перезагрузку командой reboot , и загружаемся с жесткого диска компьютера.


Пароль успешно сброшен. Как и прежде, можно вернуть сброшенный пароль, восстановив бэкап файла SAM.
Итог
Итак. Мы выполнили сброс пароля учетной записи Windows через операционную систему Linux. Все что потребовалось, это скормить chntpw SAM файл целевой ОС.
Возможно также восстановить сброшенный пароль, так как была создана резервная копия файла SAM. Подробно данный процесс описан тут.