Firmware Upgrade Guide for Rockchip devices
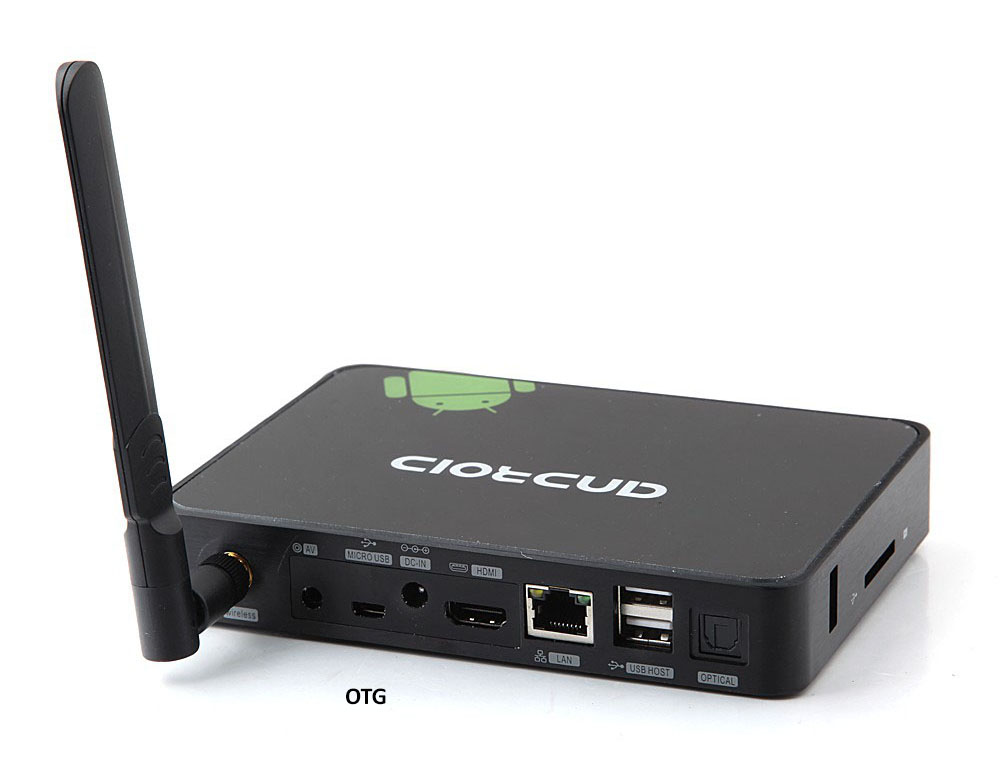
This is a common guide for reflashing RockChip based devices. All RK SoC (RK3066, RK3188, RK3288, RK3229, RK3328, RK3399 and so on) supports the same applications and drivers for Host system, if 3rd party producers do not add any other limitations or special options. Differences can be in hardware parts, so you need to detect OTG port and recovery buttons correctly.
Notice: this guide is 100% working with Ugoos RK devices .
BEFORE START
— Image file
— Host PC
— USB OTG Cable
— Supported host OS: Windows XP (32/64bit) Windows 7 (32/64bit) Windows 8 (32/64bit) Windows 10 (32/64bit)
The first thing you need is to download the archive with firmware. Inside archive, you find:
— BatchTool or Android Tool — tool for reflashing (separate Android Tool and drivers you can download HERE)
— DriverAssitant — tool to install drivers and firmware image file
— Firmware image
INSTALLING DRIVERS
Launch RK DriverAssitant and press “Install Driver”
Apply all changes and warnings during installation until finishing message
CONNECTING TO PC
Run Batch tool or Android tool on your host PC.
In order to connect device with Host PC and run bootloader mode you should perform following steps:
1. Plug off device power adaptor.
2. Connect device to computer via usb OTG port, much better to use certified OTG USB cable from package.
3. Run Batch tool or RK Android tool
4. Hold the hardware recovery button.
5. Plug in power adaptor and Turn on device if not turning on automatically.
Tip: if you can’t hold recovery button or it’s broken you can reboot to bootloader from Ugoos power menu.
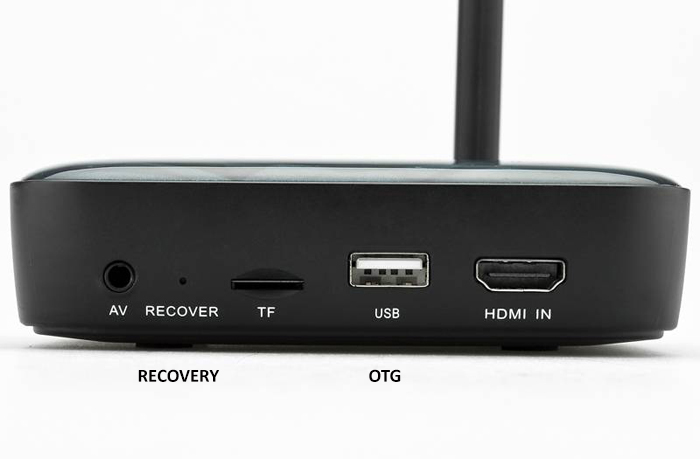
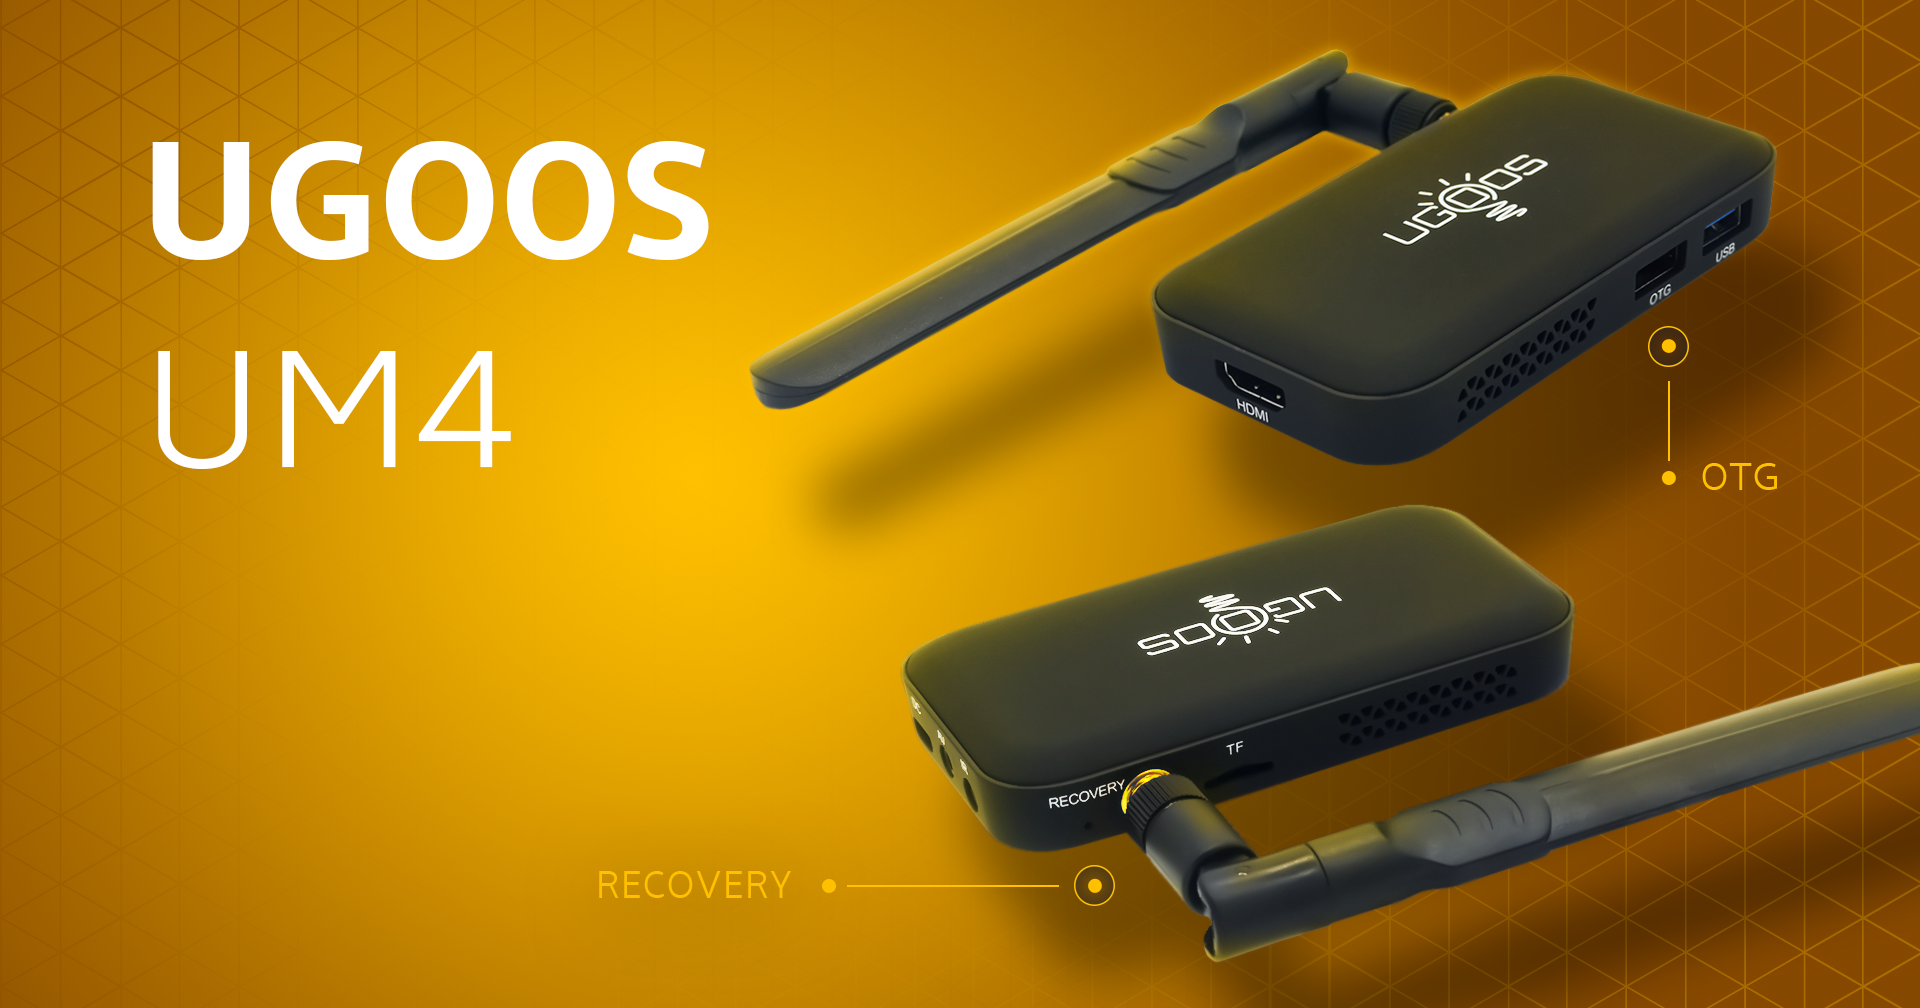
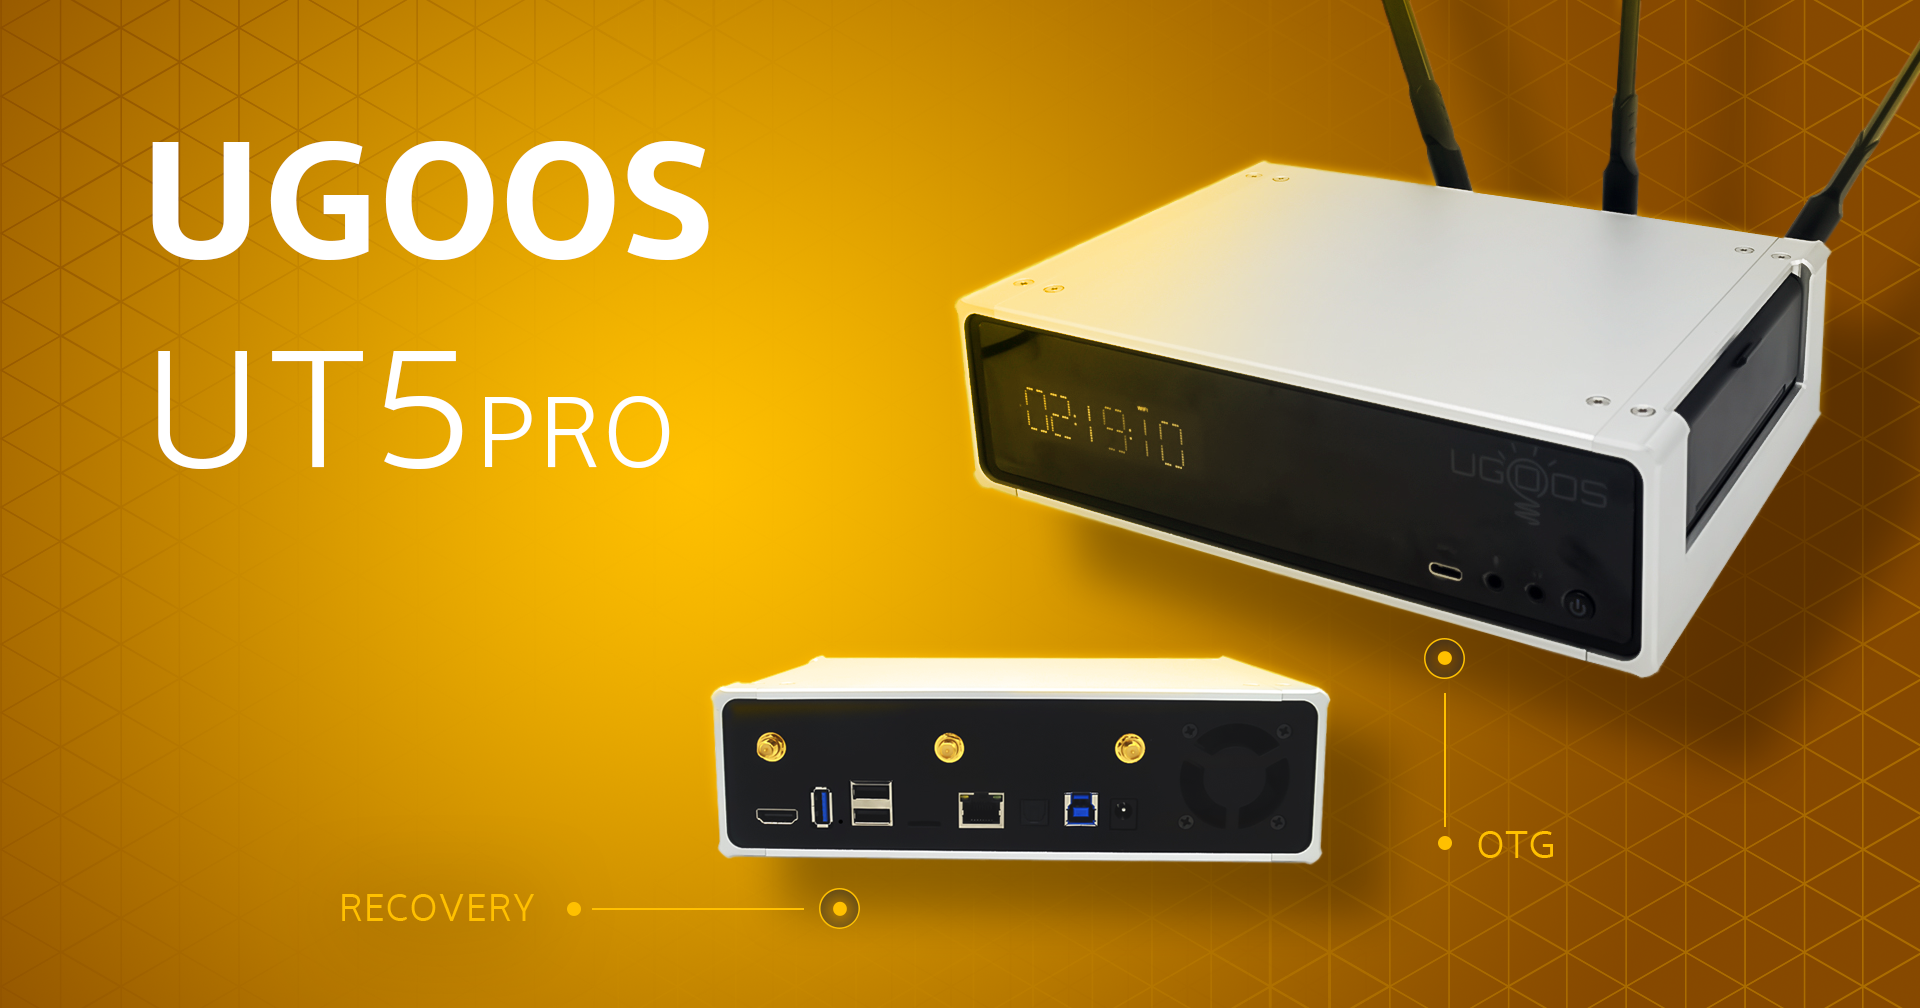
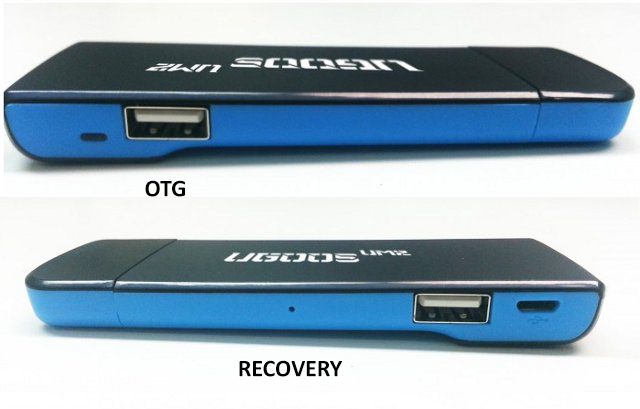
RECOVERY BUTTONS AND OTG USB PORTS LOCATION ON UGOOS DEVICES YOU CAN SEE IN THE END OF THIS INSTRACTION.
In Android Tool choose “Upgrade Firmware” tab. If you did everything correctly and the RK driver installed properly on your computer, ANDROID TOOL shows you message “Found One Loader Device “
Click “Firmware” button and specify the path to the firmware file. You need to wait until the program download information about the firmware, then it will display report on the screen. Now click “Upgrade” button to start reflashing device. At the end, you will see a report indicating a successful operation.
For flashing dualboot or clear linux firmware (for example dualboot UT3/UT3s/UM3 firmwares)
Run Android Tool. If you did everything correctly and the RK driver installed properly on your computer, ANDROID TOOL shows you message “Found One Loader Device “ In Android Tool choose “Download Image” inset. Default program configured to flash «clear» android on your device. If you want install “Dualboot” or “Clear Linux” click right mouse button by program window, and then select “Load config”.
3. Then choose one of configurations files:
config.cfg — if want flash only Android
config_dualboot.cfg — if want flash dualboot
config_linux.cfg — if want flash only linux
3. Now click the “Run” button to start reflashing device. At the end, you will see a report indicating a successful operation.
IF YOU USE BATCH TOOL:
Main difference between Android tool and Batch tool is Batch tool can reflash several devices at the same time (6 max).
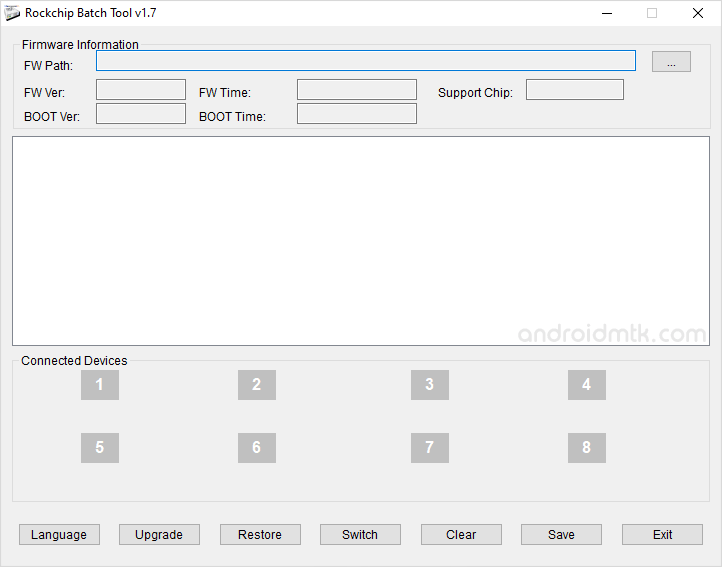
Run the Rockchip Batch Tool and click on the “…” to choose file with firmware. If you did everything correctly and the driver is installed on your computer, you will see green light on one of the indicators.
Now click the “Upgrade” button to the firmware of the device. At the end, you will see a report indicating a successful operation.
OTG usb ports and recovery buttons on Ugoos devices:
Ugoos UT4/UT3+/UT6
Recovery button and USB OTG port is on the right side
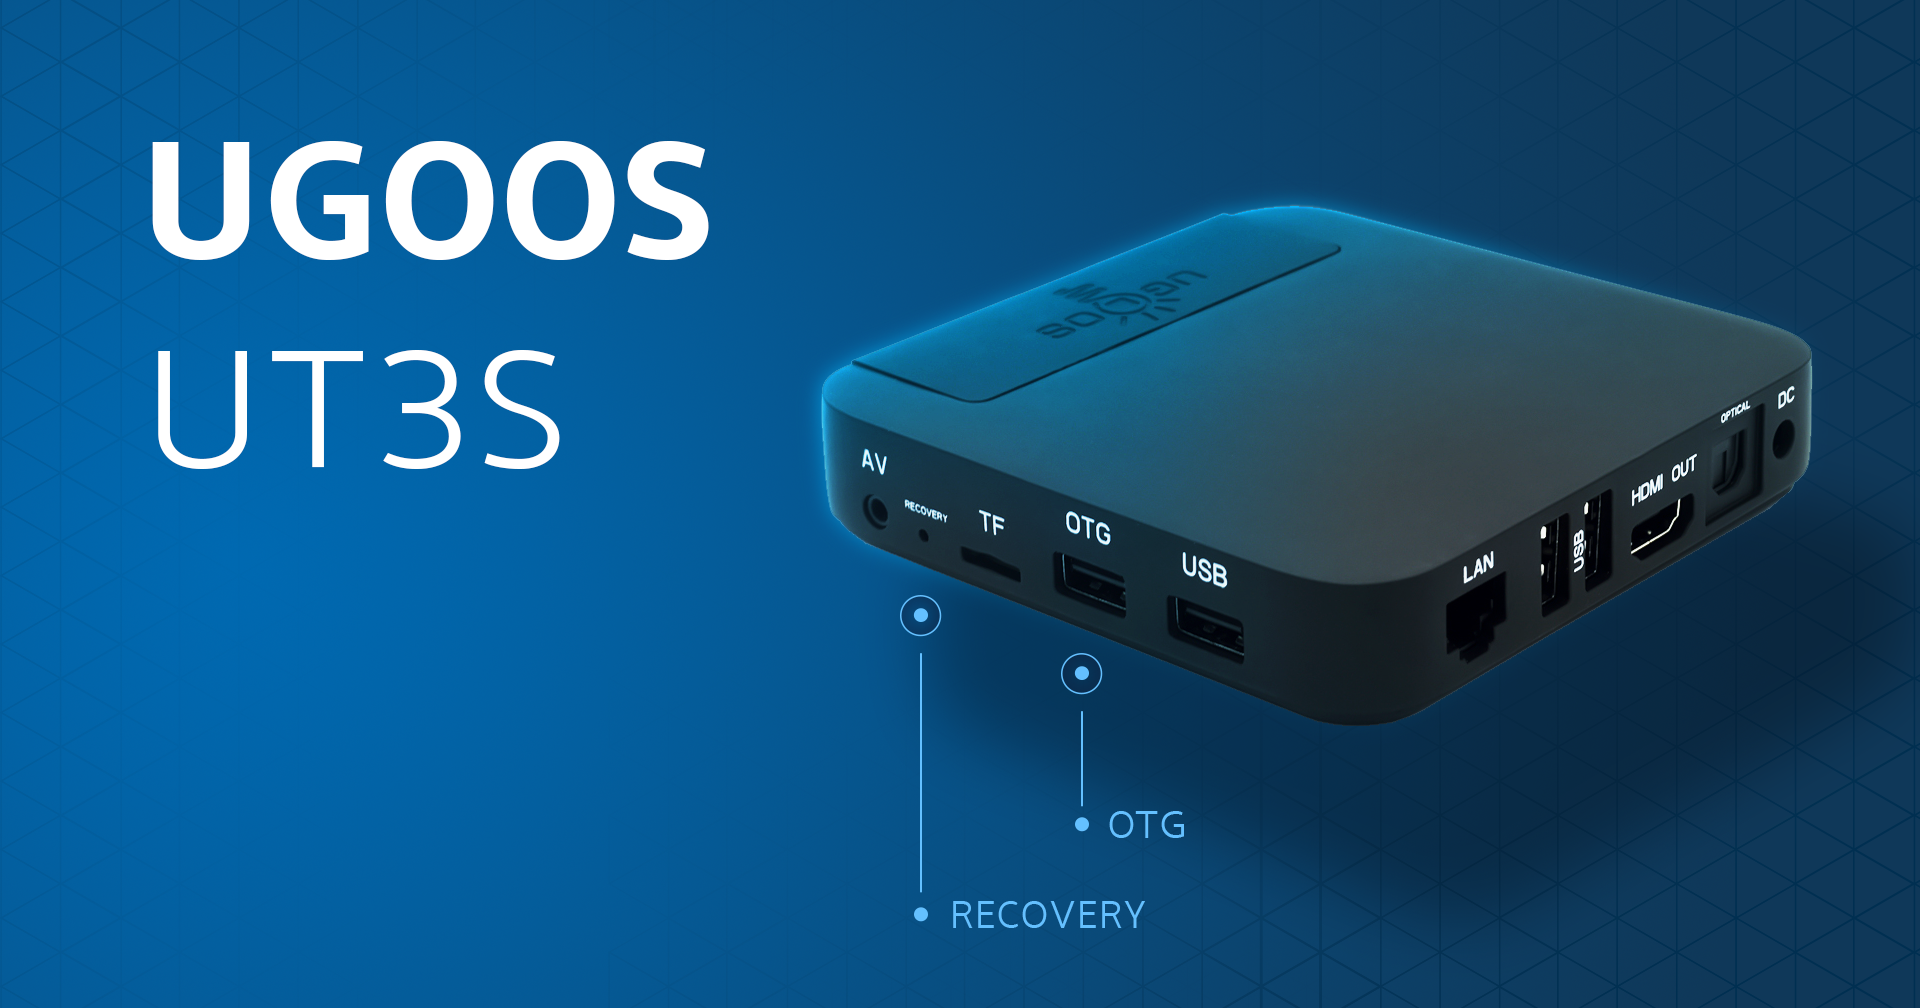
Ugoos UT3/UT3s (old version)
Recovery button and USB OTG port is on the right side
Ugoos UM3/UM4
Recovery button is from the left to antenna connector
Ugoos UT5 Pro
Ugoos UM2
Ugoos UT2
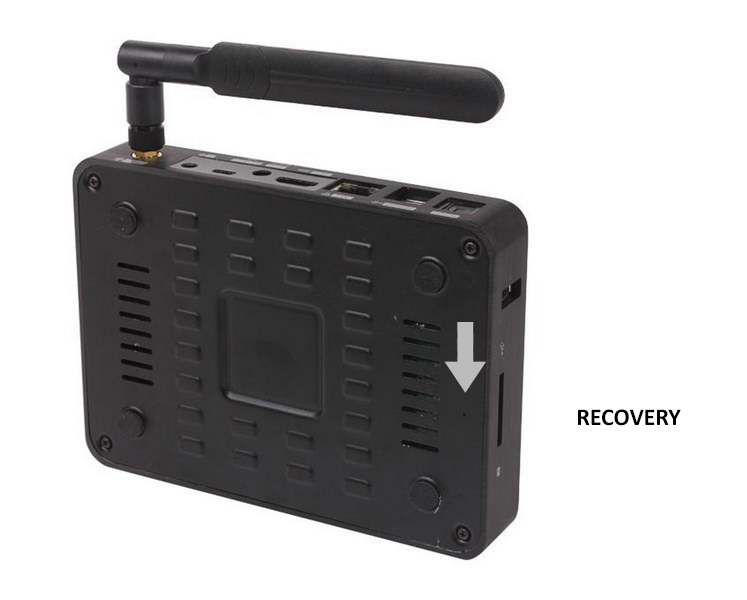
Ugoos UT1
Прошиваем RK3188 из Linux
Возникла необходимость обновить прошивку на планшете Cube U30GT2, работающем на известном китайском SoC Rockchip 3188 (RK3188). Это продолжение линейки RK3066, которая была популярна примерно в прошлом году.
Однако приложений для прошивки хоть и два, но они оба для ОС Windows (это RKAndroidTool и Rockchip Batch Tool). Раньше в таких случаях я выполнял обновление firmware из виртуалки — VirtualBox с запущенной WinXP, но это неинтересно).
Все действия выполнялись для прошивки от ImaSoft, для простого обновления системы все действия намного проще. Главная сложность процесса в моей ситуации — требуется увеличенный системный раздел, так как в стандартную область системы эти прошивки не влезают.
Итак, что имеется со стороны автора прошивки:
- Архив, называемый Firmware — суррогат прошивки, главной функцией которого является изменение структуры разделов флеш-памяти (MTD). Содержит основные компоненты: parameter — файл с метаданными о разбивке на разделы, boot.img — загрузчик, recovery.img — образ CWM Recovery, kernel.img — образ ядра linux.
- Архив с собственно прошивкой — образ загрузчика, образ ядра и набор системных файлов (приложения Android).
Дополнительные приложения, которые сначала нагуглились, а потом понадобились:
- rkflashkit: https://github.com/linuxerwang/rkflashkit. Графическое приложение для заливки образов во флеш-память устройства.
- rkflashtool: https://github.com/Galland/rkflashtool_rk3066. Консольная утилита для ручной заливки образов во флеш-память. Отличается от пункта 1 тем, что мы сами можем задавать смещения, по которым нужно произвести запись.
- rksp: https://github.com/ttz642t/rksp. Полезная утилита для генерации PARM-образа (метаданные о разбивке памяти) из файла parameter. Перед запуском любого из этих приложений его надо скомпилировать ^_^ Градус красноглазия повышен. Также нужен установленный adb (Android Debug Bridge). У кого нет — марш на developer.android.com.
Что же нужно сделать для обновления прошивки.
Внимание: делайте бэкапы, всё выполняется на свой страх и риск. При получении кирпича я не виноват 🙂
Заходим в bootloader-режим на устройстве одним из двух способов:
или просто выключаем планшет, зажимаем “громкость вверх” и вставляем usb-кабель. На экране ничего не будет, но проверить наличие подключенного планшета можно командой lsusb . В положительном случае должна появиться строчка, содержащая id устройства. Для Cube U30GT2 это 2207:0010 .
Сначала ставим Firmware.
- Генерируем parm.img, используя rksp, следующим образом:
./rkcrc.pl -p -i parameter -o parm.img У recovery.img отдельная миссия. ClockworkMod Recovery — это специальная мини-ос, позволяющая загружать основную ОС, производить над ней какие-либо действия (обновлять, удалять, стирать данные, etc.). Стоит посмотреть внизу статьи на подводные камни, чтобы понять, к чему может привести неправильный выбор этого образа.
На этом красноглазые танцы заканчиваются.
Затем ставим саму прошивку
Выключаем девайс, включаем его заново, зажав одновременно Vol+ и Power, попадаем в CWM Recovery. Выбираем пункт “Install zip from sideload”. И вводим команду типа такой:
где update.zip — файл с прошивкой. Ждём. Дожидаемся, выбираем reboot и получаем рабочий андроид 🙂
Получается всё не сложнее, чем в windows.
Подводные камни:
- На странице на форуме 4pda, посвящённой прошивке U30GT2, предлагается к установке одна из сборок CWM Recovery. Тут: http://4pda.ru/forum/index.php?showtopic=458533&st=160#entry22000603
Этот вариант использовать не надо. Почему? Потому что при заливке этого рекавери в устройство не удастся установить прошивку. Оно будет думать, что девайс — rk3066 (а не rk3188) — и отказываться принимать прошивки. Достаточен CWMR из Firmware. - Если что-то сделать не так, можно получить кирпич. Хотя, насколько я понял, убить его окончательно, если не ударить о стол/молоток/асфальт, не получится.
Использованная литература:
Download RockChip Batch Tool (all versions)
RockChip Batch Tool is a small application for Windows Computer which allows you to flash or install .img firmware on the devices powered by RockChip Chipset (RK2918, RK3066, RK3188).
Here on this page, we have shared the latest version of the RockChip Tool and the previous versions.
Features of RockChip Batch Tool
Portable Application:
It comes as a portable application, which means you don’t have to install the RockChip Tool on the computer to use it. Instead, download and extract the tool on the computer and open RKBatchTool.exe to Launch the tool.
Flash Firmware:
It allows you to flash or install stock firmware on the devices powered by RockChip Chipset. First, launch the RockChip Tool on the computer, and load the stock firmware in the tool. After loading the firmware, connect the device to the computer and click on the Upgrade or Restore button to begin the flashing process.
Supports Rockchip Devices:
It comes in support of the devices powered by Rockchip Chipset. Once you have installed the correct Rockchip Drivers on the computer, Rockchip Tool can easily detect the connected Rockchip Devices and get ready to flash or install the firmware on the device.
Support .img Format:
It supports flashing or installing the .img based stock firmware on the devices powered by Rockchip Chipset. You can find the .img file in the stock firmware of your RockChip device released by the company.
Download RockChip Batch Tool
RockChip Batch Tool is compatible with all versions of Windows OS, including Windows XP to Windows 11 (x32 or x64 bit). If in case you were looking for the latest version of the tool, then use the following links to get it on the computer:
v1.8: RockChip_Batch_Tool_v1.8.zip – Latest
Notes
[*] How to Use: If you want to learn to use RockChip Tool to install firmware, then head over to the How to use RockChip Batch Tool page.
[*] RockChip Tool allows you to flash or install the firmware on RK2918 (RK29), RK3066 (RK30), RK3188 (RK31) Chipsets. Unfortunately, it doesn’t support flashing the firmware on other chipsets, including the Allwinner Chipset.
[*] Caution: Flashing or installing firmware using the Rockchip Flash Tool will wipe the data from the device. Therefore, we recommend you take a backup of your data before using the tool.
[*] Alternative Tool: RockChip Factory Tool is the best alternative to Batch Tool. It also allows you to flash or install firmware (ROM) on RockChip Devices.
[*] Credits: RockChip Tool is created and distributed by Fuzhou Rockchip Inc. So, full credit goes to them for creating the tool.
RK3066 update.img
update.img is Rockchip’s closed image format for nand flash images, which can be flashed via the rockchip batch tool or Linux Upgrade Tool into nand flash. You can find our prebuilt update image of android and ubuntu at http://www.haoyuelectronics.com/service/RK3066/images
Generating the image
Windows
A window batch tool is provided by Rockchip to create the image, which calls the AFPTool.exe and RKImageMaker.exe to generate the image. You can find the batch tool at the rockdev folder of the SDK source code.
Afptool -pack ./ Image\update.img RKImageMaker.exe -RK30 RK30xxLoader(L)_V1.22.bin Image\update.img update.img -os_type:androidos
The afptool reads the package-file which contains what files to be packed into the image.
# NAME Relative path # #HWDEF HWDEF package-file package-file bootloader RK30xxLoader(L)_V1.22.bin parameter parameter misc Image/misc.img kernel Image/kernel.img boot Image/boot.img recovery Image/recovery.img system Image/system.img backup RESERVED update-script update-script recover-script recover-script
Linux
A linux version of afptool and image maker by fonix232 can be found on github, below is the packing tool using afptool and image maker to pack the image.
git clone https://github.com/powermcu/rockchip-pack-tools # prepare the kernel and rootfs ./mkupdate.sh # Pack the image
You will get the update.img
Source code
The source code of afptool and img_maker:


