- Выход из emergency mode
- Получение доступа к машине
- В случае, если пароль загрузчика неизвестен
- Получение имени администратора
- Сброс счетчика неудачных попыток
- Смена пароля
- Сброс блокировки учетной записи администратора
- Error “Cannot open access to console, the root account is locked” (SOLVED)
- How to unlock the root user in emergency mode
- How to recover a computer in emergency mode
- Checking disks for errors
- Failed update
- System does not boot due to incorrect entry in /etc/fstab
- Related articles:
- Alex
- Leave Your Observation Cancel observation
- Recent Posts
- Вики IT-KB
- Как восстановить доступ к Debian Linux в случае проблем с sudo или утратой root-пароля
- Загрузка в recovery mode
- Нестандартная загрузка
Выход из emergency mode
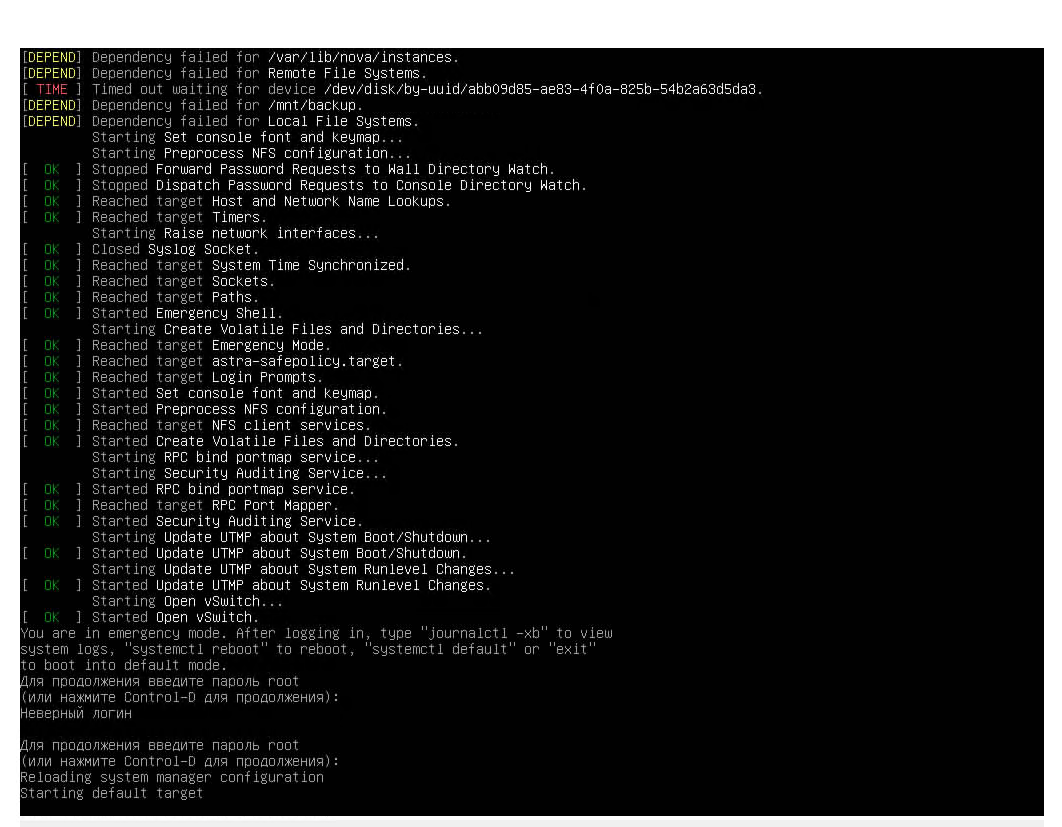
Система уходит в emergency mode после неудачной попытки примонтировать сетевой диск СХД.
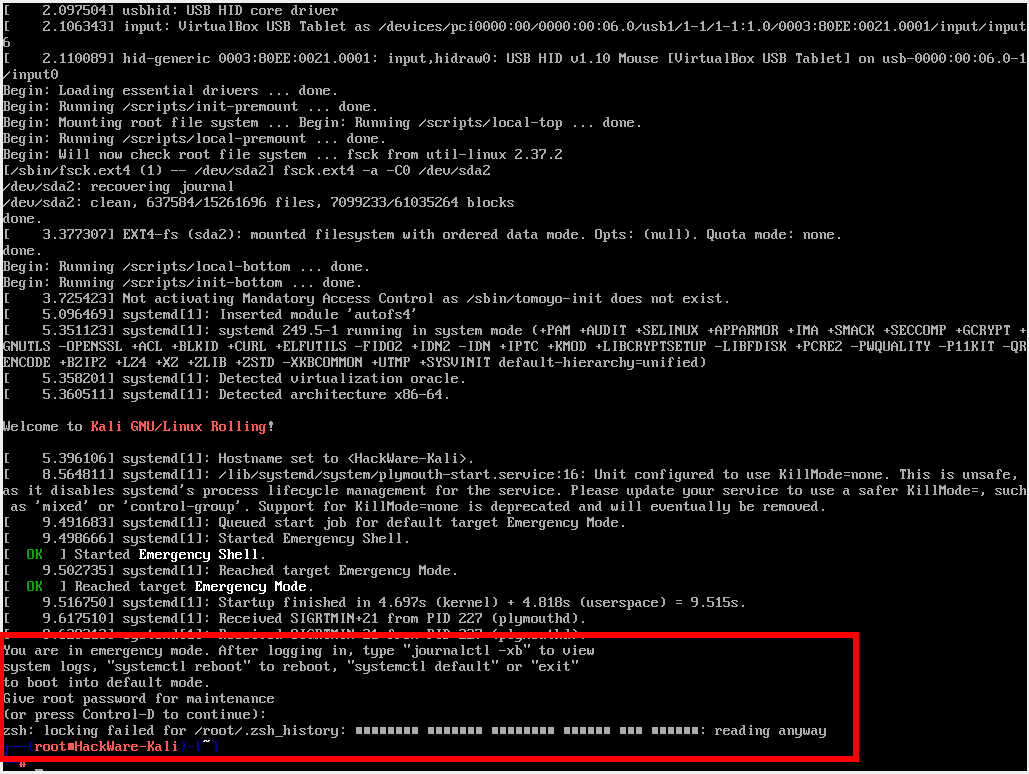
Иногда возникает проблема, что ОС не может по тем или иным причинам монтировать сетевой диск на старте. В таком случае можно увидеть следующую ошибку:
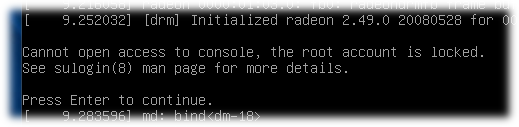
You are in emergency mode. After logging in, type 'journalctl -xb' to view system logs, 'systemctl reboot' 'systemctl default' or "exit" to boot into default mode. Cannot open access to console, the root account is locked. See sulogin(8) man page for more details. Press Enter to continue. Reloading system manager configuration
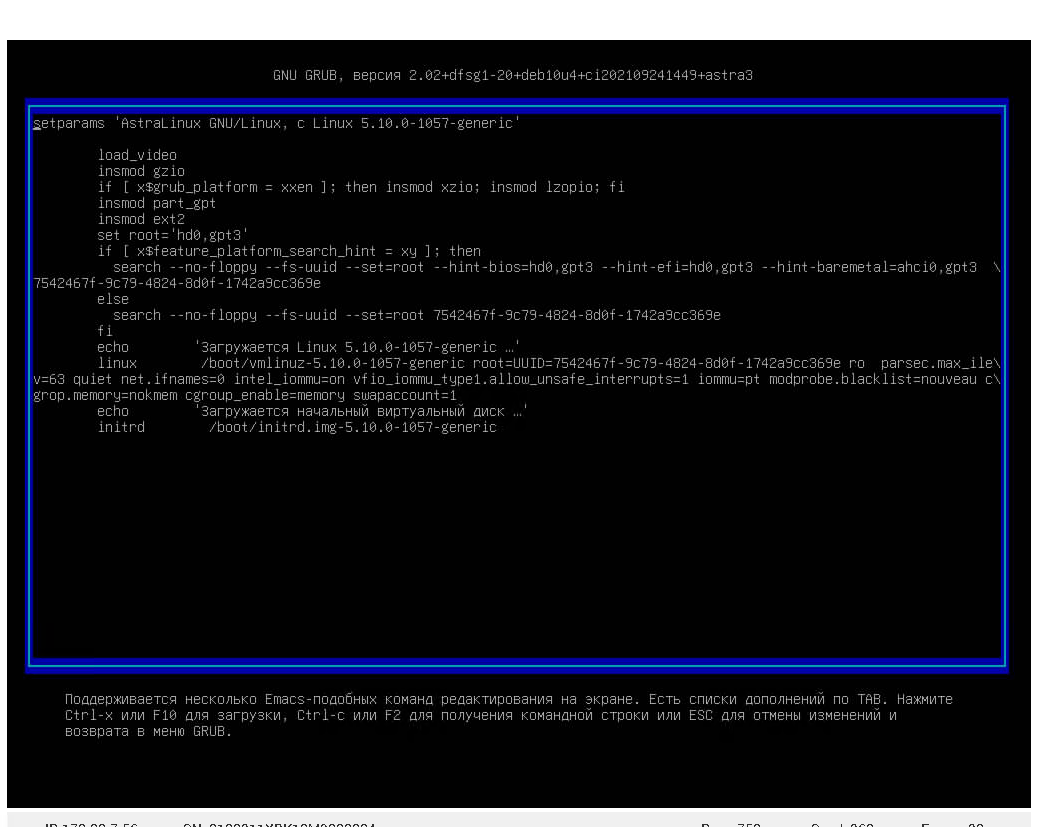
Для решения проблемы необходимо загрузиться в однопользовательском режиме. Для этого в меню grub при выборе ядра нажимаем «e» для перехода в режим редактирования настроек загрузки. Вводим логин/пароль пользователя (на Astra по умолчанию u ).
Загрузка в однопользовательском режиме 
В строке, начинающейся с linux, в конце дописать:
Загружаем ядро с новыми параметрами используя Ctrl+x или F1.
По умолчанию монтирование корневого каталога в режиме ro . Перемонтируем для возможности редактирования:
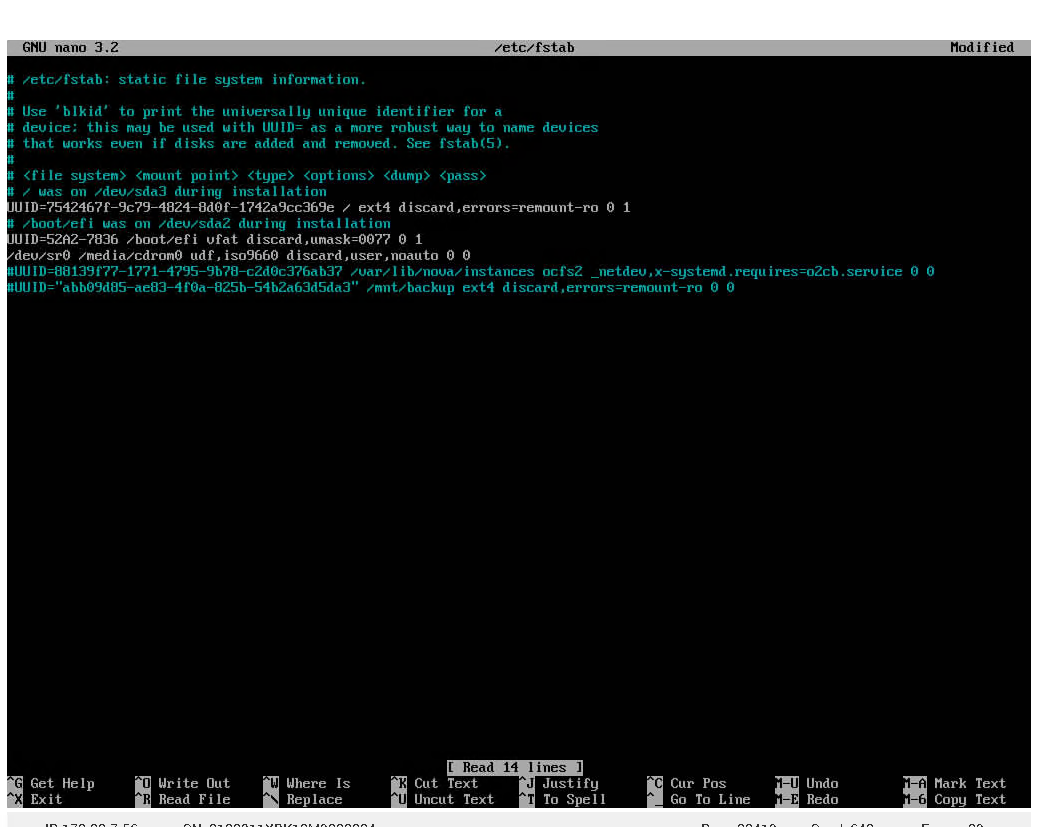
Комментируем недоступные сетевые диски. Сохраняем, выходим.
Загрузка в однопользовательском режиме 
Применяем изменения в системе. Перезагружаем:
Загружаем систему в штатном режиме.
Получение доступа к машине
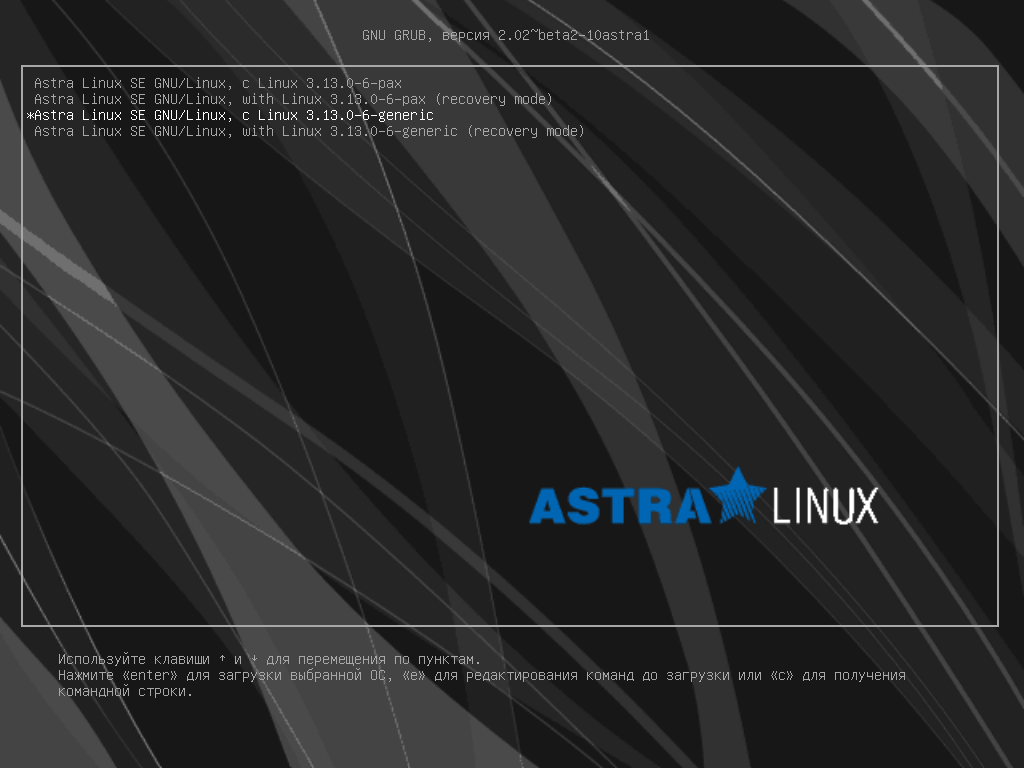
Дождаться появления меню загрузчика и нажать клавишу «e»:
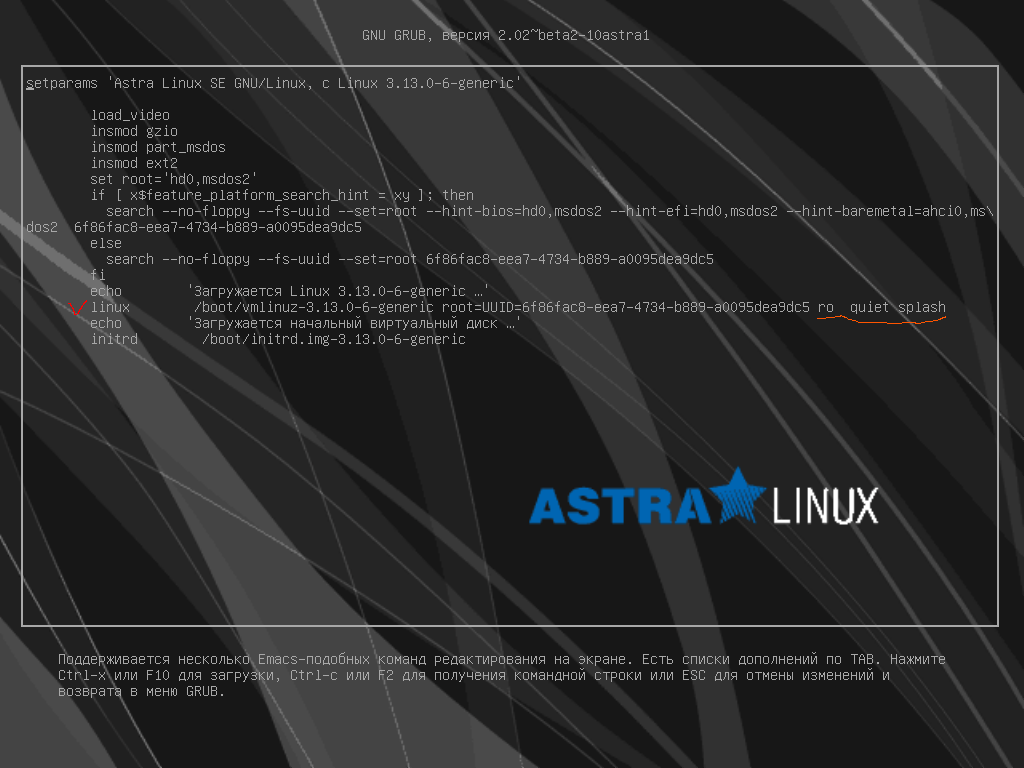
Изменяемая часть подчеркнута на снимке экрана):
В этом варианте перезагрузка машины после внесения изменений выполняется командой:
В случае, если пароль загрузчика неизвестен
- Выполнить загрузку с установочного диска Astra Linux и выбрать «Режим восстановления»;
В этом варианте перезагрузка машины после внесения изменений выполняется двумя командами:
Получение имени администратора
Создаваемому при установке ОС администратору присваивается числовой идентификатор 1000. В случае, если имя администратора не известно, его можно получить командой:
Сброс счетчика неудачных попыток
После получения доступа к системе для сброса счетчика неудачных попыток выполнить команду:
- при работе с локальными пользователями:
Пользователя можно указать по отдельному имени, числовому идентификатору или в виде диапазона числовых идентификаторов. Диапазон задается в виде максимального и минимального значений .
После сброса счетчика перезагрузить машину.
Смена пароля
После получения доступа к системе сменить пароль пользователя, для чего в ыполнить команду:
После смены пароля перезагрузить ОС.
Сброс блокировки учетной записи администратора
Если локальный администратор самостоятельно заблокировал свою учетную запись, то для ее разблокирования:
- Загрузить компьютер в режиме восстановления;
- Выполнить команду:
Error “Cannot open access to console, the root account is locked” (SOLVED)

After a sudden power outage, unsuccessful update or adding a new disk to /etc/fstab, you may face the problem that your system does not boot, or rather, boots into the console or into a black screen. Sometimes the problem is compounded by the fact that the system administrator cannot even get into the emergency console. Let’s see how to solve the following error:
You are in emergency mode. After logging in, type 'journalctl -xb' to view system logs, 'systemctl reboot' 'systemctl default' or "exit" to boot into default mode. Cannot open access to console, the root account is locked. See sulogin(8) man page for more details. Press Enter to continue. Reloading system manager configuration
After pressing Enter, everything can be repeated.
This message states that the system booted in emergency mode. In fact, this is not so bad – sometimes a system administrator can deliberately boot into emergency mode to restore the OS.
The real problem is that the root account is locked (this is indicated by the message “Cannot open access to console, the root account is locked”) and you cannot get into the console to start solving problems.
The situation becomes stalemate – the system will not let you go anywhere except in the root console, and it will not let you in the root console either, since this user is locked…
How to unlock the root user in emergency mode
Nevertheless, there is a way out of this situation. Start by booting into single user mode – this is the same mode used to reset the Linux password. Below is a generalized instruction, if something does not work out for you, then separate instructions for different distributions for booting into single-user mode can be found here.
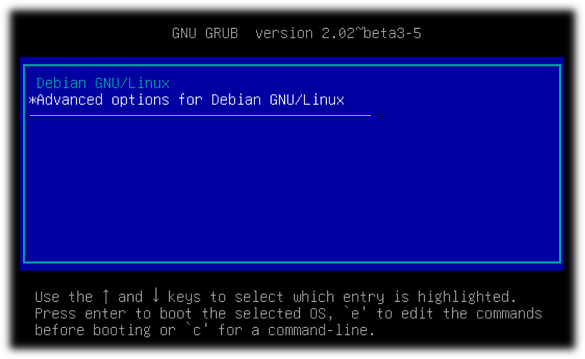
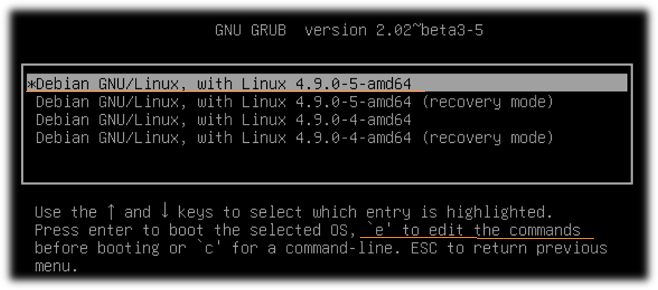
Stop the booting by holding down the SHIFT key while starting the computer, you will see:

Press the “e” key and you will proceed to editing the boot settings:
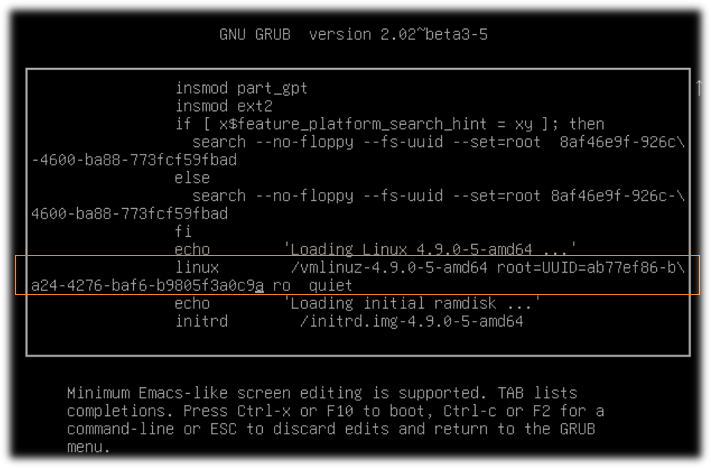
Find the line starting with “linux”.
Go to the end of this line, insert a space, and add:
It should look something like this (the kernel number may differ):

When everything is ready, press Ctrl+x or F10 to continue the booting with the set options.
You will see a shell prompt, also note that we are logged in as root i.e. we have elevated privileges, including the use of the passwd command:
will set the password for the root user.
If the passwd command fails:
passwd: Authentication token manipulation error passwd: password unchanged
the filesystem is most likely mounted read-only. To verify this, enter the command:
The “ro” indicate that the filesystem is mounted read-only and therefore the changes made cannot be saved. Remount the file system:
After that, the password change should be successful.
Remove the password lock for the root user:
If the root user is locked, then this may not be enough. Check which shell is set for root:
If “/usr/sbin/nologin” is specified as the shell for root, run one of the following commands.
sudo usermod -s /usr/bin/bash root
sudo usermod -s /usr/bin/zsh root
To turn off your computer run:
Or restart your computer with the command:
If after the reboot you see “Give root password for maintenance”, then this means that the first stage of recovery was successful – we activated the root user and can now start restoring the system.
How to recover a computer in emergency mode
Now we have the opportunity to restore the system. If you have no idea what exactly caused the error, then run the command
and try to find the cause of the problem there.
Checking disks for errors
If you think the error is caused by hard disk problems, then use the following commands to check the partitions:
umount /dev/sda2 fsck -y /dev/sda2
Partition number and disk name may differ from “sda2”, to find out the exact name, use the command
Failed update
If the system does not boot due to an interrupted update, then try the following commands:
apt install -f -y dpkg --configure -a
If you think that the problem was caused by an unsuccessful update of a specific package, then use a command like this:
This command will reconfigure an already installed package.
For example, the following command will re-configure the Linux kernel:
dpkg-reconfigure linux-image-`uname -r`
System does not boot due to incorrect entry in /etc/fstab
In the event of an unsuccessful mount (this can happen if you made an incorrect entry in the /etc/fstab file, the system will not be able to boot, it will go into emergency mode and the following message will be displayed:
You are in emergency mode. After logging in, type "journalctl -xb" to view system logs, "systemctl reboot" to reboot, "systemctl default" or "exit" to boot into default mode. Give root password for maintenance (or press Control-D to continue):
To fix the problem, enter the root password and open the /etc/fstab file for editing:
Comment out or delete the problematic line. Save the file (Ctrl+o), close it (Ctrl+x) and reboot:
Related articles:

Alex
4 observations on “ Error “Cannot open access to console, the root account is locked” (SOLVED) ”
- David
April 5, 2023 at 4:24 pm Thank you so much for this! Every other solution I found that addressed this problem involved booting a Linux rescue CD/USB in order to manipulate the corrupted host, which I could not do because I don’t have access to the host directly. Yours was the only one that gave the «single init=/bin/bash» flags that allowed me to finally boot into my corrupted host, and you even gave the solution to my second problem with the «Authentication token manipulation error» message. I’m very glad you posted this. Reply - Manuel
July 2, 2023 at 8:24 pm Hi, I have a problem. This happened to me when I was upgrading (I ran out of space). (Fedora 37) After passwd -u root (I have to do it with —force) and I get error:
passwd: Libuser error at line: 171 — error opening temporary file for ‘/etc/passwd.lock’: No space left on device. passwd: Error (password not set?) Thank you. Reply- Alex
July 3, 2023 at 12:01 am Greetings. The reason for the problem is that there is not enough disk space to even create the tiny /etc/passwd.lock file. You need to free up at least some disk space, the article “What files can be deleted when there is not enough disk space in Linux” can help you with this. If you cannot execute any command because you cannot set or change the password, then I see 2 options: 1. Forcibly reboot the server, as a result of this action, the /tmp directory will be automatically cleared, perhaps this will be enough for you 2. Boot into Live Linux using an ISO image, mount a full file system and delete some files from it. This option is suitable for both if you have physical access to the server (for example, in your home), and for virtual private servers. Usually hosting providers already have some ISO images, or you can give them a link and they will upload your ISO. Reply- Manuel
July 3, 2023 at 4:23 pm Hi, thanks for your response. That’s weird because the PC has almost 12 GB space. This is the timeline: I was upgrading and then stop on some selinux package. I stopped and retry. I got the «not enough space» error. I deleted a lot of files from my Downloads folder Reboot I can execute a lot of commands and the root user is allow to login (it doesn’t have /usr/sbin/nologin but /bin/bash) and /tmp directory is empty. I don’t know if it’s some related to cache. Thanks. Reply
- Manuel
- Alex
Leave Your Observation Cancel observation
Recent Posts
Вики IT-KB
Как восстановить доступ к Debian Linux в случае проблем с sudo или утратой root-пароля

В некоторых ситуациях может получиться так, что мы потеряем административный доступ к серверу на базе Debian GNU/Linux. Например, к такому исходу могут привести некорректные действия администратора по настройке механизма sudo (ошибки при правке файлов /etc/sudoers и/или /etc/sudoers.d/* ) и, как следствие, получение ошибки «Username is not in the sudoers file» при любых дальнейших попытках использования sudo. Иногда бывают ситуации, когда локальный доступ к серверу есть, а данные административной учётной записи недоступны и требуется восстановить административный доступ к серверу.
Загрузка в recovery mode
В типичных ситуациях в Linux имеется режим восстановления Recovery Mode, который, как правило, доступен из загрузчика ОС. В этом режиме наша Linux-система доступна в режиме супер-пользователя root, и мы можем исправить в ней имеющиеся у нас проблемы, например внести корректировки в файлы sudo или добавить/изменить учётные данные локального администратора.
Для того, чтобы попасть в меню загрузки, в процессе запуска ОС Debian нажимаем кнопку Shift. В появившемся меню загрузчика GRUB выбираем расширенный режим загрузки:
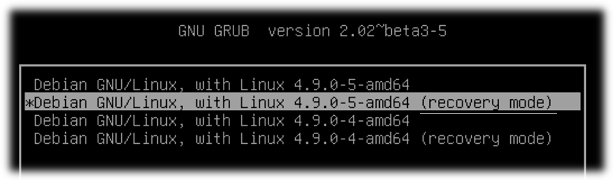
Затем выбираем интересующее нас ядро Linux в режиме recovery mode…
Однако в случае с Debian, где супер-пользователь root в конфигурации по умолчанию выключен, мы можем получить сообщение о невозможности загрузки консоли восстановления «Cannot open access to console, the root account is locked»:
В таком случае мы можем прибегнуть к приёму изменения параметров загрузки ядра.
Нестандартная загрузка
В процессе загрузки в GRUB выбираем в списке ядер нужное нам ядро (режим recovery mode здесь уже не важен) и нажимаем «e» для редактирования параметров загрузки.
Находим строку начинающуюся с «linux …»
В конце строки меняем значение « ro » на « rw », а в самом конце строки дописываем вызов оболочки « init=/bin/bash ».
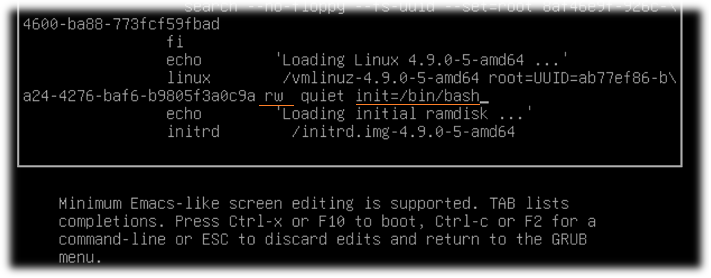
После чего для продолжения загрузки жмём F10
Теперь мы получили беспарольный root-доступ к нашему серверу. Здесь можно исправить имеющиеся у нас проблемы, например внести корректировки в файлы sudo. После внесения нужных правок система может быть загружена обычным образом (все сделанные нами ранее изменения в GRUB были временными).
Дополнительные источники информации:
Проверено на следующих конфигурациях:

Автор первичной редакции:
Алексей Максимов
Время публикации: 13.06.2018 15:45