EasyRouter:
- Computer
- cpu
- ram
- hard disk(s)
- If you want the network attached storage part, I recommend having at least 2 dedicated hard disks of equal size for attached storage for at least RAID 1, though the more the merrier
- 2 NICs ( This is key )
- monitor
- keyboard
- mouse
- Ubuntu Server install media (CD or USB)
Before you begin
Considerations
Plan out how are going to set up your machine. This is largely dependent on the number of hard drives you have. There are really lots of options here. Keep in mind that you may have to be careful if you plan on mirroring your / partition, if you don’t to thing properly, your system may not boot.
Keeping with the quick, simple, and dirty nature of this how-to, these instruction will be for a 4 or 5 HD system with 2 NICs. There will be no performance tuning or advanced options addressed.
Installation
- If you have your system ready, boot the server install media.
- The process should be relatively self explanatory. Go through filling out the logical options until you get to the Disks/Partitioning dialog. Choose manual partitioning.
- In the manual partitioning dialog, choose one disk to be your main booting disk.
- Format with:
- 0.5 — 5 Gigabytes of swap depending on your amount of RAM and hard drive space.
- 5 — 10 Gigabytes of space for /
- 7+ Gigabytes for /home
- Remainder as Extra Storage (/media/storage may be a good mount point.)
- There will now be an option at the main partitioning dialog to create RAID device.
- Choose this option and select the appropriate RAID for your disks. If it’s RAID 5 with 3 disks, then 3 devices, etc. Backup/Offline devices are not used and initialize automatically in case of drive failure.
- The installer will ask you to reboot the installer. Do so.
- Go through installer again until you get to partitioning.
- This time a raid device will be listed as a disk for partitioning. Make your storage partition on it and give it a mount point such as /media/all_my_useless_files.
- Log in.
- Check that your RAID exists: cd into its directory and make a file, delete it.
- sudo mdadm -D /dev/md0 or md will show you the status.
Routing the Lazy Way
- You should have Internet access at this point via CAT-5 to your cable modem or similar setup.
- Use aptitude to install programs:
sudo aptitude install xserver-xorg xorg xfce4 geany xfce4-terminal gnome-system-tools dhcp3-server ssh firestarter denyhosts
sudo nano /etc/network/interfaces
- At this point it will only have your internet interface and loopback interface.
- At the end add:
auto eth1 iface eth1 inet static address 192.168.0.1 network 192.168.0.0 netmask 255.255.255.0 broadcast 192.168.0.255
- On first run it will present a wizard.
- Go through wizard. Choose correct options for internet and local network. Enable connection sharing.
- Once complete, go to preference menu.
- Enable DHCP server.
- Under policy tab, righ click in allow service area. For services you want on the local network, allow service when source is LAN. For those you want to access from the internet, allow for all. If there’s a port you want open, add a custom rule.
- quit (The daemon will work in the background)
sudo /etc/init.d/networking restart
Permissions on your media share / ssh for remote admin
- In GUI admin menu users and groups, create a user. Call it creator or something.
- Create a group. Call it sharers (or similar).
- Create a user remoter. Add it to group sharers.
- Chown your RAID drive or whatever you intend to be your shared folder
sudo chown creator:sharers -R
EasyRouter (последним исправлял пользователь ug-uyst-s-0003 2011-05-16 15:53:40)
The material on this wiki is available under a free license, see Copyright / License for details
You can contribute to this wiki, see Wiki Guide for detailsHow to build Linux Router with Ubuntu Server 20.04 LTS
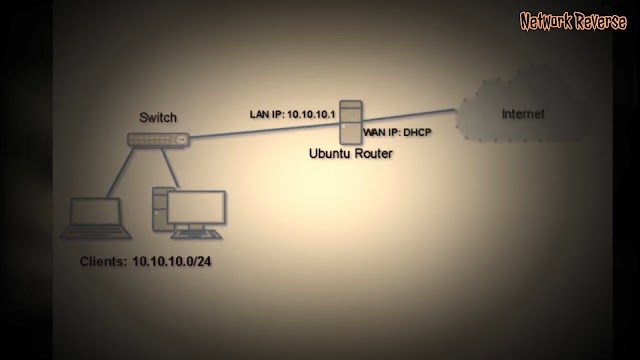
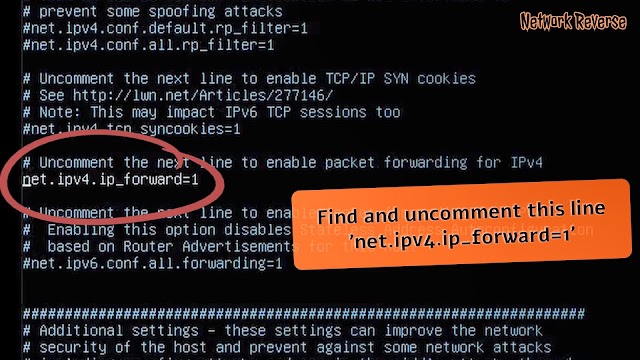
Linux router configuration is simple, you just need to make sure the router have two interfaces that connected to the network that will be routed, enable packet forwarding and iptables for NAT if needed. There are more advanced configuration, but in this post we will build Linux router on Ubuntu Server 20.04 to allow LAN traffic through to internet on WAN interface with NAT.
How to build Linux Router with Ubuntu Server 20.04 LTS
Ubuntu Server 20.04 comes with netplan as default network interface configuration tool.If you are not familiar with netplan please read the previous post about Ubuntu Server 20.04 LTS — Basic Network Configuration with netplan.
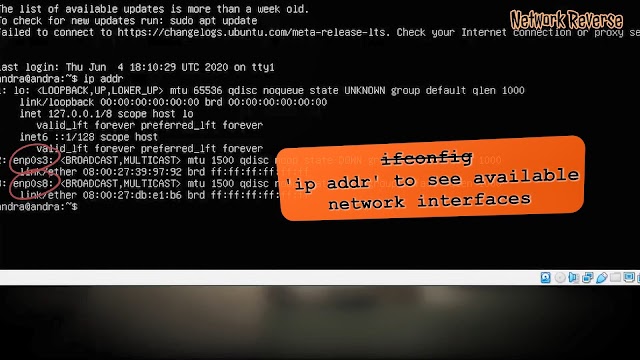
- enp0s3 is the WAN interface, it will be configured to obtain IP address from DHCP server.
- enp0s8 is the LAN interface, it will be configured to use 10.10.10.1/24 IP address.
nano /etc/netplan/anything.yaml
This configuration below addedd interface enp0s3 to obtain dhcp and enp0s8 to use 10.10.10.1/24 IP address. Just add lines that red colored to your configuration file, if it is a newly installed Ubuntu Server.
network: version: 2 renderer: networkd ethernets: enpos3: dhcp4: yes enp0s8 addresses: - 10.10.10.1/24iptables -t nat -A POSTROUTING -j MASQUERADE
iptables command line will not be saved after the system reboot, there are many ways to make it persistent after reboot. This time we will use the easiest way to install iptables-persistent package to the Ubuntu server.
apt update -y && apt install iptables-persistent
It will asks you to save the current ipv4 and ipv6 iptables rules, answer yes to save it or no to save it later.
iptables-save > /etc/iptables/rules.v4This command will save the iptables rules to /etc/iptables/rules.v4 , where later it will be restored by iptables-persistent on every reboot.
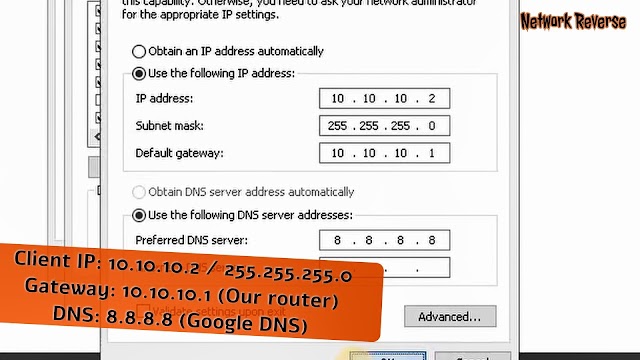
If all going well, we have finished building Linux Router with Ubuntu Server 20.04 LTS. According to the topology, the clients use 10.10.10.0/24 network address. So configure the clients accordingly.
You can watch all the activity above on building Linux Router with Ubuntu Server 20.04 LTS from this youtube video below. If you still have any problems, please put your comments.
- Go through wizard. Choose correct options for internet and local network. Enable connection sharing.
- Format with:


