- How to configure a L2TP Server on TP-Link Router
- Как настроить VPN-соединение PPTP / L2TP на вашем роутере (новый интерфейс)?
- Похожие статьи
- Как настроить VPN-соединение PPTP / L2TP на вашем роутере (новый интерфейс)?
- Related FAQs
- How to configure PPTP/L2TP/OpenVPN Client to access peer server through site-to-site VPN using business router
- Похожие статьи
How to configure a L2TP Server on TP-Link Router
![]()
Дата последнего обновления: 06-21-2017 09:58:55 AM 125413
Configuring a L2TP Server on TP-LINK router
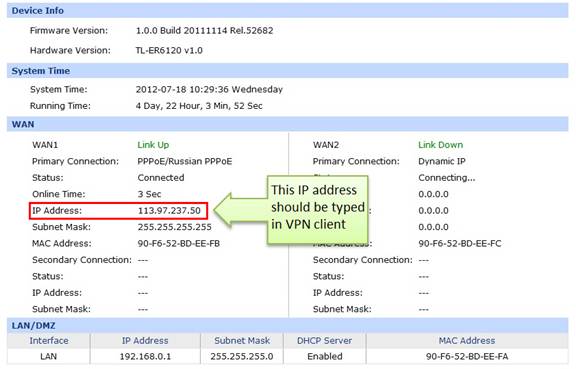
Access the router’s management web page; verify the settings needed on the router.
Click on VPN->L2TP/PPTP->IP Address Pool, enter Pool Name and IP Address Range, and then click on Add.
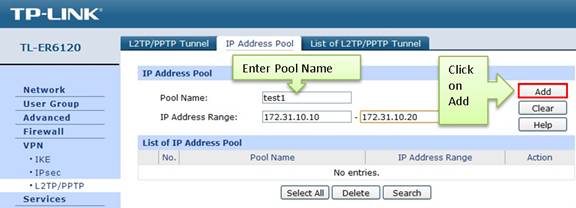
NOTE: IP Address pool must be different range from LAN IP address range.
Look for protocol, select L2TP; the Mode should be Server.
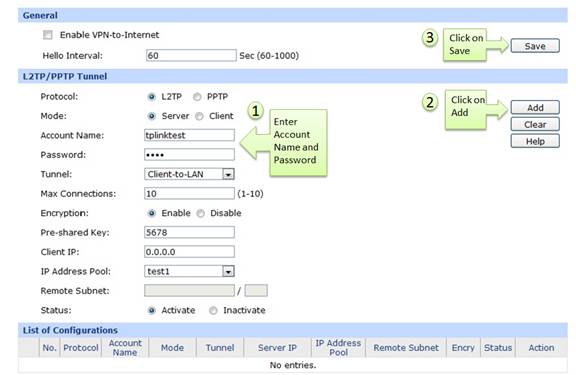
Enter Account Name and Password whatever you like, here we use “tplinktest” as account name, password is “1234”.
Under Tunnel, select Client-to-LAN.
The tunnel supports up to 10 connections, we enter 10 in this example.
Under Encryption, select Enable, and then enter “5678” as Pre-shared Key.
Under IP Address Pool, select “test1” we have added before.
Look for Status, select Active.
Click on Add.
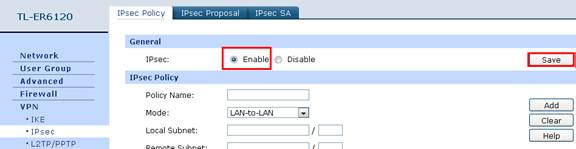
As we enabled Encryption, we need to go to VPN->IPsec, enable IPsec and then click on Save.
Till now, we have finished the L2TP Server in the router, as for the client setting on remote PC, please refer to the FAQ
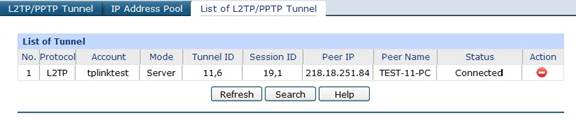
If the LPTP tunnel is established successfully, you can check it on List of Tunnel.
Был ли этот FAQ полезен?
Ваш отзыв поможет нам улучшить работу сайта.
Что вам не понравилось в этой статье?
- Недоволен продуктом
- Слишком сложно
- Неверный заголовок
- Не относится к моей проблеме
- Слишком туманное объяснение
- Другое
Как мы можем это улучшить?
Спасибо за обращение
Нажмите здесь, чтобы связаться с технической поддержкой TP-Link.
Подписаться на рассылку Мы с ответственностью относимся к вашим персональным данным. Полный текст положения об обработке персональных данных доступен здесь. С нашими условиями использования и программой улучшения пользовательского опыта можно ознакомиться здесь.
Как настроить VPN-соединение PPTP / L2TP на вашем роутере (новый интерфейс)?
![]()
Дата последнего обновления: 06-04-2018 15:45:23 PM 69078
1. Наши маршрутизаторы поддерживают клиент PPTP / L2TP, но могут подключаться только к тем VPN-серверам, чьи данные не зашифрованы.
2. Некоторые интернет-провайдеры обеспечивают соединение PPTP / L2TP. Таким образом, вы можете подключиться к интернету через клиент PPTP / L2TP.
Возьмем Archer C9_V5 в качестве примера:
1. Зайдите в настройки маршрутизатора и перейдите в раздел Дополнительные настройки -> Сеть -> Интернет.
2. Выберите PPTP в качестве типа подключения к Интернету.

3. Введите правильное имя пользователя и пароль.

4. Введите правильный IP-адрес/доменное имя VPN-сервера. (Например: 219.76.10.41, или если ваш VPN-сервер является доменным именем, вы можете ввести имя домена.)

5. Нажмите Сохранить, а затем Подключить.

Похожие статьи
Был ли этот FAQ полезен?
Ваш отзыв поможет нам улучшить работу сайта.
Что вам не понравилось в этой статье?
- Недоволен продуктом
- Слишком сложно
- Неверный заголовок
- Не относится к моей проблеме
- Слишком туманное объяснение
- Другое
Как мы можем это улучшить?
Спасибо за обращение
Нажмите здесь, чтобы связаться с технической поддержкой TP-Link.
Подписаться на рассылку Мы с ответственностью относимся к вашим персональным данным. Полный текст положения об обработке персональных данных доступен здесь. С нашими условиями использования и программой улучшения пользовательского опыта можно ознакомиться здесь.
Как настроить VPN-соединение PPTP / L2TP на вашем роутере (новый интерфейс)?
![]()
Дата последнего обновления: 06-04-2018 15:45:23 PM 69079
1. Наши маршрутизаторы поддерживают клиент PPTP / L2TP, но могут подключаться только к тем VPN-серверам, чьи данные не зашифрованы.
2. Некоторые интернет-провайдеры обеспечивают соединение PPTP / L2TP. Таким образом, вы можете подключиться к интернету через клиент PPTP / L2TP.
Возьмем Archer C9_V5 в качестве примера:
1. Зайдите в настройки маршрутизатора и перейдите в раздел Дополнительные настройки -> Сеть -> Интернет.
2. Выберите PPTP в качестве типа подключения к Интернету.
3. Введите правильное имя пользователя и пароль.
4. Введите правильный IP-адрес/доменное имя VPN-сервера. (Например: 219.76.10.41, или если ваш VPN-сервер является доменным именем, вы можете ввести имя домена.)
5. Нажмите Сохранить, а затем Подключить.
Related FAQs
Полезен ли этот FAQ?
Ваши отзывы помогают улучшить этот сайт.
Что вас заинтересовало в этой статье?
- Недоволен продуктом
- Слишком сложно
- Непонятное название
- Не применимо ко мне
- Слишком расплывчато
- Другой
Мы хотели бы получить ваши отзывы, пожалуйста, дайте нам знать, как мы можем улучшить этот контент.
Мы ценим ваше мнение.
Нажмите здесь, чтобы связаться со службой технической поддержки TP-Link.
Подпишитесь на рассылку Мы с ответственностью относимся к вашим персональным данным. Полный текст положения об обработке персональных данных доступен здесь. С нашими условиями использования и программой улучшения пользовательского опыта можно ознакомиться здесь.
How to configure PPTP/L2TP/OpenVPN Client to access peer server through site-to-site VPN using business router
![]()
Дата последнего обновления: 06-24-2022 06:25:36 AM 34569
User’s Application Scenario
Suppose a client is connected to Router A via VPN (PPTP/L2TP/OpenVPN), and Router A and Router B are connected via Site-to-Site VPN. Now the VPN Client wants to access a Server inside Router B through two of these two VPN tunnels.

1. The VPN Client uses PPTP/L2TP VPN
The method of PPTP or L2TP configuration is similar, here L2TP is used as an example
Step 1. Create an L2TP VPN Server on Router A.
Please note that the VPN IP Pool and the LAN IP of Router A need to be set in the same network segment, namely 192.168.0.1/24.

Note: The latest firmware of the router already supports VPN IP and LAN IP in the same network segment.
Step 2. Create an IPsec Site-to-Site VPN between Router A and Router B.
Here, we have established a VPN Tunnel between router A and router B.

Step 3. Connect to the L2TP Server.
Here, we used a PC connect to the L2TP Server. The IP address of 192.168.0.2 is assigned from the server.
For a detailed configuration process, please refer to: How to configure PPTP/L2TP client on remote PC?

Note: “Use default gateway on remote network” is need to be enabled.
Go to Control Panel –> Network and Internet –> Network and Sharing Center –> Change Adapter Settings, then you will find the L2TP VPN adapters. Right-click the adapter –> Properties –> Networking, Double-click “Internet Protocol Version 4” –> Advanced, then you will find the Advanced TCP/IP settings for the VPN.

Step 4. Verification process
The L2TP Client can access the server behind Router B through Site-to-Site VPN.

2. The VPN Client uses OpenVPN
Step 1. Create an OpenVPN Server on Router A.
Go to VPN—>OpenVPN—>OpenVPN Server, create a new OpenVPN Server. Please note that the IP address range entered in Local Network should include all the LAN IP address ranges of Router A and Router B. For example, the range of 192.168.0.1/16 includes 192.168.0.1/24 and 192.168.20.1/24
Because the OpenVPN client will generate a new routing table based on the address range entered here after the connection is successfully established, it is necessary to ensure that the subnet of Router B is within this range before data can enter the OpenVPN Tunnel.
At the same time, set the VPN IP Pool and the LAN IP of Router A in the same network segment.

After the OpenVPN Server is created, wait a few minutes and export the OpenVPN configuration file and sent to clients that need to connect.

Step 2. Create an IPsec Site-to-Site VPN between Router A and Router B.
This step is the same as the above process and will not be repeated here.
Step 3. Connect to the OpenVPN Server.
Here, we used the OpenVPN GUI on the PC to connect to the OpenVPN Server. Import the OpenVPN configuration file into the OpenVPN GUI and connect. The IP address of 192.168.0.10 is assigned from the server side.

By querying the routing table on the PC, it can be found that a route to 192.168.0.1/16 is generated, and the interface is the virtual IP address of OpenVPN.

Step 4. Verification process
The OpenVPN Client can access the server behind Router B through Site-to-Site VPN.

Note: When the VPN Client uses PPTP/L2TP, Router A can be implemented in both Controller mode and Standalone mode. When the VPN Client uses OpenVPN, Router A can only implement this application scenario in Standalone mode.
To get to know more details of each function and configuration please go to Download Center to download the manual of your product.
Похожие статьи
Был ли этот FAQ полезен?
Ваш отзыв поможет нам улучшить работу сайта.
Что вам не понравилось в этой статье?
- Недоволен продуктом
- Слишком сложно
- Неверный заголовок
- Не относится к моей проблеме
- Слишком туманное объяснение
- Другое
Как мы можем это улучшить?
Спасибо за обращение
Нажмите здесь, чтобы связаться с технической поддержкой TP-Link.