D301-How to set up DSL link on the first page
This article will guide you how to setup the router for PPPoE mode and the steps as below.
Note : If you have no idea about what is the internet connection type, VPI/VCI value, the accounts please call your ISP for them.
Connect the DSL line with the DSL port of the router, and then connect your computer with one of the LAN ports by a cable.
Note : after connection the SYS light should be blinking, the WLAN light should be on or blinking, the DSL light should be on or blinking.
1 Click on Network Connection Icon on the system bar, then click on Open Network and Sharing Center. (Here is for win7, other computer please click HERE .)
2 Click on Change adapter settings.
3 Right click on Local Area Connection, then choose thePropertiesoption.
4 Double click on Internet Protocol Version 4(TCP/IPv4)
5 Choose Obtain an IP address automatically andObtainDNS server address automatically and then click OK.
6 Also click onOK on the first Local Connection Properties window.
1 Open a browser then type192.168.1.1 in the Address bar, click on Enter.
Note : if you cannot login the management page, please click HERE .
2 Type the Username and Password as admin in the bars then click on Login to login the setting page of the router.
3 choose country/ISP/VPI/VCI. The connection type you can choose PPPoE or PPPoA (you can consult your ISP for it if you don’t know.) then please type in user name and password, set a security password (at least 8 characters) for your wireless. Click OK to save the settings.
check the Device Info , if the Status shows Connected that means you can access internet, please check.
How to setup D301 or D151 as a modem-router
D301/D151 has two modes of operation: one for ADSL uplink which is ATM Interface (working as a modem-router) and the other one for Ethernet link which is ETH Interface (working as a router only). Setting up a Tenda ADSL2+ modem router as a modem-router allows the device to work as a DSL modem and a router at the same time. This article will guide you on how to set up D301/D151 as a modem-router without a setup CD .
Totally, D301/D151 supports 5 different Internet connection types: PPPoE, PPPoA, IPoE, IPoA and Bridging. Contact your Internet Service Provider (ISP) for help if you have no idea on which one to choose.
Internet Connection Type
Essential information from your ISP
Static (Fixed) IP: IP address, subnet mask, primary DNS server and secondary DNS server if any.
IP address, subnet mask, primary DNS server and secondary DNS server if any.
As we can see from the picture below, there are one DSL port and 4 Ethernet ports on the back panel. Connect your devices together as the following steps.
Plug your DSL line into the DSL port of the Tenda device.
Connect one end of an Ethernet cable to your computer and the other end to an Ethernet port at the back of D301/D151.
Check the indicators on the front panel. Ensure that the PWR is on, the SYS and DSL are blinking, the LAN port which you have plugged the Ethernet cable into is on or blinking, and WLAN is on or blinking.
Before logging into the web-based setup page, you should verify that your computer has obtained a valid IP address. For instructions on how to obtain a proper IP address, click here for help.
Launch a web browser like Internet Explorer, Firefox, Safari, etc., enter default IP address 192.168.1.1 in the address bar, and then press [ Enter] .
Note: If you’ve changed the default IP address, you should enter the one you changed to.You will then be directed to a Tenda web-based setup page as the following picture.
There are 2 ways to setup your Internet connection:
Select your country and your ISP. VPI and VCI fields will be populated automatically in this way.
Select your Internet connection type correctly and complete the rest of the information by entering the requested details for DSL Settings, like account Information or IP information provided by your ISP(Internet Service Provider).
In Security Key, set a password with letters or numbers or mixed.
Note: If your country and/or your ISP are not covered in the initial page, click the button on the top-right to manually configure the VPI and VCI. For details, see Setup Internet connection in Advanced page.
Click the button on the top-right of the initial page. You will see the following page.
Select Advanced Setup > Layer 2 Interface > ATM Interface. After you have got to ATM Interface, click on Add button on the left side.
Note: EoA is for PPPoE, IPoE and Bridging.
In the left main menu, select WAN Service under Advanced Setup. Click Add button.
Depending on the type of connection, you will come to different screens and be prompted to enter the rest of the information for DSL Settings, like account Information or IP information provided by your ISP.
Note: Leave other options unchanged from factory defaults and click on Apply/Save at last.
For instructions on EOA (PPPoE, IPoE and Bridging), click here
For instructions on PPPoA, click here
For instructions on IPoA, click here
Launch a web browser and enter www.tendacn.com . If the webpage is opened, it means you have got Internet access now.
If you cannot access the Internet, you may try below solutions:
ii. Reset the Tenda device and check the essential information from your Internet Service Provider.
l Power cycle the Tenda device and your computer
Unplug the power adapter from the Tenda device and shut down your computer.
Power on the Tenda device, wait for its lights on, and then turn on the computer.
l Reset the Tenda device
Find a WPS/RST button on the back panel of the Tenda device and hold down it for about 10 seconds. During which time, you will find that all the indicators turn off and several of them will back on later. All of the customized settings of the D301/D151 will be erased after resetting.
Check the essential information from your Internet Service Provider and set it up again.
Note: If all the efforts you’ve made are in vain, you’d better ring your Internet Service Provider for help to check the Internet connection.
Роутер tenda d301 настройка
Тип подключения: “Динамический ip” (для физических лиц компании “ИнфоЛада”)
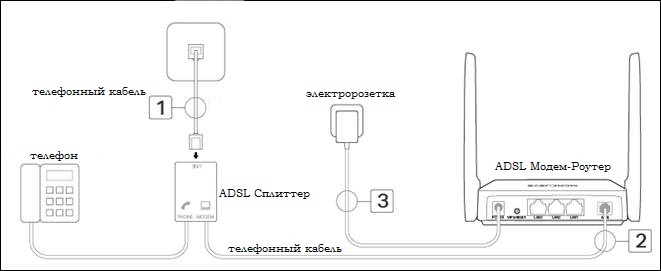
1. Подключите оборудование в соответствии с приведённой ниже схемой и подождите примерно 1–2 минуты, затем убедитесь, что на роутере загорелись индикаторы питания, ADSL и Wi-Fi.
Примечание. Если телефонная связь не нужна либо её нет, просто подключите роутер к телефонной розетке/сплиттеру с помощью прилагаемого телефонного кабеля.
2. Подключите компьютер к роутеру (подключиться можно как по кабелю, так и по беспроводной сети).
— Кабельное подключение: подключите компьютер к порту LAN роутера с помощью кабеля Ethernet из комплекта.
— Подключение к беспроводной сети: подключите компьютер к беспроводной сети роутера. Имя беспроводной сети (SSID) по умолчанию указано на этикетке с обратной стороны роутера.
3. Запустите веб-браузер и введите в адресной строке 192.168.0.1 либо 192.168.1.1. В качестве имени пользователя и пароля используйте admin (все буквы строчные). После этого нажмите Login (Войти)
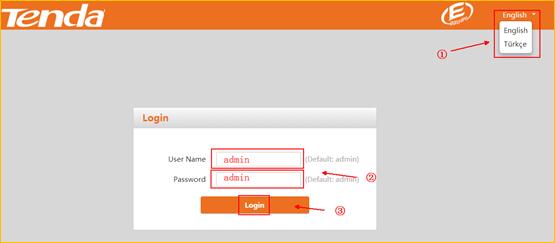
Примечание. Если окно входа в систему не отображается, попробуйте настроить компьютер на автоматическое получение IP-адреса от роутера, проверьте правильность ввода 192.168.0.1 либо 192.168.1.1 и очистите кэш браузера.
Если проблема не устранена, используйте другой веб-браузер или другое устройство для подключения к роутеру.
4. Для быстрой настройки у Вас сразу откроется требуемая страница с выбором Страны, параметрами типа подключения и выбора виртуального канала (vpi/vci).
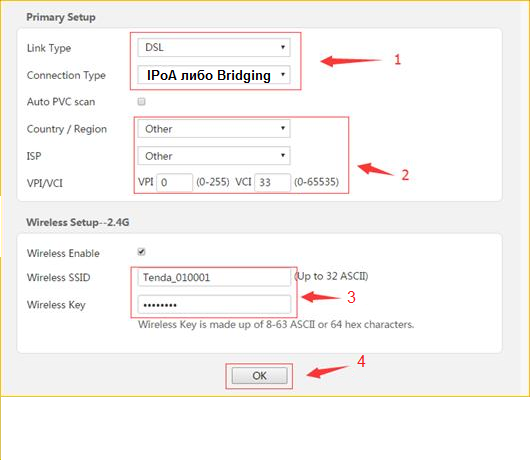
- В поле Connection Type (Тип подключения) выбираем IPoA либо Bridging.
- В поле Сountry выбрать значение Other (Другое) и ввести данные провайдера вручную.
В полях VPI и VCI — значения провайдера из договора. (это либо 0/33 либо 0/35)
Настройте параметры беспроводной сети. По умолчанию пароль беспроводной сети не задан.
- Придумайте имя беспроводной сети и укажите его в поле WirelessSSID.
В поле Wireless Key (Совместно используемый ключ) нужно указать пароль для беспроводной сети. Пароль должен быть не менее восьми символов на английском языке.
5. На этом настройка роутера завершена. Далее необходимо пройти авторизацию , с компьютера или телефона подключенного к роутеру.