- How to configure the virtual server for the ADSL Router
- Как Создать DMZ Хост и Виртуальный Сервер На Роутере?
- DMZ — что это в роутере?
- Как использовать сервер DMZ на маршрутизаторе?
- Виртуальный сервер DMZ на роутере Tenda
- Настройка DMZ на роутере TP-Link
- How to configure the virtual server for the ADSL Router
- How to configure the virtual server for the ADSL Router
How to configure the virtual server for the ADSL Router
A : When you create a server such as a Web server, FTP server or game server in your router’s LAN side, you can let Internet users access the created server through the router’s WAN IP address by configuring virtual server.
The topology is as below:
I. Run a server on your computer
Take FTP Server for example. Click start à run and type cmd in the blank. In the new window, please type netstat -an. Then you can check whether the FTP server has been run successfully.
I I. Physical connection :
I I I . Login to the management page of the router:
1. Open a web browser (IE, Firefox, Safari, etc.) and find the address bar, leaving it blank before typing in 192.168.1.1, and then press enter.
(Care: The address bar is in the most top of the web page after opening web browser).
2. Click on Advanced Settings in the following page.
3. You will see the following page.
4. Click on Advanced Setup—>NAT—>Virtual Servers.
You can check the virtual servers list there and click Add to create a new rule.
5. Configure the nat rules in the next page.
(1)Use Interface: It indicates which WAN connection the configured rules are to be applied to. When there is only one configured WAN connection available, system will select it automatically.
(2)Service Name: There are two options available:
l Select a Service: allows you to select an existing service from the drop-down list box.
l Custom Service: allows you to define a service yourself.
You have created two servers on the router’s LAN side:
(1) FTP server (Port: 21) for transferring files is at the IP address of 192.168.1.100
(2) Web server (port: 80) is at the IP address of 192.168.1.110. And you want your others from Internet to access your FTP and Web servers respectively via port: 21 and port: 80.
For configurations, follow the instructions below:
Configuring FTP server:
Click NAT-> Virtual Server, then click the Add to configure the following page.
1. Select Customer Service. In the blank please fill in a name for this rule (e.g. FTP).
2. In the Server IP address blank, filling in the IP address of your local computer which you are running the FTP service (192.168.1.100).
3. Type 21 as start port and 21 as end port in the blank Choose TCP /UDP as protocol.
4. Click on Apply/Save to save the settings.
Configuring Web server
1. Custom Service. In the blank please fill in a name for this rule (e.g. WEB).
2. In the Server IP address blank, please fill in the IP address of your local computer which you are running the Web service (192.168.1.110).
3. Type 80 as start port and 80 as end port in the blank. Choose TCP /UDP as protocol.
4. Click on Apply/Save to save the settings.
The screen appears as below after the above configuration is done.
Supposing that the WAN IP address is 202.96.134.33, then the Internet user only needs to enter ftp : //202.96.134.33 or http : //202.96.134.33 in web browser’s address bar to access your FTP or Web server respectively.
Как Создать DMZ Хост и Виртуальный Сервер На Роутере?
В этой статье я расскажу, что такое DMZ хост или сервер на роутере. А также как открыть порты с помощью функции DMZ. Раз вы уже читаете эту статью, то наверняка вы уже знаете, что такое виртуальный сервер и для чего это нужно делать. Если нет, то читаем тут. Если коротко — то открыть порт на роутере нужно в том случае, когда вы с компьютера обмениваетесь файлами с другими пользователями интернета. Например, для работы запущенного на домашнем ПК FTP-сервера, либо торрент-клиента, либо сетевой игры. В этой статье мы научимся открывать сразу все порты при помощи так называемого DMZ-хоста на примере роутеров TP-Link, Asus, Zyxel Keenetic и Tenda
DMZ — что это в роутере?
DMZ («демилиторизованная зона») — это технология, с помощью которой можно открыть абсолютно все порты на одном конкретном устройстве
Как использовать сервер DMZ на маршрутизаторе?
С помощью описанного выше методы мы с помощью роутера открываем лишь один порт для одного устройства в сети. Через DMZ-хост можно открыть сразу несколько портов. Однако, делать это нужно лишь в крайних случаях, так как в таком случае устройство оказывается абсолютно открытым для доступа из интернета. Однако иногда это делать необходимо, например, для настроек просмотра камер видеонаблюдения, подключенных через регистратор, или для организации игрового сервера.
Приведу пример — часто при подключении регистратора видеонаблюдения по умолчанию используется порт 80 и поменять его в настройках просто невозможно. В то же самое время на маршрутизаторе этот порт также занят и перенаправить его не получится. В этом случае на помощь приходит DMZ-хост на роутере.

Виртуальный сервер DMZ на роутере Tenda
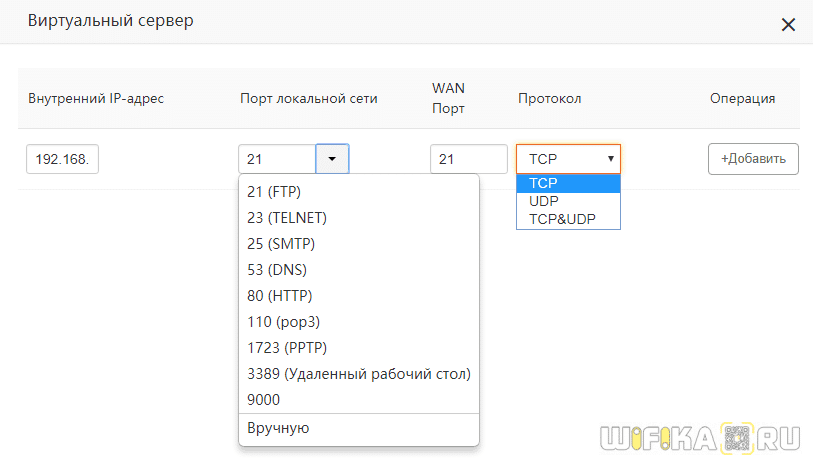
В wifi роутерах Tenda функция открытия портов называется «Виртуальный сервер». В админке ее можно найти в разделе «Дополнительные настройки — Виртуальный сервер»

Но сначала необходимо назначить статический IP адрес для компьютера, на который вы хотите сделать перенаправление портов, иначе при следующем включении по DHCP роутер может присвоить ему другой адрес и все наши настройки собьются. Как это сделать, читайте тут.
Когда за компьютером зарезервирован определенный адрес, вписываем его в разделе «Виртуальный сервер» в ячейке «Внутренний IP адрес».
- Порт локальной сети — выбираем из списка наиболее подходящий под наши нужды из выпадающего списка — ftp, http, pop3, SMTP и так далее…
- WAN порт — указываем тот же, что и в предыдущем случае
- Протокол — ставим TCP&UDP
И нажимаем кнопку «Добавить»
После сохранения настроек, порт через роутер Tenda откроется и мы сможем без проблем предоставить доступ из интернета к тем или иным ресурсам на компьютере.
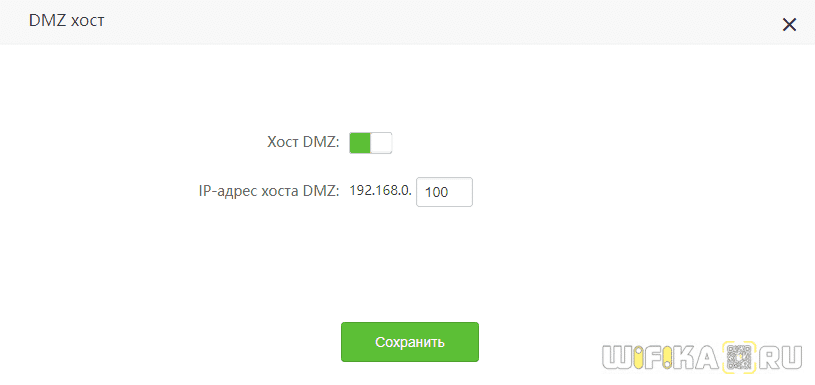
Активация DMZ хоста на wifi роутере Tenda находится в «Дополнительных настройках». Здесь все просто — переводим тумблер во включенное положение и вписываем IP адрес компьютера или иного устройства, на котором мы хотим открыть все порты
Настройка DMZ на роутере TP-Link
Функция DMZ на роутере TP-Link в новой версии веб-интерфейса находится в «Дополнительных настройках» в разделе «NAT переадресация — DMZ». Здесь все просто — включаем его галочкой и указываем IP адрес компьютера, на котором откроются все порты.
How to configure the virtual server for the ADSL Router
A : When you create a server such as a Web server, FTP server or game server in your router’s LAN side, you can let Internet users access the created server through the router’s WAN IP address by configuring virtual server.
The topology is as below:
I. Run a server on your computer
Take FTP Server for example. Click start à run and type cmd in the blank. In the new window, please type netstat -an. Then you can check whether the FTP server has been run successfully.
I I. Physical connection :
I I I . Login to the management page of the router:
1. Open a web browser (IE, Firefox, Safari, etc.) and find the address bar, leaving it blank before typing in 192.168.1.1, and then press enter.
(Care: The address bar is in the most top of the web page after opening web browser).
2. Click on Advanced Settings in the following page.
3. You will see the following page.
4. Click on Advanced Setup—>NAT—>Virtual Servers.
You can check the virtual servers list there and click Add to create a new rule.
5. Configure the nat rules in the next page.
(1)Use Interface: It indicates which WAN connection the configured rules are to be applied to. When there is only one configured WAN connection available, system will select it automatically.
(2)Service Name: There are two options available:
l Select a Service: allows you to select an existing service from the drop-down list box.
l Custom Service: allows you to define a service yourself.
You have created two servers on the router’s LAN side:
(1) FTP server (Port: 21) for transferring files is at the IP address of 192.168.1.100
(2) Web server (port: 80) is at the IP address of 192.168.1.110. And you want your others from Internet to access your FTP and Web servers respectively via port: 21 and port: 80.
For configurations, follow the instructions below:
Configuring FTP server:
Click NAT-> Virtual Server, then click the Add to configure the following page.
1. Select Customer Service. In the blank please fill in a name for this rule (e.g. FTP).
2. In the Server IP address blank, filling in the IP address of your local computer which you are running the FTP service (192.168.1.100).
3. Type 21 as start port and 21 as end port in the blank Choose TCP /UDP as protocol.
4. Click on Apply/Save to save the settings.
Configuring Web server
1. Custom Service. In the blank please fill in a name for this rule (e.g. WEB).
2. In the Server IP address blank, please fill in the IP address of your local computer which you are running the Web service (192.168.1.110).
3. Type 80 as start port and 80 as end port in the blank. Choose TCP /UDP as protocol.
4. Click on Apply/Save to save the settings.
The screen appears as below after the above configuration is done.
Supposing that the WAN IP address is 202.96.134.33, then the Internet user only needs to enter ftp : //202.96.134.33 or http : //202.96.134.33 in web browser’s address bar to access your FTP or Web server respectively.