- How to Enable UPnP on a Router
- What to Know
- How to Use UPnP on a Router
- NETGEAR
- Linksys
- D-Link
- HUAWEI
- ASUS
- TP-Link
- Google Nest Wifi
- Google Fiber
- Should I Turn on UPnP on My Router?
- Alternative Solution
- Настраиваем переброс портов (UPnP) на роутере для DC++, uTorrent и подобных программ
- Ручной переброс портов, или UPnP?
- Включаем UPnP в настройках роутера
- Проверяем настройки DC++ и uTorrent
- Послесловие
How to Enable UPnP on a Router
Tim Fisher has more than 30 years’ of professional technology experience. He’s been writing about tech for more than two decades and serves as the SVP and General Manager of Lifewire.
Chris Selph is a CompTIA-certified technology and vocational IT teacher. He also serves as network & server administrator and performs computer maintenance and repair for numerous clients.
- Routers & Firewalls
- The Wireless Connection
- Network Hubs
- ISP
- Broadband
- Ethernet
- Installing & Upgrading
- Wi-Fi & Wireless
What to Know
- Look in Advanced, Admin, or Network settings on your router’s web interface.
- Most routers have it switched on by default.
- We recommend forwarding ports manually instead.
This article explains how to turn on UPnP on your router, whether you use NETGEAR, Linksys, D-Link, HUAWEI, ASUS, TP-Link, Google Nest Wifi, or Google Fiber.
How to Use UPnP on a Router
How you activate UPnP depends on the router you have. The first step is the same for most router brands: log in as an admin.
What follows depends on your specific router:
If you don’t see your router brand below, you can most likely tweak these instructions a bit to make them work since most routers keep the UPnP setting in a similar place.
NETGEAR
:max_bytes(150000):strip_icc()/netgear-upnp-2140eca8021a443089caaac8a05a9c13.png)
Select the check box next to Turn UPnP On.
- Advertisement Period: Type the advertisement period in minutes, from 1 to 1440 (24 hours). This determines how often the router broadcasts its UPnP information. The default period is 30 minutes. Choose a shorter duration to better guarantee that control points receive current device status, or pick a longer duration to reduce network traffic.
- Advertisement Time to Live: Type the advertisement time to live in hops/steps, from 1 to 255. The default value is 4 hops. Increase this value if devices aren’t being communicated with correctly.
Some NETGEAR routers, such as the Nighthawk M1, store the UPnP option elsewhere. Find Advanced Settings > Other, and then a box you can check from the UPnP section.
:max_bytes(150000):strip_icc()/netgear-nighthawk-m1-upnp-ec3e8fb2462b4fb38bbe04af15b4373c.png)
Linksys
- Choose Administration from the top. On some models, you have to select the settings/gear icon from the left menu first.
:max_bytes(150000):strip_icc()/linksys-upnp-b314cc2006b0445a9133509490e4b1fa.png)
Select the radio button next to Enable or Enabled, on the UPnP line. If you don’t see it, confirm you’re in the Management submenu.
D-Link
:max_bytes(150000):strip_icc()/d-link-upnp-926dd8f6dfca452f9f9a807c9986e43d.png)
From the UPNP or UPNP SETTINGS area on the right, check the box next to Enable UPnP.
Following those steps won’t work for all D-Link routers. Try this instead: Open the Tools tab, choose Misc. on the left, select Enabled from the UPnP Settings area on the right, and then press Apply, and then Continue (or Yes or OK) to save.
HUAWEI
:max_bytes(150000):strip_icc()/huawei-upnp-7eb3d44f7c2846a2a5fdbd1feddd45e5.png)
Choose Network Settings from the left side, followed by the UPnP submenu.
Some HUAWEI routers require different steps to use UPnP. If the above isn’t relevant for your device, try one of these directions instead:
- Go to Security >UPnP, put a check next to UPnP, and select Submit.
- The setting toggle might instead be in Settings >Security >UPnP Settings.
- Go to Network Application >UPnP Configuration, check the box next to Enable UPnP, and select Apply.
ASUS
- Choose WAN from the Advanced Settings area on the left side of the page.
Make sure you’re in the Internet Connection tab, and then select Yes next to Enable UPnP. :max_bytes(150000):strip_icc()/asus-upnp-enable-d5992117320b498db9218ab2d3be55ad.png) On some routers, you’re looking for the UPnP tab on this step; select Enable from that page.
On some routers, you’re looking for the UPnP tab on this step; select Enable from that page. :max_bytes(150000):strip_icc()/asus-upnp-79f277d86ed44705b23312064f57ff58.png)
TP-Link
:max_bytes(150000):strip_icc()/tp-link-upnp-a3bd662fc7c24065b62cfb5faa36b068.png)
- Navigate to Advanced >NAT Forwarding >UPnP.
If those directions don’t apply to your router, try going here: Advanced > Forwarding > UPnP > Enable. Some TP-Link routers don’t require you to open Advanced first.
Google Nest Wifi
:max_bytes(150000):strip_icc()/google-wifi-upnp-19d70422142440f692393d2d6b833811.png)
Tap the button next to UPnP.
Google Fiber
:max_bytes(150000):strip_icc()/google-fiber-upnp-88f56b6c63594e0eb063fd2e7de2ae2c.png)
Select the button next to Universal Plug and Play.
Should I Turn on UPnP on My Router?
UPnP has clear benefits. It speeds up the setup process when using software and devices, such as gaming consoles. Instead of getting into the router settings yourself and enabling this and that port so your Xbox can go online, UPnP lets the Xbox communicate with the router directly to make those exceptions.
Universal Plug and Play is also helpful when using printers and other devices which rely on communicating with other devices on your network and the internet. If you use a remote access tool, for example, that functions through specific network ports, you’ll need to open those ports to allow the software to work from outside your network; UPnP makes this simple.
Malicious software can run its harmful code directly through your network more easily when UPnP is on.
A compromised computer could, for example, disguise itself as a printer and send a UPnP request to your router to open a port. The router will respond accordingly, thus opening a tunnel where the hacker can transfer malware, steal your information, etc.
Allowing specific ports on a whim is handy, but therefore less safe if an intruder takes advantage of this mechanism. DDoS attacks are another risk you’re opening yourself up to when using UPnP.
Alternative Solution
If you’re concerned about those things, and you’re okay giving up convenience for security, there is an alternative: forward ports on your router manually. It’s a bit more involved than just ticking a box on your router, but if you’re already in your router to check if UPnP is on, you may as well take that opportunity to set up port forwards manually.
Настраиваем переброс портов (UPnP) на роутере для DC++, uTorrent и подобных программ
Привет! Очень часто бывает, что после установки роутера отказываются работать такие программы как uTorrent, DC++ и подобные клиенты для P2P сетей. Это происходит по той причине, что программа не может получить файл на компьютер который находится в локальной сети (за роутером) . Но проблема может возникнуть не только с клиентами P2P сетей, но и с онлайн играми, настройкой WEB, или FTP серверов и т. д.
Для того, что бы все работало, необходимо делать перенаправленние портов. Если делать это вручную, то сам процесс немного сложный и непонятный. Нужно присваивать каждому компьютеру статический IP, затем навастривать перенаправленные портов в настройках маршрутизатора.
Есть такая полезная функция, как UPnP. Это такой себе автоматический переброс портов. В большинстве случаев, достаточно включить UPnP в настройках роутера (если он еще не включен) и все будет работать отлично. Но иногда, без ручного переброса портов не обойтись. Каждый способ имеет свои плюсы и минусы.
Ручной переброс портов, или UPnP?
В этой статье я хотел написать только о UPnP. О том как включить эту функцию на роутере и в программах DC++ и uTorrent (о ручной настройке постараюсь написать в отдельной статье) . Но давайте сначала разберемся, что лучше UPnP, или все же стоит настроить переброс вручную.
- UPnP — это просто, не нужно что-то там прописывать, долго настраивать и т. д. Если вы боитесь что-то натворить в настройках маршрутизатора, то UPnP это то что нужно. Из минусов: может не работать в некоторых программах, серверах, играх. Ну и безопасность, UPnP может перебросить то, что перебрасывать как бы не нужно 🙂 (но это спорное мнение и оно не должно Вас пугать) .
- Ручная настройка перенаправления портов требует более серьезных настроек. И этот способ немного неудобен тем, что при появлении новых программ, или каких-то изменениях существующих, придется постоянно настраивать перенаправление. Это не очень удобно.
Включаем UPnP в настройках роутера
Обычно, по умолчанию в настройках роутера сервис UPnP уже включен (в Tp-Link, точно) . Да и программы типа uTorrent даже через роутер работают без дополнительных настроек. А вот с DC++, насколько я заметил, бываю частые проблемы.
Давайте сначала проверим, активна ли функция UPnP в вашем маршрутизаторе.
Зайдите в настройки маршрутизатора. Обычно это адрес http://192.168.1.1, или http://192.168.0.1.
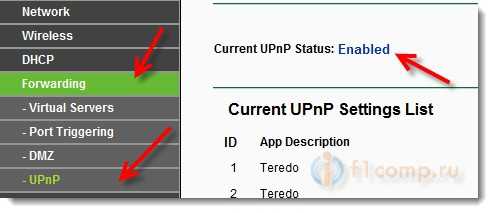
Перейдите на вкладку Forwarding — UPnP (Переадресация — UPnP) . Должен быть статус Enabled (Включено) .
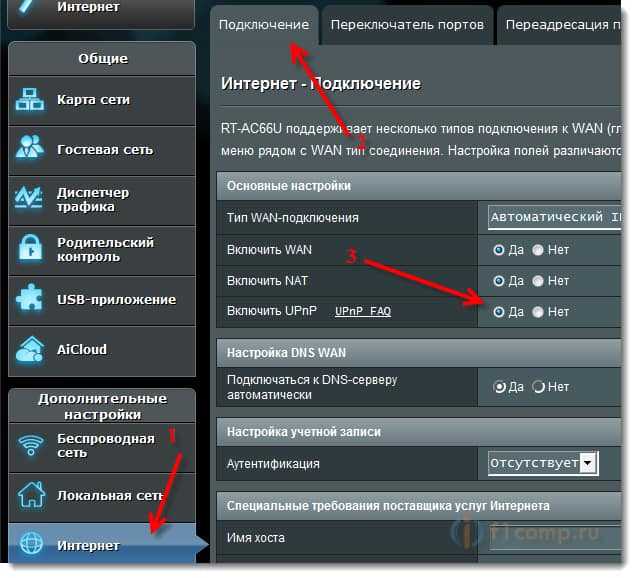
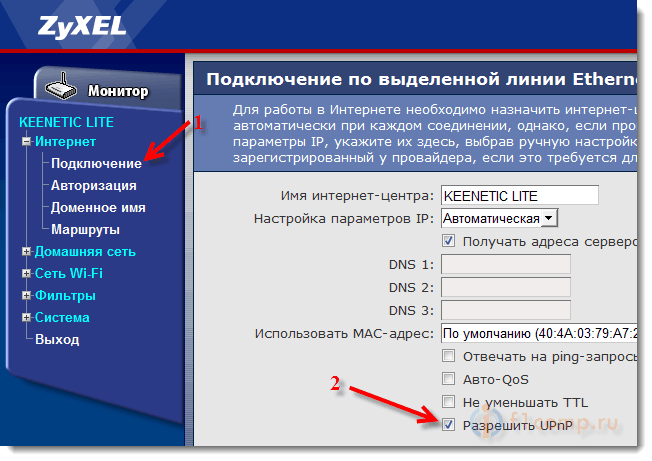
Может быть по-разному, но обычно это вкладка Интернет — Подключение и там есть переключатель UPnP.
Эта функция может называться немного по другому. Вкладка WAN — Port Trigger. Пункт Enable Port Trigger должен быть включен.
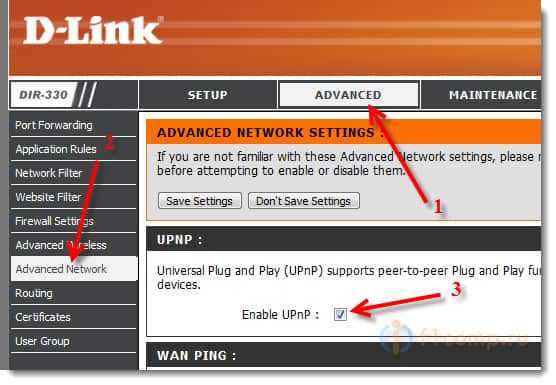
Переходим вверху на вкладку Advanced, затем слева выбираем Advanced Network и смотрим, стоит ли галочка возле Enable UPnP.
Пункты меню могут немного отличатся, в зависимости от версии устройства, прошивки и т. п. Если не сможете найти, то напишите в комментария, разберемся :).
Проверяем настройки DC++ и uTorrent
Я покажу, как проверить включена ли функция UPnP в этих программах.
В DC++ зайдите в настройки на вкладку Настройки соединения и посмотрите, отмечен ли пункт Фаэрвол с UPnP (только WinXP+).
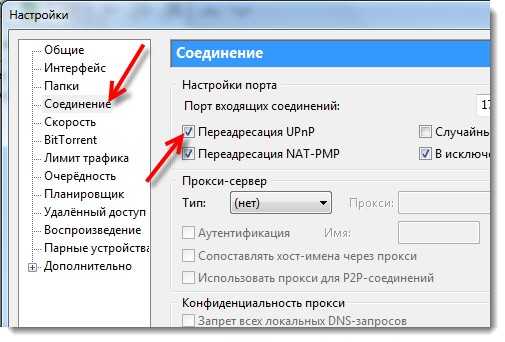
В uTorrent переходим в пункт Настройки — Настройки программы. Вкладка Соединение. Смотрим, что бы стояла галочка возле Переадресация UPnP.
Послесловие
Надеюсь, мне удалось немного прояснить ситуацию с перебросом портов. На первый взгляд эта тема кажется непонятной и сложной. Но функция UPnP создана для того, что бы немного упростить этот процесс и облегчить нашу жизнь.
Хотя, как я уже писал, иногда без ручной настройки переброса не обойтись.
Понравилась статья? Оцените её: