How to access TP-Link JetStream Managed Switch via the Console port
![]()
Updated 06-29-2022 02:22:30 AM 257070
TL-SG3424 , TL-SG5428 , T2600G-52TS , T2600G-28TS , T2500-28TC , T2700G-28TQ , T2500G-10TS , TL-SG5412F , T2600G-28MPS , TL-SX3008F , TL-SG3424P , TL-SG3428 , TL-SX3016F , TL-SL3428 , TL-SG3452P , TL-SG3428X , TL-SL3452 , TL-SG3428MP , TL-SG3216 , TL-SL5428E , T3700G-52TQ , T2600G-18TS , TL-SG3210 , TL-SG3452 , T2500G-10MPS , TL-SG3210XHP-M2 , TL-SG3428XMP , T3700G-28TQ
You can use the console cable to connect your PC to the console port of the TP-Link JetStream managed Switch and then manage the switch with the CLI.
Follow the steps below to manage the switch via the console port:
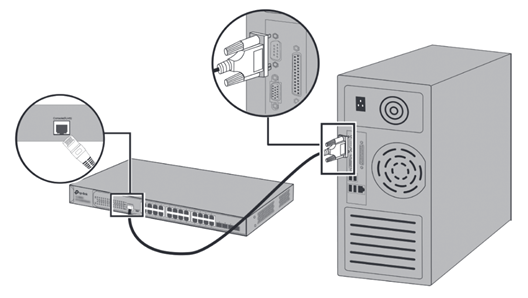
Step 1. Connect your computer to the switch.
If your computer has a serial port (COM), connect it to the console port (RJ45) of the switch, with the RJ45 console cable.
If you only have USB ports on your computer, you can get a USB-to-RS232 cable. You need to install the RS232 driver for the cable, which is provided by your cable vendor.
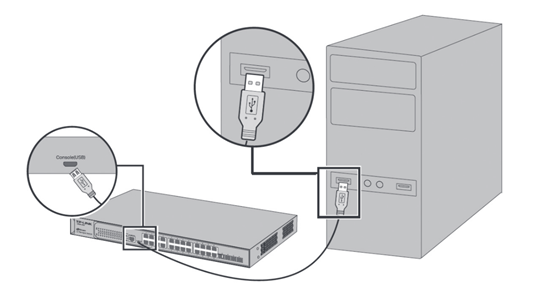
You can also choose a Micro-USB cable that supports data transfer to connect your computer to the switch. Then for Windows computers, click here to download and install the TP-Link USB Console Driver then continue. For Mac, please follow FAQ 3177 .
Note: If you need to enter the BootUtil menu to reset the switch or recover the password, please refer to FAQ 3146 . We recommend an RJ45 Console cable or USB-to-RS232 cable, as it might be more difficult to enter the BootUtil menu with a Micro-USB cable. If you still cannot enter the BootUtil after several attempts, you may get a USB-to-RS232 cable.
Step 2. Install a Terminal Emulator.
For Windows computers, you need to install a terminal emulator, such as Putty, Tera Term. Go to the official website to download the installer and follow the prompts to install the terminal emulator.
Note: If you use the Micro-USB cable, we recommend “Tera Term”, which you can download and install from the official website.
Step 3. Launch and Configure the Terminal Emulator.
Run your terminal emulator with the following serial parameters
- Baud Rate: 38400bps
- Data Bits: 8
- Parity: None
- Stop Bits: 1
- Flow Control: None
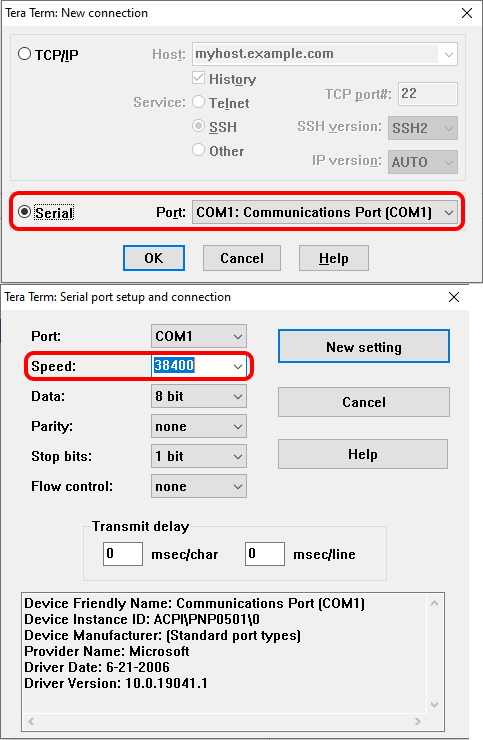
For Tera Term, choose the serial port, then go to Setup – Serial Port, set the speed to 38400, then click “New setting”.
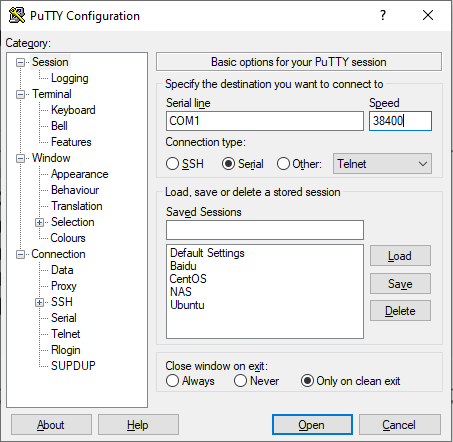
For Putty, select Serial, change the Speed to 38400, and then click “Open”.
Step 4 Launching the CLI
Enter the username and password, then you can manage the switch. Please refer to the User Guide, and CLI Reference Guide, which can be found on the support page for your switch model.
Related FAQs
Looking for More
How to access TP-Link JetStream Managed Switch via the Console port
![]()
Updated 06-29-2022 02:22:30 AM 257071
TL-SG3424 , TL-SG5428 , T2600G-52TS , T2600G-28TS , T2500-28TC , T2700G-28TQ , T2500G-10TS , TL-SG5412F , T2600G-28MPS , TL-SX3008F , TL-SG3424P , TL-SG3428 , TL-SX3016F , TL-SL3428 , TL-SG3452P , TL-SG3428X , TL-SL3452 , TL-SG3428MP , TL-SG3216 , TL-SL5428E , T3700G-52TQ , T2600G-18TS , TL-SG3210 , TL-SG3452 , T2500G-10MPS , TL-SG3210XHP-M2 , TL-SG3428XMP , T3700G-28TQ
You can use the console cable to connect your PC to the console port of the TP-Link JetStream managed Switch and then manage the switch with the CLI.
Follow the steps below to manage the switch via the console port:
Step 1. Connect your computer to the switch.
If your computer has a serial port (COM), connect it to the console port (RJ45) of the switch, with the RJ45 console cable.
If you only have USB ports on your computer, you can get a USB-to-RS232 cable. You need to install the RS232 driver for the cable, which is provided by your cable vendor.
You can also choose a Micro-USB cable that supports data transfer to connect your computer to the switch. Then for Windows computers, click here to download and install the TP-Link USB Console Driver then continue. For Mac, please follow FAQ 3177 .
Note: If you need to enter the BootUtil menu to reset the switch or recover the password, please refer to FAQ 3146 . We recommend an RJ45 Console cable or USB-to-RS232 cable, as it might be more difficult to enter the BootUtil menu with a Micro-USB cable. If you still cannot enter the BootUtil after several attempts, you may get a USB-to-RS232 cable.
Step 2. Install a Terminal Emulator.
For Windows computers, you need to install a terminal emulator, such as Putty, Tera Term. Go to the official website to download the installer and follow the prompts to install the terminal emulator.
Note: If you use the Micro-USB cable, we recommend “Tera Term”, which you can download and install from the official website.
Step 3. Launch and Configure the Terminal Emulator.
Run your terminal emulator with the following serial parameters
- Baud Rate: 38400bps
- Data Bits: 8
- Parity: None
- Stop Bits: 1
- Flow Control: None
For Tera Term, choose the serial port, then go to Setup – Serial Port, set the speed to 38400, then click “New setting”.
For Putty, select Serial, change the Speed to 38400, and then click “Open”.
Step 4 Launching the CLI
Enter the username and password, then you can manage the switch. Please refer to the User Guide, and CLI Reference Guide, which can be found on the support page for your switch model.
Related FAQs
Looking for More
How do I log into the web-based Utility (Management Page) of TP-Link wireless router?
![]()
Updated 06-20-2023 06:08:29 AM 14580075
Archer C1200 , Archer C5400 , Archer C4 , Archer C5 , Archer AX10 , Archer C2 , Archer C59 (EU) , Archer AX96 , Archer C5v , Archer C6U , TL-WR940N , Archer C80 , Archer AXE95 , Archer C8 , Archer AX10000 , Archer C9 , Archer C6 , Archer C7 , Archer C20 W , Archer AX90 , Archer C5400X , Archer A20 , Archer C60 , Archer A1200 , Archer C64 , TL-WR941N , TL-WR941ND , Archer C59 , Archer C58 , Archer AX4200 , Archer C3200 , Archer A2 , Archer AX75 , Archer AX73 , Archer A10 , Archer C50 , Archer C55 , Archer C54 , TL-WR841N , Archer AXE75 , Archer A6 , Archer A7 , Archer AX72 , Archer A5 , Archer A8 , Archer A9 , Archer AX68 , Archer AX5300 , Archer C4000 , TL-WR1043ND V3 , TL-WR841HP , Archer AXE300 , Archer AX1500 , Archer AX60 , TL-WR1043ND V1 , Archer AX3000 , Archer A2600 , Archer AX55 , Archer C5200 , Archer AX53 , Archer AX51 , Archer C50 V3.0 , Archer C5 V4 , Archer A2200 , Archer C5 W , Archer C3150 , Archer AX50 , Archer C20 V4 , Archer AX6000 , Archer C25 , Archer C24 , Archer A64 , Archer C2 V1 , Archer AX10/A , Archer C2600 , Archer C21 , Archer C20 , TL-WR840N , Archer C2 V3 , Archer A10 Pro , Archer AX1800 , Archer AX206 , Archer C900 , Archer AX4400 , Archer C3000 , Archer C50 , TL-WR941HP , Archer A54 , Archer AX4800 , Archer C20(RU) , Archer C1900 , Archer A2300 , TL-WR740N , Archer C20i , Archer C2(RU) , Archer A2600 Pro , Archer C5 v4.0 , Archer AXE200 Omni , Archer GX90 , TL-WR942N , Archer C5 Pro , TL-WR841HP V1 , Archer C2(EU) , Archer C2300 , Archer C1210 , Archer AX23 , Archer AX20 , Archer C3150 V2 , Archer AX21 , Archer A3000 , Archer C2700 , Archer C7i , TL-WR741N , Archer C90 , Archer C50(RU) , Archer AX11000 , Archer AX3200
TP-Link routers feature a built-in web-based management utility. This internal web server does not require the router to have internet access. It does however require your device to be connected to the TP-Link router’s network. This connection can either be wired or wireless and can be accessed via any device with a web browser like a desktop computer, a phone, tablet, iPad, etc.
Note: Older web browsers may have compatibility concerns with this web-based utility. It is recommended to use or install the latest version of a browser before continuing.
Connect to your router via Wired or Wireless.
If Wireless: Make sure your client device is connected to your router’s wireless SSID. If using the Defaults, the SSID and Password are printed on your router label.
If Wired: Connect your client to your router via Ethernet cable to one of the LAN ports (Yellow) on the back of your TP-Link router.
Launch/open a web browser and enter http://tplinkwifi.net or http://192.168.0.1 in the address bar.
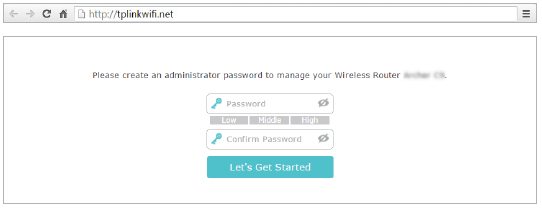
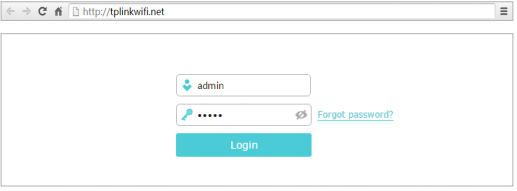
There are two types of login pages that may pop up
Type 1: Requiring you to create an administrator password.
Type 2: requesting a username and password. By default, these are both the word ‘admin’ all lower case.
If the login window does not appear, please try the following troubleshooting steps:
a. Reboot your router and try again.
b. If the computer is set to a static IP address, change its settings to obtain an IP address automatically.
c. Verify that http://tplinkwifi.net is correctly entered in the web browser. Alternatively, enter http://192.168.0.1 or http://192.168.1.1 in the web browser and press Enter.
d. Use another web browser and try again.
e. Disable and enable the network adapter being used
f. Clear your browser’s cookies
Note: If you forgot your administrative username and/or password and can’t log in, you will need to reset the router to factory default settings. Do this by finding the reset button on your router and holding the button for 30 seconds. This may require a paper clip or something like that.
The troubleshooting FAQ: https://www.tp-link.com/support/faq/2394/
To get to know more details of each function and configuration please go to Download Center to download the manual of your product.
Related FAQs
Is this faq useful?
Your feedback helps improve this site.
What’s your concern with this article?
- Dissatisfied with product
- Too Complicated
- Confusing Title
- Does not apply to me
- Too Vague
- Other
We’d love to get your feedback, please let us know how we can improve this content.
We appreciate your feedback.
Click here to contact TP-Link technical support.