- How to Log into the Graphical User Interface (GUI) of a Cisco Business Router
- Objective
- Introduction
- Applicable Devices | Software Version
- Connect to the Router
- Figure Out the IP Address
- Accessing the GUI
- Conclusion
- Роутер Cisco
- CISCO — логин и пароль по умолчанию (список роутеров)
- Забыли пароль маршрутизатора Cisco?
- Сброс маршрутизатора Cisco на пароль по умолчанию
How to Log into the Graphical User Interface (GUI) of a Cisco Business Router
The documentation set for this product strives to use bias-free language. For the purposes of this documentation set, bias-free is defined as language that does not imply discrimination based on age, disability, gender, racial identity, ethnic identity, sexual orientation, socioeconomic status, and intersectionality. Exceptions may be present in the documentation due to language that is hardcoded in the user interfaces of the product software, language used based on RFP documentation, or language that is used by a referenced third-party product. Learn more about how Cisco is using Inclusive Language.
Objective
The objective of this document is to explain options to find the IP address and access the Graphical User Interface (GUI) on a Cisco Business router. If the router is on a network, and you know the IP of the router, you can skip to the Accessing the GUI section of this article. If you must find the IP address of the router on an existing network you can use Command Prompt, FindIT Discovery Tool (a simple application), or Cisco FindIT. Details will be highlighted in a separate (future) article and linked when available.
When setting up a new router, Cisco Business recommends you do the configurations before connecting it to your network. This can help avoid potential issues and conflicts.
Introduction
One of the easiest ways to configure settings and make changes on a router is by accessing its GUI. The GUI is also referred to as the web-based interface, web-based guidance, web-based utility, web configuration page, or web configuration utility. Every Cisco RV Series router comes with a GUI. This type of interface, what you see on your screen, shows options for selection. You do not need to know any commands to navigate through these screens. The GUI gives the administrator a tool that contains all of the possible features that can be changed to modify the performance of a router.
Applicable Devices | Software Version
Connect to the Router
Connect one end of an Ethernet cable to a numbered port on the router and the other end to your computer. Make sure the router has power. An adapter might be needed for the computer, depending on the model.
Figure Out the IP Address
- If your Cisco Business router is new, the default IP address is 192.168.1.1.
- If you can’t remember the IP address or you don’t have a special configuration, use an open paperclip to press the reset button on your router for at least 10 seconds while it is powered on. This will reset the router to default settings and the default IP address of 192.168.1.1.
- If you set a static IP address for the router, you could enter that IP address instead of the default. This is not recommended as there may be conflicting configurations which may create issues in your existing network.
Accessing the GUI
Now that you know the IP address of the router, you can access the GUI.
Step 1. Double-click on a web browser to open the address (search) bar.

Step 2. Enter 192.168.1.1, or the other assigned IP address, and click Enter on your keyboard. This should open the GUI screen of the router. From here you have access to all configuration options.
When accessing a router, this default IP address only applies in situations when the router is not connected to an existing network and your computer is connected directly to the router. If the is connected to a network, Dynamic Host Configuration Protocol (DHCP) will, by default, assign an IP address and it may be different.
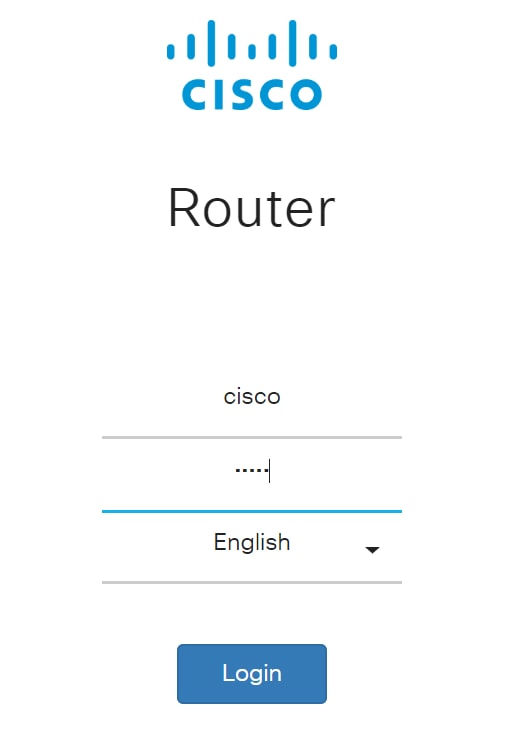
Step 3. You will see the log in screen. Enter a username and password. The default credentials are cisco for both the username and password the first time. It is highly recommended that you change the password to be more complex for security purposes. Click Login.
Conclusion
After you log into your router, you will see the GUI screen that includes a navigation pane down the left side. It contains a list of the top-level features. The navigation pane is also sometimes referred to as a navigation tree, navigation bar, or a navigation map.
The colors of this page may vary, as well as the top-level features, depending on the equipment and firmware version. The categories and options vary between routers.
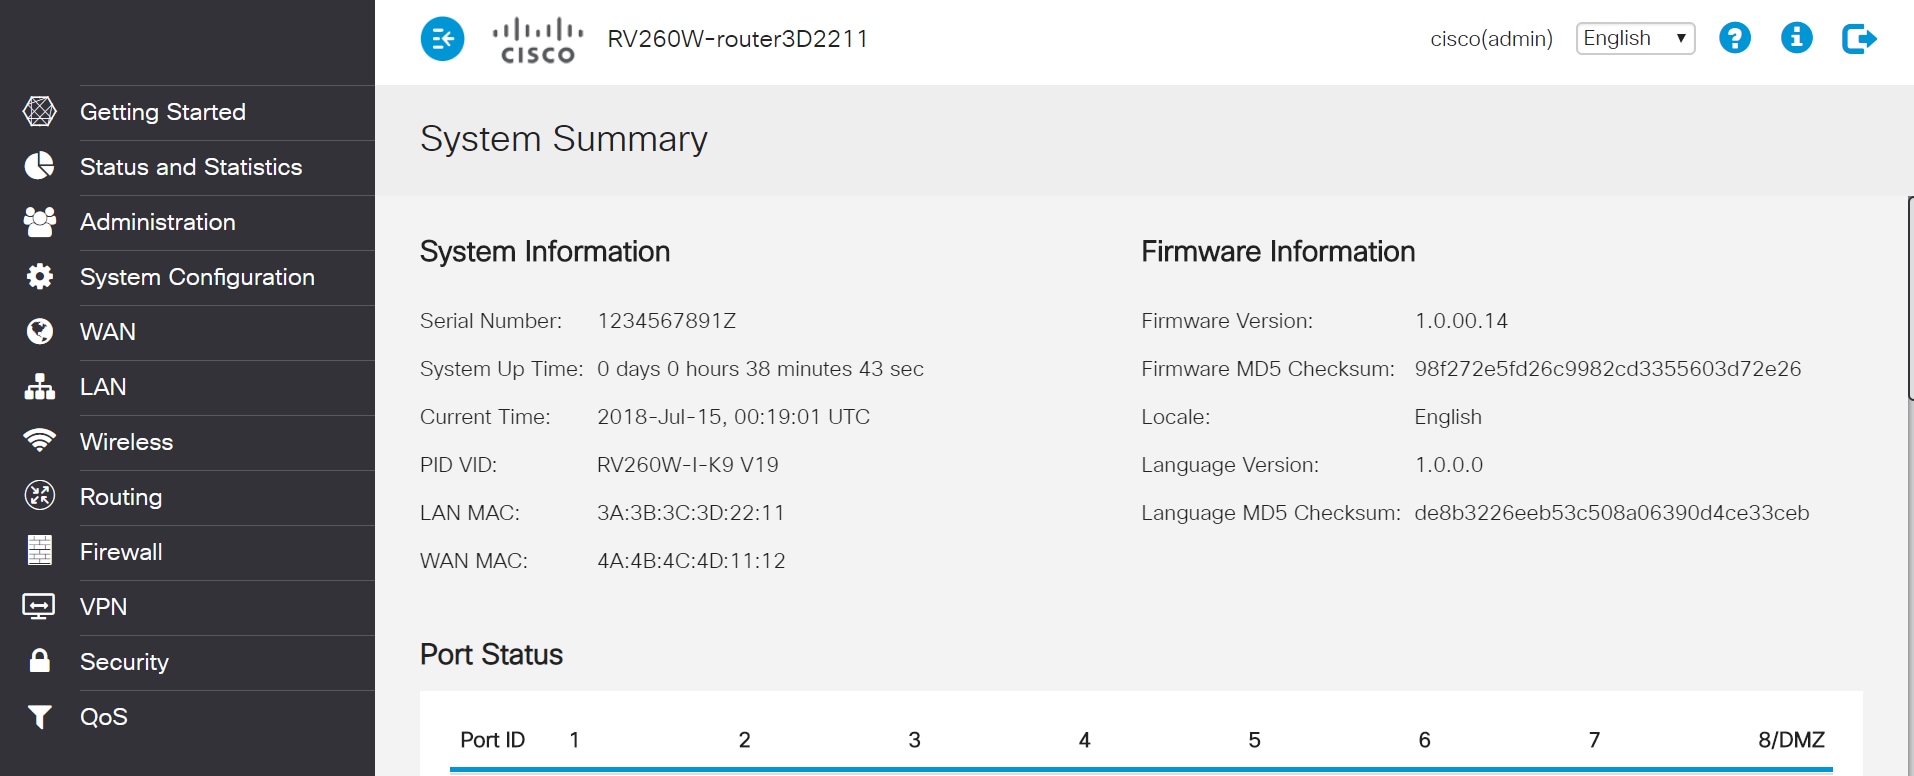
You now have access to the GUI of your router and should be able to configure settings or make changes that are just right for your business.
Роутер Cisco
Для входа в настройки роутера запустите браузер и укажите адрес 192.168.1.1 или 192.168.0.1. Используя стандартный логин — admin и пароль — admin, Вы получите доступ к веб интерфейсу роутера.
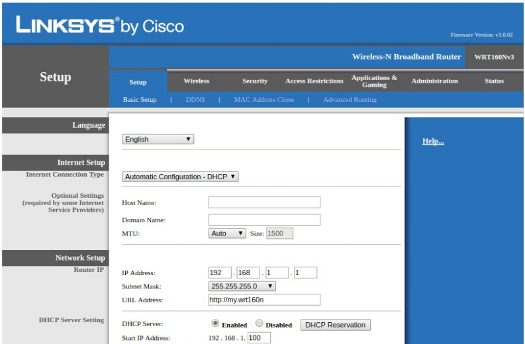
В разделе “Basic Setup” выберите тип подключения “PPPoE”, в поле “Username” и “Password” введите логин и пароль (заранее уточнив данные у оператора технической поддержки). Для сохранения данных, внизу страницы нажмите “Save Settings”.

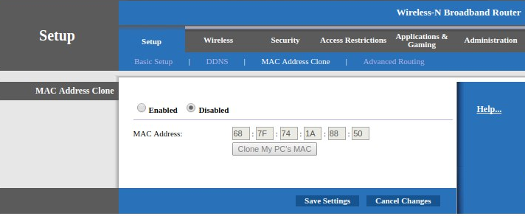
Перейдите в раздел “MAC Address Clone”, выберите значение “Enabled”, пропишите либо клонируйте с вашего устройства MAC-адрес (MAC-адрес вашего устройства должен совпадать с MAC-адресом в Вашей учетной записи у поставщика услуг Интернет. Если Вы изменили МАС-адрес требуется связаться с технической поддержкой для смены МАС-адреса в Вашей учетной записи у поставщика услуг Интернет) . Для сохранения данных, внизу страницы нажмите “Save Settings”.
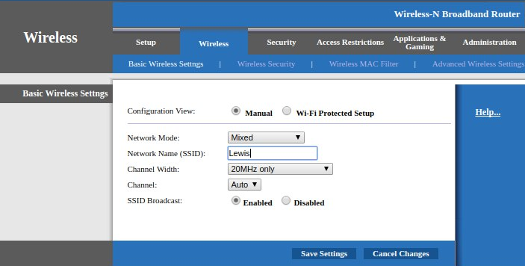
Перейдите в пункт “Wireless”, в разделе “Basic Wireless Setting”, выберите значение в поле “Configuration View” — “Manual”. В поле “Network Mode (SSID)” введите имя Вашей будущей сети. Для сохранения данных, внизу страницы нажмите “Save Settings”.
Перейдите в раздел “Wireless Security”, в поле “Security Mode” выберите тип шифрования “WPA2 Personal”, далее в поле “Passphrase” придумайте и введите пароль Вашей будущей сети, состоящий минимум из 8-ми символов. Для сохранения данных, внизу страницы нажмите “Save Settings”.
CISCO — логин и пароль по умолчанию (список роутеров)
Учетные данные по умолчанию, необходимые для входа в ваш маршрутизатор Cisco — логин, пароль и IP-адрес.
Большинство маршрутизаторов Cisco имеют имя пользователя по умолчанию cisco, пароль по умолчанию cisco и IP-адрес по умолчанию 192.168.1.1. Эти учетные данные Cisco необходимы при входе в веб-интерфейс маршрутизатора Cisco для изменения любых настроек. Поскольку некоторые модели не соответствуют стандартам, вы можете увидеть их в таблице ниже.
Совет: нажмите ctrl+ f (или cmd+ f на Mac), чтобы быстро найти номер своей модели.
Список паролей CISCO по умолчанию был обновлен в 2021 г. Если вы только что настроили сетевое устройство модем-маршрутизатор или сбросили его для повторной установки, вы можете найти информацию, необходимую для входа в систему, выполнив поиск по номеру модели из этого списка. Порядок списка — AZ.
| Модель роутера Cisco | Username (Логин) | Password (Пароль) | IP Address |
|---|---|---|---|
| ESW-520-24-K9 | cisco | cisco | http://192.168.10.2 |
| ESW-520-24P-K9 | cisco | cisco | http://192.168.10.2 |
| ESW-520-48-K9 | cisco | cisco | http://192.168.10.2 |
| ESW-520-48P-K9 | cisco | cisco | http://192.168.10.2 |
| ESW-520-8P-K9 | cisco | cisco | http://192.168.10.2 |
| ESW-540-24-K9 | cisco | cisco | http://192.168.10.2 |
| ESW-540-24P-K9 | cisco | cisco | http://192.168.10.2 |
| ESW-540-48-K9 | cisco | cisco | http://192.168.10.2 |
| ESW-540-8P-K9 | cisco | cisco | http://192.168.10.2 |
| RV016 | admin | admin | http://192.168.1.1 |
| RV042 | admin | admin | http://192.168.1.1 |
| RV042G | admin | admin | http://192.168.1.1 |
| RV082 | admin | admin | http://192.168.1.1 |
| RV110W | cisco | cisco | http://192.168.1.1 |
| RV120W | admin | admin | http://192.168.1.1 |
| RV130 | cisco | cisco | http://192.168.1.1 |
| RV130W | cisco | cisco | http://192.168.1.1 |
| RV132W | cisco | cisco | http://192.168.1.1 |
| RV134W | cisco | cisco | http://192.168.1.1 |
| RV180 | cisco | cisco | http://192.168.1.1 |
| RV180W | cisco | cisco | http://192.168.1.1 |
| RV215W | cisco | cisco | http://192.168.1.1 |
| RV220W | cisco | cisco | http://192.168.1.1 |
| RV320 | cisco | cisco | http://192.168.1.1 |
| RV325 | cisco | cisco | http://192.168.1.1 |
| RV340 | cisco | cisco | http://192.168.1.1 |
| RV340W | cisco | cisco | http://192.168.1.1 |
| RV345 | cisco | cisco | http://192.168.1.1 |
| RVL200 | admin | admin | http://192.168.1.1 |
| RVS4000 | admin | admin | http://192.168.1.1 |
| SF200-48 | cisco | cisco | http://192.168.1.254 |
| SF300-08 | cisco | cisco | http://192.168.1.254 |
| SF300-24 | cisco | cisco | http://192.168.1.254 |
| SF300-24P | cisco | cisco | http://192.168.1.254 |
| SF300-48 | cisco | cisco | http://192.168.1.254 |
| SF300-48P | cisco | cisco | http://192.168.1.254 |
| SF302-08 | cisco | cisco | http://192.168.1.254 |
| SF302-08MP | cisco | cisco | http://192.168.1.254 |
| SF302-08P | cisco | cisco | http://192.168.1.254 |
| SFE1000P | admin | [empty] | http://192.168.1.1 |
| SFE2000 | admin | admin | http://192.168.1.254 |
| SFE2000P | admin | admin | http://192.168.1.254 |
| SFE2010 | admin | admin | http://192.168.1.254 |
| SFE2010P | admin | admin | http://192.168.1.254 |
| SG200-08 | cisco | cisco | http://192.168.1.254 |
| SG200-08P | cisco | cisco | http://192.168.1.254 |
| SG200-26 | cisco | cisco | http://192.168.1.254 |
| SG200-50 | cisco | cisco | http://192.168.1.254 |
| SG300-10 | cisco | cisco | http://192.168.1.254 |
| SG300-10MP | cisco | cisco | http://192.168.1.254 |
| SG300-10P | cisco | cisco | http://192.168.1.254 |
| SG300-20 | cisco | cisco | http://192.168.1.254 |
| SG300-28 | cisco | cisco | http://192.168.1.254 |
| SG300-28P | cisco | cisco | http://192.168.1.254 |
| SG300-52 | cisco | cisco | http://192.168.1.254 |
| SG500-28 | cisco | cisco | http://192.168.1.254 |
| SG500-52 | cisco | cisco | http://192.168.1.254 |
| SGE2000 | admin | admin | http://192.168.1.254 |
| SGE2000P | admin | admin | http://192.168.1.254 |
| SGE2010 | admin | admin | http://192.168.1.254 |
| SGE2010P | admin | admin | http://192.168.1.254 |
| SLM2005 | admin | admin | http://192.168.1.254 |
| SLM2008 | admin | admin | http://192.168.1.254 |
| SLM2024 | admin | admin | http://192.168.1.254 |
| SLM2048 | admin | admin | http://192.168.1.254 |
| SLM224G | admin | admin | http://192.168.1.254 |
| SLM224G4PS | admin | admin | http://192.168.1.254 |
| SLM224G4S | admin | admin | http://192.168.1.254 |
| SLM224P | admin | admin | http://192.168.1.254 |
| SLM248G | admin | admin | http://192.168.1.254 |
| SLM248G4PS | admin | admin | http://192.168.1.254 |
| SLM248G4S | admin | admin | http://192.168.1.254 |
| SLM248P | admin | admin | http://192.168.1.254 |
| SPA2102 | admin | [empty] | http://192.168.0.1 |
| SPA3102 | admin | [empty] | http://192.168.0.1 |
| SPA8000 | admin | [empty] | http://192.168.0.1 |
| SPA8800 | admin | [empty] | http://192.168.0.1 |
| SRP520 | admin | admin | http://192.168.15.1 |
| SRP520-U | admin | admin | http://192.168.15.1 |
| SRW2008 | admin | [empty] | http://192.168.1.254 |
| SRW2008MP | admin | [empty] | http://192.168.1.254 |
| SRW2008P | admin | [empty] | http://192.168.1.254 |
| SRW2016 | admin | [empty] | http://192.168.1.254 |
| SRW2024 | admin | [empty] | http://192.168.1.254 |
| SRW2024P | admin | [empty] | http://192.168.1.254 |
| SRW2048 | admin | [empty] | http://192.168.1.254 |
| SRW208 | admin | [empty] | http://192.168.1.254 |
| SRW208G | admin | [empty] | http://192.168.1.254 |
| SRW208L | admin | [empty] | http://192.168.1.254 |
| SRW208MP | admin | [empty] | http://192.168.1.254 |
| SRW208P | admin | [empty] | http://192.168.1.254 |
| SRW224G4 | admin | [empty] | http://192.168.1.254 |
| SRW224G4P | admin | [empty] | http://192.168.1.254 |
| SRW224P | admin | [empty] | http://192.168.1.254 |
| SRW248G4 | admin | [empty] | http://192.168.1.254 |
| SRW248G4P | admin | [empty] | http://192.168.1.254 |
| Valet (M10) | admin | admin | http://192.168.1.1 |
| Valet Plus (M20) | admin | admin | http://192.168.1.1 |
| WRP400 | admin | admin | http://192.168.15.1 |
| WRV200 | admin | admin | http://192.168.1.1 |
| WRV210 | admin | admin | http://192.168.1.1 |
| WRV54G | admin | admin | http://192.168.1.1 |
| WRVS4400N | admin | admin | http://192.168.1.1 |
Забыли пароль маршрутизатора Cisco?
Вы изменили имя пользователя и / или пароль своего маршрутизатора Cisco и забыли, на что вы его изменили? Не волнуйтесь: все маршрутизаторы Cisco поставляются с заводским паролем по умолчанию, который вы можете восстановить, следуя приведенным ниже инструкциям.
Сброс маршрутизатора Cisco на пароль по умолчанию
Если вы решили вернуть маршрутизатор Cisco к заводским настройкам по умолчанию, вам следует выполнить сброс 30-30-30 следующим образом:
- Когда ваш маршрутизатор Cisco включен, нажмите и удерживайте кнопку сброса в течение 30 секунд.
- Удерживая нажатой кнопку сброса, отключите питание роутера и удерживайте кнопку сброса еще 30 секунд.
- Удерживая нажатой кнопку сброса, снова включите питание устройства и удерживайте еще 30 секунд.
Теперь ваш маршрутизатор Cisco должен быть сброшен до своих новых заводских настроек. Посмотрите в таблице, какие данные для входа обновились (скорее всего, cisco / cisco).
Если сброс к заводским настройкам не помог, ознакомьтесь с руководством по сбросу настроек Cisco 30 30 30.